Control-M SaaS Custom Migration
The Control-M SaaS custom migration copies the data from a self-hosted Control-M/EM to a SaaS Control-M/EM, and enables you to do the following:
-
Migrate one or more self-hosted Control-M/Servers to SaaS Control-M/Servers.
-
Connect one or more self-hosted Control-M/Servers to Control-M SaaS Unified View
 A mode of Control-M SaaS that enables you to connect self-hosted Control-M/Servers..
 -
Do any of the following:
-
Redefine self-hosted Agents as SaaS Agents or Agentless Hosts.
-
Connect self-hosted Agents to a SaaS Control-M/Server.
-
This migration eliminates the need to do one or more of the following:
-
Maintain a self-hosted Control-M/EM and its database.
-
Maintain self-hosted Control-M/Servers and their associated databases.
-
Redefine all self-hosted Agents as SaaS Agents or Agentless Hosts.
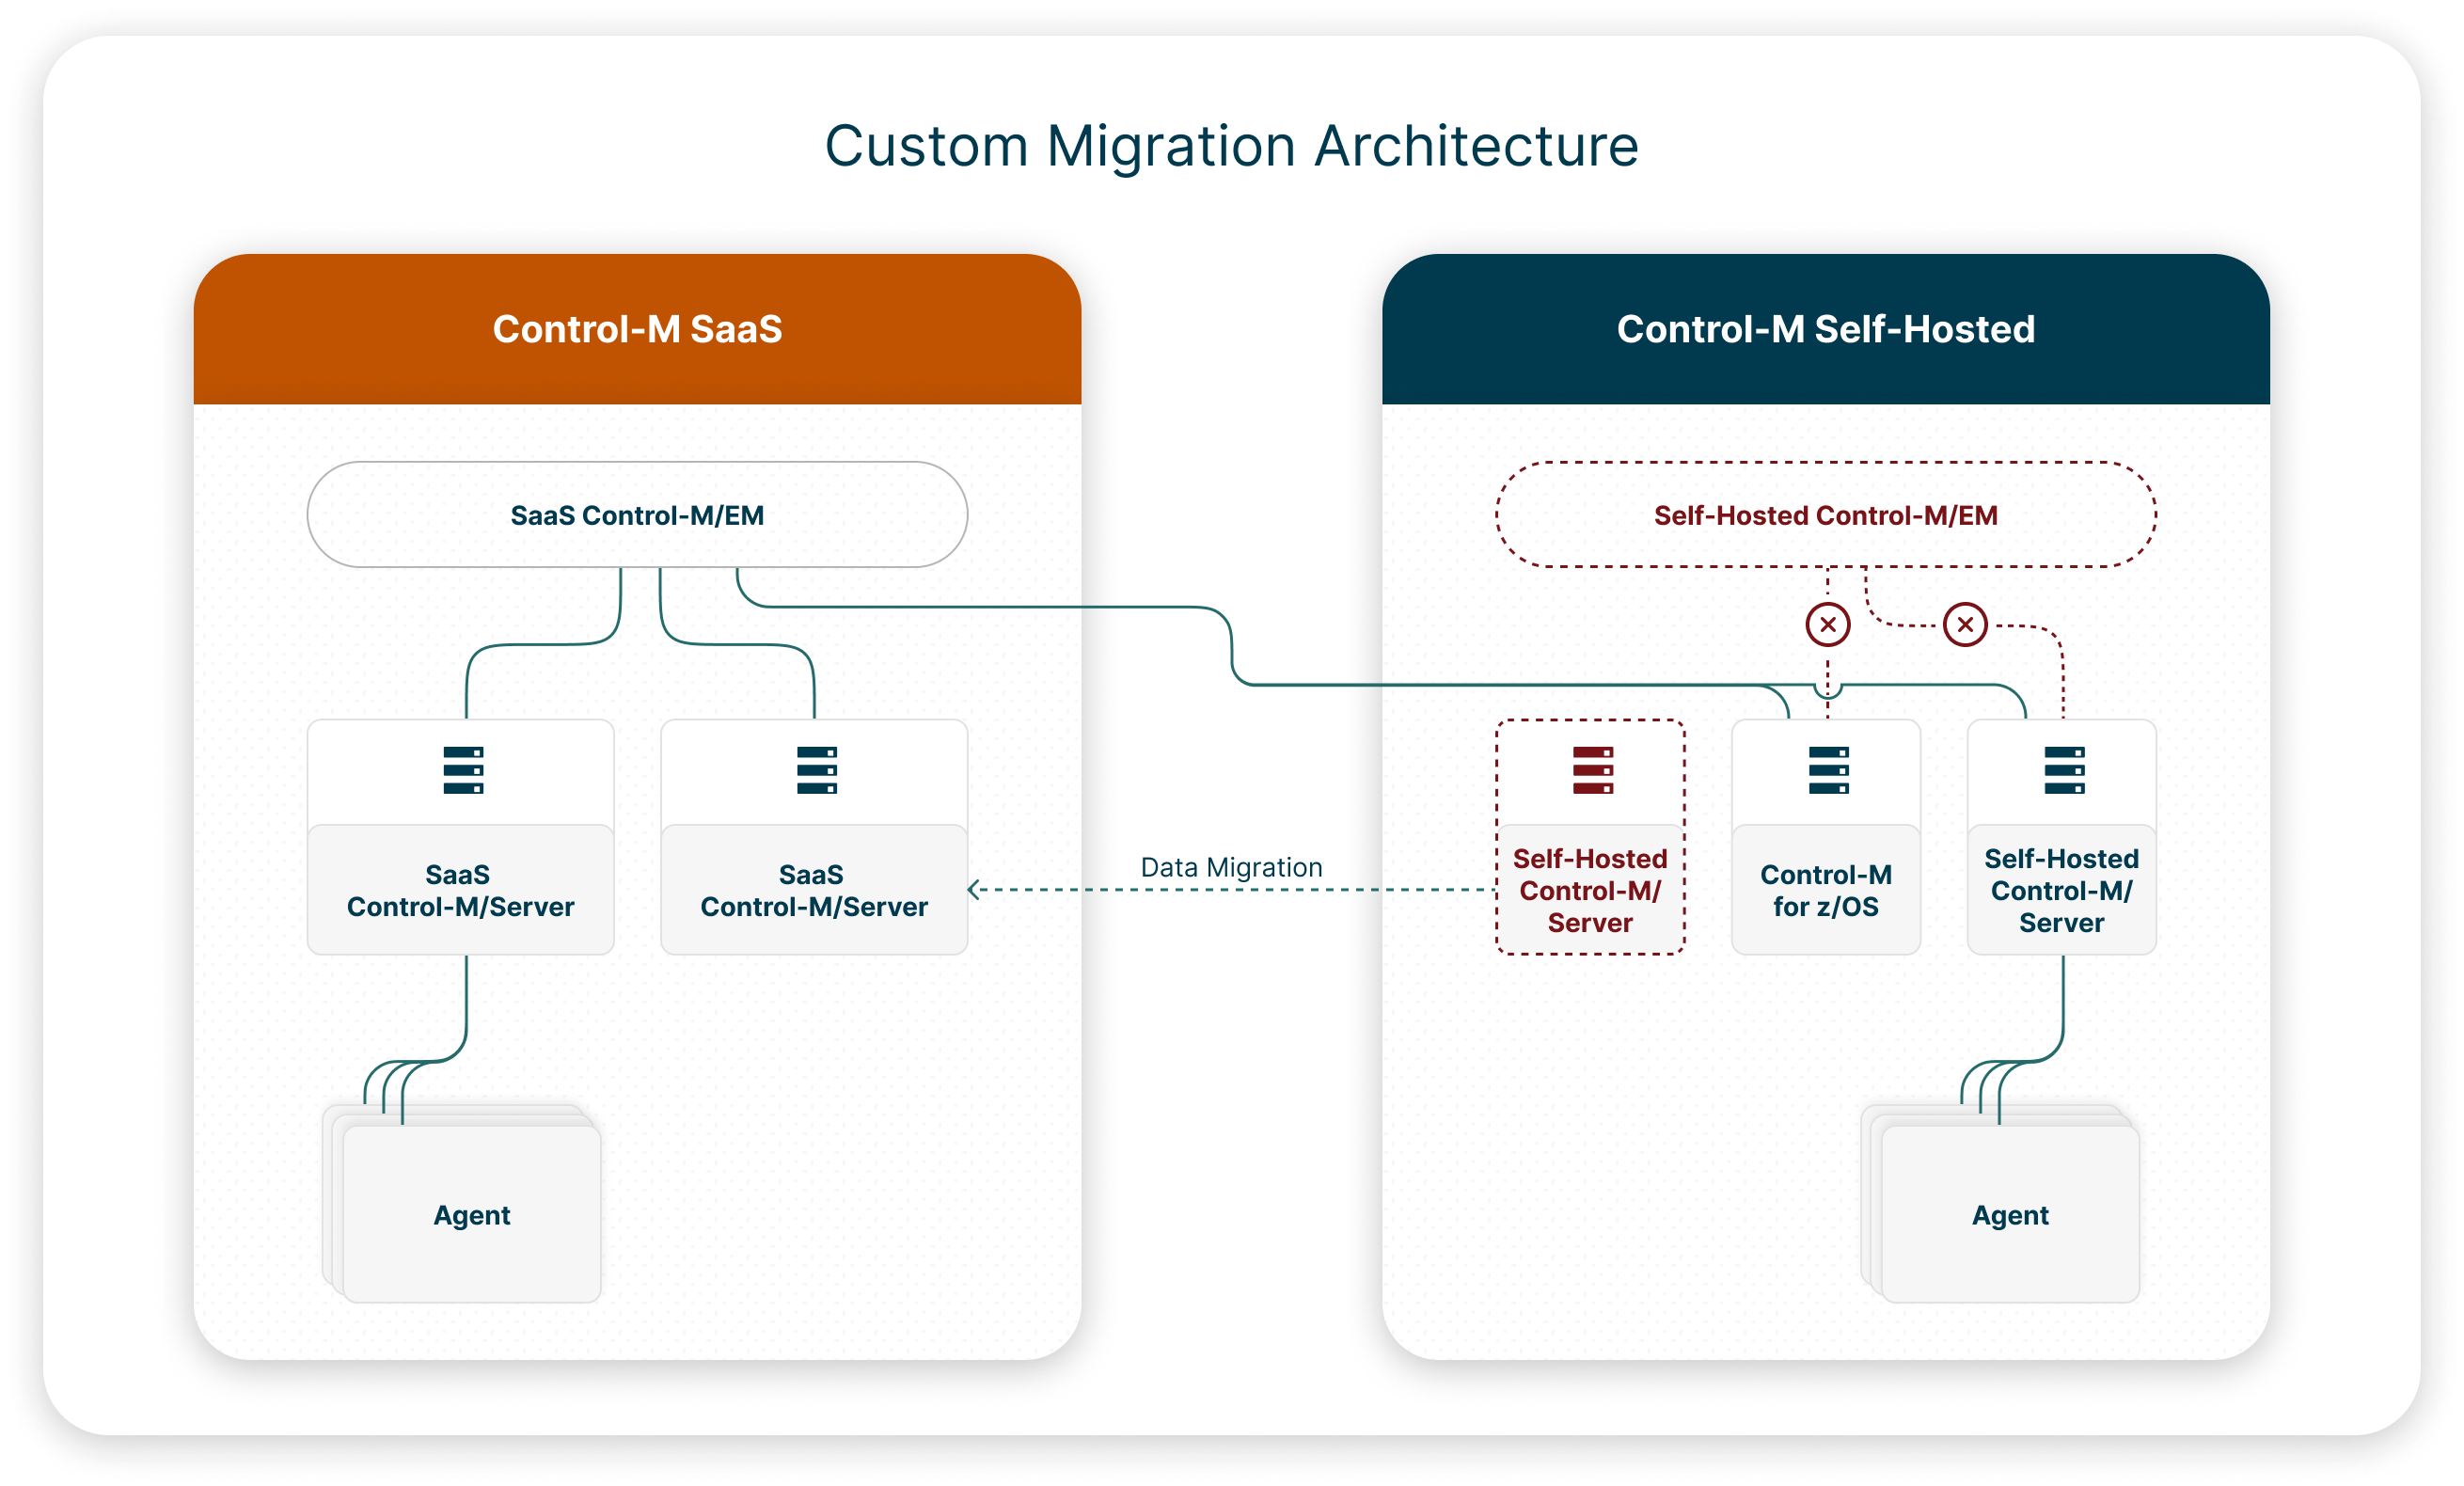
The following diagram shows the logical architecture of a typical custom migration:
Migrating to Control-M SaaS
This procedure describes how to migrate a self-hosted Control-M/EM data, and migrate or connect your self-hosted Control-M/Servers to Control-M SaaS, based on your organizational needs and the results of a preliminary qualification scan..
Before You Begin
-
Verify that you are qualified to migrate to Control-M SaaS, as described in Scanning Control-M Self-Hosted.
- Verify that Control-M/EM SaaS is installed.
-
Configure automatic time zone management, as described in Configuring Automatic Time Zone Management.
Begin
-
Register for Control-M SaaS, as described in Registering for Control-M SaaS.
This enables BMC to provide you a SaaS Control-M/EM with SaaS Control-M/Servers that match the Control-M/Server names in your current self-hosted environment.
-
From your new Control-M SaaS tenant, redefine your IdP settings, as described in Configuring System Settings.
-
(Optional) Do one or more of the following to redefine your Agents for Control-M SaaS:
-
Install a new SaaS Agent, as described in Agent Installation.
-
Connect a self-hosted Agent to a SaaS Control-M/Server, as described in Agent Connection to Multiple Control-M/Servers.
-
Define an Agentless Host, as described Agentless Hosts.
-
-
Migrate your self-hosted Control-M/EM data to Control-M SaaS, as described in Migrating a Self-Hosted Control-M/EM to Control-M SaaS.
-
For each Control-M/Server or Control-M for z/OS in your current self-hosted environment, do one of the following:
-
Migrate a Self-Hosted Control-M/Server to a SaaS Control-M/Server
-
Connect one of the following components to Control-M SaaS Unified View:
A number of Control-M Administrators connect their components to Control-M SaaS Unified View to do any of the following:
-
Run self-hosted workflows that rely on mainframe modernization plug-ins or Control-M for z/OS environments.
-
Access both platforms (Control-M/EM and Control-M SaaS) for the following reasons:
-
Critical workflows must remain on distributed self-hosted components.
-
Some self-hosted features have not yet been integrated into Control-M SaaS.
-
-
-
-
Resume all connected self-hosted components, as described in Resuming All Connected Self-Hosted Components.
-
Get started with Control-M SaaS, as described in Getting Started.
Registering for Control-M SaaS
This procedure describes how to register for Control-M SaaS, which enables BMC to provide you a with a SaaS Control-M/EM and SaaS Control-M/Servers that match the names of your current self Control-M/Servers. You must perform this procedure only once.
Before You Begin
-
Rescan your Control-M Self-Hosted components, as described in Scanning Control-M Self-Hosted.
Begin
-
From the temporary folder where you unzipped the Control-M SaaS Qualification Tool, open the following file:
-
Linux: <Temporary_Folder>/output/migration_metadata.xlsx
-
Windows: <Temporary_Folder>\output\migration_metadata.xlsx
-
-
Open the migration_metadata.xlsx file and, from the Control-M/Server column, delete all Control-M/Servers that must remain self-hosted and will not migrate to SaaS Control-M/Servers.
-
Save the migration_metadata.xlsx file and upload it in the online Helix Control-M Migration - Technical Migration Details section of the SaaS Subscription Registration form.
-
Complete and submit the SaaS Subscription Registration form.
A confirmation email with a link to your new Control-M SaaS tenant arrives after it is ready. If you do not receive this email, you must contact your customer service representative.
Migrating a Self-Hosted Control-M/EM to Control-M SaaS
This procedure describes how to migrate a self-hosted Control-M/EM to Control-M SaaS. This migration exports your self-hosted Control-M/EM data to an export file, uploads it to an Amazon S3 bucket, transfers and uncompresses it, and then integrates the Control-M/EM data into your new Control-M SaaS tenant.
If your Control-M/EM is not connected to the internet, you can transfer the export file to any internet-accessible Windows or Linux host and then continue the migration.
Before You Begin
-
Verify that Control-M/EM SaaS is installed.
Begin
-
Log in to Control-M SaaS with a username that is associated with an Admin role, and then generate and record the value of an API token, as described in Creating an API Token.
-
Download the Control-M SaaS EM Data Migration Tool to your Control-M/EM host from Control-M SaaS Scanning and Migration Tools, and unzip it to a temporary folder.
-
From the command line, navigate to the export directory in the unzipped migration folder, and then run the following command to export your self-hosted Control-M/EM data to a compressed archive (*.tar.gz file):
-
Linux: run_saas_migration_export.sh
-
Windows: run_saas_migration_export.bat
The export tool runs, produces a compressed archive export file (EMExportForSaaS.tar.gz) that contains your self-hosted Control-M/EM data, and saves it to the temporary folder.
-
-
From an internet-accessible host (either your self-hosted Control-M/EM, or a separate Windows or Linux host) do the following:
-
Verify that Python 3.8 or higher and a pip or pip3 Python package-management system is installed.
-
From the import directory in the unzipped migration tool folder, run one of the following commands:
-
Pip: pip install -r requirements.txt
-
Pip3: pip3 install -r requirements.txt
-
-
If you use a proxy server, define the following environment system variable:
-
Name: https_proxy
-
Value: http://<Proxy_Server_Address>:<Proxy_Server_Port>
-
-
Verify that you have outgoing internet access to the following locations:
-
*.controlm.com:443
-
*.amazonaws.com:443
-
-
Navigate to the import directory in the temporary folder.
From the import directory in the unzipped migration tool folder, do one of the following to import your self-hosted Control-M/EM data to Control-M SaaS:
-
Control-M/EM Host: From your internet-accessible Control-M/EM host, run the following command:
-
Linux: em ./run_saas_migration_import.sh
-
Windows: em ./run_saas_migration_import.bat
-
-
Separate Host: From your separate internet-accessible host, run the following command:
-
Linux: ./run_saas_migration_import.sh
-
Windows: ./run_saas_migration_import.bat
-
-
-
-
At the prompts, type the requested information, as described in Import Parameters.
The import tool runs and a number of status messages appear that describe the import process.
Import Parameters
The following table describes the parameters that you must provide at the import tool prompts in Migrating a Self-Hosted Control-M/EM to Control-M SaaS.
|
Parameter |
Description |
|---|---|
|
Helix Control-M Automation API Endpoint |
Defines the SaaS Control-M Automation API endpoint, in the following format: <Tenant_Name>-aapi.<Zone>.controlm.com |
|
Control-M Automation API Token |
Defines the API token that you created in Migrating a Self-Hosted Control-M/EM to Control-M SaaS. |
|
Compressed Archive Export File Pathname |
Defines the pathname of the compressed archive export file that you created in Migrating a Self-Hosted Control-M/EM to Control-M SaaS. <Temporary_Folder>HelixEmMigrationTool\export\EMExportForSaaS.tar.gz |
|
Python Interpreter Name or Pathname |
Defines the name or pathname of the Python interpreter that converts source code into machine language, as follows:
|
Migrating a Self-Hosted Control-M/Server to a SaaS Control-M/Server
This procedure describes how to migrate a self-hosted Control-M/Server to a SaaS Control-M/Server. You must perform this procedure for every self-hosted Control-M/Server that must be migrated. You can run this tool from any Windows or Linux host.
-
You cannot migrate Control-M for z/OS environments to Control-M SaaS. However, you can connect them to Control-M SaaS Unified View, as described in Connecting a Self-Hosted Control-M for z/OS to Control-M SaaS Unified View.
-
If your Control-M/Servers execute more than 150,000 jobs daily, you must distribute these jobs on two or more Control-M/Servers.
Before You Begin
-
Verify that the most recent version of Control-M Automation API is installed on Control-M/EM server. For more information, see Setting Up the API.
- Verify that you have access to the Control-M/EM database.
-
If you made changes to the self-hosted Control-M/Server after the qualification scan, then you must run the scan again.
Begin
-
Download the Control-M SaaS Server Data Migration tool from Control-M SaaS Scanning and Migration Tools, and unzip it to a temporary folder.
-
(Optional) Migrate your variable lists to pool variables, as described in Creating a LIBMEMSYM Control File.
-
From the inputParameters folder inside the temporary folder, open the parameters.txt file and define the relevant parameters, as described in Migration Tool Parameters.
-
From the command line, navigate to the temporary folder and run the following command:
migrateToHelix.bat deployCtmServer
The tool migrates your self-hosted Control-M/Server to a SaaS Control-M/Server and produces an Excel-based Deploy_Server_Report-<Server_Name>.xslx file in the report folder.
-
(Optional) Migrate Control-M MFT, Application Integrator, and Control-M Integration local connection profiles (LCPs) to SaaS-supported centralized connection profiles (CCPs), as described in Migrating Local to Centralized Connection Profiles.
-
From the report folder, open, review, and follow the directions in the Deploy_Server_Report-<Server_Name>.xslx file. You might be asked to do one or more of the following in Control-M SaaS:
-
Redefine all CCP passwords, except for the following CCPs if you migrated them from LCPs:
-
Control-M for MFT
-
Application Integrator
-
Control-M Integrations
-
-
Redefine jobs that are on unsupported hosts to run on Agentless Hosts, as described in Agentless Hosts.
-
Redefine the unsupported notification destinations that are listed in the Deploy_Server_Report-<Server_Name>.xslx file, as described in Notification Destinations.
-
Redefine folders that exceed 20,000 job runs at New Day, as described in the Run Method folder attribute in Folder General Attributes.
-
Redefine only global event prefixes that reference a migrated self-hosted Control-M/Server, as described in Creating a Global Event Prefix.
You must view current Control-M/EM global events in the Global Events Prefix tab in the Tools domain.
-
Redefine all Control-M Automation API tokens wherever they are used, such as OS job scripts, and change all credentials in Connection Profiles to API tokens, as described in Creating an API Token.
-
Redefine passwords in all Run as Users.
-
Run test jobs on all connected SaaS Agents to validate plug-in job Run as Users and connection profiles to confirm that the new Control-M SaaS environment is ready for production.
-
In all deactivated folders that are listed in the Deploy_Server_Report-<Server_Name>.xslx file, delete the _ (underscore) prefix that was appended to the Run Method name during the migration.
-
Migrating Local to Centralized Connection Profiles
This procedure describes how to migrate the following local connection profiles (LCPs) to centralized connection profiles (CCPs) in Control-M SaaS:
-
Control-M for MFT
-
Application Integrator
-
Control-M Integrations
You must perform this procedure on every Agent required for migration that contains these LCP types.
This procedure only enables you to migrate LCPs to CCPs.
Before You Begin
-
Self-Hosted Agents: Verify that Control-M/Agent 9.0.21 or higher is installed.
-
SaaS Agents: Verify that Control-M/Agent 9.0.21.200 or higher is installed.
Begin
-
Download the Helix Control-M LCP-to-CCP Migration Tool, based on your operating system, from Control-M SaaS Scanning and Migration Tools, and unzip it to a temporary folder.
-
From the Agent, navigate to the temporary folder where you unzipped the LCP-to-CCP migration tool, and run the following command to export your local connection profiles:
lcpToCcp -export [-pluginType <MFT, AI, or ALL>] [-agentDir <Windows_Agent_Directory_Pathname>]
For more information, see Connection Profile Migration Parameters.
The directory path and filename of the zipped exported LCP files appears.
-
Copy the ZIP file to the SaaS Agent.
-
From the SaaS Agent, run the following command to migrate the zipped LCPs to CCPs:
lcpToCcp -import -path <ZIP_Pathname_and_Filename> -url <Automation_API_URL> -token <API_Token> -ctm <Control-M/Server> -agent <Agent> [-cpnp <OVERWRITE, SKIP, or ASK>] [-d <TRUE or FALSE>] [-agentdir <Agent_Directory_Pathname>]
For more information, see Connection Profile Migration Parameters.
The LCPs on the self-hosted Agent are migrated to CCPs in Control-M SaaS.
Connection Profile Migration Parameters
The following table describes the parameters that you must define when you migrate your LCPs to CCPs in Control-M SaaS.
|
Parameter |
Description |
|---|---|
|
-pluginType |
(Optional) Determines which plug-in local connection profiles (LCPs) are exported, as follows:
Default: ALL |
|
-agentDir |
(Windows only) Defines the Agent directory pathname where the connection profiles are stored. You must use this parameter if you have multiple Agents on the same host. Default: Defaults to the local Agent directory. "C:\Program Files\BMC Software\SaaS Agent\ABC-TLV-WEG30I_1" |
|
-path |
Defines the ZIP file pathname on the SaaS Agent that contains the exported local connection profiles. /home/myuser/pluginExportedData_dba-tlv-w5r6p9_20230716_121315.zip |
|
-url |
Defines the Control-M Automation API URL. https://myemserver-aapi.us1.ci.ctmsaas.com/automation-api/ |
|
-token |
Defines the Control-M Automation API token, as described in Creating an API Token. |
|
-ctm |
Defines the Control-M/Server name, such as AA01. |
|
-agent |
Defines the Agent name or alias, such as Agent1. |
|
-cpnp |
(Optional) Determines one of the following actions to take when a centralized connection profile with the same name is found:
|
|
-d |
(Optional) Determines whether to save or delete the ZIP file that contains the Control-M MFT local connection profiles and Application-Integrator-created plug-in connection profiles after they are migrated to centralized connection profiles in Control-M SaaS.
Default: FALSE |
Connecting a Self-Hosted Control-M/Server to Control-M SaaS Unified View
This procedure describes how to disconnect a self-hosted Control-M/Server from your self-hosted Control-M/EM and connect it to Control-M SaaS Unified View via the ctm_menu utility.
-
You cannot connect Control-M/Servers with Agents on unsupported operating systems or with unsupported plug-ins.
-
If your Control-M/Servers execute more than 100,000 jobs daily, you must distribute these jobs on two or more Control-M/Servers.
Before You Begin
-
Generate a server token in Control-M SaaS, as described in Generating a Server Token.
Begin
-
Pause the self-hosted Control-M/Server, as described in Pausing a Self-Hosted Control-M/Server or config server::pause.
-
Disable the Control-M/Server, as described in Disabling a Self-Hosted Control-M/Server, and verify that the Actual State is Disabled.
-
Unmanage the Control-M/Server, as described in Control-M/Server Management.
-
Set the desired state of the Control-M/EM Gateway to Down from the CCM or via the ccmcli utility.
-
From the Control-M/Server host, do the following:
-
Run the following command:
ctm_menu
The Control-M Main Menu appears.
-
Press 1.
-
Type 9 or 12, depending on your database type, to select Register Control-M/Server in Helix Control-M/EM, and then follow the prompts.
The registration utility runs and connects the Control-M/Server to Control-M SaaS.
-
-
From the Control-M/Servers pane in Control-M SaaS, verify that the self-hosted Control-M/Server status changes from Ready to Connect to OK.
The self-hosted Control-M/Server is now disconnected from the Control-M/EM and is connected to Control-M SaaS.
Connecting a Self-Hosted Control-M for z/OS to Control-M SaaS Unified View
This procedure describes how to disconnect a self-hosted Control-M for z/OS from your Control-M/EM and connect it to Control-M SaaS Unified View via the ICE utility.
If your Control-M for z/OS environments execute more than 100,000 jobs daily, you must distribute these jobs on two or more Control-M for z/OS environments.
Before You Begin
-
Generate a server token in Control-M SaaS, as described in Generating a Server Token.
-
Verify that the Control-M API Gateway is installed, as described in Step 12 – Install Control-M API Gateway in the INCONTROL documentation.
Begin
-
Pause the Control-M for z/OS, as described in Pausing a Self-Hosted Control-M/Server or config server::pause.
-
Disable the Control-M for z/OS, as described in Disabling a Self-Hosted Control-M/Server, and verify that the Actual State is Disabled.
-
Unmanage the Control-M for z/OS, as described in Control-M/Server Management.
-
Set the desired state of the Control-M/EM Gateway to Down from the CCM or via the ccmcli utility.
-
From your Control-M for z/OS, load ICE, as described in Installing INCONTROL Products with ICE.
-
Select Installation.
The IOA Installation menu appears.
-
Select Customized Installation.
The IOA Customized Installation menu appears.
-
From the IOA Customized Installation menu, at the Option ===> prompt, type 2, at the Product ID ===> prompt, type CTM, and then press ENTER.
The Major Steps Selection menu appears.
-
Select 13 - Register Control-M for z/OS to Helix CTM.
The Minor Steps Selection menu appears for major step 13 - Register Control-M for z/OS to Helix CTM.
-
Follow steps 1–8 in the Minor Steps Selection menu, as described in Step 13 - Register Control-M for z/OS to Helix CTM.
The self-hosted Control-M for z/OS is now connected to Control-M SaaS.
Generating a Server Token
This procedure describes how to generate a Server token, which enables you to connect a self-hosted Control-M/Server or self-hosted Control-M for z/OS to Control-M SaaS.
Begin
-
Log in to Control-M SaaS with a user ID that is associated with an Admin role.
-
From the
 icon, select Configuration.
The Configuration domain opens.
-
From the
 drop-down list, select Control-M/Servers.
The Control-M/Servers page appears.
-
Toggle on Self-Hosted and verify that your self-hosted Control-M/Servers or Control-M for z/OS environments appear in the Self-Hosted area of the Control-M/Servers pane.
In the Status column, a Ready to Connect button appears next to the recently added Control-M/Server or Control-M for z/OS.
-
Select the required self-hosted Control-M/Server or self-hosted Control-M for z/OS, and then do the following:
-
Click Ready to Connect.
A Control-M/Server Token dialog box appears.
-
Click Get Control-M/Server Token.
A dialog box appears with the token value and enables you to copy it to your clipboard.
-
Record the token, which you must provide when you are prompted by the registration utility, as described in Connecting a Self-Hosted Control-M/Server to Control-M SaaS Unified View and Connecting a Self-Hosted Control-M for z/OS to Control-M SaaS Unified View.
-
Resuming All Connected Self-Hosted Components
This procedure describes how to resume all connected, self-hosted Control-M/Servers and Control-M for z/OS environments, which enables you to run jobs from Control-M SaaS.
Before You Begin
-
Verify that you have connected all required self-hosted Control-M/Servers, as described in the following procedures:
Begin
-
From the
icon, select Configuration.The Configuration domain opens.
-
From the
 drop-down list, select Control-M/Servers.
The Control-M/Servers page appears.
-
Do one of the following:
-
From the Control-M/Servers Pane: Toggle on Self-Hosted and select the required self-hosted Control-M/Server or Control-M for z/OS, and then click Resume.
-
From a Command Prompt: Run config server::resume.
-
-
Verify that the Control-M/Server or Control-M for z/OS Actual State changes from Paused & Up to Up.
-
Resume the remaining connected, self-hosted Control-M/Servers and Control-M for z/OS environments.
You can now access your resumed, self-hosted Control-M/Servers and Control-M for z/OS environments from Control-M SaaS Unified View.
 YouTube
 Facebook
 LinkedIn