Control-M SaaS Full Migration
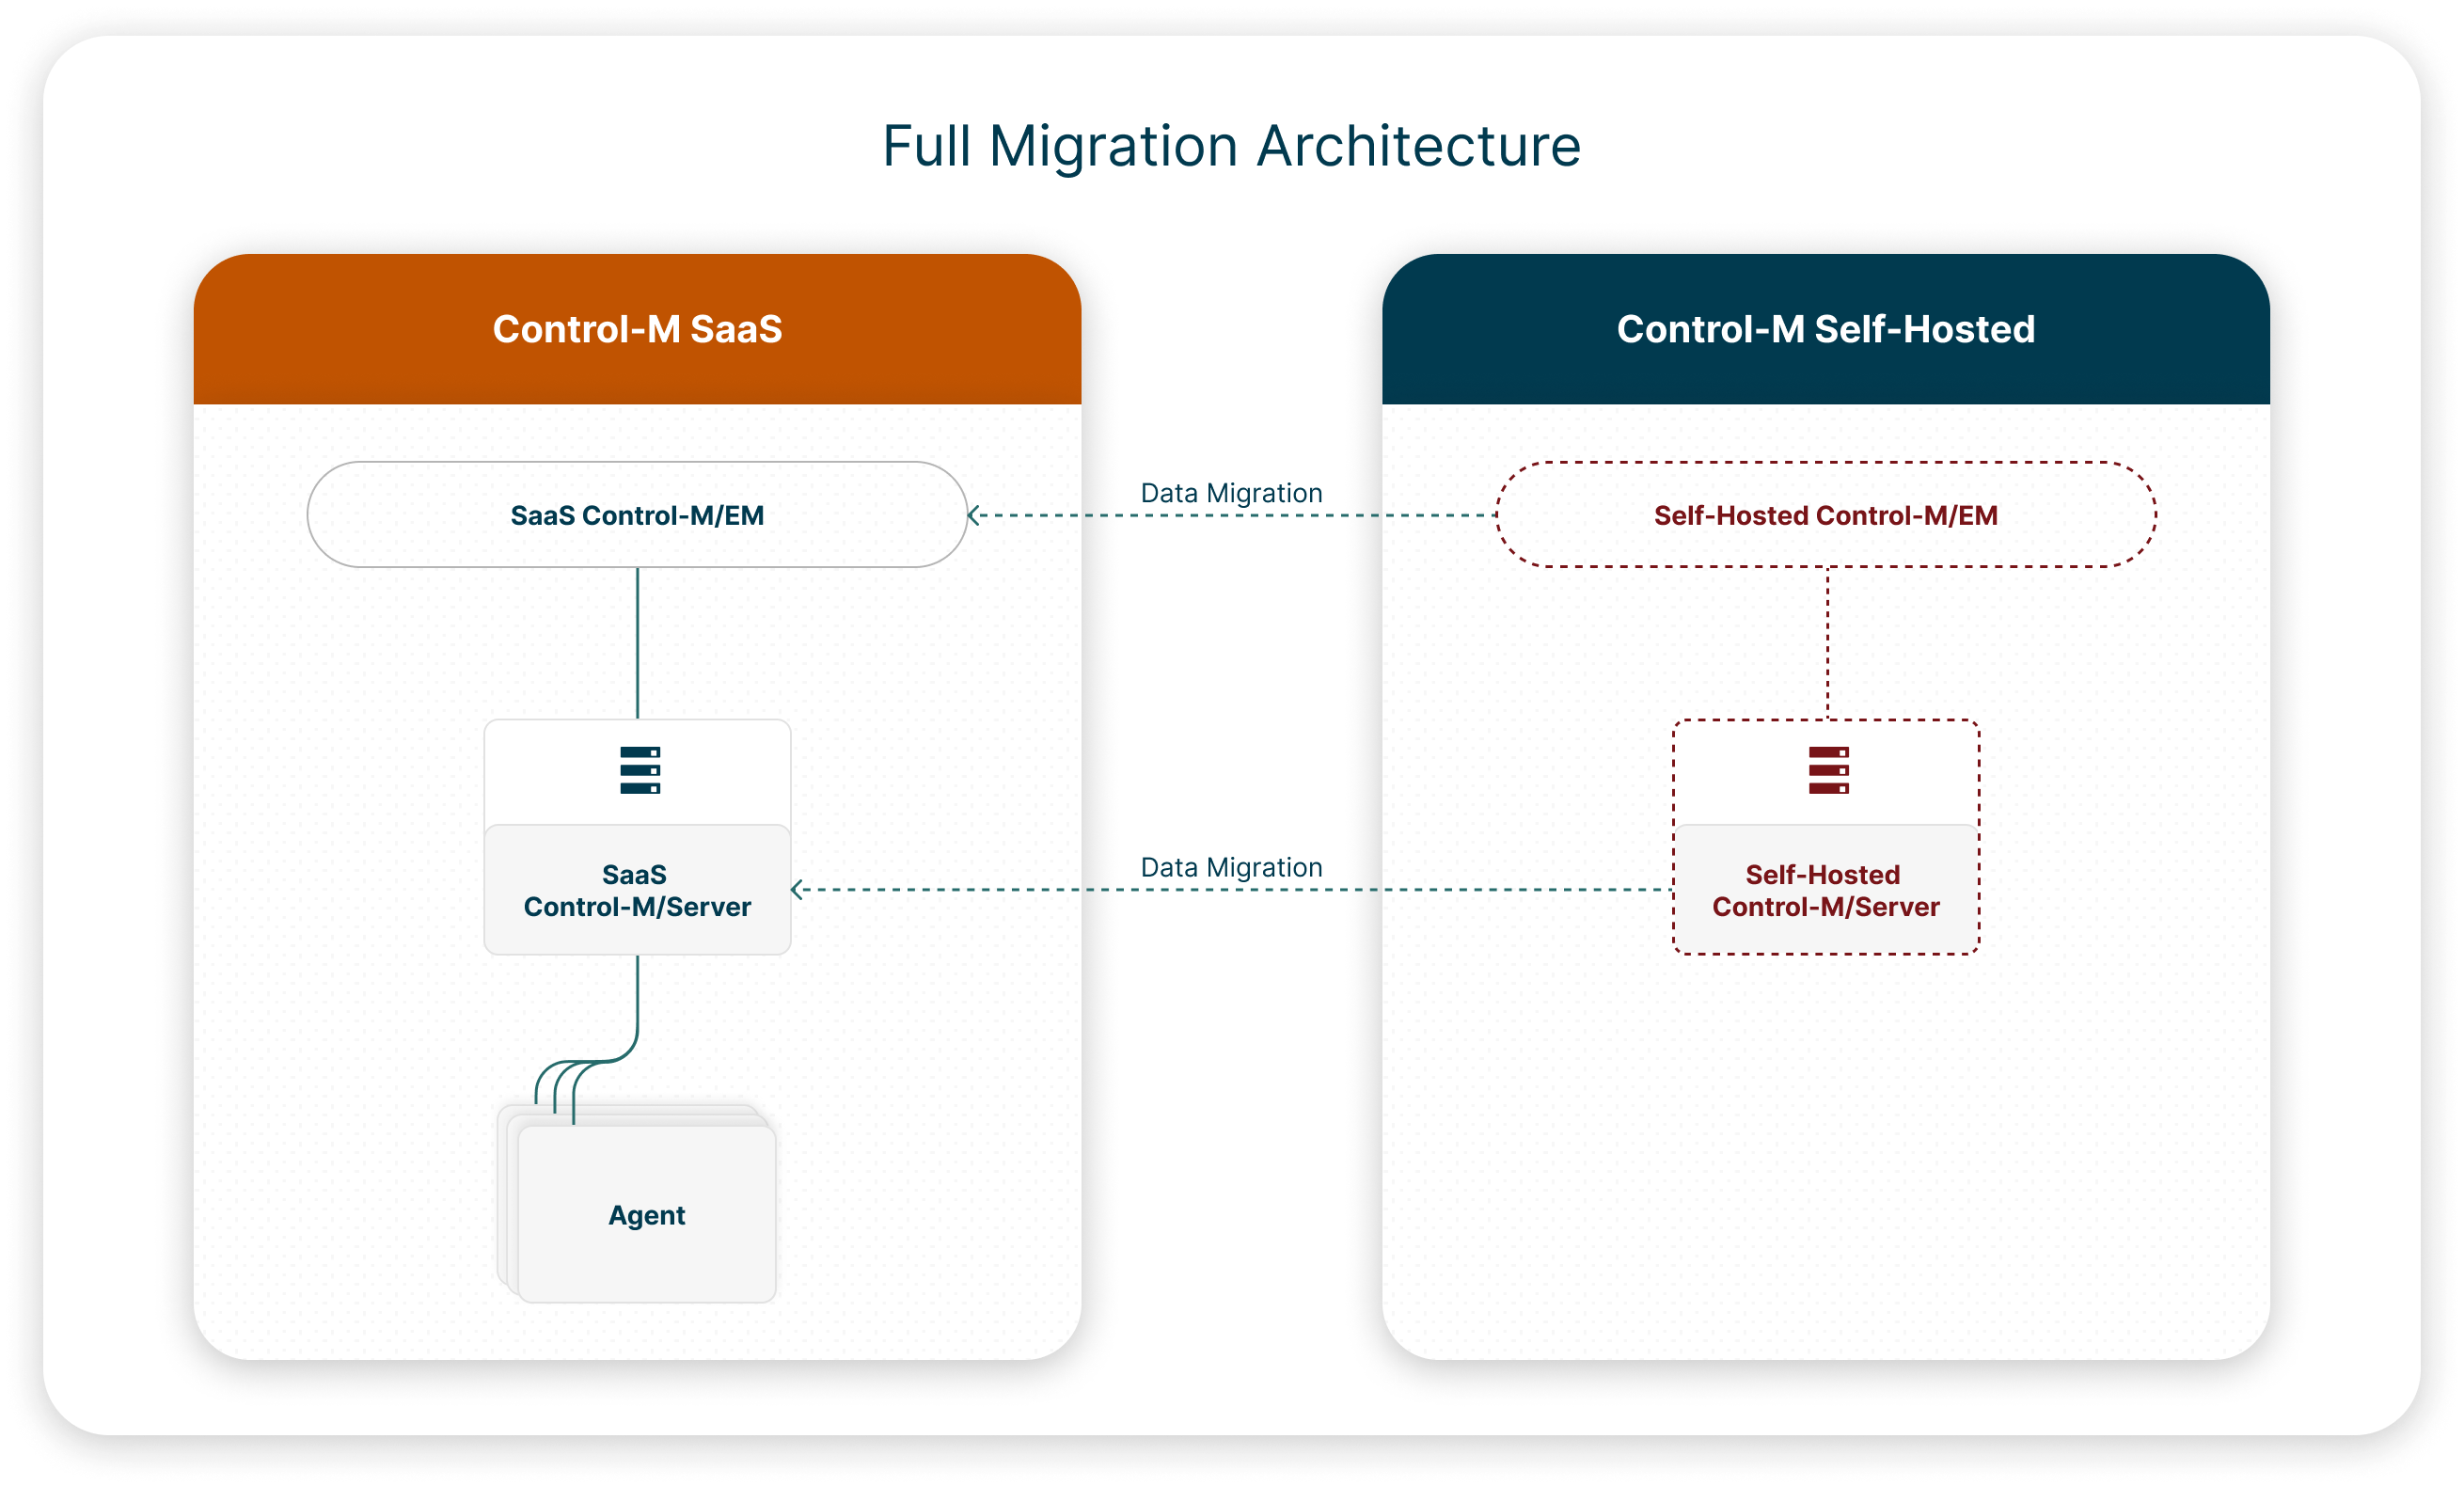
A Contol-M SaaS full migration copies the data from one self-hosted Control-M/EM to one SaaS Control-M/EM, and all self-hosted Control-M/Servers to SaaS Control-M/Servers.
This migration eliminates the need to maintain these self-hosted components and their associated databases.
The following diagram shows the logical architecture of a typical full migration:
An organization scans their Self-Hosted Control-M and discovers that they are qualified to migrate to Control-M SaaS. Their qualification report advises them to make a number of changes, including adjustments to their folder definitions. The Administrator then runs another scan in Export Mode that exports every folder in their Control-M Self-Hosted components. The Administrator makes the required changes that are detailed in the qualification report, registers for Control-M SaaS, and then runs a Deploy Only migration on every self-hosted Control-M/Server, which migrates their self-hosted Control-M/EM and all the extracted folders with the applied changes.
Migrating to Control-M SaaS
This procedure describes how to migrate your self-hosted Control-M/EM and Control-M/Server data to Control-M SaaS, based on your organizational needs and the results of the qualification scan.
Begin
-
Verify that you are qualified to migrate to Control-M SaaS, as described in Scanning Control-M Self-Hosted.
The scan produces qualification reports that enable you to determine the steps that you must take before you can migrate to Control-M SaaS.
-
Register for Control-M SaaS, as described in Registering for Control-M SaaS.
This enables BMC to provide you a SaaS Control-M/EM with SaaS Control-M/Servers that match the time zones and Control-M/Server names in your current self-hosted environment.
-
Migrate your self-hosted Control-M/EM and Control-M/Server data to Control-M SaaS, as described in Migrating to Control-M SaaS.
Migrates Self-Hosted Control-M to Control-M SaaS, applies necessary adjustments, and generates an Excel-based migration report that identifies any remaining incompatibility issues and the actions you must take to resolve or work around them.
Registering for Control-M SaaS
This procedure describes how to register for Control-M SaaS, which enables BMC to provide you a with a SaaS Control-M/EM and SaaS Control-M/Servers that match the time zones and Control-M/Server names in your current self-hosted environment. You must perform this procedure only once.
Begin
-
Run the Control-M SaaS Server Data Migration tool in Qualification Mode, as described in Control-M SaaS Full Migration.
-
Open the migration metadata file from the following location:
-
UNIX: <migrateToSaaS>/output/migration_metadata.xlsx
-
Windows: "<migrateToSaaS>\output\migration_metadata.xlsx"
-
-
From the Control-M/Server column, delete all Control-M/Servers that must remain self-hosted and do not migrate to SaaS Control-M/Servers.
-
From the Time Zone drop-down list next to each Control-M/Server, select your Control-M/Server time zone.
-
Save the file and upload it in the Control-M SaaS Migration - Technical Migration Details section of the SaaS Subscription Registration form.
-
Complete and submit the SaaS Subscription Registration form.
A confirmation email with a link to your new Control-M SaaS tenant arrives after it is ready. If you do not receive this email, you must contact your customer service representative.
Migrating to Control-M SaaS
This procedure describes how to migrate your self-hosted Control-M/EM and one Control-M/Server to Control-M SaaS. You must perform this procedure for every self-hosted Control-M/Server that is connected to the self-hosted Control-M/EM.
You can run this tool from any Windows or Linux host.
Before You Begin
-
Verify that the most recent version of Control-M Automation API is installed on Control-M/EM server. For more information, see Setting Up the API.
- Verify that you have access to the Control-M/EM database.
Begin
-
Download the Control-M SaaS Server Data Migration tool, based on your operating system, from Control-M SaaS Migration Tool, and unzip it to a temporary folder.
-
(Optional) Migrate your variable lists to pool variables, as described in Creating a LIBMEMSYM Control File.
-
From the inputParameters folder, inside the unzipped migrateToSaaS folder, open the parameters.txt file in a text editor, define the parameters for the required parameters, as described in Migration Tool Parameters. If necessary, redefine the parameters that you defined when you last ran the tool.
-
Do the following:
-
From the command line, navigate to the unzipped migration tool folder.
-
Do one of the following:
-
To rescan and migrate your defined self-hosted components to Control-M SaaS, run the following command:
-
UNIX: migrateToSaaS.sh migrate
-
Windows: migrateToSaaS.bat migrate
The tool rescans your components, migrates your self-hosted Control-M/EM and the defined Control-M/Server to Control-M SaaS, and produces an Excel-based Migration_Report.xlsx file in the report folder.
-
-
To immediately migrate your defined self-hosted components to Control-M SaaS, run the following command:
-
UNIX: migrateToSaaS.sh deployOnly
-
Windows: migrateToSaaS.bat deployOnly
The tool migrates your self-hosted Control-M/EM and the defined Control-M/Server to Control-M SaaS, and produces an Excel-based Deploy_Only_Report.xlsx file in the report folder.
-
-
-
-
From the report folder, open, review, and follow the directions in the Migration or Deploy Only Report.
Your self-hosted Control-M/EM and one self-hosted Control-M/Server has been migrated to your Control-M SaaS.
-
(Optional) Migrate Control-M MFT, Application Integrator, local connection profiles to SaaS-supported centralized connection profiles, as described in Migrating Local to Centralized Connection Profiles.
-
Get started with Control-M SaaS, as described in Getting Started.
Migration Tool Parameters
The following table describes the parameters that you must define when Control-M SaaS Full Migration and Migrating to Control-M SaaS, depending on the mode.
|
Parameter |
Mode |
Definition |
|---|---|---|
|
Control-M Automation API Endpoint |
All Modes |
--control-m-automation-api-endpoint "<endpoint>:8443/automation-api" |
|
Control-M/Server Name |
All Modes |
--control-m-server-name "<Control-M/Server-Name>" Defines the name of the Control-M/Server, as it appears in the CCM. |
|
Control-M/EM Administrator Username |
All Modes |
--control-m-enterprise-manager-username "<EM_Username>" |
|
Control-M/EM Administrator Password |
All Modes |
--control-m-enterprise-manager-password "<EM_Password>" To enter the password when prompted by the migration tool, delete "<EM_Password>". |
|
Control-M/EM Database Username |
All Modes |
--control-m-enterprise-manager-database-username "<Database_Username>" |
|
Control-M/EM Database Password |
All Modes |
--control-m-enterprise-manager-database-password "<Database_Password>" To enter the password when prompted by the migration tool, delete "<Database_Password>". |
|
Control-M/EM Database Type |
All Modes |
--control-m-enterprise-manager-database-type "<Database_Type>" Type MSSQL, PostgreSQL, or Oracle. |
|
Control-M/EM Database Host Name |
All Modes |
--control-m-enterprise-manager-database-hostname "<Database_Host_Name>" |
|
Control-M/EM Database Port Number |
All Modes |
--control-m-enterprise-manager-database-port "<Port_Number>" |
|
Control-M/EM Database Name |
All Modes |
--control-m-enterprise-manager-database-name "<EM_Database_Name>" Type your database or service name. |
|
Control File with LIBMEMSYM Details |
All Modes |
--libmemsym-control-file "<LIBMEMSYM_Control_File.csv_Pathname>" (Optional) Defines the filename that you create in Creating a LIBMEMSYM Control File, which enables you to create pool variables with names and values that correspond to each variable in the %%LIBMEMSYM list variable. Control-M SaaS does not recognize %%LIBMEMSYM variable lists. To migrate your variable lists, you must find all your %%LIBIMEMSYM variable lists, copy them to your local host, and create a control file to migrate your %%LIBIMEMSYM variable lists to Pool variables, as described in Creating a LIBMEMSYM Control File. |
|
Output Folder Path |
All Modes |
--output-folder-path "output" (Optional) To change the default output folder, replace output with a new directory path. |
|
Control-M SaaS Automation API Endpoint |
All Migrations |
--control-m-saas-automation-api-endpoint "<Endpoint>/automation-api" |
|
Control-M SaaS Automation API Token |
All Migrations |
--control-m-saas-api-token "<Token_ID>" To enter the API token when prompted by the migration tool, delete "<Token_ID>". For more information, see Creating an API Token. |
|
Skip Missing Agents |
All Migrations |
--skip-if-missing-agents (Optional) Does not migrate job and folder definitions when the required SaaS Agents are not installed. |
|
SaaS Control-M/Server Name |
All Modes |
--control-m-saas-server-name "<Control-M/Server_Name>" (Optional) Defines the name of the SaaS Control-M/Server that the current Control-M/Server migrates to. |
Migrating Local to Centralized Connection Profiles
This procedure describes how to migrate the following local connection profiles (LCPs) to centralized connection profiles (CCPs) in Control-M SaaS:
-
Control-M for MFT
-
Application Integrator
-
Control-M Integrations
You must perform this procedure on every Agent required for migration that contains these LCP types.
This procedure only enables you to migrate LCPs to CCPs.
Before You Begin
-
Self-Hosted Agents: Verify that Control-M/Agent 9.0.21 or higher is installed.
-
SaaS Agents: Verify that Control-M/Agent 9.0.21.200 or higher is installed.
Begin
-
Download the Helix Control-M LCP-to-CCP Migration Tool, based on your operating system, from Control-M SaaS Scanning and Migration Tools, and unzip it to a temporary folder.
-
From the Agent, navigate to the temporary folder where you unzipped the LCP-to-CCP migration tool, and run the following command to export your local connection profiles:
lcpToCcp -export [-pluginType <MFT, AI, or ALL>] [-agentDir <Windows_Agent_Directory_Pathname>]
For more information, see Connection Profile Migration Parameters.
The directory path and filename of the zipped exported LCP files appears.
-
Copy the ZIP file to the SaaS Agent.
-
From the SaaS Agent, run the following command to migrate the zipped LCPs to CCPs:
lcpToCcp -import -path <ZIP_Pathname_and_Filename> -url <Automation_API_URL> -token <API_Token> -ctm <Control-M/Server> -agent <Agent> [-cpnp <OVERWRITE, SKIP, or ASK>] [-d <TRUE or FALSE>] [-agentdir <Agent_Directory_Pathname>]
For more information, see Connection Profile Migration Parameters.
The LCPs on the self-hosted Agent are migrated to CCPs in Control-M SaaS.
Connection Profile Migration Parameters
The following table describes the parameters that you must define when you migrate your LCPs to CCPs in Control-M SaaS.
|
Parameter |
Description |
|---|---|
|
-pluginType |
(Optional) Determines which plug-in local connection profiles (LCPs) are exported, as follows:
Default: ALL |
|
-agentDir |
(Windows only) Defines the Agent directory pathname where the connection profiles are stored. You must use this parameter if you have multiple Agents on the same host. Default: Defaults to the local Agent directory. "C:\Program Files\BMC Software\SaaS Agent\ABC-TLV-WEG30I_1" |
|
-path |
Defines the ZIP file pathname on the SaaS Agent that contains the exported local connection profiles. /home/myuser/pluginExportedData_dba-tlv-w5r6p9_20230716_121315.zip |
|
-url |
Defines the Control-M Automation API URL. https://myemserver-aapi.us1.ci.ctmsaas.com/automation-api/ |
|
-token |
Defines the Control-M Automation API token, as described in Creating an API Token. |
|
-ctm |
Defines the Control-M/Server name, such as AA01. |
|
-agent |
Defines the Agent name or alias, such as Agent1. |
|
-cpnp |
(Optional) Determines one of the following actions to take when a centralized connection profile with the same name is found:
|
|
-d |
(Optional) Determines whether to save or delete the ZIP file that contains the Control-M MFT local connection profiles and Application-Integrator-created plug-in connection profiles after they are migrated to centralized connection profiles in Control-M SaaS.
Default: FALSE |
Creating a LIBMEMSYM Control File
This procedure describes how to create a LIBMEMSYM control file, which the migration tool uses to transfer your %%LIBMEMSYM variable lists to Pool variables. For more information, see List Variables.
Begin
-
Find all unique LIBMEMSYM files that each %%LIBMEMSYM variable points to, and copy these files from the self-hosted Control-M/Server to a temporary folder on your host.
-
Open a text editor and for each unique %%LIBMEMSYM list variable, type the following entries, separated by commas, on a new line:
-
Pathname of the copied LIBMEMSYM file that you copied from the self-hosted Control-M/Server, on your host.
-
Pathname of the LIBMEMSYM file on the self-hosted Control-M/Server.
-
Pool Name that each variable in the %%LIBMEMSYM list variable is migrated into.
c:\temp\libMem1.txt,C:\Program Files\BMC Software\Control-M Server\ctm_server\libMem1,PoolName1
c:\temp\libMem2.txt,C:\Program Files\BMC Software\Control-M Server\ctm_server\libMem2,PoolName2
c:\temp\libMem3.txt,C:\Program Files\BMC Software\Control-M Server\ctm_server\libMem3,PoolName3
-
-
Save the LIBMEMSYM_Control_File.csv file.
-
From the inputParameters folder, open the parameters.txt file, locate --libmemsym-control-file, and then type a space and the LIBMEMSYM control file pathname, enclosed in " (quotation marks), as described in Migration Tool Parameters.
UNIX: --libmemsym-control-file "/home/ABC_User/Temp/"
Windows: --libmemsym-control-file "C:\Temp\LIBMEMSYM_Control_File.csv"
Migration Troubleshooting
The following table describes migration problems that might occur and corrective actions you can take to troubleshoot the migration process.
|
Problem |
Corrective Action |
|---|---|
|
Errors appear when you run the migration tool. |
|
|
There are connectivity issues when you run the migration tool. |
Run the following command to determine if you have sufficient privileges in your self-hosted Control-M: ctm config servers::get If the following response does not appear, you must grant read and write privileges to your self-hosted Control-M Automation API: Copy
|
 YouTube
 Facebook
 LinkedIn