Events
Events are dependencies between jobs or SMART folders on a shared Control-M/Server. Events enable successor jobs or SMART folders (entities) to begin execution once their predecessor entities finish execution. This happens when these entities have fulfilled all other defined prerequisites![]() The part of the job definition that controls the flow of your jobs, such as an event that controls flow sequence or a resource that controls load balancing.. An event is a type of prerequisite, along with scheduling criteria and resource requirements, that a job or SMART folder must fulfill before it can execute.
The part of the job definition that controls the flow of your jobs, such as an event that controls flow sequence or a resource that controls load balancing.. An event is a type of prerequisite, along with scheduling criteria and resource requirements, that a job or SMART folder must fulfill before it can execute.
The following image shows a number of events, which appear as lines and arrowheads between predecessor and successor jobs:
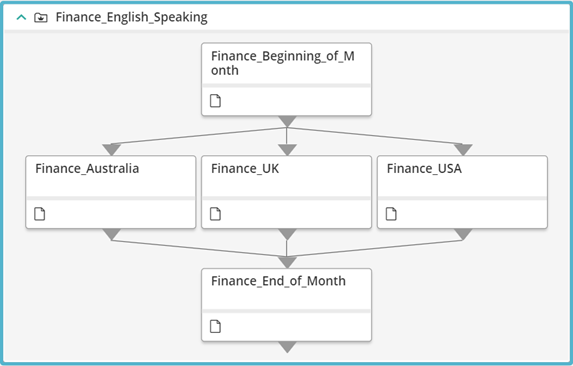
Finance_Australia, Finance_UK, and Finance_USA jobs begin execution once Finance_Beginning_of_Month successfully completes execution—provided that the successor jobs have fulfilled their other prerequisites. Finance_End_of_Month begins execution once all three of its predecessor jobs successfully complete execution, and once it has fulfilled all other prerequisites.
The Events tool in the Tools domain enables you to add or delete events, monitor active events in your workflow, and search for specific event information, such as the date of an event.
You add an event in the following situations:
-
Your database goes down. You add an event that prevents job execution until the database is back up.
-
An event that a successor job is dependent on is not added automatically. You manually add an event to for a job to begin execution when a predecessor job completes execution.
The following video describes Control-M events:
Global Events
Global events are dependencies between jobs or SMART folders on different Control-M/Servers.
The following image shows the SMART folder Bill_Monthly, on Control-M/Server dba-tlv-w8glq3, connected by a global event to Pay_Monthly, a SMART folder successor on Control-M/Server dba-tlv-w8ompr:
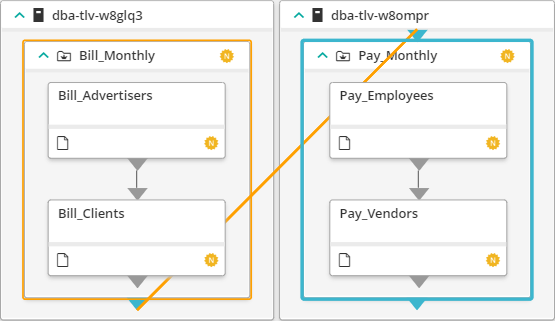
Pay_Monthly begins execution when it fulfills all of its prerequisites, including the successful execution of predecessor SMART folder Bill_Monthly.
All global events must be defined with global event prefixes, which enable you determine the Control-M/Servers where each global event operates. To create a global event prefix, see Creating a Global Event Prefix. To create a global event, see Creating a Global Event.
Wait-for-Event Inheritance
Wait-for-event inheritance enables successor jobs to inherit the wait for events of their deleted predecessor jobs. This preserves the original workflow order and eliminates the need to redefine wait for events in successor job definitions.
Inheritance only occurs in the following cases:
-
All wait for events in the deleted job are defined with the same Boolean operator (either AND or OR), as described in Wait for Event Attributes.
-
All wait for events in the deleted job, and its immediate successors, are defined simply—no { } are used to define complex expressions.
-
All deleted jobs, and their immediate predecessors and successors, are defined on the same Control-M/Server.
-
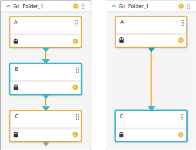
Job C inherits wait for event A-TO-B when job B is deleted.
-
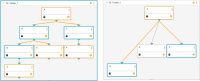
Job G and E inherit wait for event A-To-B and job F inherits wait for event A-TO-C when jobs B, D, and C are deleted.


After you delete the required jobs, the remaining jobs execute in the new order that appears in the workflow. However, the wait for event names do not change to match the new jobs that have inherited them. If you want the wait for event names to match the jobs that have inherited them, you must manually rename each wait for event.
You can enable wait-for-event inheritance in Getting Started.
Creating an Event
This procedure describes how to create an event as a dependency between two jobs, which enables the successor job to execute after its predecessor completes execution.
Begin
-
Hover your cursor over the predecessor job.
An arrowhead appears below the job.
-
Click and drag the arrowhead to the successor job.
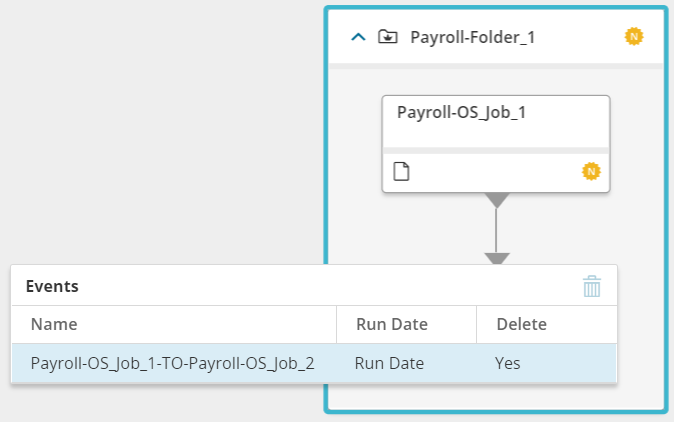
The event line appears between the two jobs. Event attributes appear in the Prerequisites tab in the right pane, as described in Event Attributes. You can view information about the event by clicking the arrowhead, as shown below:

Creating a Global Event Prefix
This procedure describes how to create a global event prefix, which enables you to create global events and determine the Control-M/Servers where each global event operates.
Begin
-
From the Tools domain drop-down list, click Global Events Prefixes.
The Global Events Prefix workspace appears.
-
Click Add.
The Add a Global Event Prefix dialog box appears.
-
In the Global Event Prefix field, type a unique prefix, 1–255 characters long.
-
From the From and To sections in the Choose Servers area, do one of the following:
-
Select Specific Servers, select one or more Servers from the list, and click Add.
-
Select Any Server and click Add.
The defined global event prefix appears in Global Events Prefix Workspace.
-
Creating a Global Event
This procedure describes how to create a global event, which is a dependency between jobs or SMART folders on two or more Control-M/Servers. This enables a job or SMART folder to execute on one or more Control-M/Servers after a predecessor job or SMART folder completes execution on a different Control-M/Server.
Before You Begin
Verify that you have created a global event prefix for the Control-M/Servers where this global event operates, as described in Creating a Global Event Prefix.
Begin
-
Hover your cursor over the predecessor job or SMART folder.
An arrowhead appears below the job or SMART folder.
-
Click and drag the arrowhead to the successor job or SMART folder.
This appears under in one of the following instances:
-
Exact Prefix Defined: An event line appears between the two jobs or SMART folders when a global event prefix is defined that exactly matches this global event.
-
Prefix with Multiple Control-M/Servers Defined: The Apply a Global Event Prefix dialog appears. Do one of the following:
-
Click the Select a Global Event Prefix option, select a global event prefix from the list, and click Apply.
An event line appears between the two jobs or SMART folders.
-
Select the Define a New Event Prefix option and do the following:
-
In the Global Event Prefix field type a prefix, and click Apply.
-
Select the Create as Global Event Prefix checkbox and click Apply, which adds this global event prefix to Global Event Prefixes in the Tools domain, as described in Creating a Global Event Prefix.
An event line appears between the two jobs or SMART folders.
-
-
-
Incorrect or No Prefix Defined: The Apply a Global Event Prefix dialog box appears. Do the following:
-
In the Global Event Prefix field, type a unique prefix, 1–255 characters long.
-
Select the Create as Global Event Prefix checkbox and click Apply, which adds this global event prefix to Global Event Prefixes in the Tools domain, as described in Creating a Global Event Prefix.
An event line appears between the two jobs or SMART folders.
-
-
Pasting Jobs with Events
This procedure describes how to paste jobs with events, which eliminates the need to redefine the events connected with the jobs that were copied.
Begin
-
Right-click on the jobs that you intend to copy, and select Copy.
The jobs and their events are copied.
-
In the same SMART folder or in a different SMART folder, right-click and select Paste with Events.
The copied jobs and events are pasted to this location.
Wait for Event Attributes
The following table describes the wait for event attributes that a successor job must wait for before it can execute.
|
Attribute |
Description |
|---|---|
|
Name |
Defines the name of the event. Rules:
The default event format is [Source Job Attribute: Job Name]-TO-[Target Job Attribute: Job Name]. You can redefine this format in one of the following ways:
|
|
Run Date |
Defines the date attribute associated with the event, as follows:
|
|
Delete |
Determines whether the event is deleted after the successor job completed execution. |
|
Relationship |
Determines the relationship between events where the successor is waiting for more than one event, as follows:
Default: AND between all. |
|
AND/OR |
Defines the Boolean relationship between the previous event and the successive event. |
 : Waits for all the events before the job executes.
 : Waits for one of the events before the job executes.
 : Enables you to set the event relationship criteria manually, as follows:
Event Attributes
The following table describes the event attributes added to a predecessor job after execution, which enables the successor job to execute.
|
Attribute |
Description |
|---|---|
|
Name |
Defines the name of the event. Rules:
The default event format is [Source Job Attribute: Job Name]-TO-[Target Job Attribute: Job Name]. You can redefine this format in one of the following ways:
|
|
Run Date |
Defines the date when the event is added or deleted, as follows:
|
|
Add/Delete |
Determines whether the event is added or deleted from the job after it completes execution. Default: Add |
 YouTube
 Facebook
 LinkedIn