Source Data Extraction
Before you can convert your data to Control-M, you must extract it from your source scheduler.
The following lists the available extraction options for each scheduler:
Broadcom AppWorx Data Extraction
To extract the source data in AppWorx, create the following files in Appworx:
-
.exp: Enables you to migrate between two AppWorx Application Managers. This file contains all your environment definitions. You need to export the .exp file from your AppWorx environment to the conversion environment using the AppWorx export utility. For more information, see Exporting the AppWorx .exp File.
-
NodeMapping.txt: Enables you to map the operating system for each host used in the .exp file. You must import the NodeMapping.txt output file into the conversion environment. For more information, see Importing the Node Mapping File.
Exporting the AppWorx .exp File
This procedure describes how to export AppWorx objects to an .exp file. For more details about exporting objects, see the AppWorx Administration Guide.
Begin
-
From the Export window of the AppWorx environment, select the objects you want to convert to Control-M, and click the arrow to move the objects to the Objects to be exported area.
-
Click the Reference tab, select the dependencies and move them to the Objects to be exported area.
-
Click Export.
The file is saved as an .exp file.
-
Verify that there are no missing modules or libraries as follows:
-
Search for CHECK M or CHECK L at the beginning of the .exp file.
CHECK M xxx: missing Module xxx.
CHECK L xxx: missing Library xxx.
These messages indicate that modules or libraries are missing.
-
Open the .exp file with an editing tool.
-
-
Do one of the following:
-
CHECK M Module_XXX: Continue with Fixing a Check Module Message.
-
CHECK L Library_XXX: Continue with Fixing a Check Library Message.
-
The .exp file is successfully exported when No CHECK messages appear.
Fixing a Check Module Message
This procedure describes how to fix a CHECK Module message in the .exp file.
Begin
-
From the AppWorx environment, select Object Type and select Modules.
-
In the Search bar, type the module name, module_XXX and then click >> to add it to the Objects to be exported area.
-
Click Export.
The file is saved as an .exp file.
-
Open the .exp file with an editing tool.
-
Search for a CHECK M message at the beginning of the .exp file.
If you find a Check M message, run this procedure again.
Fixing a Check Library Message
This procedure describes how to fix a CHECK Library message in the .exp file.
Begin
-
From the AppWorx environment, select Object Type and select Libraries.
-
In the Search bar, type the module name, library_XXX and then click >> to add it to the Objects to be exported area.
-
Click Export.
The file is saved as an .exp file.
-
Open the .exp file with an editing tool.
-
Search for a CHECK L message at the beginning of the .exp file.
If you find a Check L message, run this procedure again.
Importing the Node Mapping File
This procedure describes how to import the AppWorx Node Mapping file.
Begin
-
Copy the following script to your AppWorx environment:
<Conversion Home>\scripts\AppWorx\NodeMapping.SQL
-
Open a command prompt window and run the following command:
sqlplus -S user/password @NodeMapping.SQL
The script produces a NodeMapping.txt output file.
-
Copy the NodeMapping.txt output file to the conversion environment.
Broadcom Automic (UC4) Data Extraction
You must extract UC4 data per object type, such as jobs, Agents, and Groups, into separate XML files.
Extract UC4 job object types into a Job XML file, and UC4 Agent object types to an Agent XML file.
Job objects are mandatory, and BMC recommends to include as many objects as possible for better conversion results.
Extract UC4 data to XML using one of the following methods:
-
UC4 Explorer: Extracts UC4 data to XML through the Export function in UC4 Explorer, as described in Extracting Objects of the Same Type to One File and Exporting Objects to Separate Files.
-
Do not use this export function for mass transports when using the UC4 Explorer.
-
The UC4 administrator can limit the maximum number of objects that are exported at one time. Use the key MAX_EXPORT_COUNT in the UC4 Variable UC_SYSTEM_SETTINGS for this purpose.
-
-
Export Script: Extracts UC4 data to XML using an Export Script, as described in Extracting UC4 Data to XML Using an Export Script.
Extracting Objects of the Same Type to One File
This procedure describes how to extract objects with the same type to one file using the UC4 File Explorer.
Before You Begin
Ensure that the installed Service Pack version is at least the same as the source system (XML file).
Begin
-
From the UC4 File Explorer click Search.
The Search window appears.
-
In the Name field, type *.
-
In the Search For field, select Objects, and then from the drop-down list, select the object type you want to export, such as jobs.
Do not use this export function for mass transports when using the UC4 Explorer. For more information, see the UC4 Administration Guide.
-
Limit the maximum number of objects that are exported at one time with the MAX_EXPORT_COUNT in the UC4 Variable UC_SYSTEM_SETTINGS for this purpose.
-
Click Start.
A list of search results appears.
-
Select all by pressing Ctrl + A.
-
From the File menu, select Export.
The Save dialog box appears.
-
Click Save.
Exporting Objects to Separate Files
This procedure describes how to extract each object to a separate file using the UC4 File Explorer.
-
Do not use this export function for mass transports when using the UC4 Explorer.
-
The UC4 administrator can limit the maximum number of objects that are exported at one time. Use the key MAX_EXPORT_COUNT in the UC4 Variable UC_SYSTEM_SETTINGS for this purpose.
Before You Begin
Ensure that the installed Service Pack version is at least the same as the source system (XML file).
Begin
-
From the UC4 File Explorer click Search.
The Search window appears.
-
In the Name field, type *.
-
In the Search For field, select the Objects and then from the drop-down list, select the object type you want to export, such as jobs.
Do not use this export function for mass transports when using the UC4 Explorer. For more information, see the UC4 Administration Guide.
-
Click Start.
A list of search results appears.
-
Right click on one of the objects, and select Export.
The Save dialog box appears.
-
Save as a .csv file.
-
Create a new directory and copy the .csv file to the new directory.
-
Run the following script:
:SET &HOST# = "<name of Host>"
:SET &CSV_FILE# = "<name of the file and full directory of the exported objects to csv>"
:SET &EXPORT_PATH# = "<name of the target path directory>"
:SET &HND#=PREP_PROCESS_FILE(&HOST#,&CSV_FILE#,,"COL=DELIMITER",'DELIMITER=";"')
:PROCESS &HND#
: SET &Line#=GET_PROCESS_LINE(&HND#,1)
: PRINT "<&Line#>"
: SET &OBJECT# = &Line#
: SET &File# = "&EXPORT_PATH#&line#.xml"
: SET &Ret# = EXPORT (&Object#, &File#)
:ENDPROCESS
This script runs on the WIN01 host and the .csv file is saved as Search.csv in the C:\temp directory and is exported to the C:temp\export directory:
:SET &HOST# = "WIN01"
:SET &CSV_FILE# = "c:\temp\search.csv"
:SET &EXPORT_PATH# = "C:\temp\export\
:SET &HND#=PREP_PROCESS_FILE(&HOST#,&CSV_FILE#,,"COL=DELIMITER",'DELIMITER=";"')
:PROCESS &HND#
: SET &Line#=GET_PROCESS_LINE(&HND#,1)
: PRINT "<&Line#>"
: SET &OBJECT# = &Line#
: SET &File# = "&EXPORT_PATH#&line#.xml"
: SET &Ret# = EXPORT (&Object#, &File#)
:ENDPROCESS
Extracting UC4 Data to XML Using an Export Script
This procedure describes how to automatically export many objects to XML using an export script.
Before You Begin
Ensure the following:
-
The installed Service Pack version must be at least the same as the source system (XML file).
-
You have the permissions to run the export script function from the Client where the object currently exists.
Begin
-
Log in to client 0 (Admin-Client).
-
Open UC_SYSTEM_SETTINGS.
-
Set the MAX_EXPORT_COUNT parameter to 1000000 (maximum).
You do not need to restart.
-
Save the object.
-
Log in to the production client(s) and type the following script:
:SET &OBJECT# = "<object_name>"
:SET &FILE# = "<file_name>"
:SET &RET# = EXPORT(&OBJECT#,&FILE#)
If you have large files, filter the type of objects you want to convert.
-
Split multiple objects in one XML file by running the SplitToSpecificObjectFiles.pl script located in the following directory:
<Conversion_Home>\scripts\uc4
This example uses an export script with the calendar filter, which enables you to export only objects with the name Calendar:
:SET &OBJECT# = "CALE.*"
:SET &FILE# = "C:\temp\export\automic_CALENDAR_export.xml"
:SET &RET# = EXPORT(&OBJECT#,&FILE#)
By adapting the first Script-Line (:SET &OBJECT#=”[OBJECT_NAME_WITH_WILDCARDS”) you can also modify the exports. For instance, if your Calendars use the default naming convention, which starts with CALE.[NAME], you can create one XML file for all calendars as shown above.
Broadcom AutoSys Data Extraction
The extraction process of AutoSys data includes:
-
Converting AutoSys Jobs to Control-M
This involves scanning scripts and the JIL file to find AutoSys command lines and keywords, to create AutoSys virtual machines and variables.
Converting AutoSys Jobs to Control-M
This procedure describes how to convert AutoSys jobs to Control-M.
Begin
-
Run a full scan of all scripts run by AutoSys, which enables you to find occurrences of AutoSys command lines, executables and variables within the scripts.
-
Identify any external interfaces, such as monitoring and alerting tools, reporting tools, help desk incident management tools and CMDB’s.
-
Run a scan of the JIL file.
The conversion tool does not handle Job_terminator and box_terminator statements. Before commencing the conversion, you must scan the JIL extract file keywords. For more information, see AutoSys Keywords.
-
Create AutoSys virtual machines. For more information, see Creating Autosys Virtual Machines.
-
Create AutoSys variables. For more information, see Creating AutoSys Variables.
Creating Autosys Virtual Machines
This procedure describes how to create AutoSys virtual machines, which are the AutoSys equivalent of Control-M host groups, and will be converted into Control-M host groups.
Begin
-
Obtain a list from AutoSys of all virtual machine names and the hosts that constitute the group, which is obtained by running the following AutoSys command:
autorep –M ALL –d
The following is example output when running the AutoSys command autorep –M ALL –d
Copyautorep -M ALL
Machine Name Max Load Current Load Factor O/S Status
_____________________________ __________ ____________ _______ ___________ ______
abtgpdb --- --- 1.00 Unix Online
abtgpftp --- --- 1.00 Unix Online
abtgposs1 --- --- 1.00 Unix Online
abtgpstmt --- --- 1.00 Unix Online
TGPRODDB.abtgpdb --- --- ---- Unix Online
TGPRODFTP.abtgposs1 --- --- ---- Unix Online
TGPRODSTMT.abtgpstmt --- --- ---- Unix Online
abtgqdb --- --- 1.00 Unix Online
TGQADB.abtgqdb --- --- ---- Unix Online
TGQAFTP.abtgqdb --- --- ---- Unix Online
TGQASTMT.abtgqdb --- --- ---- Unix Online
Example conversion to Control-M Server:
ctmnodegrp -EDIT -NODEGRP TGPRODDB -APPLTYPE OS -ADD abtgpdb
ctmnodegrp -EDIT -NODEGRP TGPRODFTP -APPLTYPE OS -ADD abtgposs1
ctmnodegrp -EDIT -NODEGRP TGPRODSTMT -APPLTYPE OS -ADD abtgpstmt
ctmnodegrp -EDIT -NODEGRP TGQADB -APPLTYPE OS -ADD abtgqdb
ctmnodegrp -EDIT -NODEGRP TGQAFTP -APPLTYPE OS -ADD abtgqdb
ctmnodegrp -EDIT -NODEGRP TGQASTMT -APPLTYPE OS -ADD abtgqdb
Creating AutoSys Variables
This procedure describes how to create AutoSys variables, which are the AutoSys equivalent of Control-M variables can then be embedded in the job definition or script.
Begin
-
Obtain a list of AutoSys variables and convert these manually to Control-M Variables for a one off installation.
To obtain a list of AutoSys variables, run the following AutoSys command:
autorep –G ALL
The following is example output when running the AutoSys command autorep –G ALL.
Copyautorep -G %TGPROD%Global Name Value Last Changed
____________________________ _____________________________________ ____________________
TGPROD_APIINBOX /tgprod/interfaces/inbox 03/02/2009 16:44:09
TGPROD_APIOUTBOX /tgprod/interfaces/outbox 03/02/2009 16:44:09
TGPROD_AUTOBACKUP /tgprod/reports/current 06/12/2009 11:00:50
TGPROD_AUTOBIN /opt/CA/AutoSys/autosys/bin 03/02/2009 16:44:09
TGPROD_DATEA 2009-09-18 09/18/2009 00:01:04
TGPROD_DATEB 20090918 09/18/2009 00:01:04
TGPROD_DATEC 090918
Example conversion to Control-M\Server for Windows:
ctmvar -ACTION SET -VAR "%%%%\TGPROD_APIINBOX" –VAREXPR /tgprod/interfaces/inbox
ctmvar -ACTION SET -VAR "%%%%\TGPROD_APIOUTBOX" –VAREXPR /tgprod/interfaces/outbox
ctmvar -ACTION SET -VAR "%%%%\TGPROD_AUTOBACKUP" –VAREXPR /tgprod/reports/current
ctmvar -ACTION SET -VAR "%%%%\TGPROD_AUTOBIN" –VAREXPR /opt/CA/AutoSys/autosys/bin
ctmvar -ACTION SET -VAR "%%%%\TGPROD_DATEA" –VAREXPR 2009-09-18
ctmvar -ACTION SET -VAR "%%%%\TGPROD_DATEB" –VAREXPR 20090918
ctmvar -ACTION SET -VAR "%%%%\TGPROD_DATEC" –VAREXPR 090918
AutoSys Keywords
The following table describes the AutoSys keywords that you must scan for in the .JIL extract files.
|
Broadcom AutoSys Keyword |
Action |
|---|---|
|
job terminator: 1 job terminator: Y job terminator: y |
If any of these statements are present and the AutoSys box (folder) was set to a failure status, this job must be killed. |
|
box terminator: 0 box terminator: N box terminator: n |
If a job in the box fails, do not stop the box or mark it as failed. In Control-M define an ON NOTOK DO OK in the job or group. |
Extracting AutoSys Data
This procedure describes how to extract Broadcom AutoSys Workload Automation (AutoSys) data.
Begin
-
From the AutoSys environment, create the following definitions file by running the following commands:
-
.JIL Job Definitions: autorep –j ALL –q
-
.TZO Time Zone Definitions: autotimezone –l
-
.CAL Calendar Definitions: autocal_asc –E autosys.STANDARD_CAL –s ALL
-
Broadcom JOBTRAC Data Extraction
Extracting Broadcom JOBTRAC Data
This procedure describes how to extract Broadcom JOBTRAC data.
Begin
-
From the JOBTRAC environment, locate the JCL file and then transfer it to your JOBTRAC machine via FTP with ASCII mode by running the following commands:
-
ftp> ascii
-
ftp> put <file location><library>(<Member>)
-
-
Submit the job that collects all the required JOBTRAC data into one sequential file.
-
Transfer the output file from the JOBTRAC machine to the conversion system in ASCII mode by running the following commands:
-
ftp> ascii
-
ftp> get <filename> <local data file>)
-
For information about the parameters, see Broadcom JOBTRAC JCL Parameters and Broadcom JOBTRAC JCL Parameters
Broadcom JOBTRAC JCL Parameters
The following table describes the parameters for the JCL file.
|
Parameter |
Description |
|---|---|
|
JCL created file |
Defines a filename for the JCL file created on the Mainframe. |
|
Output data file name |
Defines a filename for the output file. Default: CTM.JBT.OUT |
|
Job card |
Defines the job name Default: //COLLECTED JOB. |
|
Allocate converted JCL libraries |
Enables you to allocate new JCL libraries. If this parameter is not selected, the Conversion Tool overrides the original JCL libraries. |
|
JCL library Prefix |
Defines a prefix value Example: CTM |
|
Unit |
Defines the volser unit. |
|
Volser |
Defines the volume on which to allocate the output file. |
|
Storage Management System (SMS) Data Class |
Defines the data definition parameters. |
|
SMS Storage Class |
Defines the performance and availability requirements of the host machine. |
|
SMS Management |
Defines the data migration, backup, and retention attributes of the host machine. |
|
Primary Allocation (CYL) |
Defines a space allocation value. Example: 100 |
|
Secondary Allocation (CYL) |
Defines a space allocation value. Example: 100 |
|
Number of Directory Blocks (Mainframe Editor Rules only) |
Defines the number of directory blocks allocated to the converted JCL library. This must be the same as the number of directory blocks in the original JOBTRAC JCL library. |
Broadcom JOBTRAC Environment Parameters
The following table describes the parameters for the JOBTRAC environment.
|
Parameters |
Description |
|---|---|
|
SCL |
Defines the SCL (Software Collections) library, which contains JOBTRAC job definitions. |
|
JCL (Job Controlled Language) |
Determines JCL libraries to apply variable substitution. |
|
ADI (Automatic Date Insertion) |
Defines JOBTRAC variables that are stored in the PRODDATE member of DATELIB. |
|
CCPF (Condition Code Program Filter)
|
Determines the values to be converted to ON PGMST and DO ACTION OK. |
|
ADR (Automatic Dataset Recognition)
|
Defines the table used to create the Control-M/EM input file. |
|
AMR (Automatic Message Recognition) |
Defines the table used to create the Control-O input file. |
|
SCS (System Command Scheduling)
|
Defines scheduling system commands to be issued by time processing periods or intervals. |
| RESOURCE |
Defines resource conditions that must be met before the job can be submitted. |
| EXCLPARM |
Determines the lists of event names or prefixes that are grouped for mutual exclusion recognition by controlling all job resource sharing or preventing concurrent runs of jobs. |
Extracting Broadcom Dollar Universe Data
This procedure describes how to extract Dollar Universe data so it is converted to Control-M data.
Begin
-
From the Dollar Universe environment, run the following commands to create these files:
-
Session Details File: "uxshw ses ses=* lnk vses=*"
Defines a detailed description for each session. It contains lists of UPRs and dependencies between UPRs that are defined with each session.
-
Task Details File: "uxshw tsk upr=* mu=* ses=* vupr=000 nomodel partage"
Defines a detailed description of task parameters corresponding to the UPR or session that is running.
-
UPR File: "uxshw upr upr=* vupr=* partage"
Defines a set of parameters and events that define the UPROC functionality.
-
Rule File: "uxshw rul rul=*"
Defines an algorithm rule, which translates the required execution periodicity of a task.
-
Resource File: "uxshw res res=*"
Contains the resource definitions.
The following is an example of a Batch file to load resource pools.
ecaqrtab ADD QRResource1 0
ecaqrtab ADD QRResource2 100
ecaqrtab ADD QRResource3 25
-
Calendar File: "uxshw cal exp mu=* since=2010 before=2014 nomodel"
Defines a calendars definition file.
-
Management Unit Details File: "uxshw mu mu=*"
Contains management unit definitions.
-
Management Unit Dependencies: "uxlst HDP OUTPUT=c:\temp\LstHdp.txt"
Contains a hierarchy of management unit dependencies.
-
SAP ZUXTS Table File: Select the transaction ID and table name and when connected to the table, extract the table into the CSV file.
Contains all SAP job parameters and connects to your SAP system using the SAP Logon console.
The SAP ZUXTS table file is required only if you have Dollar Universe UPROCs that use the uxstr sap command.
-
Agent Mapping File: Copy the UXSRSV.SCK Agent mapping file from the MGR folder in the Dollar Universe environment.
Defines the mapping file (UXSRSV.SCK file) between agent logical and physical names.
-
Extracting Broadcom Unicenter WLM (TNG) Data
This procedure describes how to extract Unicenter WLM (TNG) data, so it is converted to Control-M data.
Begin
-
From the Unicenter environment, create the cauexpr.txt file by running the following command:
cauexpr -a
-
Import calendar definitions, by running the following commands:
-
caldb save cal_filename.dsb
-
caldb script cal_filename.dsb > cal_filename.txt
-
Extracting Broadcom Workload Automation DE Data in Batch Mode
This procedure describes how to extract Workload Automation DE (dSeries) data using the imexutil utility in batch mode, enabling it to later be converted to Control-M data.
Begin
-
From the DE (dSeries) environment, do one of the following:
-
UNIX: Navigate to the install_dir/bin directory (where the server is installed) and type the following:
imexutil.sh -h host -p port -u user -w password -c @cmdfilename|cmds
-
Windows: Navigate to the install install_dir\bin directory (where the server is installed) and type the following:
imexutil.bat -h host -p port -u user -w password -c @cmdfilename|cmds
-
For information about the parameters, see Broadcom Workload Automation DE Data Extraction Parameters.
Broadcom Workload Automation DE Data Extraction Parameters
The following table describes the dSeries data extraction parameters for the imexutil utillity.
|
Parameter |
Description |
|---|---|
|
-h |
Defines the IP address or DNS name for the server. |
|
-p |
Determines the port number for the server. |
|
-u |
Defines the Broadcom Workload Automation user ID |
|
-w |
Defines the password for the user ID. The user ID and password are optional if you specify a filename instead of commands in the -c switch. Instead of specifying the -u and -w values, you can specify the user command in the file. |
|
-c |
Defines the export commands or a file containing the export commands. |
|
@cmdfilename |
Defines the file containing the commands. If the filename contains a space, enclose the name with double quotes. -c "@input file.txt" |
|
cmds |
Determines one or more commands. To specify multiple commands, separate each command with a semi-colon. If the command contains a space, enclose the command with double quotes. Export command options are, as follows: exportartifact: exportagent, exportagentgrp, exportalert, exportapplication, exportcalendar, exportevent, exportforecast, exportgroup, exportjavascript, exportresource, exportsundry, exportuser, exportreportdesign, and exportvarctx. -c "exportapplication -outdir c:\applications;exportvarctx -outdir c:\contexts" The import/export utility runs in batch mode. |
Broadcom Workload Automation DE Data Extraction Examples
The following examples describe how to run the imexutil utility, when extracting Broadcom Workload Automation DE data.
Export artifacts from a server named prodserv in batch mode.
The following command exports all applications to c:\applications and all calendars to c:\calendars:
imexutil.bat -h prodserv -p 7500 -u schedmaster -w schedmaster -c "exportapplication -outdir c:\applications;exportcalendar -outdir c:\calendars"
Export artifacts from a server named prodserv in batch mode using a command file.
The following command uses a file named commandfile.txt, which contains the client user ID, password, and the commands to export all applications to c:\applications and all calendars to c:\calendars:
imexutil.bat -h prodserv -p 7500 -c @c:\commandfile.txt
The commandfile.txt file contains the following commands:
user schedmaster schedmaster
exportapplication -outdir c:\applications
exportcalendar -outdir c:\calendars
Cron Data Extraction
Extract Cron data using one of the following methods:
-
Extracting Cron Data Using BMC Discovery: Finds Cron jobs that reside in crontabs files using BMC Discovery.
-
Cron Data Extraction with Agents: Sets the Agent to collect Cron data from available Agents and Agentless Hosts.
-
Importing Cron Data Manually: Extracts Cron data manually and imports the data into the Conversion Tool by adding data from multiple locations and users.
Extracting Cron Data Using BMC Discovery
This procedure describes how to extract Cron data using BMC Discovery.
Before You Begin
Configure the folder, application, and sub-application fields to use in Control-M for the Cron jobs that BMC Discovery will import to Control-M, as follows:
-
Locate the setting.cfg file in <Conversion Home>\data\ and replace any of the default values of the following properties to your own values:
-
CRON_DISCOVERY_JOBS_FOLDER_NAME=Conversion_discovery_CRON
-
CRON_DISCOVERY_JOBS_APPLICATION=Conversion_discovery
-
CRON_DISCOVERY_JOBS_SUB_APPLICATION=CRON
-
Begin
-
Install and learn how use BMC Discovery.
-
In the Conversion Tool, in the Load Data window, select Import data from BMC Discovery.
-
Enable the connection to BMC Discovery by defining the following properties:
-
Discovery Server Host
-
Discovery Username
-
Discovery Password
-
-
Click Import.
The Conversion Tool connects to BMC Discovery and imports the data. A summary appears in the Assessment Report window.
-
Follow the remaining on-screen instructions.
The Conversion Tool converts the Cron job data retrieved by BMC Discovery to Control-M data.
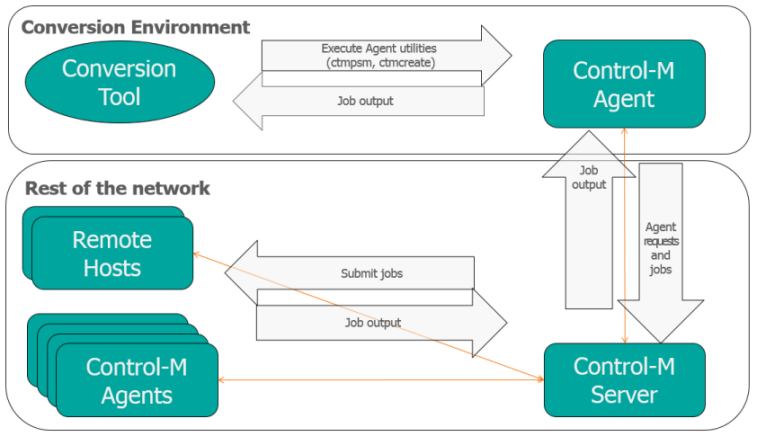
Cron Data Extraction with Agents
You can use the Agents that are installed on the same Windows host as the Conversion Tool to collect Cron data from available UNIX or Windows Agents and Agentless Hosts.
The Agent uses Control-M jobs and Agent utilities to collect the Cron data. The Control-M job run by the Agent executes a script file to collect data and to view a list of available hosts. The following script files are used, which are dependent on the host platform:
-
UNIX: captureScriptUnix.txt
-
Windows: captureScriptWindows.txt
To start the collection of data by Agents, a job is submitted to the primary Control-M/Server. After a list of available hosts is created in the Conversion Tool, you can select the hosts that from which you want to collect data. A job is then submitted to each selected host to retrieve the Cron data.
Importing Cron Data Automatically Using Control-M/Agents
This procedure describes how to use Agents to extract your Cron data and convert it to Control-M data.
Begin
-
Copy the Conversion Tool to a Windows machine that has a Control-M/Agent installed and running on it.
-
Ensure that the Agent is connected to a Control-M/Server that allows execution of the ctmpsm and ctmcreate utilities by the Agent.
-
Copy the following script files from the Conversion Tool script folder, <Conversion Home>/scripts/DataCollection, to your Control-M/Server.
You can store the script files in any custom location on the Control-M/Server. The default location to store these files is <Server_Home>/ctm_server.
-
captureScriptUNIX.txt
-
captureScriptWindows.txt
On UNIX, run the following command to ensure that the script file has the necessary authorizations:
chmod +x captureScriptUNIX.txt
-
-
Run the Conversion Tool and create a Cron project.
-
In the Load Data window, select Import data using Control-M Agents and then set the following properties:
-
Control-M/Server platform: Select either UNIX or Windows.
-
Script location: Set the directory where you stored the script files (default or custom location).
The Conversion Tool detects the Agents and displays a list of detected Agents.
-
-
Review the list of Agents to ensure that the relevant Agents are selected, and then click Next.
-
Confirm that you want each of the Agents to submit a job to retrieve Cron data.
A list of job results appears. For each successful job, pre-conversion Cron data is available.
-
Ensure that root mode is enabled on each of the selected UNIX-based Agents during this step. After this step completes, you can switch back to non-root mode.
-
If you want to import additional Cron data that is not accessible by Agents, you can now click Add Data Manually and provide Data File details, as described in Importing Cron Data Manually.
-
-
Click Import.
An Assessment Report window summarizes the data retrieval process.
-
Follow the remaining on-screen instructions.
The Conversion Tool converts the Cron job data retrieved by the Agents to Control-M data.
Importing Cron Data Manually
This procedure describes how to import data manually to a Cron conversion project.
Before You Begin
-
Run the following command to create a text file that contains the machine's jobs:
crontab -l >> {OutputFileName}.txt
Begin
-
In the Conversion Tool, in the Load Data window, select Import data manually.
-
Click Add.
-
From the Add Data Manually window, define the following Data File details:
-
Machine Name
-
User Name
-
Data File
-
-
Click Apply & Close.
-
Repeat steps 2–4 as needed.
-
Click Import.
The data is loaded into the Conversion Tool. A summary appears in the Assessment Report window.
-
Click Next.
The Run Conversion window appears.
-
Select Run conversion or Load existing conversion results and click Next, then click Finish.
IBM Tivoli Workload Scheduler (TWS) Data Extraction
This procedure describes how to convert TWS jobs to Control-M.
Begin
Run a full scan of all scripts run by IBM Tivoli Workload Scheduler (TWS) to search for occurrences of TWS command lines, executables and variables within the scripts.
-
Identify external interfaces to monitoring and alerting tools, reporting tools, help desk incident management tools, and CMDBs.
-
Create TWS variables, which are equivalent to Control-M variables and can be embedded in the job definition or script.
These can be found in the Parms.txt file.
$PARM
PROD_E_SCR "c:\schedules\e-commerce\filecopy.txt"
Example conversion to Control-M Server for Windows:
ctmvar -ACTION SET -VAR "%%%%\PROD_E_SCR" –VAREXPR “C:\schedules\e-commerce\filecopy.txt”
-
From the TWS environment, create the following files:
-
Job Definitions File: (Mandatory) Run the following command:
composer create <jobs file> from JOBS or if the command creates an empty file: composer create <jobs file> from jobs=@#@
-
CPU Definitions File: (Mandatory) Run following command:
composer create <cpu file> from CPU or if the command creates an empty file: composer create <cpu file> from cpu=@
-
Parameters Definitions File(Mandatory): Run the following command:
composer create <parms file> from PARMS
-
Schedule Definitions File: (Mandatory) Run the following command:
composer create <schedule file> from SCHED or if the command creates an empty file: composer create <schedule file> from sched=@#@
-
Resource Definitions Filez: (Optional): Run the following command:
composer create <resource file> from RESOURCES
-
Calendar Definitions File: (Optional) Run the following command:
composer create <calendars file> from CALENDARS
-
Variable Tables Definitions File: (Optional): Run the following command:
composer create <variables file> from VARIABLES
-
Workstation Parameters: (Optional): Run the following command:
<Workstation_name>_parms.txt
-
JP1 Automatic Job Scheduler Data Extraction
Data extraction from the JP1 scheduler is knowing the location of the JP1 Unit Definition File.
The following table describes how the Conversion Tool converts job types, job folders, OS jobs, variables, prerequisites and actions from JP1 to Control-M.
|
JP1 |
Control-M |
|---|---|
|
JP1 Folders and Jobs |
|
|
Root jobnet |
Folder |
|
Jobnet |
Sub-folder |
|
Job |
Job |
|
unit name (Job/Jobnet) |
Job/Folder name |
|
ex (execution-agent-name) |
Host/Host Group |
|
Run As |
|
JP1-user-name |
Created By |
|
Group unit name (ty=g) (contains a chain of all grandparent groups) |
Application If there are more than two level groups, the application contains the grandparent group path. |
|
Sub Group unit name (ty=g) - closest parent group |
Sub Application |
|
cm (comment) |
Description |
|
JP1 Job Types |
|
|
UNIX/Windows jobs (ty=j,rj,pc,rp) |
OS job |
|
All other job types (such as ty=flwj, evsj, evwj, jdj, mlsj) |
Dummy jobs These jobs are not supported and converted to Dummy jobs. Manual conversion may be required. |
|
Jobnet Connector (ty=nc) |
Dummy jobs These jobs are not supported and converted to Dummy jobs. Manual conversion may be required. |
|
JP1 OS Jobs |
|
|
command-text (te) NOTE: script-file-name with no path (sc) |
Command JP1 commands and variables in the command line are not supported. |
|
script-file-name (sc) |
script - File Name |
|
script - File path |
|
JP1 Variables |
|
|
parameter (prm) |
PARM All other variables (such as env, system variables) are not currently supported by the Conversion Tool. Manual conversion may be required. |
|
JP1 Prerequisites and Action |
|
|
ar=(f=[from unit], t=[to unit], [relation-type]) |
Events (In/Out) The following are not supported:
|
|
ar=(f=[from unit], t=[to Recovery unit], [relation-type]) |
If Actions |
|
JP1 Scheduling |
|
|
Group- open days (op) |
Calendar- WORKDAYS-[group] |
|
Group- closed days (cl) |
Calendar- NON_WORKDAYS-[group] |
|
st |
From Time The following are not supported:
|
|
sd, cy |
Rule-based calendars (RBCs) The following are not supported:
|
|
cy=N,(1,d) |
RBC - Everyday (daily) |
|
cy=N,(1,d) + sd contains '*' |
RBC - WORKDAYS (daily) Based on Calendar WORKDAYS [group] If no calendar is found, open/closed days are converted to Everyday. |
|
cy=N,(1,d) + sd contains '@' |
RBC- NON WORKDAYS (daily) Based on Calendar NON_WORKDAYS [group] If no calendar is found, open/closed days are converted to Everyday. |
|
cy=N,(1,w), sd={su|mo|tu|we|th|fr|sa} |
RBCs- Sunday, Monday, Tuesday, Wednesday, Thursday, Friday, Saturday (Weekly) The following is not supported:
|
|
cy=N,(1,m) |
RBC (Monthly) The following is not supported: If sd contains weekday. sd=yyyy/mm/{su|mo|tu|we|th|fr|sa}) |
|
cy=N,(1,m) |
RBC (Monthly) The following is not supported: If sd contains weekday sd=yyyy/mm/{su|mo|tu|we|th|fr|sa}) |
|
cy=N,(1,m), sd=yyyy/mm/dd | mm/dd| dd |
RBC- Nth_of _month (Monthly) |
|
cy=N,(1,m), sd=yyyy/mm/b | mm/b| b |
RBC- Last_of_month (Monthly) |
|
cy=N,(1,m), sd=yyyy/mm/b-DD | mm/b-DD| b-DD |
RBC- Nth_from_month_end (Monthly) |
|
cy=N,(1,m) + sd contains '*' |
RBC- Nth_workday (Monthly) Based on Calendar WORKDAYS-[group] |
|
cy=N,(1,m) + sd contains '*b' |
RBCs- NthLastWorkday/ LastWorkday (Monthly) Based on Calendar WORKDAYS-[group] |
|
cy=N,(1,m) + sd contains '@' |
RBC- Nth_non_workday (Monthly) Based on Calendar NON_WORKDAYS-[group] |
|
cy=N,(1,m) + sd contains '@b' |
RBC- NthLastNonWorkday/ LastNonWorkday (Monthly) Based on Calendar NON_WORKDAYS-[group] |
|
cy=N, (n,y) |
Currently not supported. |
|
cy=N,(n,d|w|m) where n>1 (Interval) |
Currently not supported. |
|
sd=0,ud |
Scheduling is taken from the parent. |
MS Task Scheduler Data Extraction
You can extract Task Scheduler data via one of the following methods:
-
Extracting Task Scheduler Data Using BMC Discovery: Finds Task Scheduler jobs that reside in Task Folders using BMC Discovery. BMC recommends that you complete Configuring Control-M Fields for Task Scheduler Jobs of folder, application, and sub-application.
-
Task Scheduler Data Extraction with Agents: Sets the Agent to collect Task Scheduler data from available Agents and Agentless Hosts.
-
Importing MS Task Scheduler Data Manually: Extracts Task Scheduler data manually and then import the data into the Conversion Tool by adding data from multiple locations and users.
Configuring Control-M Fields for Task Scheduler Jobs
This procedure describes how to configure Control-M fields for Task Scheduler jobs.
As Task Scheduler does not have folders, applications, or sub-application fields, you configure these fields for the jobs that BMC Discovery is importing to Control-M by changing the default values in the setting.cfg file to the values you set.
Begin
-
Close the Conversion Tool.
-
Locate the setting.cfg file in <Conversion Home>\data\ and set one or more of the following parameters:
-
MS_DISCOVERY_JOBS_FOLDER_NAME=Conversion_discovery_MS
-
MS_DISCOVERY_JOBS_APPLICATION=Conversion_discovery
-
MS_DISCOVERY_JOBS_SUB_APPLICATION=MS
All jobs converted using BMC Discovery have folder, application, and sub-application fields set to the values you set.
-
-
Complete the Extracting Task Scheduler Data Using BMC Discovery procedure.
Extracting Task Scheduler Data Using BMC Discovery
This procedure describes how to extract Task Scheduler data using BMC Discovery.
Begin
-
Install and learn how use BMC Discovery.
-
In the Conversion Tool, in the Load Data window, define the following:
-
Discovery Server Host
-
Discovery User
-
Discovery Password
The Conversion Tool connects to BMC Discovery and converts Task Scheduler jobs that are found by BMC Discovery to Control-M.
-
Task Scheduler Data Extraction with Agents
You can use the Agents that are installed on the same Windows host as the Conversion Tool to collect Task Scheduler data from available UNIX or Windows Agents and Agentless Hosts.
The Agent uses Control-M jobs and Agent utilities to collect the Task Scheduler data. The Control-M job run by the Agent executes a script file to collect data and to view a list of available hosts. The following script files are used, which are dependent on the host platform:
-
UNIX: captureScriptUnix.txt
-
Windows: captureScriptWindows.txt.
To start the collection of data by the Agents, a job is submitted to the primary Control-M/Server. After a list of available hosts is created, in the Conversion Tool, you can select the hosts that from which you want to collect data. A job is then submitted to each selected host to retrieve the Task Scheduler data.
Setting Up the Task Scheduler Conversion Environment with Agents
This procedure describes how to use Agents to extract your Task Scheduler data.
Before You Begin
-
Verify that Control-M/Agent is installed and running on the same Windows environment as the Conversion Tool.
-
Verify that the Agent is available and connected to a Control-M/Server.
-
Verify that the Control-M/Server allows the Agent to execute the ctmpsm and ctmcreate utilities.
Begin
-
Copy the following script files from the Conversion Tool script folder, <Conversion Home>/scripts/DataCollection, to your Control-M/Server:
-
captureScriptUNIX.txt
-
captureScriptWindows.txt
-
Importing MS Task Scheduler Data Manually
This procedure describes how to import data manually to a MS Task Scheduler conversion project.
Before You Begin
Run one of the following commands:
- schtasks /Query /XML >> <OutputFileName>.xml
- schtasks /Query /V /FO CSV >> <OutputFileName>.csv
Begin
-
In the Import data manually window, click Add.
The Add Data Manually window appears.
-
From the Add Data Manually window, define the following:
-
Machine Name
-
User Name
-
Date
-
-
Click Apply & Close.
-
Repeat steps 2–3 as needed, then click Import.
The data is loaded into the Conversion Tool and a summary of the imported data appears in the Assessment Report window.
For more information, see Data Evaluation.
-
Click Next.
The Run Conversion window appears.
-
Select Run conversion or Load existing conversion results and click Next, then clickFinish.
Redwood BPA/CPS Data Extraction
You can extract and import data from Redwood software for SAP Business Process Automation (BPA) or SAP Central Process Scheduling (CPS) for the conversion to Control-M.
Extracting BPA/CPS Data
This procedure describes how to extract Redwood BPA/CPS data.
Begin
-
Log in to SAP BPA by Redwood or SAP CPS by Redwood.
-
Navigate to Applications.
-
Select all user-defined entities that you want to export, right-click, and select Export tree or Export > Export with related objects.
A CAR (compressed ZIP) file is downloaded.
-
Rename the CAR file extension from .car to .zip.
Rename extracted_data.car to extracted_data.zip.
-
Extract the CAR file with the .zip extension into a separate directory named extracted_data.
After the extraction, this directory contains various sub-directories, such as Application, JobDefinition, TimeWindow, or SubmitFrame.
If the Export option is disabled for multiple entities, select and export just one entity at a time. Then combine all exports into one export by renaming the extension of each individual CAR file to .zip and extracting those files to a directory named combined_data.
-
Open the conversion tool and import the data from the extracted_data or combined_data directory.
Tidal CPS Data Extraction
Extract and import Tidal data in one of the following ways:
-
Automatic Import: Define the Tidal database owner credentials or the database schema name.
-
Manual Import: Extract CPS data by doing one of the following:
Extracting Tidal Data on MSSQL Server
This procedure describes how to extract data on a Tidal MSSQL Server.
Begin
-
From the <Conversion Home>/scripts/Tidal directory, run the following command:
tidal_MsSQL_export(-U <username> -P <password>| -W <Windows credentials>)-S <database server> -D <database/schema name>
The command, causes a batch script to export the table from the Tidal MSSQL server.
Extracting Tidal Data Using Oracle SQL Developer
This procedure describes how to extract data on an Oracle SQL Developer.
Begin
-
From Oracle SQL developer, log in to the database.
BMC recommends that you log in as the (database owner) DBO user, but you can log in with any user with read permissions on the Tidal database.
-
Expand the table group.
-
Select the following tables:
-
EVNTMST
-
JOBDEP
-
JOBDTL
-
JOBMST
-
NODLSTMS
-
NODMST
-
OWNER
-
VARMST
-
BIZUNIT
-
EVNTCHLD
-
EVNTCOND
-
EVNTFSCL
-
EVNTYEAR
-
JOBCLS
-
NODLSTDT
-
RESJOB
-
RESMST
-
SERVICEMST
-
TRGJOB
-
TRGMST
-
TRGTSK
-
TSKALRT
-
TSKLOG
-
TSKMAIL
-
TSKMST
-
TSKSCH
-
TSKVAR
-
USRMST
-
WORKGRP
-
WORKUSR
-
-
Right-click and select Export.
-
From the Export window, do the following:
-
Clear the Export DDL checkbox.
-
Check the Export data checkbox
-
From the Format list, select csv.
-
From the Save As list, select Separate Files.
-
From the File box, enter the location of the export file.
-
-
Click Next, Next, and then Finish.
ASG Zena Data Extraction
Extract and import Zena data in one of the following ways:
-
Automatic Import: Define the Zena database owner credentials or the database working directory in the Conversion Tool.
-
Manual Import: Extract Zena data by doing one of the following:
Extracting Zena Data on an Oracle SQL Developer
This procedure describes how to extract Zena data on an Oracle SQL Developer.
Begin
-
Log in to the Zena database and type your database name.
-
Select the following tables:
-
definitions
-
agents
-
-
Right-click and select Export.
-
From the Export window, do the following:
-
Clear the Export DDL checkbox.
-
Check the Export data checkbox.
-
From the Format list select csv.
-
From the Save As list select Separate Files.
-
From the File box enter the export file location.
-
-
Click Next, Next and then Finish.
Extracting Zena Data on an MSSQL Server
This procedure describes how to extract Zena data on an MSSQL Server.
Begin
-
From the <Conversion Home>/scripts/<Zena> directory, run the following command:
zena_MsSQL_export -U <username> -P <password> -S <database server> -D <database/schema name>
You do not have to insert <tables list> because a table default value is set to run conversion. After you run the command, a batch script exports the table from the Zena MSSQL server.
Hadoop-Oozie Data Extraction
Extract and import Hadoop-Oozie data in a manual import, as described in Extracting Hadoop - Oozie Data.
Extracting Hadoop - Oozie Data
This procedure describes how to manually extract Hadoop - Oozie data.
Begin
-
Create the following files:
- coordinator.xml: Converts to a folder in Control-M. Each action in the Coorindator XML is converted to a sub-folder created from the corresponding workflow.
-
workflow.xml: Holds the Hadoop execution types (such as Map/Reduce, sqoop, Pig, Hive) that converts to Control-M for Hadoop jobs.
-
bundle.xml: Enables you to batch a set of coordinator applications.
-
bundle.properties: Holds the variables and its values.
SAP Data Extraction
You can export and import SAP data in one of the following ways:
-
Automatic Import: Download the SAP Java connector files. For more information, see Downloading the SAP Java Connector Files
-
Manual Import: Extract and then load the required data. For more information, see Extracting SAP Data Using the Control-M SAP Jobs Extractor Manually .
Downloading the SAP Java Connector Files
This procedure describes how to download the required SAP Java Connector files so that you can import your data automatically to Control-M.
Begin
-
Download the sapjco3.jar and sapjco3.dll C library files from http://service.sap.com/connectors.
-
In the left pane, under Connectors, click SAP Java Connector and then click Tools & Services.
-
In the right pane, under SAP Java Connector (SAP JCo), click the quick link to download SAP JCo Release 3.x.
-
Download the sapjco3.jar and sapjco3.dll C library files from that section.
Ensure that you download the appropriate files for your host architecture (32 bit or 64 bit).
-
Copy the sapjco3.jar and sapjco3.dll C library files to the following directory:
<Conversion Home>\lib
-
Windows: Obtain and install the Visual Studio .Net C/C++ runtime libraries required by JCo.
-
For more information about how to obtain and install the Visual Studio runtime libraries, see the Support and Release Strategy section in the SAP Java Connector download page.
-
Starting with JCo 3.0.00, JCo running on Windows requires the Visual Studio 2005 C/C++ runtime libraries. See SAP note 684106 for details on how to install them.
-
-
After adding the files, restart the Conversion Tool and continue with automatic data import.
Extracting SAP Data Using the Control-M SAP Jobs Extractor Manually
This procedure describes how to extract SAP data using the Control-M SAP Jobs Extractor so that you can import your data manually to Control-M.
Begin
-
Extract the BMC Control-M SAP Jobs Extractor ZIP file from the following location:
<Conversion Home>\scripts\SAP\BMC_CONTROL-M_SAP_jobs_extractor.zip
-
Download the sapjco3.jar and sapjco3.dll C library files from http://service.sap.com/connectors
-
In the left pane, under Connectors, click SAP Java Connector and then click Tools & Services.
-
In the right pane, under SAP Java Connector (SAP JCo), click the quick link to download SAP JCo Release 3.x.
-
Download the required files from that section and copy the sapjco3.jar and sapjco3.dll C library files to the following path:
<BMC Control-M SAP Jobs extractor folder>
-
Run the sapextgui.cmd command.
The BMC Control-M SAP Jobs Extractor window appears.
-
In the SAP Connection field, complete the SAP parameters.
-
Click Test Connection to test the connectivity to the SAP system.
-
In the Jobs Filter field, define the mandatory parameters:
-
Job Name
-
User Name
-
Job Status
You can use "*" characters for Job Name and Job Count.
The remaining parameters are optional.
-
-
After you define the parameters, save the file.
You can retrieve the file for reuse, using the Load Rule File and Save Rule File buttons.
-
Click Get Jobs.
The jobs are extracted.
-
Click Yes and then Yes.
The output file is saved.
The jobs have been successfully extracted.
Extracting IBM Sterling Connect:Direct Data
This procedure describes how to extract IBM Sterling Connect:Direct data so that you can import your data manually to Control-M.
Begin
-
Extract the content of the Sterling Process Files Directory to use in the Conversion Tool.
IBM Sterling Connect:Direct Mapping
The conversion from IBM Sterling Connect:Direct (C:D) is based on having input C:D process files that contain all the file transfer logic (such as source host, target host , file to transfer etc.) and reside in your file system.
If C:D file transfers are triggered within scripts, obtains file transfer parameters from outside scripts, and dynamically creates C:D process files you need to replace all the jobs that calls those scripts with the File transfer job template that use those parameters.
The following table describes how the Conversion Tool converts job types, files, statements and parameters from IBM Sterling Connect:Direct to Control-M.
|
IBM Sterling Connect:Direct |
Control-M |
|---|---|
|
Process Files |
SMART folders containing Managed File Transfer (MFT) jobs (and Dummy jobs) |
|
COPY statements |
MFT jobs |
|
RUN statements |
Dummy jobs |
|
SUBMIT statements |
Dummy jobs |
|
GOTO, IF, EIF, EXIT, SYMBOL statements |
Not converted and must be manually handled. The Conversion Tool issues a warning message if those statements exist in the Process files. |
|
COPY FROM and TO parameters |
MFT FTP-LPATH1 and FTP-RPATH1 job parameters (the source and destination locations on the hosts) corresponding to which one is defined as the PNODE (Primary node) and SNODE (Secondary node) in IBM Sterling Connect:Direct. |
|
PNODE (Primary node) and SNODE (Secondary node) |
The conversion specifies a connection profile name consisting of a combination of a PNODE and SNODE separated by a dash. The user needs to create the Connection profiles in the Control-M Configuration Manger and chose them manually from the MFT jobs created by the Conversion Tool. |
 YouTube
 Facebook
 LinkedIn