Agent Connection to Multiple Control-M/Servers
An Agent that is connected to a self-hosted Control-M/Server can also connect to a SaaS Control-M/Server. This enables you to manage and simultaneously run OS, SLA Management, Application Integrator, Control-M Databases, and Control-M Integration plug-in jobs on an Agent from both Control-M/Servers, and eliminates the time needed to install and configure a SaaS Agent.
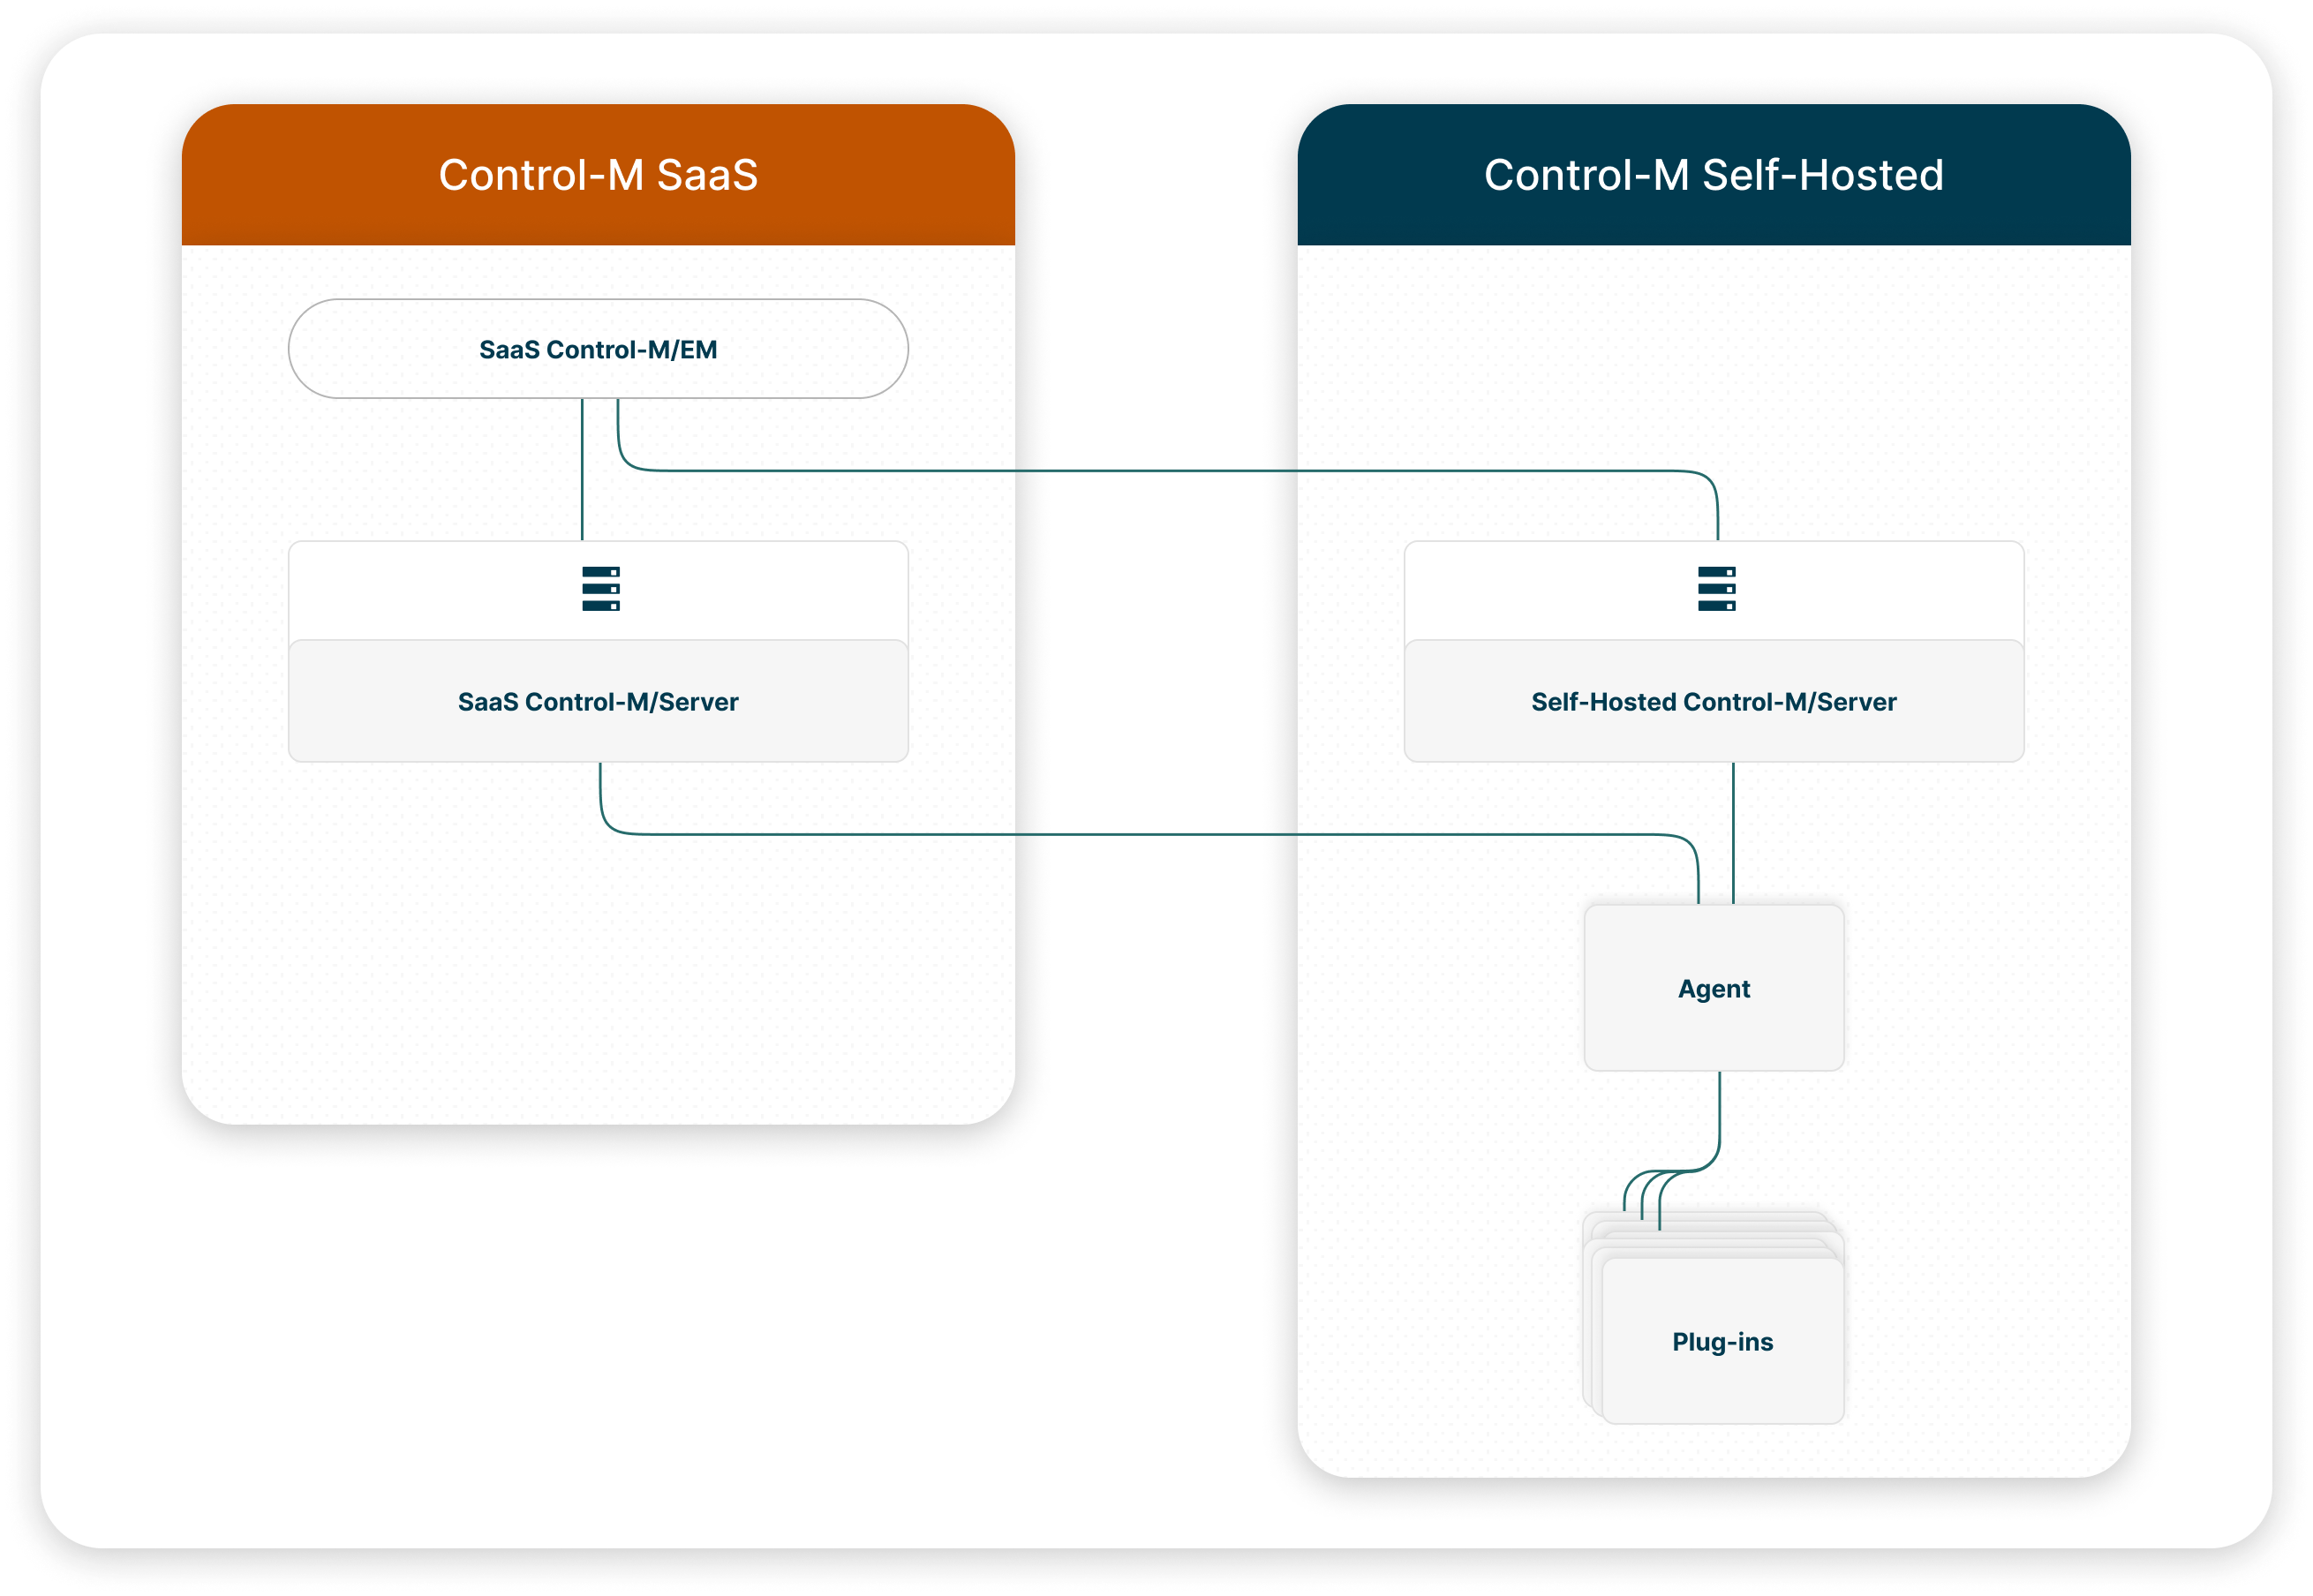
The following architectural diagrams demonstrate two ways that an Agent can connect to a self-hosted Control-M/Server and a SaaS Control-M/Server:
-
Control-M SaaS Unified View: The Agent is connected to one self-hosted Control-M/Server and one SaaS Control-M/Server, which are both managed by Control-M SaaS.

-
Control-M/EM and Control-M SaaS: The Agent is connected to one self-hosted Control-M/Server that is managed by Control-M/EM and one SaaS Control-M/Server that is managed by Control-M SaaS.


-
Agentless Host jobs cannot run on the non-default server, which you can change via the ctmag_mng_svr utility.
-
You can only concurrently execute the maximum number of jobs permitted on a SaaS Agent, based on your platform, as described
in Agent System Requirements for Windows and Agent System Requirements for UNIX.
Connecting an Agent to a SaaS Control-M/Server
This procedure describes how to connect an Agent to a SaaS Control-M/Server. This enables you to manage and run jobs on the Agent from a self-hosted Control-M/Server and a SaaS Control-M/Server, which eliminates the need to create a separate Agent for each Control-M/Server.
Before You Begin
-
Verify that you have upgraded to Control-M/EM 9.0.22 on Windows or UNIX, as described in Control-M/EM Upgrade.
-
Verify that you have upgraded your self-hosted Control-M/Server to version 9.0.22 on Windows or UNIX, as described in Control-M/Server Upgrade.
-
Verify that you have installed or upgraded to Control-M/Agent 9.0.22 on Windows, Linux, or AIX, as described in Agent Installation and Control-M/Agent Upgrade.
-
Verify that all centralized connection profiles are defined in Control-M SaaS.
-
Verify that your Agent is connected to a self-hosted Control-M/Server, as described in Adding an Agent.
-
Verify that the Agent is up.
-
Verify that you have outgoing HTTPS access (port 443) to the following URLs:
-
*.controlm.com:443
-
*.amazonaws.com:443
-
Begin
-
Log in to the Agent host.
-
From a command line, run the following command to verify that the Agent is connected to the self-hosted Control-M/Server:
ag_diag_comm
The Control-M/Agent Communication Diagnostic Report appears and confirms that the Agent ping to the self-hosted Control-M/Server Succeeded.
-
Log in to Control-M Web with a username that is associated with a Control-M/EM Admin role and do the following:
-
From the
 icon, select Configuration.
The Configuration domain opens.
-
From the
 drop-down list, select Agents.
The Agents tab appears.
-
Select the required Agent, and from the drop-down list select Ping.
The Ping Agent dialog box appears and states that the Agent is Available.
-
-
Generate an Agent token, as described in Generating an Agent Token for Multiple Control-M/Servers.
-
From the Agent host, shut down the Agent, as described in Shutting Down the Agent.
-
From the Agent host, run the following command to connect the Agent to the SaaS Control-M/Server:
ctmag_mng_svr -ACTION ADD -Token "<Agent_Token>"
where the <Agent_Token> parameter is the token that you created above and copied to the clipboard.
The Agent is now connected to the SaaS Control-M/Server.
-
Start the Agent, as described in Starting Up the Agent.
-
From the Agents tab in Control-M SaaS, verify that the new Agent appears, select the Agent, and then from the Agents toolbar click Ping.
The Ping Agent dialog box appears and confirms that the ping is successful.
-
If you have already defined Agent restrictions for your self-hosted Control-M/Server, define the same CPU Usage restriction for your SaaS Control-M/Server, as described in Agent (Host) Restrictions.
-
Self-Hosted Control-M/Server: 80%
-
SaaS Control-M/Server: 80%
The Agent is available and can now run jobs through a self-hosted and SaaS Control-M/Server.
-
Generating an Agent Token for Multiple Control-M/Servers
This procedure describes how to generate an Agent token that enables you to connect an Agent to a self-hosted and SaaS Control-M/Server.
Begin
-
From the Agents tab in the Configuration domain in Control-M Web, do the following:
-
From the table of Agents in the Agents pane, select the relevant Agent.
-
Locate the Tag column and, if the selected Agent has a tag, record the tag name.
-
-
Log in to Control-M SaaS, and do the following:
-
From the
 icon, select Configuration.
The Configuration domain opens.
-
From the
 drop-down list, select Agents.
The Agents pane appears.
-
-
From the Manage drop-down list, select Agent Tokens.
The Agent Token Management pane appears.
-
Click
 to add an Agent token.
The Generate Agent Token pane appears.
-
In the Agent Token Name field, type an Agent token name.
-
From the Control-M/Server drop-down list, select the SaaS Control-M/Server to associate with this Agent token.
-
Do the following:
-
From the Agent Tag / Tag Pattern drop-down list, select *.
The Agent Tag field appears.
-
Do one of the following:
-
If the self-hosted Agent does not have a tag, in the Agent Tag field type admin.
-
If the self-hosted Agent has a tag, in the Agent Tag field type the tag name.
-
-
Click Generate Token.
A new token appears.
-
Click
 to copy the token to the clipboard, and then click Close.
The new token appears in the Agent Tokens table in the Agent Token Management pane.
-
Disconnecting an Agent from a SaaS Control-M/Server
This procedure describes how to disconnect an Agent from a SaaS Control-M/Server.
Before You Begin
-
Verify that your Agent is connected to a self-hosted Control-M/Server, as described in Adding an Agent.
-
Verify that the Agent is up.
Begin
-
Log in to the Agent host.
-
From a command line, run the following command to find the required Control-M/Server code:
ctmag_mng_svr -ACTION list
-
Record the required Control-M/Server code for the following step.
-
Run the following command:
ctmag_mng_svr -ACTION remove_server -server_code <Server_Code>
The Agent is now disconnected from the SaaS Control-M/Server.
-
Delete the Agent from Control-M SaaS, as described in Deleting an Agent.
Disconnecting an Agent from a Self-Hosted Control-M/Server
This procedure describes how to disconnect an Agent from a self-hosted Control-M/Server.
Before You Begin
-
Verify that your Agent is connected to a SaaS Control-M/Server, as described in Adding an Agent.
-
Verify that your SaaS Control-M/Server is the default Control-M/Server, as described in ctmag_mng_svr.
- Verify that the Agent is up.
Begin
-
Log in to the Agent host.
-
From a command line, run the following command to find the required Control-M/Server code:
ctmag_mng_svr -ACTION list
-
Record the required Control-M/Server code for the following step.
-
Run the following command:
ctmag_mng_svr -ACTION remove_server -server_code <Server_Code>
The Agent is now disconnected from the self-hosted Control-M/Server.
-
Delete the Agent from Control-M Web, as described in Deleting an Agent.
 YouTube
 Facebook
 LinkedIn