Online Facilities
This chapter contains the following topics:
-
Migration, Printing, Backup, Restore Mission Definition Facility
-
Migration, Printing, Backup, Restore Mission Definition – Mission List Screen
-
Migration, Printing, Backup, Restore Mission Definition – Category List Screen
-
Migration, Printing, Backup, Restore Mission Definition Screen
-
Copying Migration, Printing, Backup, Restore Mission Definitions to another Member
Overview
The Online facility is the basic means of communication between the user and Control-V.
Online mission definition gives users the ability to define and modify parameters for report decollating, printing, backup and restore missions in the Control-V environment.
Online tracking displays the current status of all variables relating to a specific mission, a group of missions or all the missions scheduled under Control-V.
Online control enables authorized users to modify variables relating to a specific mission, a group of missions or all the missions scheduled under Control-V.
This chapter describes the main features of the Online facility.
IOA Features
This section discusses the IOA features common to all INCONTROL products.
IOA Entry Panel
Enter the IOA online facility according to the instructions of your INCONTROL administrator. Upon entering the IOA online facility, the IOA entry panel may be displayed.
Display of the IOA Entry Panel is optional. If your INCONTROL administrator determined that the entry panel is bypassed, the IOA Primary Option menu, which is discussed in the following section, is displayed.
Figure 7 IOA Editor Edit Entry Panel
 -----------------------------  IOA ENTRY PANEL  -----------------------------
         +-----------------------------------------------------------+
         |                                                           |
         |          USER ID      ===>                                |
         |                                                           |
         |          PASSWORD     ===>                                |
         |                                                           |
         |          NEW PASSWORD ===>          ===>                  |
         |                                                           |
         +-----------------------------------------------------------+
 PLEASE FILL IN USER ID AND PASSWORD AND PRESS ENTER                   18.30.18
Type your user ID and password and press Enter. If you enter a correct user ID and password, the IOA Primary Option menu is displayed.
The IOA Online facility allows three attempts to enter a valid user ID and password combination. After the third unsuccessful attempt, the program is terminated.
To change a password, type the new password twice: Once in the NEW PASSWORD field and once in the confirmation field to the right of the NEW PASSWORD field.
General IOA Features
General IOA features include:
Customization
IOA screens, constants, messages, colors, commands and PFKey definitions can be site-modified to adapt them to local needs. For more information, see the INCONTROL for z/OS Installation Guide for details.
INCONTROL products can be customized globally (for the whole site) using the INCONTROL Installation and Customization Engine (ICE) according to profile variables defined during installation.
In addition, INCONTROL products can be customized to respond differently to individual users if these profile variables are specified in User profile members.
For example, depending on the setting of a variable in a particular User profile member, upon exit from a screen in which changes have been requested, this INCONTROL product may either perform the requested changes automatically or display a confirmation window before performing the changes.
Customization issues are discussed in the IOA administration chapter of the INCONTROL for z/OS Administrator Guide.
Due to customization, screens and examples illustrated in this guide may differ from the ones used at your site.
Environment Support
The Online facility can be activated under the following environments:
-
TSO (native)
-
TSO/ISPF
-
ROSCOE/ETSO
-
CICS
-
VTAM
-
IMS/DC
-
IDMS/DC
-
COM-PLETE
Cross memory interfaces to the Online monitor are optional under native TSO, TSO/ISPF, and ROSCOE/ETSO. They are always used under the other environments.
There are slight differences in the operation of the Online facility under the different environments. Special notes are provided in the guide where applicable.
Terminal Support
IOA supports the following models of the IBM 3270 terminals:
-
Model 2–24 lines, 80 columns.
-
Model 3–32 lines, 80 columns.
-
Model 4–43 lines, 80 columns.
-
Model 5–27 lines, 132 columns.
When using the IOA online facility under IMS/DC and IDMS/DC, all model types display 24 lines and 80 columns.
IOA adjusts to the screen size in order to use the maximum available data area on the screen.
Special Character Usage on Terminals
In certain cases, special keyboard characters, such as $, #, and @, are assigned special meanings. The characters specified appear on standard American terminals but may not be available on other keyboards. In addition, some special characters on your keyboard may be assigned different hexadecimal values than the ones recognized by IOA. Special keyboard mapping requirements, and a complete discussion of the conventions used in this guide, are shown in Conventions Used in This Guide.
Color Support
When INCONTROL products are activated from a screen with extended seven color support, they make extensive use of the color attributes of the screen. The concept of management by color is emphasized in INCONTROL screens.
Like all screen attributes, the color attribute for each field is defined externally to the program and can be locally modified by the site.
IOA does not automatically recognize IMS/DC and IDMS/DC terminals as supporting extended color attributes. If your IMS/DC or IDMS/DC terminal supports extended color attributes and you want IOA to recognize this, refer to the IOA administration chapter of the INCONTROL for z/OS Administrator Guide for more information. At this time, IOA does not support extended color attributes under COM-PLETE. Due to ISPF characteristics, color changes cannot occur in adjacent columns but must be separated by an attribute byte without color, that is, black. Therefore, some IOA screens have a different appearance under ISPF than under other online environments, such as native TSO and CICS.
Prefixing
For fields that automatically support prefixing, selection strings are always treated as prefixes. Selection is made if a segment of the text beginning with the first letter (that is, any prefix) matches the selection criteria.
Assume the following names exist: A3, A4, M, M01, M03, M12, M13, M22, M23, M30, M33, M103, M135, M301.
Table 8 Prefixing Examples
|
Entry |
Matching values |
|---|---|
|
blank |
All the above values |
|
A |
A3, A4 |
|
M |
M, M01, M03, M12, M13, M22, M23, M30, M33, M103, M135, M301 |
|
M1 |
M12, M13, M103, M135 |
|
M13 |
M13, M135 |
If a field supports prefixing, this is indicated in its description.
Character Masking
For fields that support masking, mask characters function as follows:
-
* represents any number of characters (including no characters).
-
? represents any one character.
For fields that do not automatically support prefixing, a prefix value can be specified by ending the selection with an * (asterisk).
Assume the following names exist: A3, M, M3, M01, M03, M13, M23, M33, M103, M435, M2243.
Table 9 Masking Examples
|
Entry |
Matching Values |
|---|---|
|
* |
All the above values |
|
M?3 |
M03, M13, M23, M33 |
|
M??3 |
M103 |
|
M*3 |
M3, M03, M13, M23, M33, M103, M2243 |
|
M* |
M, M3, M01, M03, M13, M23, M33, M103, M435, M2243 (since the last character in this example is *, M is treated as a prefix) |
|
M?3* |
M03, M13, M23, M33, M435 |
If a field supports masking, this fact is indicated in its description.
IOA Primary Option Menu
The IOA Primary Option menu is the primary interface to functions available under the various INCONTROL products. The options displayed in the menu depend on the INCONTROL products installed at the site, and the functions and facilities that have been authorized to you.
If only Control-D and Control-V are installed at your site, and you are authorized to access all functions and facilities, the following screen is displayed:
When the Online facility is activated as an ISPF application, options 6 is displayed as: "6 UTILITIES Online Utilities." In this case, option 6 activates the Online Utilities under ISPF. When the Online facility is not activated under TSO or TSO/ISPF, option 6 is inactive.
Figure 8 IOA Primary Option Menu when only Control-V is Installed
---------------------       IOA PRIMARY OPTION MENU       -----------------(1)
OPTION ===>                                              USER        N22A
                                                         DATE        19.08.01


   4   COND/RES          IOA Conditions/Resources Display
   5   LOG               IOA Log Display
   6   TSO               Enter TSO Command
   7   MANUAL COND       IOA Manual Conditions Display
   8   CALENDAR DEF      IOA Calendar Definition
  IV   VARIABLE DATABASE IOA Variable Database Definition Facility
   C   CMEM DEFINITION   CTM Event Manager Rule Definition
   A   MISSION STATUS    CTD/V Active Mission Status Display
   M   MISSION DEF       CTD/V Prt/Bkp/Rst/Mig Mission Definition
   R   REPORT DEF        CTD/V Rep Decol/Index Mission Definition
   T   RECIPIENT TREE    CTD Recipient Tree Definition
   U   USER REPORTS      CTD/V Reports-Status/Update/View
   F   PC PACKET STATUS  CTD File Transfer to CTD/PC
  DO   OBJECTS           CTD Objects Facility


 COMMANDS:  X - EXIT, HELP, INFO  OR CHOOSE A MENU OPTION              18.12.41
To select an option, type the option number or letters in the OPTION field and press Enter. Alternatively, for a number option, press the PFKey with the same number. For example, to select the LOG option, press PF05.
Your INCONTROL administrator can limit the options displayed on a user-by-user basis, and can alter option numbers and customize option descriptions. Product-supplied default options are discussed in this guide.
Certain IOA commands, functions, and facilities (options) are shared by all INCONTROL products. These shared IOA commands, functions and facilities are described later in this chapter, and outlined in Table 10.
Table 10 INCONTROL Shared IOA Functions and Facilities
|
Option |
Function |
Description |
|---|---|---|
|
4 |
COND/RES |
Display and update status of the IOA Conditions file and Control-M Resources file. |
|
5 |
LOG |
View audit trail information about jobs, missions and rules scheduled under the supervision of IOA products. |
|
6 |
TSOa |
Perform TSO commands. |
|
7 |
MANUAL COND |
Display the list of prerequisite conditions that should be confirmed manually by operations personnel. |
|
8 |
CALENDAR DEF |
Define scheduling calendars. |
|
X |
EXIT |
Exit the Online facility. |
|
INFO |
INFO |
Display a window in the IOA Primary Option Menu. The window contains information about installed INCONTROL products. For more details on the information displayed by this command, refer to IOA Version Information. |
Entering =1 in the command line of any other screen returns you to the IOA Primary Option Menu that is displayed at your site.
The following commands, functions, and facilities (options) are applicable to Control-D:
Table 11 Control-V Functions and Facilities
|
Option |
Function |
Description |
|---|---|---|
|
A |
MISSION STATUS |
Display and update Active Missions status. |
|
M |
MISSION DEF |
Define printing, backup and restore missions. |
|
R |
REPORT DEF |
Define decollating missions. |
|
T |
RECIPIENT TREE |
Display and update the Recipient Tree. |
|
U |
USER REPORTS |
Display the status of user reports. View report pages online. |
|
F |
PC PACKET STATUS |
Display the status of reports (packets) that have been scheduled for transfer from the mainframe to a PC. |
The following IOA Primary Option menu is displayed at sites supporting all currently available INCONTROL products (under ISPF)
Option OK (KOA Recorder facility) is available only under IOATSO, and not under IOAISPF or IOAMON.
When the IOA online facility is activated as an ISPF application, option 6 is displayed as 6 UTILITIES Online Utilities. In this case, option 6 activates the Online utilities under ISPF. When the online facility is not activated under TSO or TSO/ISPF, option 6 is inactive.
Figure 9 IOA Primary Option Menu when all INCONTROL Products are Installed
---------------------       IOA PRIMARY OPTION MENU       ------------------(1)
OPTION ===>                                               USER        N06

IOA                        CONTROL-D/V                CONTROL-O

  4  COND-RES                A  MISSION STATUS         OR  RULE DEFINITION
  5  LOG                     M  MISSION DEF            OM  MSG STATISTICS
  6  UTILITIES               R  REPORT DEF             OS  RULE STATUS
  7  MANUAL COND             T  RECIPIENT TREE         OL  AUTOMATION LOG
  8  CALENDAR DEF            U  USER REPORTS           OA  AUTOMATION OPTS
 IV  VARIABLE DATABASE       F  PC PACKET STATUS       OC  COSMOS STATUS
                            DO  OBJECTS


CONTROL-M & CTM/Restart    CONTROL-M/Analyzer         CONTROL-M/Tape

  2  JOB SCHEDULE DEF       BB  BALANCING STATUS       TR  RULE DEFINITION
  3  ACTIVE ENV.            BM  MISSION DEF            TP  POOL DEFINITION
  C  CMEM DEFINITION        BV  DB VARIABLE DEF        TV  VAULT DEFINITION
  W  WORKLOAD MANAGEMENT    BR  RULE DEFINITION        TI  INQ/UPD MEDIA DB
 JD  JCL VERIFY DEFAULTS    BA  RULE ACTIVITY          TC  CHECK IN EXT VOL
 JV  JCL VERIFICATION
 JR  JCL VERIFY RULES

COMMANDS: X - EXIT, HELP, INFO, SET OR CHOOSE A MENU OPTION            16.08.18
Entering =1 in the command line of any other screen returns you to the IOA Primary Option Menu that is displayed at your site.
For a description of the options for other INCONTROL products, see the user guides of the respective products.
Additional options available on the IOA Primary Option menu when operating Control-D and Control-V with other INCONTROL products are listed in Table 12.
Table 12 IOA Primary Option Menu Options
|
Option |
Name |
Description |
|---|---|---|
|
IV |
VARIABLE DATABASE |
Define, display and update IOA Database variables used by Control-O and Control-M. Option IV is available only at sites where Control-O or CMEM are installed. |
|
2 |
JOB SCHEDULE DEF |
Define or modify job production parameters. |
|
3 |
JOB STATUS |
Display and update status of jobs scheduled under Control-M. |
|
C |
CMEM DEFINITION |
Define or modify CMEM rules. |
|
W |
WORKLOAD MANAGEMENT |
Define or modify Workload Policies and Load-Indexes. |
|
JD |
JCL Verify Defaults |
Define verification parameter defaults. |
|
JV |
JCL Verification |
Activate the verification, reformatting, or enforcement process on job members. |
|
JR |
JCL Verify Rules |
Define rules for site standard verification, reformatting, or enforcement. Options 2, 3, C, and W are available only at sites where Control-M is installed. Options JD, JV, and JR are available only at sites where Control-M JCL Verify is installed. |
|
BB |
BALANCING STATUS |
Display and update the status of active balancing missions. |
|
BM |
MISSION DEF |
Define balancing missions. |
|
BV |
DB VARIABLE DEF |
Define, display and update Database variables. |
|
BR |
RULE DEFINITION |
Define balancing rules. |
|
BA |
RULE ACTIVITY |
Display rule activity and the result of invoking Control-M/Analyzer rules. Options BB, BM, BV, BR, and BA are available only at sites where Control-M/Analyzer is installed. |
|
OR |
RULE DEFINITION |
Define rules. |
|
OM |
MSG STATISTICS |
View message statistics. |
|
OS |
RULE STATUS |
View Rule Status screen. |
|
OL |
AUTOMATION LOG |
Display commands, messages and/or traces. |
|
OA |
AUTOMATION OPTS |
Display available operator productivity tools. |
|
OC |
COSMOS STATUS |
Display or modify the status of COSMOS-controlled objects and databases. |
|
OK |
KOA RECORDER |
Record VTAM scripts Options OR, OM, OS, OL, OA, OV, OC, and OK are available only at sites where Control-O is installed. |
|
TR |
RULE DEFINITION |
Define rules. |
|
TP |
POOL DEFINITION |
Define pools. |
|
TV |
VAULT DEFINITION |
Define vaults. |
|
TI |
INQ/UPD MEDIA DB |
Display Inquire/Update screen. |
|
TC |
CHECK IN EXT VOL |
Check in external volumes. Options TR, TP, TV, TI, and TC are available only at sites where Control-M/Tape is installed. |
IOA Version Information
Enter INFO in the OPTION field of the IOA Primary Option menu to display the IOA Version Information window, as illustrated in Figure 10. This window lists the version and level of each INCONTROL product installed at the site, plus the CPU ID and current system date. The IOA Version Information window also identifies the unique IOA QNAME assigned to the site. For further information about the IOA QNAME, see the IOA operational parameters step, the IOAPLEX parameters step, and the adding IOA structures to the CFRM step, all in the INCONTROL for z/OS Installation Guide. Press Enter or END (PF03/PF15) to exit the window and return to the IOA Primary Option menu.
Figure 10 IOA Version Information
---------------------       IOA PRIMARY OPTION MENU       ------------------(1)
OPTION ===>                                               USER        N05
       EssssssssssssssssssssssssssssssssssssssssssssssssssssssssssssssssssN
 IOA   ×            IOA Version  9.0.00  Information and Status           ×
       ×                                                                  ×
   4  C×                           Running Mode Security                  ×
   5  L×    IOA                         9.0     Active                    ×
   6  U×    CDAM                        9.0                               ×
   7  M×    IOAGATE                     9.0                               ×
   8  C×    CONTROL-M                   9.0     Active                    ×
  IV  V×    CONTROL-M/Restart           9.0                               ×
       ×    Control-M JCL Verify        9.0                               ×
       ×    CONTROL-M/Analyzer          9.0     Active                    ×
       ×    CONTROL-M/Tape              9.0     Active                    ×
 Contro×    CONTROL-D                   9.0     Active                    ×
 & Cont×    CONTROL-V                   9.0                               ×
   2  J×    CONTROL-O                   9.0     Active                    ×
   3  A×    IOA QNAME  IOAR900   TRAN-ID            Sec.Prod. RACF        ×
   C  C×    USER-ID    N05       LANGUAGE ENG       OS  z/OS    01.13.00  ×N
  JD  J×    SMF-ID     MVS3      SYSTEM NAME  MVS3                        ×B
  JV  J×    DATE       01.05.14  CPUID 19F037 2827                        ×L
  JR  J×                                                                  ×
       DssssssssssssssssssssssssssssssssssssssssssssssssssssssssssssssssssM
 COMMANDS: X - EXIT, HELP, INFO, SET OR CHOOSE A MENU OPTION            16.24.21
Multi-Screen Control
It is not necessary to return to the IOA Primary Option menu to move from one online facility to another.
To speed up transfer of control between screens of different facilities and to enable you to manage several online facilities at the same time, transfer control commands can be specified. Transfer commands take you directly from your current screen to the requested screen. Transfer commands can be used to reach any screen that can be accessed through the IOA Primary Option menu at your site.
Each transfer control command consists of an equal sign immediately followed by the option on the IOA Primary Option menu. The option identifies the target screen of the transfer. For example, from any screen, specify:
Table 13 IOA Transfer Control Commands
|
Command |
Description |
|---|---|
|
=5 |
to access the IOA Log screen. |
|
=4 |
to access the IOA Conditions/Resources screen. |
|
=A |
to access the Control-D/V Mission Status screen. |
|
=1 |
to access the IOA Primary Option menu. |
If you use a transfer command to reach another screen, the state of the current screen remains unchanged when you return to it using another transfer command.
The INCONTROL administrator can globally deactivate any or all of the transfer commands.
Fast Exit from the IOA Online Facility
To exit immediately from the IOA Online facility, type =X on the command line and press Enter.
In most cases, the =X command has the same effect as pressing END (PF03/PF15) in all open screens and then entering X (Exit) in the IOA Primary Option menu. Any window, such as the Exit Option window, that would be displayed when exiting an open screen is displayed when the =X command is entered.
However, when the =X command is entered while definition screens such as the Calendar Definition screen are open, changes to the open definition screens are cancelled. Changes currently in definition facility list screens, for example, changes to previously closed definition screens, are not cancelled. Those screens and all other open screens are treated as if END (PF03/PF15) has been entered.
The =X command is intentionally not supported on certain screens.
Screen Layout
Most IOA screens are divided into four basic areas. The example used in this section is the IOA Log screen.
Table 14 Basic IOA Screen Areas
|
Screen Area |
Description |
|---|---|
|
Screen Description and Message Line |
This line at the top of the screen describes the purpose of the screen (in the example screen, the "IOA Log.") A screen identifier may appear in the upper right corner (in the example screen, 5). This line is also used to display messages. |
|
Screen Header and Command Area |
This area is used for online commands, and, where applicable, headings of the screen data. |
|
Data Area |
On some screens, the data area can be scrolled. For more information, see Scrolling Commands. |
|
Screen Bottom |
This area of the screen usually contains a list of available commands or options (In the example screen, SHOW, GROUP, CATEGORY, and SHPF), or a brief explanation about screen usage. The current time is displayed in the lower right corner. |
Figure 11 IOA Log Screen
FILTER:            ---------------- IOA LOG --------------------------------(5)
COMMAND ===>                                                    SCROLL===> CRSR
SHOW LIMIT ON ==>                                          DATE 080800 - 080800
DATE   TIME   ODATE  USERID   CODE    ------ M E S S A G E -------------------
080800 122330 080800 M24      SCD203I REP PRDKPLW4 ELIGIBLE FOR PROCESSING
080800 122330 080800 M18      SCD203I REP GPLIR17A ELIGIBLE FOR PROCESSING
080800 122330 080800 M24      REP267I PRDKPLW4 PRDKPLW4/JOB04800 DECOLLATION
                                      FROM SPOOL STARTED
080800 122359 080800 M24      REP251I REP PRDKPLW4 PRDKPLW4/JOB04800
                                      DECOLLATION ENDED "OK"
080800 122359 080800 M24      SCD208I REP PRDKPLW4 PROCESSING ENDED "OK"
080800 124634 080800 GENERAL  CTD049I MISSION PROCESSING STARTED
080800 124635 080800 M24A     CTD511I REP PLRPT010 ODATE 080800 PLACED ON
                                      ACTIVE MISSIONS FILE-INVENTORY REPORT
080800 124635 080800 GENERAL  CTD696I ALL MISSIONS PROCESSED SUCCESSFULLY
080800 124643 080800 M24      SCD203I REP PLRPT010 ELIGIBLE FOR PROCESSING
080800 124733 080800 M24      REP267I REP PLRPT010 PLRPT010/JOB04838
                                      DECOLLATION FROM SPOOL STARTED
080800 124808 080800 M24      REP251I REP PLRPT010 PLRPT010/JOB04838
                                      DECOLLATION ENDED "OK"
080800 124808 080800 M24      SCD208I REP PLRPT010 PROCESSING ENDED "OK"
080800 163335 080800 M22      CTD659I HOLD OF MISSION INTR0002 ODATE 080800
                                      PERFORMED
CMDS: SHOW, GROUP, CATEGORY, SHPF                                      13.09.29
Commands and PFKeys
Commands are entered by typing a command in the COMMAND field and then pressing Enter, or by pressing a predefined PFKey, or a combination of both.
It is not necessary to enter the full command name; the shortest unique abbreviation of the command is sufficient. If the abbreviation is ambiguous, an appropriate message is displayed in the message area.
IOA commands are flexible; you can change command syntax or provide aliases (synonyms) to suit your site. If you want to add or change a command syntax, consult BMC Customer Support. The examples provided in this chapter exhibit the original command syntax supplied with this INCONTROL product.
PFKey command assignments can be site-customized. It is possible to assign PFKeys differently for each screen. To change PFKey command assignments, see your INCONTROL administrator.
Supplied PFKey definitions are consistent throughout most of the screens. For example: PF08/PF20 is used to scroll down (forward) on all INCONTROL screens where scrolling is possible.
Table 15 Command PFKey Definitions
|
PFKey |
Description |
|---|---|
|
PF01/PF13 |
HELP |
|
PF02/PF14 |
SHOW (where applicable)a |
|
PF03/PF15 |
END (exit current screen and go back one level) |
|
PF04/PF16 |
RESET (where applicable) |
|
PF05/PF17 |
FIND (where applicable) |
|
PF06/PF18 |
=6 (transfer to TSO screen/application or to Utilities screen)b |
|
PF07/PF19 |
UP (scroll backward) |
|
PF08/PF20 |
DOWN (scroll forward) |
|
PF10/PF22 |
LEFT or PREV (where applicable) |
|
PF11/PF23 |
RIGHT or NEXT (where applicable) |
|
PF12 |
RETRIEVE (Retrieves a sequence of commands and options entered by the user during the current session. These commands and option are displayed in reverse order, on the command line of the current screen.) |
|
PF24 |
SHPF |
To see the PFKey assignment of the screen with which you are working, type reserved command SHPF in the command line and press Enter. A window describing the current PFKey assignment appears on the screen. Press Enter again to close the window.
Figure 12 PFKey Assignment Widow
FILTER:            ---------------- IOA LOG --------------------------------(5)
COMMAND ===>                                                   SCROLL===> CRSR
 SHOW LIMIT ON ==>                                         DATE 080800 - 080800
 DATE   TIME   ODATE  USERID   CODE    ------ M E S S A G E --------------------
 080800 122330 080800 M24      SCD203I REP PRDKPLW4 ELIGIBLE FOR PROCESSING
 080800 122330 080800 M18      SCD203I REP GPLIR17A ELIGIBLE FOR PROCESSING
 080800 122330 080800 M24      REP267I PRDKPLW4 PRDKPLW4/JOB04800 DECOLLATION
                                       FROM SPOOL STARTED
 080800 122359 080800 M24      REP251I REP PRDKPLW4 PRDKPLW4/JOB04800
                                       DECOLLATION ENDED "OK"
 080800 122359 080800 M24      SCD208I REP PRDKPLW4 PROCESSING ENDED "OK"
 080800 124634 080800 GENERAL  CTD049I MISSION PROCESSING STARTED
 +----------------------------------------------------------------------------+
 |                                                                            |
 |     ENTER ENTER                     PF13  HELP                             |
 |     PF01  HELP                      PF14  SHOW                             |
 |     PF02  SHOW                      PF15  END                              |
 |     PF03  END                       PF16  RESET                            |
 |     PF04  RESET                     PF17  FIND                             |
 |     PF05  FIND                      PF18  =6                               |
 |     PF06  =6                        PF19  UP                               |
 |     PF07  UP                        PF20  DOWN                             |
 |     PF08  DOWN                      PF24  SHPF                             |
 |     PF12  RETRIEVE                                                         |
 +----------------------------------------------------------------------------+
If you type text in the COMMAND field and press a PFKey, the text in the COMMAND field is treated as a subparameter of the command assigned to the PFKey.
Two additional key definitions are:
Table 16 Additional Key Assignments
|
Key |
Description |
|---|---|
|
PA1 |
ABORT (forced exit). |
|
PA2 |
Under native TSO and ROSCOE, the first time you press this key, the screen is refreshed. The second consecutive time, a copy of the screen is sent to be printed (or to a file) via DD statement PRTDBG. (For terminal models supporting PA3, PA3 is defined in exactly the same way as PA2.) When the IOA Online facility is activated as an ISPF application, PA2 is controlled by ISPF and only refreshes the screen. For information on printing the screen, see IOA Under ISPF. Under other online environments (CICS, VTAM, and so on), PA2 serves as a refresh only. Usually one of the PA keys is assigned a local print function. |
For information on changing IOA PFKey definitions, see the appendix in the INCONTROL for z/OS Administrator Guide, which deals with modifying IOA Online Facility Commands.
Scrolling Commands
IOA scrolling conventions are very similar to IBM’s ISPF conventions. Two basic commands are used for scrolling:
|
Command |
PFKey |
Description |
|---|---|---|
|
UP |
(PF07/PF19) |
Scroll up (backward) |
|
DOWN |
(PF08/PF20) |
Scroll down (forward) |
The commands can be specified by typing the command in the COMMAND field or by pressing the predefined PFKey.
The scrolling amount is determined by the content of the SCROLL field in the right corner of the screen header. Valid scrolling amounts are:
Table 17 Scrolling Amounts in the SCROLL Field
|
Scrolling Amount |
Description |
|---|---|
|
PAGE |
Scroll a full page. |
|
HALF |
Scroll a half page. |
|
CRSR |
Scroll by cursor position. If the cursor is outside the data area, a full page is scrolled. |
|
MAX |
Scroll maximum available (for example, UP MAX scrolls to the top). |
It is only necessary to type the first letter of the new amount in the SCROLL field in order to change the scrolling amount.
A scrolling amount other than that shown in the SCROLL field can be used by specifying the amount directly after the scroll command itself, or by specifying the scroll amount in the COMMAND field and pressing the appropriate scrolling PFKey. The scrolling amount in the SCROLL field remains unchanged.
If PAGE is the value in the SCROLL field, to scroll to the bottom, type M (MAX) in the COMMAND field and press PF08/PF20 (DOWN).
LOCATE Command
The LOCATE command, and its abbreviation, L, can be used to search for items in the NAME field in all "directory type" screens that contain scrollable data, such as the Calendar List screen. The syntax of the command is
LOCATE string
where string is the search string. Apostrophes (‘single quotes’) or quotation marks ("double quotes") are not required.
The search proceeds from the top of the list to the first item in the list that starts with the specified string. The cursor is positioned on the OPTION field at the beginning of the line containing the string, if found, or on the OPTION field of the alphabetically closest preceding value if the specified value is not found.
FIND Command
The FIND command, and its abbreviation, F, can be used in all screens that contain scrollable data to find and display the next occurrence of a character string. The syntax of the command is
FIND string [fromcol] [tocol] [PREV]
where
-
stringis the search string
Mandatory. -
fromcolis the first column in the search range
Optional. -
tocolis the last column in the search range
Optional.
PREV is the indicator that the search must move backward, instead of forward, from the current cursor position
Optional.
General Rules
If the string contains blanks, enclose the string with apostrophes (‘single quotes’) or quotation marks ("double quotes"). For example:
FIND 'WAIT SCHEDULE'The column range searched can be limited by entering fromcol or tocol values, or by entering both fromcol and tocol values.
The search for the string proceeds from the current cursor position forward, or backward if PREV is entered. If the string is found, the cursor is positioned at the start of the string.
To repeat the find, to the next or previous occurrence of the string, press PF05/PF17.
The following situations outline where the FIND command can, or should, be further modified to enhance its functionality.
-
Some screens enable the user to limit the number of lines searched by a FIND command. This is discussed in the relevant screen descriptions.
-
In some screens, the FIND command does not detect information that is to the right or left of the information displayed in the monitor. To ensure detection of the desired string, the screen must be displayed in wraparound mode, when available, before executing the FIND command.
Text String Searches
The FIND command can also be used to search for text strings, in which case the command finds all instances of the string, regardless of whether the characters within the string are lowercase, uppercase, or mixed case. To search for a text string, include the letter T immediately before a quoted string.
FIND T'WAIT SCHEDULE'finds WAIT SCHEDULE, and it also finds wait schedule, and Wait Schedule, and any other case variant.
Text string searches are the default. If your system default is for text strings, You do not need to include the T if you perform a text string search. Your INCONTROL administrator can change the default to character string. In this case you do not need to include the C if you perform a character string search.
Character String Searches
The FIND command can be used to search for character strings, in which case the command finds all instances of the string, but only where the string contains characters that match the case specified. To search for a character string, include the letter C immediately before a quoted string.
FIND C'WAIT SCHEDULE'finds WAIT SCHEDULE, but it does not find wait schedule, or Wait Schedule, or any other case variant.
CANCEL and RESET Commands
CANCEL and RESET commands are specified in the COMMAND field.
The CANCEL command cancels changes made in a definition screen, such as the IOA Calendar Definition screen, and exits the screen.
The RESET command (PF04/PF16) cancels Edit environment options specified in a definition screen. It does not cancel changes already made and it does not exit the screen or cancel Edit environment mode. For more information about the Edit environment, see Editing Mission Definitions in the IOA Edit Environment.
The RESET command (PF04/PF16) can also be used in most windows, for example, the IOA Log Show Screen window, to cancel changes and close the window.
Online Help
The following types of online help are available for INCONTROL screens:
Screen help
Provides information about the entire screen. This help is available on all INCONTROL screens and is accessed by pressing the HELP key (PF01/PF13) while the cursor is positioned on the COMMAND field in the screen.
Line-Sensitive help
Provides information about the fields on a particular line on a screen. This help is available on several INCONTROL screens. It is accessed by pressing the HELP key (PF01/PF13) while the cursor is positioned on the desired line of the screen.
If line-sensitive help is not supported in a screen, pressing the HELP key (PF01/PF13) from anywhere in the screen displays the beginning of the Help panel.
Figure 13 IOA Help Screen
  ----------------------------- IOA HELP SCREEN -------------------- (CTMHDT2 )
  COMMAND ===>                                                  SCROLL===> CRSR

    Calendar List Screen
    ====================

    The Calendar List screen displays a list of calendars (members) in the
    specified library. This screen can be entered directly from the entry
    panel or upon exiting the Year List screen.

    By default, only calendar names are listed in the screen. However, if
    the default has been modified at time of installation, statistical
    information is displayed for each calendar name.

    Use the scrolling PFKeys to scroll forward (PF08/PF20) and backward
    (PF07/PF19) on the Calendar List.

    To return to the entry panel, press END (PF03/PF15).


    Options of the Calendar List Screen
    -----------------------------------
    To request one of the following options, specify the option in the OPT
Help can be scrolled using standard scrolling conventions.
To return to the original screen, use the END command (PF03/PF15).
The Help member name appears on the right in the Help screen header. Members containing the Help descriptions can be found in the IOA MSG library.
IOA Under ISPF
The IOA Online facility can be activated as an ISPF application. As such, it can work in ISPF split screen mode like any other ISPF application.
WARNING: Multiple calls to the IOA ISPF interface can be performed in ISPF split screen mode as long as all invocations are for the same IOA environment. Otherwise, the results may be unpredictable.
The command line of the IOA Online facility is controlled by IOA. It is not possible to enter ISPF commands in an IOA screen. Two ISPF commands must be defined to PFKeys:
Table 18 ISPF Command Definitions for PFKeys
|
Command |
PFkey |
|---|---|
|
SPLIT |
(usually PF02/PF14) |
|
SWAP |
(usually PF09/PF21) |
The rest of the PFKeys are controlled by IOA PFKey definitions, which are in the IOA PARM library.
It is possible to assign TSO/ISPF commands such as PRINT to PFKeys, or to change PFKey definitions by performing the following steps:
-
Exit from IOA and ISPF to the READY prompt.
-
Type the following command and press Enter:
CopyISPSTART PANEL(ISR@PRIM) NEWAPPL(CTM)This command brings you to ISPF.
-
Type the KEYS command and press Enter. A set of key definitions is displayed.
-
Modify the key definitions as desired and exit from ISPF.
ISPF KEY definitions for the following ISPF commands take precedence over IOA PFKey definitions: SPLIT, SWAP, KEYS, PRINT, PFSHOW. For example, if PF02 is defined as SPLIT in ISPF, an IOA definition for PF02 is ignored in online screens. ISPF KEY definitions for the following ISPF commands take precedence over IOA PFKey definitions: SPLIT, SWAP, KEYS, PRINT, PFSHOW. For example, if PF02 is defined as SPLIT in ISPF, an IOA definition for PF02 is ignored in online screens. For all other ISPF commands, such as UP or DOWN, the key definitions in ISPF are ignored and the PFKey is interpreted according to the definition in the IOA Online facility.
Under ISPF, IOA Option 6 activates the Online Utilities panel, described in IOA Online Utilities Menu. For more information about these utilities, see the INCONTROL for z/OS Utilities Guide.
For more information on changing IOA PFKey definitions, see the appendix in the INCONTROL for z/OS Administrator Guide that deals with modifying IOA Online Facility Commands.
IOA Editor
The IOA Editor enables you to edit members of a partitioned dataset (PDS) using an editor similar to the ISPF editor. Enter EDMEM in the command line of any screen to display the Edit Entry Panel window, as shown in Figure 14.
Figure 14 IOA Editor Edit Entry Panel
---------------------       IOA PRIMARY OPTION MENU       ------------------(1)
OPTION ===>                                               USER        N06

IOA                          CONTROL-D/V               CONTROL-O

  4  COND/RES                A  MISSION STATUS         OR  RULE DEFINITION
  5  +--------------------------------------------------------------+ICS
  6  |                     EDIT ENTRY PANEL                         |
  7  |                                                              |LOG
  8  | LIBRARY ==>                                                  |OPTS
 IV  |                                                              |US
     | MEMBER  ==>                                                  |R
     |                                                              |
     | FILL IN PARAMETERS AND PRESS ENTER TO CONTINUE OR PF3 TO EXIT|
CONTR|                                                              |
     +--------------------------------------------------------------+
  2  JOB SCHEDULE DEF       BB  BALANCING STATUS       TR  RULE DEFINITION
  3  ACTIVE ENV.            BM  MISSION DEF            TP  POOL DEFINITION
  C  CMEM DEFINITION        BV  DB VARIABLE DEF        TV  VAULT DEFINITION
                            BR  RULE DEFINITION        TI  INQ/UPD MEDIA DB
                            BA  RULE ACTIVITY          TC  CHECK IN EXT VOL


COMMANDS:  X - EXIT, HELP, INFO  OR CHOOSE A MENU OPTION               19.12.05
To create a new member or edit an existing member, fill in the LIBRARY and MEMBER parameters and press Enter. The IOA Editor screen is opened for editing, as shown in Figure 15.
If the member already exists in the specified library, the member is displayed for editing in the IOA Editor. Similarly, if you accessed the IOA Editor screen from line option J in either screen 2 or screen 3, the member in the library referred to in the schedule definition member is displayed for editing.
Figure 15 IOA Editor
----------------------------  I O A   E D I T O R   ------------------- (EDMEM)
COMMAND ===>                                                    SCROLL===> CRSR
ROW     PROD.V610.DEMO(TEST)                                        COL 001 072

......
......
......
......
......
......
......
......
......
......
************************ B O T T O M  O F  D A T A **************************


OPTIONS:  I INSERT  D DELETE  R REPEAT  C COPY  M MOVE  UC/LC UPPER/LOWER CASE
IOA Editor PFKey Functions
While working within the IOA Editor, PFKeys perform the functions shown in Table 19:
Table 19 PFKey Functions Within the IOA Editor Screen
|
PFKeys |
Description |
|---|---|
|
PF01/PF13 |
Activates online help. |
|
PF02/PF14 |
Saves the current member. |
|
PF03/PF15 |
Terminates the editing session. If the edited member has been changed the member is saved automatically. |
|
PF04/PF16 |
Cancels the editing session without saving changes. |
|
PF05/PF17 |
Invokes the Find facility. |
|
PF07/PF19 |
Scrolls forward. |
|
PF08/PF20 |
Scrolls backward. |
|
PF10/PF22 |
Scrolls left. |
|
PF11/PF23 |
Scrolls right. |
Commands of the IOA Editor Screen
Table 20 describes editing commands that can be executed by entering the command in the COMMAND line.
Table 20 IOA Editor Command Line Commands
|
Command |
Description |
|---|---|
|
SAVE |
Saves all new data without terminating the edit session. |
|
CANCEL |
Terminates the edit session without saving new data. |
|
COPY |
Enables you to import a member from a specific library. |
Table 21 describes editing commands that can be executed by entering the command in the leftmost position of the applicable row.
Table 21 IOA Editor Row Commands
|
Command |
Description |
|---|---|
|
I |
Inserts a new line below the current line. |
|
D |
Deletes the current line. |
|
R |
Repeats the current line. |
|
C |
Identifies the source line for a copy operation. |
|
M |
Identifies the source line for a move operation. |
|
A |
Identifies the destination of a copy or move operation. |
|
B |
Identifies the destination of a copy or move operation. |
|
LC |
Changes text in a line from uppercase to lowercase. To change text in more than a single line to lowercase, enter LCnn, where nn indicates the number of lines to be changed to lowercase. |
|
UC |
Changes text in a line from lowercase to uppercase. To change text in more than a single line to uppercase, enter UCnn, where nn indicates the number of lines to be changed to uppercase. |
IOA SET Command Panel
The IOA SET Command Panel enables you to set and stop TRACE levels, choose the language that is used in online screens and to set a dollar sign representation that will be used in online screens for system variables of type %%$VAR. Enter SET in the command line of any screen to display the SET Command Panel window, as shown in Figure 16.
Figure 16 IOA SET Command Panel
+-----------------------------------------------------------------------------------+
|                        SET Command Panel                                          |
|                                                                                   |
|                                                                                   |
|  TRACE level     , ON  (Trace level 001-512, ON or OFF)                           |
|                                                                                   |
|                                                                                   |
|    LANGUAGE              ENG - English                                            |
|                                      FRA - French                                 |
|                                      GER - German                                 |
|                                      JPN - Japanese                               |
|                                                                                   |
|                                                                                   |
|    SPECIAL CHARACTERS: Dollar     Current representation is "$"(X'5B')            |
|                                                                                   |
|                                                                                   |
| FILL IN PARAMETERS AND PRESS ENTER TO CONTINUE OR PF3 TO EXIT                     |
|                                                                                   |
+-----------------------------------------------------------------------------------+
The process of setting TRACE levels and turning off a particular TRACE, and the process of setting language preferences for online screens and messages, begins in the SET Command Panel.
Using the SET Command Panel to set and end TRACE levels
Setting the TRACE level can help you monitor certain IOA Online facility and INCONTROL functions, such as security checks.
The following steps explain how to set or turn off a TRACE level:
-
Type a TRACE level number, from 1 through 256, in the TRACE LEVEL field of the SETCommand Panel.
-
In the (Trace level 1-256, ON or OFF) field, type ON to set a TRACE level, or OFF to turn off a TRACE level.
-
Press Enter to confirm the setting, in which case the following message is displayed:
CopyCTMA2AI TRACE LEVEL nnn WAS SET xxxwhere
-
nnn is the TRACE level number
-
xxx indicates whether the TRACE level was set ON or turned OFF
-
TRACE level settings take effect immediately.
Using the SET Command Panel to set a dollar sign representation
Setting the dollar sign representation influences how System variables are shown in online screens.
The following steps explain how to set the dollar sign representation:
-
Type a $ character in the Dollar field using your keyboard.
-
Press Enter to confirm the setting, in which case the following message is displayed:
CopyCTMA2DI THE NEW DOLLAR REPRESENTATION IS "c"(X'yy')where
-
c is $ character you set
-
yy is the EBCDIC hexadecimal code for $
-
There are differences in the EBCDIC hexadecimal code for the $ (dollar sign) character on keyboards that have been adapted to show local or national symbols.
Using the SET Command Panel to set language preferences
Setting the LANGUAGE influences the online screens and messages in subsequent sessions.
The following steps explain how to set language preferences:
-
In the LANGUAGE field, type one of the following sets of characters to select a language preference:
-
ENG, to set English as the preferred language
-
FRA, to set French as the preferred language
-
GER, to set German as the preferred language
-
JPN, to set Japanese as the preferred language
-
-
Press Enter to confirm the setting, in which case the following message is displayed:
CopyCTMA27I THE NEW LANGUAGE WILL BE USED FROM THE NEXT LOGON TO IOA
Language preference settings do not take effect until your next logon to the system.
IOA TSO Command Processor Screen
The IOA TSO Command Processor screen can be entered only when the IOA Online facility is activated as a TSO application. It cannot be entered when the IOA Online facility is activated as an ISPF application or activated under a non-TSO environment.
The TSO screen enables activation of any TSO command without exiting the IOA Online facility. For example, a typical program activated under the TSO screen is ISPF. Therefore, all ISPF/PDF facilities and functions (such as editing a member or scanning job output) can be activated while you are working under the IOA Online facility.
To activate a TSO command, type the command in the COMMAND field and press Enter.
Figure 17 IOA TSO Command Processor Screen
 -------------------------- IOA TSO COMMAND PROCESSOR ----------------------(6)
 COMMAND ===>


 PLEASE ENTER TSO COMMAND                                              15.32.52
CLISTs cannot be activated from the TSO screen. To activate a CLIST, first activate ISPF and then execute the CLIST under ISPF.
TSO commands can also be activated directly from any online screen by typing TSO in the COMMAND field.
Transfer of Control Between the TSO Application and the IOA Online Facility
You can return to the IOA Online facility from the TSO application by simply exiting the TSO application in a normal manner. However, this method may be time consuming and inconvenient if an ISPF application or similar TSO application is activated.
If the TSO application can issue a TSO command, it is possible to transfer control to the IOA Online facility, and vice versa, without exiting the TSO application.
While working under the TSO application, for example, under ISPF, issue the command:
TSO CTMTTRA {n | =n}where n is the online screen number. The requested screen is displayed as it was when you transferred from it.
To return to the TSO application, use the =6 command (PF06/PF18). The application remaining in the same state as when you transferred from it.
It is recommended that you simplify transfer between screens by permanently assigning one of your PFKeys under ISPF (or SDSF, and so on) to the command TSO CTMTTRA. Once this key assignment is made, you no longer need to type the full transfer command. Instead, you merely type the IOA option number or code in the COMMAND field and press the assigned PFKey. You are transferred to the desired screen.
You must activate ISPF under the IOA Online facility if you want to use the control transfer feature.
Report Decollating Mission Definition Facility
The Control-V Report Decollating Mission Definition facility is composed of a series of screens that enable you to view, create, and modify report decollating missions and parameters.
Report decollating mission definitions under Control-V are stored in libraries (partitioned datasets). A library contains members (also referred to as jobs or report names), and each member contains categories of one or more mission definitions. A member generally contains decollating mission definition categories related to specific topics. When Control-M is installed and a member contains decollating mission definitions that process output from Control-M jobs, the member name should correspond to the jobname as defined in each of its decollating mission definitions. For mission definitions that process output from non-Control-M jobs, there is no such restriction for the member name. Although most sites designate a primary mission definition library, the number of mission definition libraries that you can use is unlimited.
Members contain mission definitions – not the JCL of the member. The number of members in a library, the number of mission definitions in a member, and the size of each mission definition, are all calculated dynamically and are not dependent on parameter specification or optional ZAPs.
Accessing the Report Decollating Mission Definition Facility
The Report Decollating Mission Definition facility contains the following screens:
Table 22 Report Decollating Mission Definition Facility Screens
|
Screens |
Definition |
|---|---|
|
Mission Definition entry panel |
Allows specification of parameters which determine which screen is displayed. |
|
Job List screen |
Displays the list of members in the specified library. |
|
Category List screen |
Displays the list of mission definitions in a specific job table. |
|
Mission Definition screen |
Displays the parameters of the selected mission definition. This screen is used to define, display and modify mission definition parameters. |
To enter the Report Decollating Mission Definition facility, select option R on the IOA Primary Option menu and press Enter. The entry panel is displayed.
Creating Members
Members can be created in any of the following ways:
-
By specifying the new member name in the entry panel and pressing Enter.
-
By using the SELECT command (described later) to specify the new member name in the Job List screen and pressing Enter.
As a result of using either of the above methods, a skeletal mission definition (that is, one with most fields not filled in) is displayed in the Mission Definition screen.
Fill in the blanks and save the screen entries. The member is created with the specified mission definition. The mission definition is the first and only definition in the Category list for the member. As additional mission definitions are created in the member (described below), they are added to the Category list.
Upon exiting the Category List screen, if changes were made in at least one mission definition, an Exit Option window is displayed. One field of the window displays the member name. This value can be changed to a new member name. This creates a new member in which the mission definitions are saved.
Creating Mission Definitions
Mission definitions can be created using two basic methods:
-
A skeletal mission definition can be created by specifying the name of a new mission definition in the entry panel. (The member specified in the entry panel can be either a new member or an existing member.) In this case, virtually all fields of the mission definition are empty.
-
A copy of an existing mission definition can be created using the INSERT option (described later) in the Category List screen. In this case, most fields of the new mission definition have the same values as the fields in the copied mission definition.
Performing Operations on Members and Mission Definitions
Many operations can be performed on members and on the mission definitions in them. These operations are performed using commands and options in the various screens of the Report Decollating Mission Definition facility.
Below is a brief summary of some of the major operations possible within the facility. Options and commands that have not yet been explained are explained in detail following the summary.
Accessing (Editing or Browsing) a Member and its Mission Definitions
A member (that is, the mission definitions in the member) can be browsed or edited.
When browsed, the member cannot be modified or updated. When the member is edited, new mission definitions can be added and existing mission definitions can be modified or deleted.
Browsing, however, has advantages:
-
Access and exit are quicker than in editing.
-
Mission definitions that are in use by another user can be viewed.
-
Access for browsing might be granted, even though access for editing might be denied due to site security requirements.
To browse a member (and its category list and mission definitions), use the BROWSE option in the Job List screen.
Specifying the job (member) name in the entry panel or using the SELECT option in the Job List screen provides edit access.
Depending on user profile definitions, if the table requested for editing is in use, either access is granted in Browse mode or access is not granted.
Copying a Mission Definition to Another Member
Mission definitions can be copied from one member to another using the COPY option in the Category List screen. For more information, see Copying Report Decollating Mission Definitions to Another Member.
Deleting a Member or a Mission Definition
Unneeded mission definitions can be deleted via the DELETE option in the Category List screen. For more information, see Options of the Category List Screen. Unneeded members can be deleted via the DELETE option in the Job List screen. For more information, see Deleting Members.
Ordering Multiple Members
More than one member at a time can be ordered at one time. To select multiple members, Tab down to each table in the Job List screen that you want to select and enter the letter "O" next to the desired member. Press Enter. A popup confirmation window appears that asks whether or not you want to view the confirmation window for each member.
If you choose not to view the confirmation screen before viewing each member (Confirm Y, Ask For Each One N), press Enter.
Saving Modifications
All changes made to a member and its mission definitions are kept in memory until the member is exited. Upon exiting the member, the user can choose to save or cancel the changes. For more information, see Exiting the Mission Definition Screen.
Entry Panel
To open the desired display, fill in Entry Panel fields LIBRARY, JOB, and CATEGORY as described below. Type Y (Yes) or N (No) in the SHOW SCHEDULING CRITERIA field to determine whether scheduling parameters appear when the Report Decollating Mission Definition screen is displayed.
Figure 18 Report Decollating Mission Definition Facility Entry Panel
 ------- CONTROL-D/V REPORT DECOLLATING MISSION DEFINITION ENTRY PANEL -----(R)
 COMMAND ===>
 SPECIFY LIBRARY, JOB/REPORT NAME, CATEGORY
  LIBRARY   ===> CTD.PROD.REPORTS
  JOB       ===>                      (Blank for job selection list)
  CATEGORY  ===>                      (Blank for category selection list)
  SHOW SCHEDULING CRITERIA ===> N     (Y/N)
 USE THE COMMAND "SHPF" TO SEE PFK ASSIGNMENT                          13.11.20
If you use the selection list fields, their values are not erased until you exit the entry panel by pressing END (PF03/PF15).
Displaying the list of members (jobs) in a library
-
Type the library name.
-
Leave the member (job) name blank or type the member (job) name using mask characters (* and ?).
-
Press Enter.
Displaying the list of mission definitions for a specific member
-
Type the library name.
-
Type the member name.
-
Press Enter.
If the member does not exist, the screen for defining a new mission definition in the member is displayed.
Displaying the details of a specific mission definition (Mission Definition screen)
-
Type the library name
-
Type the job (member) name.
-
Type the mission definition (category) name.
-
Press Enter.
If the member does not exist, or the mission definition for the specified member does not exist, the screen for defining a new mission definition in the member is displayed.
If you enter the screen for defining a new mission definition and want to leave the screen without defining a mission definition, use the CANCEL command.
Displaying the Search Window
-
Type the library name.
-
Type the mission definition (category) name.
-
Leave the member name blank or type the member name using mask characters (* or ?).
-
Press Enter.
Creating a new member
-
Type the library name.
-
Specify a new job (member) name.
-
Press Enter.
The Mission Definition screen, for defining the first mission definition in the new member, is displayed.
Search Window
The Search window allows the user to search for the specified mission definitions in members in the specified library. Members in which the mission definition have been found are then displayed in the Job List screen.
Figure 19 Report Decollating Mission Definition Facility Entry Panel Search Window
- CONTROL-D/V REPORT DECOLLATING MISSION DEFINITION FACILITY - ENTRY PANEL--(R)
COMMAND ===>
SPECIFY LIBRARY, JOB/REPORT NAME, CATEGORY
   LIBRARY   ===> CTD.PROD.SCHEDULE
   JOB       ===>                     (Blank for job selection list)
   CATEGORY  ===> CTVSAMPLE           (Blank for category selection list)
                                +-------------------------------------------+
                                |                                           |
                                |    PLEASE SELECT ONE OF THE FOLLOWING:    |
                                |                                           |
                                |    1  - STOP SEARCH IMMEDIATELY           |
                                |    2  - ASK AGAIN AFTER 000010 MEMBERS    |
SHOW SCHEDULING CRITERIA ===>   |    3  - UNCONDITIONAL SEARCH              |
                                |                                           |
                                |    NUMBER OF MEMBERS IN LIBRARY: 000015   |
                                |    NUMBER OF SEARCHED MEMBERS:   000000   |
                                |    NUMBER OF SELECTED MEMBERS:   000000   |
                                |                                           |
                                +-------------------------------------------+
USE THE COMMAND SHPF TO SEE PFK ASSIGNMENT                             12.11.54
To close the Search Window without performing any action, press END (PF03/PF15).
To perform a search, select one of the following choices and press Enter:
3 - UNCONDITIONAL SEARCHPerforms an uninterrupted search of all tables in the specified library.
The search is stopped immediately when you select option 1.
2 - ASK AGAIN AFTER number MEMBERSSearches the specified number of members in the specified library, and then pauses. The search number can be modified. Default:10.
-
Continue the search by pressing Enter.
-
Stop the search by selecting option 1 (Stop Search Immediately).
If any members are found, the Job List is displayed listing those members.
During the search, the following information is displayed at the bottom of the window:
-
Number of members in library. Lists the total number of members in the specified library.
-
Number of searched members. Lists the cumulative number of members searched. For example, if you perform three searches with a specified number of 10, the figure displayed is 30.
-
Number of selected members. Lists the cumulative number of members selected that contain the mission definition being searched.
If any members are selected during the search, the Job List is displayed listing those members. If no members are selected, the Search Window is closed and a message is displayed.
Report Decollating Mission Definition – Job List
The screen displays the list of members in the specified library. This screen can be entered directly from the entry panel or upon exiting the Category List screen.
By default, only member names are listed in the screen. However, if the default has been modified at time of installation, statistical information is displayed for each member name (as shown in Figure 20).
Figure 20 Report Decollating Mission Definition Facility Job List Screen
  LIST OF JOBS LIB: CTD.PROD.REPORTS                           ----------------
  COMMAND ===>                                                  SCROLL===> CRSR
  OPT  NAME ------------ VV.MM  CREATED     CHANGED     SIZE  INIT   MOD   ID
       PRDKPL01          01.00 00/08/08 00/08/08 16:54    18    18     0 M04B
       PRDKPL02          01.00 00/08/08 00/08/08 16:54    20    20     0 M04B
       PRDKPLW1          01.01 00/11/24 00/11/24 12:17     9     9     0 M35A
       PRDKPLW2          01.00 00/06/30 00/06/30 09:54    12    12     0 V309
       PRDKPLW3          01.02 00/11/22 00/11/22 11:04     6     6     0 M72
       PRDKPLW4          01.01 00/11/27 00/11/27 13:33     8     8     0 M18C
       PRDLRPT1          01.00 00/04/17 00/04/17 00:50    70    70     0 O01
       PRDLRPT2          01.00 00/04/17 00/04/17 00:50   180   180     0 O01
       PLRPT010          01.00 00/04/17 00/04/17 00:50    41    41     0 O01
       PRODYALT          01.00 00/04/17 00/04/17 00:50     5     5     0 S07
       PRODYHST          01.00 00/04/17 00/04/17 00:50     9     9     0 S07
       PRODYJCL          01.00 00/04/17 00/04/17 00:50    14    14     0 S07
       PRODYRPT          01.00 00/04/17 00/04/17 00:50     5     5     0 S07
       QNTR0001          01.01 00/11/24 00/11/24 12:17     9     9     0 M35A
       QNTR0002          01.00 00/06/30 00/06/30 09:54    12    12     0 V309
       RBDMM4D           01.02 00/11/22 00/11/22 11:04     8     6     0 M72
       RTUPDT            01.01 00/11/27 00/11/27 13:33     8     8     0 M18C
       STPRQV            01.00 00/04/17 00/04/17 00:50    70    70     0 O01
       TRUPDOLV          01.00 00/08/08 00/08/08 16:54    18    18     0 M04B
       UPLIR17A          01.00 00/08/08 00/08/08 16:54    20    20     0 M04B
  OPTIONS:  S SELECT   O ORDER   F FORCE   B BROWSE   D DELETE         14.39.49
To scroll down the Job list, press PF08/PF20. To scroll up the Job list, press PF07/PF19.
To return to the entry panel, press END (PF03/PF15).
Options of the Job List Screen
To request one of the following options, specify the option in the OPT field to the left of the member names and press Enter:
Table 23 Options of the Job List Screen
|
Option |
Description |
|---|---|
|
S (SELECT) |
Display the list of mission definitions of the member for any purpose, including editing and modification. Only one member can be selected at a time. |
|
O (ORDER) |
Order all the mission definitions of the member, provided that their basic scheduling criteria (discussed later in this chapter) are met. Multiple members can be ordered. |
|
F (FORCE) |
Order all the mission definitions of the member, regardless of their basic scheduling criteria (discussed later in this chapter). Multiple members can be forced. |
|
B (BROWSE) |
Display a list of mission definitions of a member for browsing. Only one member can be browsed at a time. |
|
D (DELETE) |
Delete the member from the library. Multiple members can be deleted. |
The INCONTROL administrator can authorize specific users to access only the Browse option.
Deleting Members
To delete members specify option D in the OPT field to the left of the members to be deleted and press Enter.
The following confirmation window is displayed, in sequence, for each member selected for deletion.
Figure 21 Report Decollating Mission Definition Facility Delete Members Confirmation Window
  LIST OF JOBS LIB: CTD.PROD.REPORTS                           ----------------
  COMMAND ===>                                                  SCROLL===> CRSR
  OPT  NAME ------------ VV.MM  CREATED     CHANGED     SIZE  INIT   MOD   ID
       ACCTNG01          01.00 00/08/08 00/08/08 16:54    18    18     0 M04B
       ACCTNG02          01.00 00/08/08 00/08/08 16:54    20    20     0 M04B
       ACCTNGW1               +--------------------------+
       ACCTNGW2               |   CONFIRM DELETE OPTION  |
   D   ACCTNGW3   <-----------|               (Y/N)      | 6     6     0 M72
       ACCTNGW4               +--------------------------+ 8     8     0 M18C
       ADMINST1          01.00 00/04/17 00/04/17 00:50    70    70     0 O01
       ADMINST2          01.00 00/04/17 00/04/17 00:50   180   180     0 O01
       PERSNL10          01.00 00/04/17 00/04/17 00:50    41    41     0 O01
   D   PERSNLDK          01.00 00/04/17 00/04/17 00:50     5     5     0 S07
       PERSNLST          01.00 00/04/17 00/04/17 00:50     9     9     0 S07
       PRODTNCL          01.00 00/04/17 00/04/17 00:50    14    14     0 S07
       PRODTNTL          01.00 00/04/17 00/04/17 00:50     5     5     0 S07
   D   RESTOR01          01.01 00/09/25 00/09/25 12:17     9     9     0 M35A
       RESTOR02          01.00 00/06/30 00/06/30 09:54    12    12     0 V309
       SALES4D           01.02 00/09/22 00/09/22 11:04     8     6     0 M72
       SALEST            01.01 00/09/26 00/09/26 13:33     8     8     0 M18C
       SALESV            01.00 00/04/17 00/04/17 00:50    70    70     0 O01
       TRAIN001          01.00 00/08/08 00/08/08 16:54    18    18     0 M04B
       TRAIN001          01.00 00/08/08 00/08/08 16:54    20    20     0 M04B
OPTIONS: S SELECT O ORDER F FORCE B BROWSE D DELETE 14.39.49-
Enter Y (Yes) in the window to confirm the delete request.
-
Enter N (No) in the window to cancel the delete request.
If PDSMAN is operational at your site, $$$SPACE members are not deleted.
A message is written to the IOA Log file for each member deleted.
Report Decollating Mission Definition – Category List
The screen displays the list of mission definitions of a member in a specified library. This screen can be entered directly from the Report Decollating Mission Definition entry panel or the Job List screen, or upon exiting the Mission Definition screen.
If the S (Select) option was specified in the Job List screen for a member that is currently in use (selected) by another user, then either the Category List screen is not displayed and the Job List screen remains displayed (the default), or the Category List screen is displayed in Browse mode (if a User profile definition overrides the default). In either case, an appropriate message is displayed.
Figure 22 Report Decollating Mission Definition – Category List Screen
 CATEGORIES OF LIB CTD.PROD.REPORTS                               JOB: PLRPT010
 COMMAND ===>                                                   SCROLL===> CRSR
 OPT  NAME --------------------------------------------------------------------
      DAILY                  INVENTORY AND EMPLOYEE REPORTS - DAILY
      MONTHLY                INVENTORY AND EMPLOYEE REPORTS - MONTHLY
  ====== >>>>>>>>>>>>>>  NO MORE CATEGORIES FOR THE JOB <<<<<<<<<<<<<<<<< =====


 OPTIONS:  S SELECT   D DELETE   I INSERT   O ORDER   F FORCE          13.43.00
Use the scrolling conventions to scroll forward and backward through the Category list.
Format of the Category List Screen
Next to each mission definition name in the Category list, certain information can be displayed. The type and format of this information depends on whether the screen is displayed in DESC format or in STAT format:
-
In DESC format, the mission definition’s description, taken from the DESC field of the mission definition, is displayed. Default.
-
In STAT format, the mission definition’s ISPF statistical information is displayed.
By default, the Category list is displayed in DESC format. To change formats, use the DESC or STAT commands, described in Table 24.
Commands of the Category List Screen
The following commands can be specified in the COMMAND field of the Category List screen.
Table 24 Commands of the Category List Screen
|
Command |
Description |
|---|---|
|
DESC |
Command DESC displays the mission definition’s description next to the mission definition name. The description is taken from the DESC field in the mission definition. |
|
STAT |
Command STAT displays the following ISPF-like statistical information about the mission definition next to the mission definition name: Version and modification numbers, creation date, last modification date, and user ID |
Options of the Category List Screen
To request one of the following options, specify the option in the OPT field to the left of the mission definition name and press Enter:
If the Category List screen is displayed in Browse mode, options D (Delete) and I (Insert) are not available.
Table 25 Options of the Category List Screen
|
Option |
Description |
|---|---|
|
S (SELECT) |
Display the Report Decollating Mission Definition screen, which contains decollating parameters of the specific mission definition. If the Mission Definition screen is not displayed in Browse mode, the decollating parameters can be edited and updated. If the Mission Definition screen is displayed in Browse mode, the decollating parameters can only be browsed; they cannot be modified. |
|
D (DELETE) |
Delete a mission definition from the Category list. |
|
I (INSERT) |
Insert a new mission definition in the List. The Mission Definition screen appears, with the same details of the mission definition marked "I", but the CATEGORY and DESCRIPTION parameters are empty for you to fill in. The new mission definition is added after the mission definition marked "I". |
|
O (ORDER) |
Order a mission definition of a member based on the basic scheduling criteria. For more information, see Basic Scheduling Parameters. |
|
F (FORCE) |
Force a mission definition order regardless of its basic scheduling criteria. For more information, see Basic Scheduling Parameters. |
|
C (COPY) |
Copy the mission definition to another member (as described in Copying Migration, Printing, Backup, Restore Mission Definitions to another Member). Multiple mission definitions can be copied. |
Report Decollating Mission Definition Screen
This screen is used to define, display and modify decollating parameters of the reports of a specific mission definition. This screen can be entered directly from the Report Decollating Mission Definition entry panel or from the Category List screen. Update of parameters is not permitted in Browse mode.
Control-V indexing instructions are included in the decollating parameters.
Decollating parameters take up more than one screen. Use the scrolling conventions to scroll the decollating parameters forward and backward.
For a detailed explanation of the decollating parameters, refer to Decollating Mission Parameters.
Parameters marked in this documentation with the symbol M can have many occurrences. Whenever you fill in the last occurrence of the parameter on the screen, Control-V adds a new empty occurrence of that parameter which you may fill in. The only limit to the number of occurrences is the region size available for the application.
To delete a parameter on the screen, simply erase it (press the EOF key or blank it out). If additional operations are required, Control-V issues appropriate instructions.
Report decollating mission parameters are divided into the following basic groups indicated on the following screen:
-
General parameters
-
Basic Scheduling parameters
-
Runtime Scheduling parameters
-
Post-processing parameters
-
Decollating parameters (including indexing instructions)
The groups are separated by a delimiter line.
The decollating parameters are organized in ON blocks. Each ON block contains decollating instructions for those reports that are defined in the ON statement.
Figure 23 Report Decollating Mission Definition Screen
  ----- CONTROL-D/V CATEGORY DAILY               JOB  M15ACC   ---------- (R.S)
  COMMAND ===>                                                  SCROLL===> CRSR
  +---------------------------------------------------------------------------+
    CATEGORY DAILY                  JOBNAME PLRPT10   GENERIC N  MONITOR 1
    OWNER    M22       TASKTYPE REP GROUP   PL-PRODUCTION        JOBID
    DESC     EMPLOYEE REPORTS
    DESC
    ===========================================================================
    DAYS                                                          DCAL
                                                                       AND/OR
    WDAYS   ALL                                                   WCAL
    MONTHS  1- Y 2- Y 3- Y 4- Y 5- Y 6- Y 7- Y 8- Y 9- Y 10- Y 11- Y 12- Y
    DATES
    CONFCAL          SHIFT   RETRO N MAXWAIT 00
    MINIMUM          PDS
    ===========================================================================
    IN PLRPT010-ENDED-OK         0909
    WHEN IN QUEUE Y CLS   TIME FROM      UNTIL      INTERVAL      PRIORITY
    DSN
    ===========================================================================
    OUT
     MSG ==== REPORT DECOLLATION FOR PLRPT010 ENDED NOTOK ====
    ===========================================================================
    DEF COPIES 01 LVL    USER UNIDENT              DEST          MAX COPIES 10
    ===========================================================================
    SET        = %%        =                                           C   CS
    ===========================================================================
    ON CLASS      = D         EXTWTR               DEST          FORM
    PRT COPIES    LVL    USER                      DEST          MAX COPIES
        PRINT/CDAM PARMS =
    WHEN LINE 00001 - 00001 COL 00014 - 00046 PRINT   REF NXT N CT     AND/OR O
         STRING = E M P L O Y E E S    R E P O R T
    DO INDEX   = EMNUM                M   R   G   LINE +00000 COL 00011 - 00014
          MASK = ####                 RC Y LINE 00002 - 00060 COL 00011 - 00014
    02 SUBINDX = EMPNAME              M   LVL 02  LINE +00000 COL 00016 - 00035
          MASK = *                    RC Y LINE 00002 - 00060 COL 00016 - 00035
    03 SUBINDX = EMPGRADE             M   LVL 03  LINE +00000 COL 00037 - 00040
          MASK = ####                 RC Y LINE 00002 - 00060 COL 00037 - 00040
       SUBINDX =                      M   LVL     LINE        COL       -
          MASK =                      RC   LINE       -       COL       -
    ===========================================================================
                              INDEX LEVEL DISPLAY
      EMPNUM / EMPNAME / EMPGRADE
    ===========================================================================
    DO USER    = *                         LVL    LINE        COL 00064 - 00074
                            S N T         SYNONYM =       CONCAT =
    DO NAME    = EMPLOYEES REPORT
    DO MIGRATE  = MIG005Y
    DO
    WHEN LINE       -       COL       -       PRINT   REF NXT   CT     AND/OR
         STRING =
  ====== >>>>>>>>>> END OF JOB/REPORT PARAMETERS FOR THIS CATEGORY <<<<<<< ====
  FILL IN REPORT DEFINITION. CMDS: EDIT, SCHED, SHPF, PATH             12.32.12
CAPS Command
By default, all entries of lowercase characters in the Report Decollating Mission Definition screen are converted and saved as uppercase. You can use the CAPS OFF command to enable certain fields to accept and save lowercase entries.
Valid formats of the CAPS command are:
Table 26 CAPS Command Formats
|
Command |
Description |
|---|---|
|
CAPS |
Indicates whether CAPS ON or CAPS OFF mode is active. |
|
CAPS ON |
Forces all user entries to be displayed in uppercase characters, regardless of the case in which they were entered. Default. |
|
CAPS OFF |
Enables user entries in certain parameters to be entered, saved, and displayed in lowercase. |
The CAPS OFF command is available only for the following parameters and subparameters:
Table 27 Parameters and Subparameters Accepting Lowercase Values
|
Parameter |
Description |
|---|---|
|
DO NAME |
All values can be entered and retained in lowercase. |
|
DO REMARK |
All values can be entered and retained in lowercase. |
|
DO REMARK2 |
All values can be entered and retained in lowercase. |
|
DO REMARK3 |
All values can be entered and retained in lowercase. |
|
DO INDEX |
All values of the MASK subparameter can be entered and retained in lowercase. |
|
SET |
All values of the %%VAR subparameter for user-defined variables can be entered and retained in lowercase. |
|
DO SET |
All values of the %%VAR subparameter for user-defined variables can be entered and retained in lowercase. |
|
PRINT/CDAM PARMS |
All values of the XMLSEP subparameter can be entered and retained in lowercase. |
|
WHEN LINE |
All values of the STRING subparameter can be entered and retained in lowercase. |
|
WHEN VAR |
All values of the STRING subparameter can be entered and retained in lowercase. |
When you first enter a decollation mission definition screen, the CTOD78I message is displayed with the current CAPS setting. The CTOD78I message is also displayed, with the current ON or OFF status, whenever you enter the CAPS command.
Display and Non-Display of Scheduling Criteria
When N has been entered in the SHOW SCHEDULING CRITERIA field of the Report Decollating Mission Definition entry panel, all General, Basic Scheduling, Runtime Scheduling and Post-processing parameters are hidden except the Category line of the General parameters. The SET lines of Decollating parameters are also hidden.
The Category line is displayed, followed by the decollating parameters.
Figure 24 Non-Display of Scheduling Criteria
 ------- CONTROL-D/V CATEGORY DAILY                JOB  PLRPT010 ---------(R.S)
 COMMAND ===>                                                   SCROLL===> CRSR
 +----------------------------------------------------------------------------+
   CATEGORY DAILY                     JOBNAME PLRPT010 GENERIC   MONITOR
   ===========================================================================
   DEF COPIES 01 LVL    USER UNIDENT              DEST          MAX COPIES
   ===========================================================================
   ON CLASS      = D         EXTWTR               DEST          FORM
   PRT COPIES 01 LVL 20 USER MGT                  DEST          MAX COPIES
       PRINT/CDAM PARMS =
   WHEN LINE 00001 - 00014 COL 00014 - 00046 PRINT Y REF NXT N CT N   AND/OR
        STRING = E M P L O Y E E S     R E P O R T
   DO NAME     = EMPLOYEES REPORT
   DO USER    = *                         LVL    LINE        COL 00064 - 00074
                           S N T         SYNONYM =       CONCAT =
   DO PRINT    = STD                                   MUST   =
   DO BACKUP   = BKP0007D
   DO
   WHEN LINE       -       COL       -       PRINT   REF NXT   CT     AND/OR
      STRING =
   DO
   ===========================================================================
   ON DSN        = DDNAME=PLREP4,PGMSTEP=PLRP0010
   PRT COPIES 01 LVL 20 USER MGT                  DEST          MAX COPIES
 FILL IN REPORT DEFINITION. CMDS: EDIT, SCHED, SHPF, PATH              11.42.50
When defining report decollating missions, it is customary to work with the scheduling criteria hidden.
SCHED Command
Typing SCHED (abbreviated SC) in the command line alternates between the display and non-display of the scheduling parameters (independent of the SHOW SCHEDULING CRITERIA field).
PATH Command
Command PATH can be entered on the command line of the Report Decollating Mission Definition screen to alternately hide or display the Index Level display. When the Index Level screen is displayed, each chain of indexes is listed when it is defined. By default, the Index Level screen is displayed.
The following screen illustrates the definition of four index paths.
Figure 25 Report Decollating Mission Definition Screen – Path Command
  ----- CONTROL-D/V CATEGORY CENSUS5             JOB  N54COPY  ---------- (R.S)
  COMMAND ===>                                                  SCROLL===> CRSR
  +---------------------------------------------------------------------------+
    CATEGORY ACCOUNT                JOBNAME CENSUS5   GENERIC    MONITOR
    ===========================================================================
    DO INDEX   = STATE                M   R   G   LINE +00001 COL 00004 - 00005
          MASK = @                    RC Y LINE 00001 - 00001 COL 00004 - 00005
    02 SUBINDX = COUNTY               M   LVL 02  LINE +00001 COL 00007 - 00025
          MASK =                      RC Y LINE       -       COL       -
    03 SUBINDX = CITY                 M   LVL 03  LINE +00001 COL 00027 - 00055
          MASK =                      RC Y LINE       -       COL       -
    04 SUBINDX = ZIPCODE              M   LVL 04  LINE +00001 COL 00031 - 00040
          MASK = #####-####           RC Y LINE 00001 - 00001 COL 00031 - 00040
    04 SUBINDX = STREET               M   LVL 04  LINE +00002 COL 00004 - 00023
          MASK =                      RC Y LINE       -       COL       -
    05 SUBINDX = BLDG_NO              M   LVL 05  LINE +00002 COL 00025 - 00038
          MASK =                      RC Y LINE       -       COL       -
    06 SUBINDX = APT_NO               M   LVL 06  LINE +00002 COL 00032 - 00037
          MASK =                      RC Y LINE       -       COL       -
    ===========================================================================
                              INDEX LEVEL DISPLAY
      STATE / COUNTY / CITY / ZIPCODE
      STATE / COUNTY / CITY / STREET / BLDG_NO / APT_NO
    ===========================================================================
    DO INDEX   = AREACOD              M   R   G   LINE +00004 COL 00004 - 00006
          MASK = ###                  RC Y LINE 00004 - 00004 COL 00004 - 00006
    02 SUBINDX = PHONE                M   LVL 02  LINE +00004 COL 00008 - 00015
          MASK = ###-####             RC Y LINE 00004 - 00004 COL 00008 - 00015
    02 SUBINDX = FAX                  M   LVL 03  LINE +00004 COL 00017 - 00024
          MASK = ###-####             RC Y LINE 00004 - 00004 COL 00017 - 00024
       SUBINDX =                      M   LVL     LINE        COL       -
          MASK =                      RC   LINE       -       COL       -
    ===========================================================================
                              INDEX LEVEL DISPLAY
      AREACOD / PHONE
      AREACOD / FAX
    ===========================================================================
  ====== >>>>>>>>> END OF JOB/REPORT PARAMETERS FOR THIS CATEGORY <<<<<<< =====
  FILL IN REPORT DEFINITION. CMDS: EDIT, SCHED, SHPF, PATH             12.32.12
General Parameters
General parameters describe the mission and specify the mission type, owner and group.
Figure 26 General Parameters
 ------- CONTROL-D/V CATEGORY DAILY               JOB  PLRPT010 ----------(R.S)
 COMMAND ===>                                                   SCROLL===> CRSR
 +----------------------------------------------------------------------------+
   CATEGORY DAILY                     JOBNAME PLRPT010 GENERIC N MONITOR
   OWNER    M22         TASKTYPE REP  GROUP   PL-PRODUCTION      JOBID
   DESC     INVENTORY AND EMPLOYEE REPORTS - DAILY
   DESC
   ===========================================================================
   DAYS
Table 28 General Parameters
|
Parameter |
Description |
|---|---|
|
CATEGORY |
Name of the report decollating mission parameters (for example, DAILY, MONTHLY, WORKDAY). |
|
JOBNAME |
Name of the job. |
|
GENERIC |
Yes/No indicator that specifies whether the mission is a regular or generic report decollating mission. |
|
MONITOR |
Control-D monitor that should decollate the job. |
|
OWNER |
ID of the user who requests Control-V services, for security purposes. |
|
TASKTYPE |
Type of task to be performed by Control-V. Currently, REP (report), CRP (cyclic report), and ERP (emergency report) are supported. |
|
GROUP |
Name of the group to which the mission belongs (for example, BACKUPS, RESERVATIONS, INVENTORY). |
|
JOBID |
JES job identification number of the job that created the report to be decollated. |
|
DESCH |
Description of the mission (free text). |
Basic Scheduling Parameters
Control-V Basic Scheduling parameters specify on what dates the mission is activated. The basic scheduling requirements are then checked. If they are satisfied, the mission is placed in the Active Missions file. However, the mission is not activated until its runtime scheduling and message/event criteria have been satisfied.
Using the Basic Scheduling parameters is optional. The SHOW SCHEDULING CRITERIA field of the Report Decollating Mission Definition entry panel manages the display of Basic and Runtime Scheduling parameters on the Report Decollating Mission Definition screen. It is also possible to control this feature from the Report Decollating Mission Definition screen. Type SCHED (or SC) on the command line and press Enter to alternate between display and non-display of the scheduling parameters.
Figure 27 Basic Scheduling Parameters
===========================================================================
DAYS                                                          DCAL
                                                                AND/OR
WDAYS   ALL                                                   WCAL
MONTHS  1- Y 2- Y 3- Y 4- Y 5- Y 6- Y 7- Y 8- Y 9- Y 10- Y 11- Y 12- Y
DATES
CONFCAL          SHIFT   RETRO N MAXWAIT 00
MINIMUM          PDS
===========================================================================
Table 29 Basic Scheduling Parameters
|
Parameter |
Description |
|---|---|
|
DAYS |
Days of the month to schedule the report decollating mission. |
|
DCAL |
DAYS calendar specification. |
|
AND/OR |
Conjunctional parameter that links parameters DAYS and WDAYS. |
|
WDAYS |
Days of the week to schedule the report decollating mission. |
|
WCAL |
WDAYS calendar specification. |
|
MONTHS |
Months to activate the report decollating mission. |
|
DATES |
Specific dates in the year to activate the report decollating mission. |
|
CONFCAL |
Name of a calendar used to confirm report decollating mission schedule dates. |
|
SHIFT |
Indicates if and when a report decollating mission should be scheduled when it fails confirmation by the CONFCAL calendar. |
|
RETRO |
Yes/No indicator that specifies whether or not the report decollating mission can be selected (retroactively) after the original scheduling date has passed. |
|
MAXWAIT |
Number of extra days within which to try to execute the report decollating mission if the date of the mission has passed. |
|
MINIMUM |
Minimum number of free tracks required by the library specified in parameter PDS. The mission is scheduled if the number of free tracks is less than the minimum.a |
|
PDS |
Name of partitioned dataset to be checked for free space. The mission is scheduled if the dataset has less than the minimum number of required free tracks specified in parameter MINIMUM.8 |
Runtime Scheduling Parameters
Runtime Scheduling parameters specify requirements that must be satisfied to execute the mission.
Figure 28 Runtime Scheduling Parameters
MINIMUM          PDS
===========================================================================
IN      PLRPT010-ENDED-OK    ODAT
WHEN IN QUEUE Y CLS   TIME FROM 0100 UNTIL 0630 INTERVAL 001  PRIORITY
DSN
===========================================================================
OUT
Table 30 Runtime Scheduling Parameters
|
Parameter |
Description |
|---|---|
|
INM |
Prerequisite conditions for the report decollating mission. |
|
WHEN IN QUEUE |
Indicator that specifies whether or not to look for the job in the output queue, and whether currently executing jobs are or are not included in the search. |
|
CLS |
Any valid non-held output class. If CLS is specified, a decollating mission does not start unless some output is currently in the specified class. |
|
TIME FROM/UNTIL |
Time limit for report decollating mission execution. |
|
INTERVAL |
Minimum length of time to wait between successive executions of cyclic report decollating missions. |
|
PRIORITY |
Report decollating mission priority in receiving Control-V services. |
|
DSN |
Dataset name identifiers that are common to many compressed datasets of the job. For detailed information, see DSN: Runtime Scheduling Parameter (Decollating Mission). |
Post-Processing Parameters
Post-processing parameters specify what to do when the mission finishes processing (OK or NOTOK).
Figure 29 Post-Processing Parameters
DSN
===========================================================================
OUT     PLRPT010-DECOLLATED  ODAT +
SHOUT WHEN NOTOK                                TO OPER2            URG R
MSG ==== REPORT DECOLLATION FOR PLRPT010 ENDED  N O T O K ====
SHOUT WHEN                                      TO                  URG
MSG
===========================================================================
DEF COPIES    LVL    USER                      DEST          MAX COPIES
Table 31 Post-Processing Parameters
|
Parameter |
Description |
|---|---|
|
OUTM |
Prerequisite conditions to be added and/or deleted when decollation finishes OK. |
|
SHOUTM |
Message to be sent to a specified destination in a specific situation. |
|
WHEN |
Specifies the situation in which to send the message. |
|
TO |
Destination of the message. |
|
URG |
Urgency of message. |
|
MSG |
The message (free text). Control-V system variables are supported. |
Decollating Parameters
Decollating parameters specify how to decollate the reports of the job.
Figure 30 Decollating Parameters
MSG
===========================================================================
DEF COPIES 01 LVL    USER CRDBANK              DEST          MAX COPIES 05
===========================================================================
SET        = %%        =                                           C   CS
===========================================================================
ON CLASS      = D         EXTWTR               DEST          FORM
Default Decollating Parameters
General default decollating parameters for report pages include:
Table 32 Default Decollating Parameters
|
Parameter |
Description |
|---|---|
|
DEF COPIES |
Default number of copies of the job’s reports to be printed. |
|
LVL |
Default level of a user (recipient) who should receive every unidentified page of the job’s reports. |
|
USER |
Default name of a user (recipient) who should receive every unidentified page of the job’s reports. |
|
DEST |
Default printing destination for the job’s report pages that are not identified in ON statements. Also used to activate extraction of original spool destination. |
|
MAX COPIES |
Maximum number of copies to be printed for the job’s reports unless specified in an ON....MAX COPIES statement. |
SET Statement
The SET statement assigns an initial value to a system variable that is used during this decollation process or a regular variable that can be used in this decollation mission.
===========================================================================
DEF COPIES 01 LVL    USER UNIDENT              DEST          MAX COPIES 10
===========================================================================
SET        = %%$MEMORY  =ABOVEBAR                                   C   CS
===========================================================================
ON CLASS = D EXTWTR DEST FORMONM Statement
The ON statement allows the decollation is to be carried out on the following criteria:
Table 33 ON Statement Subparameters
|
Subparameter |
Description |
|---|---|
|
CLASS |
Specified class name (held and non-held). |
|
DSN |
Specified compressed dataset’s compressed sysouts. |
|
MQ |
Executes an IBM Websphere® MQ message. |
|
SYSOUT |
Step and/or DD statement selection criteria, for example, a program or procedure step name, a DD name, or a class. |
|
SYSDATA |
Three system datasets of the job. |
|
SYSJCL |
JCL system dataset of the job. |
|
SYSLOG |
Syslog system dataset of the job. |
|
SYSMSG |
Execution messages system dataset of the job. |
|
TRNCLASS |
Displays the same fields as the CLASS subparameters with the addition of the CLIQUE subparameter, which identifies the Report Clique to be used for report transformation |
|
TRNDSN |
Displays the same fields as the DSN subparameter, with the addition of the CLIQUE subparameter, which identifies the Report Clique to be used for report transformation |
ON CLASS      = D         EXTWTR               DEST          FORM
PRT COPIES 01 LVL 20 USER MGT                  DEST          MAX COPIES 04
       PRINT/CDAM PARMS =
   ON SYSOUT     PGMSTEP PLRPT010 PROCSTEP           DDNAME PLRPT4   CLASS
   PRT COPIES 01 LVL 20 USER MGT                  DEST          MAX COPIES 06
   ON SYSLOG
   PRT COPIES 01 LVL 90 USER PRODCNTL             DEST          MAX COPIES 05
       PRINT/CDAM PARMS =
ON Statement Defaults
Each ON statement is followed by printing default parameters that apply to the reports defined under the ON statement.
Table 34 ON Statement Defaults
|
Subparameter |
Description |
|---|---|
|
PRT COPIES |
Default number of copies to print of the reports defined under the ON statement. |
|
LVL |
Default level of a user (recipient) who should receive every unidentified page of the reports defined under the ON statement. |
|
USER |
Default name of a user (recipient) who should receive every unidentified page of the reports defined under the ON statement. |
|
DEST |
Default printing destination of the unidentified pages of reports defined under the ON statement. Also used to activate extraction of original spool destination. |
|
MAX COPIES |
Maximum number of copies that can be requested to be printed of the reports defined under the ON statement (or in the User Report list). |
|
PRINT/CDAM PARMS |
Printing/CDAM parameters. This field overrides default CDAM parameters, such as PREFIX and UNIT. |
  ON CLASS      = X         EXTWTR               DEST          FORM
  PRT COPIES 01 LVL 20 USER MGT                  DEST RUR252   MAX COPIES
      PRINT/CDAM PARMS = PAGEDEF=ARI1,FORMDEF=IBM1
      PRINT/CDAM PARMS =
  WHEN LINE       -       COL       -       PRINT   REF NXT   CT     AND/OR
PRINT/CDAM Parameters
This field overrides default CDAM parameters, such as PREFIX and UNIT.
    PRINT/CDAM PARMS =
WHEN LINE 00001 - 00001 COL 00014 - 00046 PRINT Y REF NXT N CT N   AND/OR
     STRING = E M P L O Y E E S     R E P O R T
DO NAME = EMPLOYEES REPORT WHENM Parameter
The WHEN parameter indicates page identification criteria.
Table 35 WHEN Subparameters
|
Subparameter |
Description |
|---|---|
|
LINE |
Lines in the page (from and to) between which the character string search takes place. |
|
COL |
Columns (from and to) between which the character string search takes place. |
|
VAR |
A variable used in comparing a string, variable, or system variable in the STRING subparameter. This subparameter is a variant of the LINE and COL subparameters. |
|
|
Yes/No indicator that specifies whether or not to print the line containing the identifying string. |
|
REF NXT |
Yes/No indicator that specifies whether the identifying string refers to the page where it is found, or to the page after the page where it is found. |
|
CT |
"Continuous identification" flag that indicates whether unidentified pages are directed to the default user, to the user obtained from the previous pages, and so on. |
|
AND/OR |
Conjunctional parameter that opens and links additional WHEN statements. |
|
STRING |
The character string for that to search. The string can contain logical comparison operators. |
   WHEN LINE 00001 - 00001 COL 00014 - 00046 PRINT   REF NXT   CT     AND/OR
STRING = E M P L O Y E E S R E P O R T DOM Options
The following are a description and example of each of the DO action that can be taken when the WHEN condition is fulfilled:
DO USER – Name of the user (recipient) to whom the identified page in the report is sent, or the LINE and COL range in the report where the user name can be found.
    DO USER    = *                         LVL    LINE        COL 00064 - 00074
                            S N T         SYNONYM =       CONCAT =            _
DO INDEX – Defines a main index and optional subindexes for a CDAM file.
    DO INDEX   = EMNUM                M   R   G   LINE +00000 COL 00011 - 00014
          MASK = ####                 RC Y LINE 00002 - 00060 COL 00011 - 00014
    02 SUBINDX = EMPNAME              M   LVL 02  LINE +00000 COL 00016 - 00035
          MASK = *                    RC Y LINE 00002 - 00060 COL 00016 - 00035
    03 SUBINDX = EMPGRADE             M   LVL 03  LINE +00000 COL 00037 - 00040
          MASK = ####                 RC Y LINE 00002 - 00060 COL 00037 - 00040
       SUBINDX =                      M   LVL     LINE        COL       -
          MASK =                      RC   LINE       -       COL       -
DO MIGRATE – Specifies the migration mission that migrates this report from DASD to another storage media.
   DO MIGRATE = MIG0007Y
   DO
DO BACKUP – Specifies the backup missions that backs up this sysout.
   WHEN LINE 00001 - 00001 COL 00014 - 00046 PRINT   REF NXT   CT     AND/OR
        STRING = E M P L O Y E E S     R E P O R T
     DO BACKUP   = BKP0031D
     DO
   WHEN LINE       -       COL       -       PRINT   REF NXT   CT     AND/OR
DO PRINT – Specifies the printing missions that should (can) print this report.
   WHEN LINE 00001 - 00001 COL 00014 - 00046 PRINT   REF NXT   CT     AND/OR
        STRING = E M P L O Y E E S     R E P O R T
     DO PRINT    = STD                                   MUST
     DO
   WHEN LINE       -       COL       -       PRINT   REF NXT   CT     AND/OR
DO NAME – Specifies the report name. The user (recipient) can use the name as a key for retrieving the report.
   WHEN LINE 00001 - 00001 COL 00014 - 00046 PRINT   REF NXT   CT     AND/OR
        STRING = E M P L O Y E E S     R E P O R T
     DO NAME     = EMPLOYEES REPORT
     DO
   WHEN LINE       -       COL       -       PRINT   REF NXT   CT     AND/OR
DO COND – Adds and/or deletes prerequisite conditions.
   WHEN LINE 00001 - 00001 COL 00014 - 00046 PRINT   REF NXT   CT     AND/OR
        STRING = E M P L O Y E E S     R E P O R T
     DO COND     = EMPLOYEES-FILE-OK    ODAT +
     DO
   WHEN LINE       -       COL       -       PRINT   REF NXT   CT     AND/OR
DO SET – Assigns a value to a variable that can be used by other decollation parameters.
   WHEN LINE 00001 - 00001 COL 00001 - 00001 PRINT   REF NXT   CT     AND/OR
        STRING = %%ACC
   DO
   DO SET     = %%REP     ='REPORT FOR '                              C   CS
   DO SET     = %%REM_M   =NEW                                        C   CS
DO SHOUT – Specifies a message to be sent. Control-V system variables are resolved in the message text.
   WHEN LINE 00001 - 00001 COL 00014 - 00046 PRINT   REF NXT   CT     AND/OR
        STRING = E M P L O Y E E S     R E P O R T
     DO SHOUT    TO U-EMPLOYEES-DEP     URGENCY R
      = MONTHLY EMPLOYEES FILE AND REPORTS ARE OK
     DO
   WHEN LINE       -       COL       -       PRINT   REF NXT   CT     AND/OR
DO CTBRULE – Invokes the Control-M/Analyzer Runtime Environment that performs balancing operations defined in the specified rule on Control-V pages. Available only at sites using Control-M/Analyzer.
   WHEN LINE 00001 - 00001 COL 00014 - 00046 PRINT   REF NXT   CT     AND/OR
        STRING = B A N K I N G   R E P O R T
     DO CTBRULE  = BNKRULE  ARG 100000,50000,25000
     DO
   WHEN LINE       -       COL       -       PRINT   REF NXT   CT     AND/OR
        STRING =
     DO
DO NOTOK – Generates a NOTOK status if the string specified in the WHEN statement is found.
   WHEN LINE 00001 - 00001 COL 00014 - 00046 PRINT   REF NXT   CT     AND/OR
        STRING = ENDED WITH ERRORS
     DO NOTOK
     DO
   WHEN LINE       -       COL       -       PRINT   REF NXT   CT     AND/OR
DO REMARK – Specifies a remark to be generated when the string specified in the WHEN statement is found.
WHEN LINE 00001 - 00001 COL 00014 - 00046 PRINT   REF NXT   CT     AND/OR
        STRING = E X C E P T I O N S     R E P O R T
     DO REMARK   = EXCEPTION                    LINE     COL     -
     DO REMARK2  = EXCEPTION                    LINE     COL     -
     DO REMARK3  = EXCEPTION                    LINE     COL     -
DO LEVEL – Specifies the level of the user (recipient) to whom the identified page in the report is sent. It is recommended not to use DO LEVEL at this stage.
   WHEN LINE 00001 - 00001 COL 00014 - 00046 PRINT   REF NXT   CT     AND/OR
        STRING = E X C E P T I O N S     R E P O R T
     DO LEVEL
   WHEN LINE       -       COL       -       PRINT   REF NXT   CT     AND/OR
DO APPROV – Specifies that the report should be approved.
DO
WHEN LINE 00020 - 00060 COL 00020 - 00024 PRINT   REF NXT   CT     AND/OR
     STRING = TOTAL
DO APPROV  =          HIDDEN Y MULTI   STORE N SLA
DO
Editing Mission Definitions in the Edit Environment
Report decollating mission definition parameters can be edited (moved, copied, deleted, repeated) by performing IOA line editing commands, similar to standard ISPF line commands, from within the Control-V Edit environment.
The EDIT command alternately activates and deactivates the Edit environment of the Report Decollating Mission Definition screen.
Figure 31 Entering Editing Commands
  ------- CONTROL-D/V CATEGORY DAILY               JOB  *        ---------(R.S)
  COMMAND ===>                                                  SCROLL===> CRSR
  +---------------------------------------------------------------------------+
  __ WHEN LINE 00001 - 00001 COL 00014 - 00046 PRINT   REF NXT   CT     AND/OR
  __      STRING =
  __   DO NAME     = PRODUCTION JCL
  MM   DO USER     = *                     LVL    LINE      COL 00064 - 00074
                              S N T         SYNONYM =       CONCAT =
  __   DO BACKUP   = BKP0007D
  __   DO SHOUT    TO TSO-001             URGENCY
  MM    = NON-PRODUCTION JCL COMPLETED
  __ WHEN LINE       -       COL       -       PRINT   REF NXT   CT     AND/OR
  __      STRING =
  __   DO
  __ =========================================================================
  __ ON CLASS      = B         EXTWTR               DEST          FORM
  __ PRT COPIES    LVL    USER                      DEST          MAX COPIES
  __     PRINT/CDAM PARMS = ALLOCOPT=JOBSDSN1
  __     PRINT/CDAM PARMS =
  __ WHEN LINE       -       COL       -       PRINT   REF NXT   CT     AND/OR
  __      STRING =
  A_   DO NAME     = NON-PRODUCTION JCL
  __   DO
 FILL IN REPORT DEFINITION. CMDS: EDIT, SCHED, SHPF, PATH              18.47.45
A 2-character line editing command field, marked by underscores, is displayed for each line on the screen.
Editing commands are typed directly onto these underscores.
Specified line editing commands are processed when Enter is pressed.
For more detailed information and examples, see Editing Mission Definitions in the IOA Edit Environment.
Exiting the Report Decollating Mission Definition Screen
Use one of the following commands to exit the Report Decollating Mission Definition screen:
Table 36 Commands for Exiting the Report Decollating Mission Definition Screen
|
Command |
Description |
|---|---|
|
END |
Keep the changes made to the parameters of the mission and return to the Category List screen. |
|
CANCEL |
Do not keep the changes made to the parameters of the mission and return to the Category List screen. |
|
NEXTCTG |
Keep the changes made to the parameters of the mission and display the next mission definition in the Category list. |
|
PREVCTG |
Keep the changes made to the parameters of mission and display the previous mission definition in the Category list. |
Changes made to the parameters are initially kept only in memory. They are written to the disk after you exit the Category List screen.
Automatic Syntax Checking
The definition syntax is automatically checked when the Report Decollating Mission Definition screen is exited using the END, NEXTCTG, or PREVCTG command. This includes checking that users specified in DO USER statements are in the Recipient Tree.
If errors are found in the Report Decollating Mission Definition screen an error message is displayed. The errors may then be corrected. If no errors are found, exit to the Category List screen.
CHKUSR Command
The Control-D CHKUSR command checks if the user specified in parameter DO USER is found in the Recipient Tree. Type CHKUSR (or CH) on the COMMAND line and press Enter.
This check is performed automatically when exiting the Report Decollating Mission Definition screen.
Saving Report Decollating Mission Definitions
Press END (PF03/PF15) to exit the Category List screen. If changes have been made in the Report Decollating Mission Definition facility, an Exit Option window is opened.
Figure 32 The Report Decollating Mission Definition Exit Option Window
CATEGORIES OF LIB CTD.PROD.REPORTS                                JOB: PLRPT010
COMMAN +-----------------------------------------------------------+  ===> CRSR
OPT  N |                 PLEASE SELECT EXIT OPTION                 |  ---------
     D |                                                           |
     M |     SAVE    CREATE                                        |
 ===== |                                                           |  <<< =====
       |     LIBRARY CTD.PROD.REPORTS                              |
       |     JOB     PLRPT010                                      |
       |                                                           |
       +-----------------------------------------------------------+


OPTIONS:  S SELECT   D DELETE   I INSERT   O ORDER   F FORCE  C COPY   15.10.46
You must enter Y (Yes) or N (No) in one of the exit options. It is possible to change the name of the library or member (job or report name) in the window. Return to the Job List or to the entry panel, depending on where you were when you entered the Category List screen.
When saving changes using the EXIT option, all of the mission definitions within a member (job) are saved, even if changes were made to only one mission definition.
Canceling Changes
To exit without saving decollating parameter changes, enter the CANCEL command in the Mission Definition screen, or press RESET (PF04/PF16) in the Exit Option window of the Category List screen
Ordering Report Decollating Missions
The Report Decollating Mission Definition screen is used to define decollating and indexing criteria. This definition becomes "active" only after it is ordered. The report decollating mission can be ordered manually, or it can be ordered automatically each day. For further information see the Control-D and Control-V chapter of the INCONTROL for z/OS Administrator Guide. One way to manually order missions is to use options O and F of the Job or Category List screens.
The options can be activated from:
-
Job List screen – All report decollating mission definitions in the selected jobs are ordered.
-
Category List screen – Only the selected decollating mission definition is ordered.
These options are specified as follows:
Table 37 Options for Ordering Report Decollating Missions
|
Option |
Description |
|---|---|
|
O (ORDER) |
Schedule the report decollating mission only if the specified date is defined as a scheduling date in the mission definition’s basic scheduling criteria. |
|
F (FORCE) |
Schedule the report decollating mission regardless of basic scheduling criteria. |
When you use the O and F options, the default confirmation window shown below is opened. If the default has been modified in the User profile, a different confirmation window, requiring double confirmation, is opened:
Figure 33 Order and Force Confirmation Window
  LIST OF JOBS LIB: CTD.PROD.REPORTS                           ----------------
  COMMAND ===>                                                  SCROLL===> CRSR
  OPT  NAME ------------ VV.MM  CREATED     CHANGED     SIZE  INIT   MOD   ID
       ACCTNG01          01.00 00/08/08 00/08/08 16:54    18    18     0 M04B
       ACCTNG02          01.00 00/08/08 00/08/08 16:54    20    20     0 M04B
       ACCTNGW1               +-------------------------------+  9     0 M35A
       ACCTNGW2               |   CONFIRM     ODATE 000808    |
   O   ACCTNGW3   <-----------|   ASK FOR EACH ONE  Y         |
       ACCTNGW4               +-------------------------------+  8     0 m18C
       ADMINST1          01.00 00/04/17 00/04/17 00:50    70    70     0 O01
       ADMINST2          01.00 00/04/17 00/04/17 00:50   180   180     0 O01
       PERSNL10          01.00 00/04/17 00/04/17 00:50    41    41     0 O01
   O   PERSNLDK          01.00 00/04/17 00/04/17 00:50     5     5     0 S07
       PERSNLST          01.00 00/04/17 00/04/17 00:50     9     9     0 S07
       PRODTNCL          01.00 00/04/17 00/04/17 00:50    14    14     0 S07
       PRODTNTL          01.00 00/04/17 00/04/17 00:50     5     5     0 S07
   O   RESTOR01          01.01 00/09/25 00/09/25 12:17     9     9     0 M35A
       RESTOR02          01.00 00/06/30 00/06/30 09:54    12    12     0 V309
       SALESD            01.02 00/09/22 00/09/22 11:04     8     6     0 M72
       SALEST            01.01 00/09/26 00/09/26 13:33     8     8     0 M18C
       SALESV            01.00 00/04/17 00/04/17 00:50    70    70     0 O01
       TRAIN001          01.00 00/08/08 00/08/08 16:54    18    18     0 M04B
       TRAIN002          01.00 00/08/08 00/08/08 16:54    20    20     0 M04B
  OPTIONS:  S SELECT   O ORDER   F FORCE   B BROWSE   D DELETE         14.39.49
The specified date can be changed. If you decide not to order the member (job) or mission definition (category), enter N (No) in the CONFIRM field (for CANCEL), and you return to the original screen.
The ASK FOR EACH ONE line is only displayed if more than one Order (or Force) is requested. If you are certain that you want to order or force all indicated members (jobs) or mission definitions (categories), and do not want to change the ODATE for any of the individual members or mission definitions, you can bypass individual confirmations by entering Y (Yes) in the CONFIRM field and N in the ASK FOR EACH ONE field, and pressing Enter. All the members or mission definitions marked O (or F) is ordered.
For each member or mission definition that is successfully scheduled (ordered), the screen in Figure 34 appears.
Figure 34 The Control Report Order Message Screen
 ---------------------- CONTROL-D REPORT ORDER MESSAGES ------------------(R.O)
 COMMAND ===>                                                   SCROLL===> CRSR
 ------------------------------------------------------------------------------
  17.24.36 CTD049I MISSION PROCESSING STARTED
  17.24.39 CTD528I MISSION PRDKPLW4 ODATE 080800 PLACED ON ACTIVE MISSIONS FILE
  17.24.39 CTD696I ALL MISSIONS PROCESSED SUCCESSFULLY
  ===== >>>>>>>>>>>>>>>>>>>>  END OF MESSAGE LIST   <<<<<<<<<<<<<<<<<<<<< =====


 PRESS END TO RETURN. LEFT AND RIGHT TO SEE MORE.                      09.18.06
Use the END command (PF03/PF15) to return to the Job or Category List screen.
Copying Report Decollating Mission Definitions to Another Member
To copy one or more mission definitions from the current member to another member, specify option C (Copy) by the mission names in the Category List screen and press Enter. The following window is displayed:
Figure 35 Window for Copying Decollating Mission Definitions to Another Member
 CATEGORIES OF LIB CTV.PROD.REPORTS                               JOB: PLRPT010
 COMMAND ===>                                                   SCROLL===> CRSR
  OPT  NAME -------------------------------------------------------------------
   C   DAILY                  INVENTORY AND EMPLOYEE REPORTS - DAILY
       MONTHLY                INVENTORY AND EMPLOYEE REPORTS - MONTHLY


                  +-----------------------------------------------------------+
                  |                                                           |
                  |     SPECIFY DESTINATION LIBRARY,MEMBER AND CATEGORY NAME  |
                  |                                                           |
                  |  LIBRARY :  CTV.PROD.REPORTS                              |
                  |  MEMBER  :                                                |
                  |  CATEGORY:  DAILY                                         |
                  |                                                           |
                  |  PRESS END/RESET TO CANCEL     ENTER TO PERFORM THE COPY  |
                  +-----------------------------------------------------------+
The window contains the following fields (some fields contain default values that can be modified):
Table 38 Fields in the Window for Copying Mission Definitions to Another Member
|
Field |
Description |
|---|---|
|
Library |
Library containing the table into which the decollating mission definitions should be copied. Must be an existing library. Default is the current library. |
|
Member |
Name of the member into which the decollating mission definition should be copied. A decollating mission definition can only be copied to another member. It cannot be copied to its own member (even if the mission definition is renamed). If the specified member does not exist, the member is created when the request is performed. |
|
Category |
Name of the decollating mission definition to be copied. If multiple mission definitions are selected, the window initially is displayed with the first selected mission definition. As each request is performed or canceled, the next requested mission definition name is displayed. |
To perform a request, press Enter.
To cancel a request, press END (PF03/PF15) or RESET (PF04/PF16).
Migration, Printing, Backup, Restore Mission Definition Facility
The Control-V Migration, Printing, Backup, Restore Mission Definition facility is composed of a series of screens which enable you to view, create, and modify printing, backup and restore mission parameters.
Migration, printing, backup, and restore mission definitions under Control-V are stored in libraries (partitioned datasets). A library contains missions (members), and each mission contains categories of one or more mission definitions. A mission generally contains migration, printing, backup, and restore mission categories related to specific topics. Although most sites designate a primary mission library, the number of mission libraries that you can use is unlimited.
Missions contain mission definitions – not the JCL of the mission. The number of missions in a library, the number of mission definitions in a mission, and the size of each mission definition are all calculated dynamically and are not dependent on parameter specification or optional ZAPs.
Accessing the Mission Definition Facility
The Migration, Printing, Backup, Restore Mission Definition facility contains the following screens:
Table 39 Printing, Backup, Restore Mission Definition Facility Screens
|
Screen |
Description |
|---|---|
|
Mission Definition entry panel |
Allows specification of parameters which determine which screen is displayed. |
|
Mission List screen |
Displays the list of missions (members) in the specified library. |
|
Category List screen |
Displays the list of categories of mission definitions in a specific mission table. |
|
Mission Definition screen |
Displays the parameters of the selected mission definition. This screen is used to define, display and modify mission definition parameters. |
To create mission definitions via the online facility, select option M on the IOA Primary Option menu. The Mission Definition entry panel is displayed.
Creating Missions
Missions can be created in any of the following ways:
-
By specifying the new mission name in the entry panel and pressing Enter.
-
By using the SELECT command (described later) to specify the new mission name in the Mission List screen and pressing Enter.
As a result of using either of the above methods, a skeletal mission definition (that is, one with most fields left blank) is displayed in the Mission Definition screen.
Fill in the blanks and save the screen entries. The mission is created with the specified mission definition. The mission definition is the first and only definition in the Category list for the mission. As additional mission definitions are created in the mission (described below), they are added to the Category list.
Upon exiting the Category List screen, if changes were made in at least one mission definition, an Exit Option window is displayed. One field of the window displays the mission name. This value can be changed to a new mission name that creates a new mission in which the mission definitions are saved.
Creating Mission Definitions
Mission definitions can be created using two basic methods:
-
A skeletal mission definition can be created by specifying the name of a new mission definition (category) in the entry panel. (The mission specified in the entry panel can be either a new mission or an existing mission.) In this case, virtually all fields of the mission definition are empty.
-
A copy of an existing mission definition can be created using the INSERT option (described later) in the Category List screen. In this case, most fields of the new mission definition have the same values as the fields in the copied mission definition.
Performing Operations on Missions and Mission Definitions
Many operations can be performed on missions and on the mission definitions in them. These operations are performed using commands and options in the various screens of the Migration, Printing, Backup, Restore Mission Definition facility.
Below is a brief summary of some of the major operations possible within the facility. Additional options and commands that have not yet been explained are explained in detail following the summary.
Accessing (Editing or Browsing) a Mission and its Mission Definitions
A mission (that is, the mission definitions in the mission) can be browsed or edited.
When browsed, the mission cannot be modified or updated. When the mission is edited, new mission definitions can be added and existing mission definitions can be modified or deleted.
Browsing, however, has advantages:
-
Access and exit are quicker than in editing.
-
Mission definitions that are in use by another user can be viewed.
-
Access for browsing might be granted, even though access for editing might be denied due to site security requirements.
To browse a mission (and its category list and mission definitions), use the BROWSE option in the Mission List screen.
Entering the mission name in the entry panel or using the SELECT option in the Mission List screen provides edit access.
Depending on user profile definitions, if the table requested for editing is in use, either access is granted in Browse mode or access is not granted.
Copying a Mission Definition to another Mission
Mission definitions can be copied from one mission to another using the COPY option in the Category List screen. For more information, see Copying Migration, Printing, Backup, Restore Mission Definitions to another Member.
Deleting a Mission or a Mission Definition
Unneeded mission definitions can be deleted using the DELETE option in the Category List screen. For more information, see Options of the Category List Screen. Unneeded missions can be deleted using the DELETE option in the Mission List screen. For more information, see Deleting Missions.
Ordering Multiple Missions
More than one mission at a time can be ordered at one time. To select multiple missions, Tab down to each mission in the Missions List screen that you want to select and enter the letter "O" next to the desired mission. Press Enter. A popup confirmation window is displayed, prompting you to choose whether or not to view the confirmation window for each mission.
If you choose not to view the confirmation screen before viewing each mission (Confirm Y, Ask For Each One N), press Enter.
Saving Modifications
All changes made to a mission and its mission definitions are kept in memory until the mission is exited. Upon exiting the mission, the user can choose to save or cancel the changes. For more information, see Exiting the Mission Definition Screen.
Entry Panel
Figure 36 Printing, Backup, Restore Mission Definition Facility Entry Panel
 --------------- CONTROL-D/V MISSION DEFINITION - ENTRY PANEL --------------(M)
 COMMAND ===>


  SPECIFY LIBRARY, MISSION NAME, CATEGORY

    LIBRARY   ===> CTV.PROD.MIGMIS
    MISSION   ===>                      TYPE ==>      (PRT, BKP, RST, MIG)
    CATEGORY  ===>


 FOR A NEW MISSION, SPECIFY THE MISSION TYPE                           13.00.49
If you use the selection list fields, their values are not erased until you exit the entry panel by pressing END (PF03/PF15).
To open the desired display fill in Entry Panel fields LIBRARY, MISSION, and CATEGORY, as described below.
Displaying the list of missions in a library
-
Type the library name.
-
Leave the mission name blank or type the mission name using mask characters (* and ?).
-
Press Enter.
Displaying the list of mission definitions of a specific mission
-
Type the library name.
-
Type the mission name.
-
Press Enter.
If the mission does not exist, the screen for defining a new mission in the mission is displayed.
Displaying the details of a specific mission definition (Mission Definition screen)
-
Type the library name.
-
Type the mission name.
-
Type the mission definition (category) name.
-
Press Enter.
If the mission does not exist, or the mission definition for the specified mission does not exist, the screen for defining a new mission in the mission is displayed.
If you enter the screen for defining a new mission definition and want to leave the screen without defining a mission definition, use the CANCEL command.
Displaying the Search Window
-
Type the library name.
-
Type the mission definition (category) name.
-
Leave the mission name blank or type the member name using mask characters (* and ?).
-
Press Enter.
Creating a new mission
-
Type the library name.
-
Specify a new mission name.
-
Press Enter.
The Mission Definition screen, for defining the first mission in the new mission, is displayed.
Search Window
The Search window allows the user to search for the specified mission definition in members of the specified library. Members in which the mission definition have been found are then displayed in the Mission List screen.
Figure 37 Printing, Backup, Restore Mission Definition Facility Search Window
------------- CONTROL-D/V MISSION DEFINITION - ENTRY PANEL -----------------(M)
COMMAND ===>
SPECIFY LIBRARY, MISSION NAME, CATEGORY
   LIBRARY   ===> CTD.PROD.BKPMIS
   MISSION   ===>                     (Blank for mission selection list)
   CATEGORY  ===> CTDSAMPLE           (Blank for category selection list)
                                +-------------------------------------------+
                                |                                           |
                                |    PLEASE SELECT ONE OF THE FOLLOWING:    |
                                |                                           |
                                |    1  - STOP SEARCH IMMEDIATELY           |
                                |    2  - ASK AGAIN AFTER 000010 MEMBERS    |
                                |    3  - UNCONDITIONAL SEARCH              |
                                |                                           |
                                |    NUMBER OF MEMBERS IN LIBRARY: 000015   |
                                |    NUMBER OF SEARCHED MEMBERS:   000000   |
                                |    NUMBER OF SELECTED MEMBERS:   000000   |
                                |                                           |
                                +-------------------------------------------+


USE THE COMMAND SHPF TO SEE PFK ASSIGNMENT                             12.11.54
To close the Search Window without performing any action, press END (PF03/PF15).
To perform a search, select one of the following choices and press Enter:
3 - UNCONDITIONAL SEARCH-
Performs an uninterrupted search of all members (missions) in the specified library.
-
The search is stopped immediately when you select option 1.
2 - ASK AGAIN AFTER number MEMBER-
Searches the specified number of members in the specified library, and then pauses. The search number can be modified. Default:10.
-
Continue the search by pressing Enter.
-
Stop the search by selecting option 1 (Stop Search Immediately).
If any members are found, the Mission List is displayed listing those members.
During the search, the following information is displayed at the bottom of the window:
-
Number of members in library. Lists the total number of members in the specified library.
-
Number of searched members. Lists the cumulative number of members searched. For example, if you perform three searches with a specified number of 10, the figure displayed is 30.
-
Number of selected members. Lists the cumulative number of members selected that contain the mission definition being searched.
If any members are selected during the search, the Mission List is displayed listing those members. If no members are selected, the Search Window is closed and a message is displayed.
Migration, Printing, Backup, Restore Mission Definition – Mission List Screen
This screen displays a list of missions (members) in the specified library. This screen can be entered directly from the entry panel or upon exiting the Category List screen.
By default, only mission names are listed on the screen. However, if the default has been modified at your site, statistical information may be displayed for each mission name (as shown in Figure 38).
Figure 38 Printing, Backup, Restore Mission Definition – Mission List Screen
  MISSION LIST IN   CTD.PROD.MIGMIS                                ---------(M)
  COMMAND ===>                                                 SCROLL ===> CRSR
  OPT  NAME ------------ VV.MM  CREATED     CHANGED     SIZE  INIT   MOD   ID
       MIG0009D          01.01 00/11/29 00/11/29 12:40    15    15     0 PROD
       MIG0027D          01.00 00/06/30 00/06/30 09:54     7     7     0 PROD
       MIG0196D          01.01 00/06/30 00/06/30 09:54    15    15     0 PROD
       MIG0200D          01.00 00/06/30 00/06/30 09:54     7     7     0 PROD
       MIG0206D          01.01 00/11/29 00/11/29 12:40    15    15     0 PROD
       MIG0222D          01.00 00/06/30 00/06/30 09:54     7     7     0 PROD
       MIG0257D          01.01 00/11/29 00/11/29 12:40    15    15     0 PROD
       MIG0271D          01.00 00/06/30 00/06/30 09:54     7     7     0 PROD
       MIG0280D          01.01 00/11/29 00/11/29 12:40    15    15     0 PROD
       MIG0297D          01.00 00/06/30 00/06/30 09:54     7     7     0 PROD
       MIG0332D          01.01 00/11/29 00/11/29 12:40    15    15     0 PROD
       MIG0356D          01.00 00/06/30 00/06/30 09:54     7     7     0 PROD
   ====== >>>>>>>>>>>>>>>> NO MORE MISSIONS IN LIBRARY <<<<<<<<<<<<<<<< =======


 OPTIONS:  S SELECT   O ORDER   F FORCE   B BROWSE   D DELETE          15.24.57
To scroll down the Mission list, press PF08/PF20. To scroll up the Mission list, press PF07/PF19. To return to the entry panel, press END (PF03/PF15).
Options of the Mission List Screen
To request one of the following options, specify the option in the OPT field to the left of the mission names and press Enter.
Table 40 Options of the Mission List Screen
|
Option |
Description |
|---|---|
|
S (SELECT) |
Display the list of mission definitions of the mission for any purpose, including editing and modification. Only one mission can be selected at a time. |
|
O (ORDER) |
Order all the mission definitions of the mission, provided that their basic scheduling criteria (discussed in Basic Scheduling Parameters are met. Multiple missions can be ordered. |
|
F (FORCE) |
Order all the mission definitions of the mission, regardless of their basic scheduling criteria (discussed in Basic Scheduling Parameters). Multiple missions can be forced. |
|
B (BROWSE) |
Display a list of mission definitions of a mission for browsing. Only one mission can be browsed at a time. |
|
D (DELETE) |
Delete the mission (member) from the library. Multiple missions can be deleted. |
The INCONTROL administrator can authorize specific users to access only the Browse option.
Deleting Missions
To delete missions, specify option D in the OPT field to the left of the missions to be deleted and press Enter.
The following confirmation window is displayed, in sequence, for each mission selected for deletion.
Figure 39 Migration, Printing, Backup, Restore Mission Definition Facility Delete Confirmation Window
  MISSION LIST IN   CTD.PROD.BKPMIS                                ---------(M)
  COMMAND ===>                                                 SCROLL ===> CRSR
  OPT  NAME ------------ VV.MM  CREATED     CHANGED     SIZE  INIT   MOD   ID
       BKP0009D          01.01 00/11/29 00/11/29 12:40    15    15     0 PROD
       BKP0027D          01.00 00/06/30 00/06/30 09:54     7     7     0 PROD
       BKP0196D               +--------------------------+
       BKP0200D               |   CONFIRM DELETE OPTION  |
   D   BKP0206D   <-----------|               (Y/N)      | 5    15     0 PROD
       BKP0222D               +--------------------------+ 7     7     0 PROD
   D   BKP0257D          01.01 00/11/29 00/11/29 12:40    15    15     0 PROD
       BKP0271D          01.00 00/06/30 00/06/30 09:54     7     7     0 PROD
       BKP0280D          01.01 00/11/29 00/11/29 12:40    15    15     0 PROD
   D   BKP0297D          01.00 00/06/30 00/06/30 09:54     7     7     0 PROD
       BKP0332D          01.01 00/11/29 00/11/29 12:40    15    15     0 PROD
       BKP0356D          01.00 00/06/30 00/06/30 09:54     7     7     0 PROD
   ====== >>>>>>>>>>>>>>>> NO MORE MISSIONS IN LIBRARY <<<<<<<<<<<<<<<< =======


  OPTIONS:  S SELECT   O ORDER   F FORCE   B BROWSE   D DELETE         15.24.57
Enter Y (Yes) in the window to confirm the delete request.
Enter N (No) in the window to cancel the delete request.
If PDSMAN is operational at your site, $$$SPACE missions are not deleted.
A message is written to the IOA Log file for each mission deleted.
Migration, Printing, Backup, Restore Mission Definition – Category List Screen
This screen displays the list of mission definitions in a mission in a specified library. This screen can be entered directly from the Migration, Printing, Backup, Restore Mission Definition entry panel or the Mission List screen, or upon exiting the Mission Definition screen.
If the S (Select) option was specified in the Mission List screen for a mission that is currently in use (selected) by another user, then either the Category List screen is not displayed and the Mission List screen remains displayed (the default), or the Category List screen is displayed in Browse mode (if a User profile definition overrides the default). In either case, an appropriate message is displayed.
Figure 40 Migration, Printing, Backup, Restore Mission Definition – Category List Screen
 CATEGORIES OF LIB CTD.PROD.PRTMIS                             PRT MIS STD
 COMMAND ===>                                                  SCROLL ===> CRSR
 OPT  NAME --------------------------------------------------------------------
      NORTH-COURIER          BUNDLE FOR COURIER TO NORTH BRANCHES
      SOUTH-COURIER          BUNDLE FOR COURIER TO SOUTH BRANCHES
      CENTRAL-COURIER        BUNDLE FOR COURIER TO CENTRAL BRANCHES
  ====== >>>>>>>>>>>>>> NO MORE CATEGORIES IN THE MISSION <<<<<<<<<<<<<<< =====


 OPTIONS:  S SELECT   D DELETE   I INSERT   O ORDER   F FORCE  C COPY  10.16.49
Use the scrolling conventions to scroll forward and backward through the Category list.
Format of the Category List Screen
Next to each mission definition name in the Category list, certain information can be displayed. The type and format of this information depends on whether the screen is displayed in DESC format or in STAT format:
-
In DESC format, the mission definition’s description, taken from the DESC field of the mission definition, is displayed. Default.
-
In STAT format, the mission definition’s ISPF statistical information is displayed.
By default, the Category list is displayed in DESC format. To change formats, use the DESC or STAT commands, described below.
Commands of the Category List Screen
The following commands can be specified in the COMMAND field of the Category List screen.
Table 41 Commands of the Category List Screen
|
Command |
Description |
|---|---|
|
DESC |
Command DESC displays the mission definition’s description next to the mission definition name. The description is taken from the DESC field in the mission definition. |
|
STAT |
Command STAT displays the following ISPF like statistical information about the mission definition next to the mission definition name. Version and modification numbers, creation date, last modification date, and user ID. |
Options of the Category List Screen
To request one of the following options, specify the option in the OPT field to the left of the mission definition name and press Enter.
If the Category List screen is displayed in Browse mode, options D (Delete) and I (Insert) are not available.
Table 42 Options of the Category List Screen
|
Option |
Description |
|---|---|
|
S (SELECT) |
Display the Mission Definition screen, which contains mission parameters of the specific mission definition. If the Mission Definition screen is not displayed in Browse mode, the mission parameters can be edited and updated. If the Mission Definition screen is displayed in Browse mode, the mission parameters can only be browsed; they cannot be modified. |
|
D (DELETE) |
Delete a mission definition from the Category list. |
|
I (INSERT) |
Insert a new mission definition in the list. The Mission Definition screen appears, with the same details of the mission definition marked "I", but the CATEGORY and DESCRIPTION parameters are empty for you to fill in. The new mission definition is added after the mission definition marked "I". |
|
O (ORDER) |
Order a mission definition of a mission based on its basic scheduling criteria. For more information, see Basic Scheduling Parameters. |
|
F (FORCE) |
Force a mission definition order regardless of its basic scheduling criteria. For more information, see Basic Scheduling Parameters. |
|
C (COPY) |
Copy the mission definition to another mission (described in Copying Report Decollating Mission Definitions to Another Member). Multiple mission definitions can be copied. |
Migration, Printing, Backup, Restore Mission Definition Screen
This screen is used to define, display, and modify mission parameters of a specific mission definition. The screen can be entered directly from the Migration, Printing, Backup, Restore Mission Definition entry panel, or from the Category List screen. Update of parameters is not permitted in Browse mode.
Mission parameters can take up more than one screen. Use the scrolling conventions to scroll the mission parameters forward and backward.
For a detailed explanation of migration, printing, backup and restore mission parameters, see Migration, Printing, Backup and Restore Mission Parameters.
Parameters marked with the symbol M can have many occurrences. Whenever you fill the last occurrence of the parameter on the screen, Control-V adds a new empty occurrence of that parameter that you may fill in. The only limit to the number of occurrences is the region size available for the application.
To delete a parameter on the screen, simply erase it (press the EOF key or blank it out). If additional operations are required, Control-V issues appropriate instructions.
Migration, printing, backup and restore mission parameters are divided into six basic groups, as indicated on the following screen:
-
General parameters
-
Bundling parameters (printing missions only)
-
Basic Scheduling parameters
-
Runtime Scheduling parameters
-
Post-processing parameters
-
Mission specific parameters (printing, migration and backup missions only)
The groups are separated by a delimiter line.
Display or Non-Display of Scheduling Criteria
All of the General, Basic Scheduling, Runtime Scheduling and Post-processing parameters are displayed in the Mission Definition screens.
SCHED Command
Typing SCHED (abbreviated SC) in the command line alternately hides or displays the scheduling parameters in the Mission Definition screen.
Migration Mission Definition Screen
Figure 41 Migration Mission Definition Screen
  ---- CONTROL-V CATEGORY MIGSEC             MIG MISSION MIGSEC   --------(M.S)
  COMMAND ===>                                                  SCROLL===> CRSR
  +---------------------------------------------------------------------------+
  ======= >>>>>>>>>>>>>>>>>>> TOP OF CATEGORY PARAMETERS <<<<<<<<<<<<<<<< =====
    CATEGORY MIGCAT                            MISSION MIGSEC
    OWNER    M15A          TASKTYPE MIG        GROUP
    DESC
    ===========================================================================
                          STAGE 01 SCHEDULING PARAMETERS
    DAYS                                                          DCAL
                                                                       AND/OR
    WDAYS                                                         WCAL
    MONTHS  1- Y 2- Y 3- Y 4- Y 5- Y 6- Y 7- Y 8- Y 9- Y 10- Y 11- Y 12- Y
    DATES
    CONFCAL          SHIFT   RETRO N MAXWAIT 00
    MINIMUM          PDS
   ===========================================================================
    IN        IN-CARD              ODAT        IN-CARD2             ODAT
    IN
    TIME FROM 0010 TO 1200 NOT LATER THAN 1258 PRIORITY 09
    ===========================================================================
    OUT       OUT-CARD             ODAT +
    SHOUT WHEN NOTOK                                TO OPER2             URGN R
     MSG MIGRATION MISSION MIGSEC STAGE 01 ENDED NOTOK
    ===========================================================================
    RETENTION DAYS 00370          FORCE N        SECONDARY SKELETON  MICSEC
    CENTERA RETENTION CLASS
    ===========================================================================
    STAGE 01 PRIMARY   MEDIA NAME CART     AGE 0001 REFRESH EVERY
             SECONDARY MEDIA NAME                   REFRESH EVERY
    ===========================================================================
                        MIGRATION PATH SCHEDULING PARAMETERS
    DAYS                                                          DCAL
                                                                       AND/OR
    WDAYS                                                         WCAL
    MONTHS  1- Y 2- Y 3- Y 4- Y 5- Y 6- Y 7- Y 8- Y 9- Y 10- Y 11- Y 12- Y
    DATES
    CONFCAL          SHIFT   RETRO N MAXWAIT 00
    MINIMUM          PDS
    ===========================================================================
    IN        MSM-IN               ODAT
    TIME FROM 1030 TO 1322 NOT LATER THAN 1458 PRIORITY 09
    ===========================================================================
    OUT       MSMOUT               ODAT +
    SHOUT WHEN NOTOK                                TO OPER2             URGN R
     MSG MIGRATION MISSION MIGSEC STAGE 02 ENDED NOTOK
    ===========================================================================
    STAGE 02 PRIMARY   MEDIA NAME FTK1     AGE 0003 REFRESH EVERY
             FSET            VSET
             SECONDARY MEDIA NAME                   REFRESH EVERY
    STAGE 03 PRIMARY   MEDIA NAME          AGE      REFRESH EVERY
             SECONDARY MEDIA NAME                   REFRESH EVERY
    ===========================================================================
  ====== >>>>>> END OF MIGRATE MISSION PARAMETERS OF THIS CATEGORY <<<<<< =====

  PLEASE FILL IN MISSION PARAMETERS. USE "SHPF" TO SEE PFK DEFINITION  12.12.05
Printing Mission Definition Screen
Figure 42 Printing Mission Definition Screen
  ---- CONTROL-V CATEGORY NORTH-COURIER        PRT MISSION STD    --------(M.S)
  COMMAND ===>                                                  SCROLL===> CRSR
  +---------------------------------------------------------------------------+
    CATEGORY NORTH-COURIER                     MISSION STD        MONITOR
    OWNER    M22        TASKTYPE PRT           GROUP   DAILY-PRT
    BATCH               SKELETON               FREE    CLOSE      TIMEOUT
    OVERRIDE CLASS      DEST                   EXTWTR             FORM
    WRITER OPTION TEST
    DESC     BUNDLE FOR COURIER TO NORTH BRANCHES
    ===========================================================================
    INCLUDE USER NORTH
    EXCLUDE USER
    INCLUDE ODATE
    EXCLUDE ODATE
    SORT PARAMETERS: 1-USER  2-JOB   3-REPORT NAME 4-CATEGORY  5-LEVEL 6-TREE
                     7-FORMS 8-CHARS 9-MODIFY T-TIME/DATE E-USER DEFINED
    ENTER SORT SEQ : 6,3,8
    ===========================================================================
    DAYS    ALL                                                   DCAL
                                                                       AND/OR
    WDAYS                                                         WCAL
    MONTHS  1- Y 2- Y 3- Y 4- Y 5- Y 6- Y 7- Y 8- Y 9- Y 10- Y 11- Y 12- Y
    DATES
    CONFCAL          SHIFT   RETRO N MAXWAIT 00
    MINIMUM          PDS
    ===========================================================================
    IN
    TIME FROM 0230 TO      NOT LATER THAN 0300 PRIORITY 10
    ON PAGE#               ON LINE#            INTERVAL
    ===========================================================================
    OUT
    SHOUT WHEN NOTOK                                TO OPER3             URGN R
     MSG PRINTING MISSION STD ENDED NOTOK
    PRINTER  PRT1                 DEST                   CHUNKSIZE
    PRINTER                       DEST                   CHUNKSIZE
    ON FORM
     REQUEST
    ===========================================================================
   STORE          BACKUP                MIGRATION
  ====== >>>>>> END OF PRINTING MISSION PARAMETERS OF THIS CATEGORY <<<<<< ====
  PLEASE FILL IN MISSION PARAMETERS. USE "SHPF" TO SEE PFK DEFINITION  09.08.12
Backup Mission Definition Screen
Figure 43 Backup Mission Definition Screen
---- CONTROL-V CATEGORY DAILY                BKP MISSION BKP0031D --------(M.S)
COMMAND ===>                                                   SCROLL===> CRSR
 +----------------------------------------------------------------------------+
   CATEGORY DAILY                             MISSION BKP0031D
   OWNER    M22           TASKTYPE BKP        GROUP   DAILY-BKP
   DESC     BACKUP REPORTS FOR 31 DAYS
   DESC
   ===========================================================================
   DAYS    ALL                                                   DCAL
                                                                      AND/OR
   WDAYS                                                         WCAL
   MONTHS  1- Y 2- Y 3- Y 4- Y 5- Y 6- Y 7- Y 8- Y 9- Y 10- Y 11- Y 12- Y
   DATES
   CONFCAL          SHIFT   RETRO N MAXWAIT 00
   MINIMUM          PDS
   ===========================================================================
   IN        OP-START-BACKUP-031D ODAT
   TIME FROM      TO      NOT LATER THAN      PRIORITY
   ===========================================================================
   # OF DAYS TO KEEP 00031                    # OF GENERATIONS TO KEEP 0000
   ===========================================================================
   OUT
   SHOUT WHEN NOTOK                                TO OPER2             URGN R
    MSG BACKUP MISSION BKP0031D ENDED NOTOK
   SHOUT WHEN                                      TO                   URGN
    MSG
 ====== >>>>>>> END OF BACKUP MISSION PARAMETERS OF THIS CATEGORY <<<<<< ======
 PLEASE FILL IN MISSION PARAMETERS. USE "SHPF" TO SEE PFK DEFINITION   10.21.10
Restore Mission Definition Screen
Figure 44 Restore Mission Definition Screen
---- CONTROL-V CATEGORY DAILY                RST MISSION RSTADHOC --------(M.S)
COMMAND ===>                                                   SCROLL===> CRSR
 +----------------------------------------------------------------------------+
   CATEGORY DAILY                             MISSION RSTADHOC
   OWNER    M22           TASKTYPE RST        GROUP   DAILY-RST
   DESC     AD-HOC RESTORE MISSION
   DESC
   ===========================================================================
   DAYS    ALL                                                   DCAL
                                                                      AND/OR
   WDAYS                                                         WCAL
   MONTHS  1- Y 2- Y 3- Y 4- Y 5- Y 6- Y 7- Y 8- Y 9- Y 10- Y 11- Y 12- Y
   DATES
   CONFCAL          SHIFT   RETRO N MAXWAIT 00
   MINIMUM          PDS
   ===========================================================================
   IN        OP-START-RESTORE-ADH ODAT
   TIME FROM      TO      NOT LATER THAN      PRIORITY    INTERVAL
   ===========================================================================
   OUT
   SHOUT WHEN NOTOK                                TO OPER2             URGN R
    MSG RESTORE MISSION RSTADHOC ENDED NOTOK
   SHOUT WHEN                                      TO                   URGN
 PLEASE FILL IN MISSION PARAMETERS. USE "SHPF" TO SEE PFK DEFINITION   10.22.31
General Parameters
General parameters describe the mission and specify the mission type, owner, and group.
Figure 45 General Parameters
 ---- CONTROL-V CATEGORY NORTH-COURIER         PRT MISSION STD     -------(M.S)
 COMMAND ===>                                                   SCROLL===> CRSR
 +----------------------------------------------------------------------------+
   CATEGORY DAILY                                MISSION STD      MONITOR
   OWNER M22              TASKTYPE PRT           GROUP   DAILY-PRT
   BATCH                  SKELETON               FREE    CLOSE    TIMEOUT
   OVERRIDE CLASS         DEST                   EXTWTR           FORM
   DESC     BUNDLE FOR COURIER TO NORTH BRANCHES
   DESC
 ==============================================================================
Table 43 General Parameters
|
Parameter |
Description |
|---|---|
|
CATEGORY |
Name of the migration, printing, backup, restore mission parameters of the mission. |
|
MISSION |
Name of the mission. |
|
MONITOR |
Number that identifies the print monitor (for printing missions only). |
|
OWNER |
ID of the owner of the Control-V mission, for security purposes. |
|
TASKTYPE |
Type of task to be performed by Control-V. Enter MIG for migration missions. |
|
GROUP |
Name of the group to which the mission belongs (such as DAILY-MIG). |
|
DESCM |
Description of the mission (free text). |
Bundling Parameters (Printing Missions Only)
Bundling parameters determine who receives the bundle, the original scheduling date, and the sequence of reports in the bundle.
Figure 46 Bundling Parameters
 ===========================================================================
 INCLUDE USER NORTH
 INCLUDE USER
 EXCLUDE USER BR129
 EXCLUDE USER
 INCLUDE ODATE 010321
 INCLUDE ODATE
 EXCLUDE ODATE
 SORT PARAMETERS: 1-USER  2-JOB   3-REPORT NAME 4-CATEGORY  5-LEVEL 6-TREE
                  7-FORMS 8-CHARS 9-MODIFY T-TIME/DATE E-USER DEFINED
 ENTER SORT SEQ : 6,3,8
 ===========================================================================
Table 44 Bundling Parameters
|
Parameter |
Description |
|---|---|
|
INCLUDE USER |
Name of a user (recipient) whose reports are included in the bundle (the user and the user’s descendants in the Recipient Tree). |
|
EXCLUDE USER |
Name of a user (recipient) whose reports are not included in the bundle (the user and the user’s descendants in the Recipient Tree). |
|
INCLUDE ODATE |
Original scheduling date of reports to include in the bundle. |
|
EXCLUDE ODATE |
Original scheduling date of reports NOT to include in the bundle. |
|
SORT |
Sort keys to be used to sort the reports in the bundle. |
Basic Scheduling Parameters
Basic Scheduling parameters specify the day and time to execute the mission.
Figure 47 Basic Scheduling Parameters
 DAYS                                                          DCAL
                                                               AND/OR
 WDAYS   ALL                                                   WCAL
 MONTHS  1- Y 2- Y 3- Y 4- Y 5- Y 6- Y 7- Y 8- Y 9- Y 10- Y 11- Y 12- Y
 DATES
 CONFCAL          SHIFT   RETRO N MAXWAIT 00
 MINIMUM          PDS
 ===========================================================================
Table 45 Basic Scheduling Parameter
|
Parameter |
Description |
|---|---|
|
DAYS |
Days of the month to schedule the mission. |
|
DCAL |
DAYS calendar specification. |
|
AND/OR |
Conjunctional parameter that links parameters DAYS and WDAYS. |
|
WDAYS |
Days of the week to schedule the mission. |
|
WCAL |
WDAYS calendar specification. |
|
MONTHS |
Months to schedule the mission. |
|
DATES |
Specific dates in the year to schedule the mission. |
|
CONFCAL |
Name of a calendar used to confirm mission scheduling dates. |
|
SHIFT |
Indicates if and when a mission should be scheduled when it fails confirmation by the CONFCAL calendar. |
|
RETRO |
Yes/No indicator that specifies whether or not the mission is to be selected (retroactively) after the original scheduling date has passed. |
|
MAXWAIT |
Number of extra days within which to try to execute the mission if the original scheduling date of the mission has passed. |
|
MINIMUM |
Minimum number of free tracks required by the library specified in parameter PDS. The mission is scheduled even if the number of free tracks is less than the minimum.a |
|
PDS |
Name of partitioned dataset to be checked for free space. The mission is scheduled even if the dataset has less than the minimum number of required free tracks specified in parameter MINIMUM.a |
Basic Scheduling parameters are defined separately for stage 01 migration and for subsequent migration stages. For more information, see Basic Scheduling Parameters..
Runtime Scheduling Parameters
Runtime Scheduling parameters specify requirements that must be satisfied to execute the mission.
Figure 48 Runtime Scheduling Parameters
   MINIMUM                PDS
   ===========================================================================
   IN        PROD-REPORTS-READY   ODAT
   TIME FROM 0230 TO      NOT LATER THAN 0300 PRIORITY 10
   ON PAGE#               ON LINE#            INTERVAL
   ===========================================================================
   OUT
Table 46 Runtime Scheduling Parameters
|
Parameter |
Description |
|---|---|
|
INM |
Prerequisite conditions for the mission. |
|
TIME FROM/TO |
Time limit for executing the mission. |
|
NOT LATER THAN |
Time by which mission starts executing even if the prerequisite conditions do not exist. |
|
PRIORITY |
Execution priority (compared to other missions). |
|
ON PAGE # |
Threshold number of pages that triggers (initiates the execution of) a printing mission. |
|
ON LINE # |
For future use |
|
INTERVAL |
Minimum length of time to wait between successive executions of cyclic restore and printing missions. |
Post-Processing Parameters
Post-processing parameters specify what to do when the mission finishes processing (OK or NOTOK).
Figure 49 Post-Processing Parameters
ON PAGE#               ON LINE#            INTERVAL
===========================================================================
OUT       NORTH-BUNDLE-PRINTED ODAT +
SHOUT WHEN NOTOK                                TO OPER2             URGN R
 MSG PRINTING MISSION STD - NORTH COURIER - ENDED NOTOK
SHOUT WHEN                                      TO                   URGN
 MSG
Table 47 Post-Processing Parameters
|
Parameter |
Description |
|---|---|
|
OUTM |
Prerequisite conditions to be added or deleted when the mission ends OK. |
|
SHOUTM |
Message to be sent to a specified destination upon the occurrence of specific events. |
|
WHEN |
Specifies that the message is sent when the mission finishes OK, finishes NOTOK, or does not finish executing by a specified time. |
|
TO |
Destination of the message (for example, a Control-V user, a TSO or ROSCOE user, the IOA Log file, or the operator console). |
|
URGN |
Urgency of message: regular, urgent, or very urgent. |
|
MSG |
The message (free text). |
Mission Specific Parameters
Mission specific parameters are listed below by type of mission and function. These parameters are only displayed in the mission definition screen for the appropriate type of mission.
Printing Missions
These parameters specify values that affect the execution of printing missions.
Figure 50 Printing Mission Parameters
MSG PRINTER  PRT1                 DEST NODE9 U1234       CHUNKSIZE
 ON FORM
REQUEST
===========================================================================
 STORE        BACKUP               MIGRATE
Table 48 Printing Mission Parameters
|
Parameter |
Description |
|---|---|
|
PRINTERM |
Logical name of the printer for this printing mission. |
|
DEST |
Unique printer destination (the JES destination), if different from the destination specified in the installation parameters. |
|
CHUNKSIZE n |
Number of lines per chunk sent to the spool for printing. |
|
ON FORMM |
For future use. |
|
REQUEST |
For future use. |
|
STORE |
Yes/No indicator that specifies whether or not a new copy of the report should be created and stored as a new report file with embedded print resources. If the report has indexes, this indicator also specifies whether or not a new copy of the index file should be created. |
Batch Printing Parameters
These parameters enable a printing mission to be run as a batch job.
Figure 51 Batch Printing Parameters
  CATEGORY                                      MISSION            MONITOR
  OWNER               TASKTYPE               GROUP
  BATCH               SKELETON               FREE                  TIMEOUT
  OVERRIDE CLASS      DEST                   EXTWTR                FORM
  WRITER OPTION
  DESC
Table 49 Batch Printing Parameters
|
Parameter |
Description |
|---|---|
|
BATCH |
Yes/No indicator that specifies whether the printing mission is submitted as a batch job or as a subtask of the print monitor. |
|
SKELETON |
The name of an existing member in the library referenced by DD statement DADSKL. |
|
FREE |
Sysout allocation mode. Value CLOSE indicates that chunking is implemented and sysout files freed as soon as printed. Value END indicates that chunking is not used and sysout files are held until the end of the print job. |
|
TIMEOUT |
Specifies a number of minutes after the print job begins execution. If the printing mission does not start before the specified number of minutes have elapsed, it terminates NOTOK. |
Override Values for Printing Missions
The values specified in these parameters supersede the corresponding values obtained during the decollation process for all reports printed by this mission.
Table 50 Override Values for Printing Missions
|
Value |
Description |
|---|---|
|
CLASS |
Output printing class. |
|
DEST |
Local or remote printer JES destination (node and user ID) for printing the report. If Control-D/Delivery Server is installed, reports can be distributed to a Unix or Windows environment by setting the node value to CTDS. For more information, see Control-D/Delivery Server. |
|
EXTWTR |
External writer name. |
|
FORM |
Form to use when printing the report. |
Migration Missions
These parameters specify values that affect the execution of migration missions.
Figure 52 Migration Missions in the Migration, Printing, Backup, Restore Mission Definition Screen
    ===========================================================================
                          STAGE 01 SCHEDULING PARAMETERS
    DAYS                                                          DCAL
                                                                       AND/OR
    WDAYS                                                         WCAL
    MONTHS  1- Y 2- Y 3- Y 4- Y 5- Y 6- Y 7- Y 8- Y 9- Y 10- Y 11- Y 12- Y
    DATES
    CONFCAL          SHIFT   RETRO N MAXWAIT 00
    MINIMUM          PDS
    ...
    ===========================================================================
    RETENTION DAYS 00355          FORCE          SECONDARY SKELETON  MICLIM
    CENTERA RETENTION CLASS
    ===========================================================================
    STAGE 01 PRIMARY   MEDIA NAME OSS      AGE 0030 REFRESH EVERY 0183
             PREFIX
             SECONDARY MEDIA NAME CART              REFRESH EVERY 1460
    ===========================================================================
                        MIGRATION PATH SCHEDULING PARAMETERS
    DAYS                                                          DCAL
                                                                       AND/OR
    WDAYS   0,6                                                   WCAL
    MONTHS  1- Y 2- Y 3- Y 4- Y 5- Y 6- Y 7- Y 8- Y 9- Y 10- Y 11- Y 12- Y
    DATES
    CONFCAL          SHIFT   RETRO N MAXWAIT 00
    MINIMUM          PDS
    ===========================================================================
    ...
    STAGE 02 PRIMARY   MEDIA NAME FTK2     AGE 0365 REFRESH EVERY 1460
             FSET            VSET
             SECONDARY MEDIA NAME                   REFRESH EVERY
    ===========================================================================
Table 51 Migration Mission Parameters
|
Parameter |
Description |
|---|---|
|
RETENTION DAYS |
Number of days to keep migrated reports before they are erased. If set to 9999, reports are not automatically erased. |
|
FORCE |
Yes/No indicator that determines if the retention period in $SYSDATA records created by previous runs of the same migration mission are (Y) or are not (N) set to the value specified in RETENTION DAYS. The default is N. |
|
SECONDARY SKELETON |
Name of the member in the Control-D SKL library that contains the skeleton job for secondary migration. |
|
CENTERA RETENTION CLASS |
This parameter can be specified only by migrating to EMC Centera storage system. Optional. One of the classes defined in the EMC Centera environment can be specified. The migrated report will be kept number of days defined for the specified class in the EMC Centera definitions. If this parameter is specified, the RETENTION DAYS parameter is ignored. |
|
STAGE |
Stage (01 ... 10) in the migration path. |
|
PRIMARY MEDIA NAME |
Name of the target media for primary migration. |
|
AGE |
Age of the report (in days) on which the migration mission can select this report for migration to the target media of this stage. |
|
REFRESH EVERY |
Cyclic time interval (in days) between refresh operations (when the report automatically migrates to a new physical media of the same type). |
|
PREFIX |
Prefix of the volume or platter to which files are migrated (for migration to DASD or OSS only). |
|
FSET |
FileTek Storage Machine file set (for migration to FileTek). |
|
VSET |
FileTek Storage Machine volume set (for migration to FileTek). |
|
SECONDARY MEDIA NAME |
Name of the target media for secondary migration. |
Backup Missions
These parameters specify values that affect the execution of backup missions.
Figure 53 Backup Mission Parameters
 TIME FROM      TO      NOT LATER THAN      PRIORITY
===========================================================================
# OF DAYS TO KEEP 00031                     # OF GENERATIONS TO KEEP
===========================================================================
OUT
Table 52 Backup Mission Parameters
|
Parameter |
Description |
|---|---|
|
# OF DAYS TO KEEP |
Number of days to keep backed up reports before they are erased by utility CTDCLHST. |
|
# OF GENERATIONS TO KEEP |
Number of generations of backup mission output to keep. Older generations are erased by utility CTDCLHST. |
Editing Mission Definitions in the Edit Environment
Mission definition parameters can be edited (moved, copied, deleted, repeated) from within the Control-V Edit environment by performing IOA line editing commands, similar to standard ISPF line commands.
The EDIT command alternately activates and deactivates the Edit environment of the Mission Definition screen.
Figure 54 Entering Edit Commands
---- CONTROL-V CATEGORY DAILY                PRT MISSION DELPRT   --------(M.S)
COMMAND ===>                                                    SCROLL===> CRSR
+-----------------------------------------------------------------------------+
__ CATEGORY DAILY                             MISSION STDPRT     MONITOR
__ OWNER    M51        TASKTYPE PRT           GROUP
__ BATCH    N          SKELETON               FREE    CLOSE      TIMEOUT 10
__ OVERRIDE CLASS      DEST                   EXTWTR             FORM
__ DESC     PRINTING MISSION FOR ALL STANDARD FORM REPORTS
__ DESC
__ ===========================================================================
MM INCLUDE USER N44
__ INCLUDE USER N45
MM INCLUDE USER N46
A_ INCLUDE USER N43
__ EXCLUDE USER
__ INCLUDE ODATE
__ EXCLUDE ODATE
__ SORT PARAMETERS: 1-USER  2-JOB   3-REPORT NAME 4-CATEGORY  5-LEVEL 6-TREE
__                  7-FORMS 8-CHARS 9-MODIFY T-TIME/DATE E-USER DEFINED
__ ENTER SORT SEQ : 1
__ ===========================================================================
__ DAYS    ALL                                                   DCAL
__                                                                    AND/OR
__ WDAYS                                                         WCAL
__ MONTHS  1- Y 2- Y 3- Y 4- Y 5- Y 6- Y 7- Y 8- Y 9- Y 10- Y 11- Y 12- Y
PLEASE FILL IN MISSION PARAMETERS. USE "SHPF" TO SEE PFK DEFINITION    13.47.47
A 2-character line editing command field, marked by underscores, is displayed for each line on the screen.
Editing commands are typed directly onto these underscores.
Specified line editing commands are processed when Enter is pressed.
For more information about and examples of editing mission definition parameters in the Edit environment, see Editing Mission Definitions in the IOA Edit Environment.
Exiting the Mission Definition Screen
Use one of the following commands to exit the Mission Definition screen:
Table 53 Exiting the Mission Definition Screen Commands
|
Command |
Description |
|---|---|
|
END |
Keep the changes made to the parameters of the mission and return to the Category List screen. |
|
CANCEL |
Do not keep the changes made to the parameters of the mission and return to the Category List screen. |
|
NEXTCTG |
Keep the changes made to the parameters of the mission and display the next mission definition in the Category list. |
|
PREVCTG |
Keep the changes made to the parameters of the mission and display the previous mission definition in the Category list. |
Changes made to the parameters are kept only in memory. They are written to the disk after exiting the Category List screen.
Automatic Syntax Checking
The definition syntax is automatically checked when the Mission Definition screen is exited using the END, NEXTCTG or PREVCTG command. If errors are found in the Mission Definition screen, an error message is displayed. The errors may then be corrected. If no errors are found, exit to the Category List screen.
Saving Mission Definitions
Press END (PF03/PF15) to exit the Category List screen. If changes have been made in the Mission Definition facility, an Exit Option window is opened.
Figure 55 Saving Mission Definition Screen
CATEGORIES OF LIB CTV.PROD.RSTMIS                              RST MIS RSTADHOC
COMMAN +-----------------------------------------------------------+  ===> CRSR
OPT  N |                 PLEASE SELECT EXIT OPTION                 |  ---------
     D |                                                           |
 ===== |     SAVE    CREATE                                        |  <<< =====
       |                                                           |
       |     LIBRARY CTD.PROD.RSTMIS                               |
       |     MISSION RSTADHOC                                      |
       |                                                           |
       +-----------------------------------------------------------+


OPTIONS:  S SELECT   D DELETE   I INSERT   O ORDER   F FORCE           11.03.53
Enter Y (Yes) or N (No) in one of the exit options. It is possible to change the name of the library or mission in the window. You are returned to the Mission List screen or to the entry panel, depending on where you where when the Category List screen was entered.
When saving changes using the EXIT option, all of the mission definitions within a mission are saved, even if changes were made to only one mission definition.
Canceling Changes
To exit without saving mission definition parameter changes, enter the CANCEL command in the Mission Definition screen, or press RESET (PF04/PF16) in the Exit Option window of the Category List Screen.
Ordering Missions
The Mission Definition screens are used to define migration, printing, backup and restore mission criteria. A definition becomes "active" only after it is ordered. The report decollating mission can be ordered manually, or it can be ordered automatically each day. For further information see the Control-D and Control-V chapter of the INCONTROL for z/OS Administrator Guide. One way to manually order one or more missions is by using options O and F of the Mission List or Category List screens.
The options can be activated from:
-
Mission List Screen: All mission definitions in the selected mission are ordered.
-
Category List Screen: Only the selected mission definition is ordered.
These options are specified as follows:
Table 54 Options for Ordering Missions
|
Option |
Description |
|---|---|
|
O (ORDER) |
Schedule the mission definitions of the mission only if the specified date is defined as a scheduling date in the mission definition’s basic scheduling criteria. |
|
F (FORCE) |
Schedule the mission definitions of the mission regardless of basic scheduling criteria. |
When you use the O or F option, a default confirmation window is opened. (If the default has been modified in the User profile, a different confirmation window, requiring double confirmation, is opened.)
Figure 56 Order and Force Confirmation Window
MISSION LIST IN   CTV.PROD.BKPMIS                             --------------(M)
COMMAND ===>                                                    SCROLL===> CRSR
OPT  NAME ------------ VV.MM  CREATED     CHANGED     SIZE  INIT   MOD   ID
     BKP0009D          01.01 00/06/29 00/06/29 12:40    15    15     0 PROD
     BKP0027D          01.00 00/06/30 00/06/30 09:54     7     7     0 PROD
     BKP0196D               +-------------------------------+  5     0 PROD
     BKP0200D               |   CONFIRM     ODATE 080800    |
 O   BKP0206D   <-----------|   ASK FOR EACH ONE  Y         |
     BKP0222D               +-------------------------------+  7     0 PROD
     BKP0257D          01.01 00/06/29 00/06/29 12:40    15    15     0 PROD
 O   BKP0271D          01.00 00/06/30 00/06/30 09:54     7     7     0 PROD
     BKP0280D          01.01 00/06/29 00/06/29 12:40    15    15     0 PROD
 O   BKP0297D          01.00 00/06/30 00/06/30 09:54     7     7     0 PROD
     BKP0332D          01.01 00/06/29 00/06/29 12:40    15    15     0 PROD
     BKP0356D          01.00 00/06/30 00/06/30 09:54     7     7     0 PROD
 ===== >>>>>>>>>>>>>>>>> NO MORE MISSIONS IN LIBRARY <<<<<<<<<<<<<<<<<< ======


OPTIONS:  S SELECT   O ORDER   F FORCE   B BROWSE   D DELETE           14.39.49
The specified date can be changed. If you decide not to order the mission or mission definition, enter N in the CONFIRM field (for CANCEL).
The ASK FOR EACH ONE line is only displayed if more than one Order (or Force) is requested. If you are certain that you want to order or force all indicated missions or mission definitions, and do not want to change the ODATE for any of the individual missions or mission definitions, you can bypass individual confirmations by entering Y in the CONFIRM field and N in the ASK FOR EACH ONE field, and pressing Enter. All the missions or mission definitions marked O (or F) are ordered.
For each mission or mission definition that is successfully scheduled (ordered), the following messages are displayed:
Figure 57 Control-D Mission Order Message Window
------------------------ CONTROL-D MISSION ORDER MESSAGES ----------------(M.O)
COMMAND ===>                                                    SCROLL===> CRSR
17.24.36 CTD049I MISSION PROCESSING STARTED
17.24.39 CTD528I MISSION BKP0007D ODATE 080800 PLACED ON ACTIVE MISSIONS FILE -
17.24.39 CTD696I ALL MISSIONS PROCESSED SUCCESSFULLY
====== >>>>>>>>>>>>>>>>       END OF MESSAGE LIST      <<<<<<<<<<<<<<<<< =====

PRESS END TO RETURN, LEFT AND RIGHT TO SEE MORE.
Use the END command (PF03/PF15) to return to the Mission or Category List screen.
Copying Migration, Printing, Backup, Restore Mission Definitions to another Member
To copy one or more mission definitions from the current member to another member (mission), specify option C (Copy) by the mission names in the Category List screen and press Enter. The window in Figure 58 is displayed.
Figure 58 Window for Copying Mission Definitions to another Mission
CATEGORIES OF LIB: CTV.PROD.RSTMIS                              PRT MIS STD
COMMAND ===>                                                    SCROLL===> CRSR
OPT  NAME ------------ VV.MM  CREATED     CHANGED     SIZE  INIT   MOD   ID
 C   PRINTJOB1         01.01 00/06/29 00/06/29 12:40    15    15     0 PROD


               +-----------------------------------------------------------+
               |                                                           |
               |     SPECIFY DESTINATION LIBRARY,MEMBER AND CATEGORY NAME  |
               |                                                           |
               |  LIBRARY :  CTV.PROD.RSTMIS                               |
               |  MEMBER  :                                                |
               |  CATEGORY:  PRINTJOB                                      |
               |                                                           |
               |  PRESS END/RESET TO CANCEL     ENTER TO PERFORM THE COPY  |
               +-----------------------------------------------------------+


OPTIONS:  S SELECT   O ORDER   F FORCE   B BROWSE   D DELETE           14.39.49
The window contains the following fields (some fields contain default values that can be modified):
Table 55 Fields in the Window for Copying Mission Definitions to another Mission
|
Field |
Description |
|---|---|
|
Library |
Library containing the table into which the mission definitions should be copied. Must be an existing library. Default is the current library. |
|
Member |
Name of the member (mission) into which the mission definition should be copied. A mission definition can only be copied to another member. It cannot be copied to its own member (even if the mission definition is renamed). If the specified member does not exist, the member is created when the request is performed. |
|
Category |
Name of the mission definition to be copied. If multiple mission definitions are selected, the window is initially displayed with the first selected mission definition. As each request is performed or canceled, the next requested mission definition name is displayed. |
To perform a copy request, press Enter.
To cancel a request, press END (PF03/PF15) or RESET (PF04/PF16).
Recipient Tree and Approval Tree Definition
The Control-D/V Recipient/Approval Tree Definition facility provides a series of screens that enable you to create, view, and modify a user Recipient Tree and an Approval Tree.
These trees can contain up to 15 levels of recipients or approvals. Each level is identified by a user defined 2-character code and a full name. Levels are installation defined. For more information, see Defining the Recipient Tree and the INCONTROL for z/OS Installation Guide: Installing.
-
The Recipient Tree is stored as a member in a library (partitioned dataset). It can contain an unlimited number of report recipients.
For information about loading the RecipientTree, see the Control-D and Control-V chapter of the INCONTROL for z/OS Administrator Guide. -
The Approval Tree is comprised of Approval names. Each Approval name represents one or more users that can approve reports from Control-D/WebAccess Server.
Defined Approval names are relevant when assigning a report for approval using one of the following methods:
-
Inclusion of the DO APPROV parameter during the decollation process (see DO APPROV: Decollating Parameter (Decollating Mission)).
-
Adding reports for approval in Control-D/WebAccess Server (see the Control-D/WebAccess Server User Guide).
-
Configuring Approval fields in a Permanent User File (see Table 73: Additional Info Fields in the Default (D) Display Type, in User Report List Display Types).
-
Entry Panel
To enter the Recipient/Approval Tree facility, select option T on the IOA Primary Option menu. The IOA Recipient/Approval Tree entry panel is displayed.
Figure 59 Recipient/Approval Tree Facility Entry Panel
  ---------------- IOA RECIPIENT/APPROVAL TREE - ENTRY PANEL -----------------(T)
   COMMAND ===>
   SPECIFY LIBRARY NAME AND MEMBER (TREE) NAME
      LIBRARY ===> CTD.PROD.PARM
      MEMBER  ===> CTDTREE                      BROWSE   (Y/N)
           LEVEL 10       OPERATIONS            ===>
                 15       PRESIDENT             ===>
                 20       REGNL-MGMT            ===>
                 25       BRANCH                ===>
                 30       BRANCH-DEPT           ===>
                 50       DIVISION              ===>
                 55       DEPARTMENT            ===>
                 60       SECTION               ===>
                 80       WORKERS               ===>
                 90       CD-Control            ===>
                 95       OP-USER               ===>


 FOR DIRECT ACCESS, FILL IN RECIPIENT NAME IN APPROPRIATE LEVEL       17.29.25
In this example entry panel, the CTDTREE member is specified. The CTDTREE member is a sample Recipient Tree that is provided during product installation. A sample Approval Tree is also provided, in a member named CTDAPRV.
If you use the selection list fields, their values are not erased until you exit the entry panel by pressing END (PF03/PF15).
Displaying a Recipient Tree or Approval Tree
Specify the desired Recipient Tree or Approval Tree by typing the library name and member (tree) name. The content of the member that you specify determines the display in the next screen, whether a Recipient Tree or an Approval Tree.
The library and member containing the Recipient Tree or Approval Tree are installation defined. They should correspond to the TREE parameter or APRV parameter in the CONTROLD and CTDPRINT JCL procedures.
The following sample members are provided:
-
CTDTREE: sample Recipient Tree member.
-
CTDAPRV: sample Approval Tree member, which contains a root-level element named CDAPPROV.
Select the desired display mode (Edit or Browse) by entering Y or N in the BROWSE field:
-
Y (Yes): The tree is displayed in Browse mode. Updates are not permitted but the CHKTREE command (described later) is permitted.
-
N (No): The tree is displayed in Edit mode. Updates are permitted. Default.
If a specific recipient or Approval is desired, type its name (or prefix) next to the appropriate level.
Press Enter.
Recipient/Approval Tree List Screen
Depending on the type of member that you specified in the entry panel, this screen displays a tree with a list of either recipients or Approval names.
For ease of identification, each successive level of the tree is indented from the previous level.
The Recipient/Approval Tree may require more than one screen. Use the scrolling PFKeys to scroll the tree forward and backward.
Tree size is limited only by the region size available for the Online facility.
The following figures show two separate examples of a Recipient Tree List Screen and an Approval Tree List screen. Note that the root-level element in an Approval Tree is always named CDAPPROV.
If the tree is displayed in Browse mode, a message indicating this is displayed at the top of the screen.
If a tree requested in Edit mode is in use (in Edit mode) by another user, the tree may be displayed in Browse mode, depending on your User profile definition, and an appropriate message is issued.
Figure 60 Recipient Tree List Screen
--------------------- CONTROL-D RECIPIENT/APPROVAL TREE --------------------(T)
COMMAND ===>                                                    SCROLL===> CRSR
LEVELS  ===> 10 Y 15 Y 20 Y 25 Y 30 Y 50 Y 55 Y 60 Y 80 Y 90 Y
     10 CDTREE    CONTROL-D RECIPIENT TREE SAMPLE
     20 MGT      MANAGEMENT DEPARTMENT
     55 MKT      MARKETING DEPARTMENT
     55 DEV      DEVELOPMENT DEPARTMENT
     55 PROD     PRODUCTION DEPARTMENT
     55 WAREHSE  WAREHOUSE
     25 BR129    THE NORTH COUNTY BRANCH
     30 BR129LO  THE LOANS DEPARTMENT
     30 BR129FC  THE FOREIGN CURRENCY DEPARTMENT
     30 BR129SA  THE SAVINGS DEPARTMENT
     55 BMIAMI   THE CONTROL-D USER
     90 PRODCNTL PRODUCTION Control USER
     90 UNIDENT  UNIDENTIFIED REPORTS
     90 NULL     IDENTIFIED REPORTS NOT NEEDED
====== >>>>>>>>>>>>>>>>>>>>>>>> END OF TREE >>>>><<<<<<<<<<<<<<<<<<<<<< ======

OPTIONS:  D DELETE   I INSERT   S SELECT   P SEE/HIDE PARENT         17.29.39
The following example Approval Tree contains single-level Approvals. For examples of Approval Trees that contain multi-level Approvals, see Multi-level Approvals in Approval Trees.
Figure 61 Approval Tree List Screen
--------------------- CONTROL-D RECIPIENT/APPROVAL TREE --------------------(T)
COMMAND ===>                                                    SCROLL ===>CRSR
LEVELS  ===> 10 Y 15 Y 20 Y 25 Y 30 Y 40 Y 50 Y 55 Y 60 Y 80 Y
    10 CDAPPROV CTD APPROVAL TREE
    15 APP1     APPROVAL PROCESS1
    15 APP21    APPROVAL PROCESS
    15 APP22    APPROVAL PROCESS
    15 DOC      APPROVAL PROCESS1
    15 APP23    APPROVAL PROCESS
    15 APRV2    APPROVAL PROCESS
    15 APRV1    APPROVAL PROCESS
    15 APPOVAL3 APPROVAL PROCESS
    15 MANUAL   APPROVAL PROCESS
    15 REGULAR  APPROVAL PROCESS

=====>>>>>>>>>>>>>>>>>>>>> END OF TREE >>>>>>>><<<<<<<<<<<<<<<<<<<<<<= = = = = =
OPTIONS: D DELETE   I INSERT        S SELECT       P SEE/HIDE PARENT     10.45.19
Recipient Tree Parameters
The following parameters are displayed for each recipient. This information can be updated here or in the Recipient Definition screen, which is described in Recipient Definition Screen.
LEVELS  ===> 10 Y 15 Y 20 Y 25 Y 30 Y 50 Y 55 Y 60 Y 80 Y 90 Y
    10 CDTREE    CONTROL-D RECIPIENT TREE SAMPLE
                55 MKT      MARKETING DEPARTMENT
                        PARENT: MGT       LEVEL: 20
Table 56 Parameters of the Recipient Tree
| Parameter | Description |
|---|---|
|
LEVELS |
This parameter allows you to display or hide specific levels in the tree. The defined levels are listed.
|
|
LEVEL |
2-digit level code (01-99) that is site dependent and reflects the recipient’s level in the organization hierarchy. |
|
RECIPIENT NAME |
Main identifying name of the recipient, up to eight characters. This name must be unique in the tree. If you change the level, the line automatically adjusts its indentation (horizontal position). However, the parent name remains the same (it is not automatically adjusted). The physical position of the recipient in the tree does not determine parent and child relationships. Only the parent field specifies the actual relationship. A recipient can be the child of any one recipient at a higher level in the tree. |
|
DESCRIPTION |
Description of the recipient (free text). Only the first line of the description is displayed in this screen. |
|
PARENT/LEVEL |
Parent of the current recipient and the level of the parent. These parameters can be displayed or hidden as desired. |
Approval Tree Parameters
The following parameters are displayed for each Approval. This information can be updated here or in the Approval Definition screen, which is described in Approval Definition Screen.
LEVELS  ===> 10 Y 15 Y 20 Y 25 Y 30 Y 40 Y 50 Y 55 Y 60 Y 80 Y
    10 CDAPPROV CTD APPROVAL TREE
                15 APP1     APPROVAL PROCESS1
                        PARENT: CDAPPROV      LEVEL: 10
Table 57 Parameters of the Approval Tree
| Parameter | Description |
|---|---|
|
LEVELS |
This parameter allows you to display or hide specific levels in the tree. The defined levels are listed.
|
|
LEVEL |
2-digit level code (01-99) that is site dependent and reflects the Approval's level in the approval process organization hierarchy. |
|
APPROVAL NAME |
Name of the Approval element, which represents 1 or more users that can approve reports from Control-D/WebAccess Server. This name must be unique in the tree. You can define single-level Approvals or multi-level approvals. Use single-level Approvals if you want the report to be approved by a single Approval. Use Multi Approval if the report requires approval from more than one Approval. For Multi Approval, you can choose between two modes — Multi-level Approval or Parallel Approval. For more information, see Multi-level Approvals in Approval Trees. |
|
DESCRIPTION |
Description of the Approval (free text). Only the first line of the description is displayed in this screen. |
|
PARENT/LEVEL |
Parent of the current Approval and the level of the parent. These parameters can be displayed or hidden as desired. |
Multi-level Approvals in Approval Trees
You can implement two modes of Multi Approval, that is,approval by multiple groups of users — Multi-level Approval and Parallel Approval.
For Multi-level Approval, the administrator defines each successive Approval name as a child of the previous one. Each individual Approval name represents a separate group of authorized users.
Approval is performed sequentially -- each approver approves the report only after all preceding (parent) approvers have completed the Approval process.
Figure 62 Example of Multi-level Approval Definition
15 MSTAPP        MULTISTAGE APPROVAL STEP 1 (AUTHORIZE …)
PARENT: CDAPPROV  LEVEL: 10
20 MSTAPP2  MULTISTAGE APPROVAL STEP 2 (AUTHORIZE …)
PARENT: MSTAPP         LEVEL: 15
25 MSTAPP3  MULTISTAGE APPROVAL STEP 3 (AUTHORIZE …)
PARENT: MSTAPP2        LEVEL: 20
For Parallel Approval, the administrator defines multiple Approval names as children of the main Approval entity. Each of the child Approval names represents a separate group of authorized users. However, the main (parent) Approval entity is not associated with any users.
The report is available for approval at the same time by all child approvers, in parallel.
Figure 63 Example of Parallel Approval Definition
15 PARAPP        PARALLEL APPROVAL HEADER (NO AUTHORIZE)
PARENT: CDAPPROV  LEVEL: 10
20 PAR1          1-ST PARALLEL APPROVAL (AUTHORIZE …)
PARENT: PARAPP         LEVEL: 15
20 PAR2          2-ND PARALLEL APPROVAL (AUTHORIZE …)
PARENT: PARAPP         LEVEL: 15
20 PAR3          3-RD PARALLEL APPROVAL (AUTHORIZE …)
PARENT: PARAPP         LEVEL: 15
For further information, see Assigning approval to multiple groups in the INCONTROL for z/OS Administrator Guide.
Options of the Recipient/Approval Tree List Screen
To request one of the following options, specify the option in the field to the left of the recipient name or Approval name, and press Enter.
If the screen is displayed in Browse mode, options D (Delete) and I (Insert) are not available.
Table 58 Options of the Recipient/Approval Tree List Screen
|
Option |
Description |
|---|---|
|
S (SELECT) |
Display the Recipient Definition screen for the selected recipient or the Approval Definition screen for the selected Approval name. If the current screen is displayed in Browse mode, the Definition screen can only be browsed; it cannot be modified. |
|
D (DELETE) |
Delete an item (recipient or Approval) from the tree. |
|
I (INSERT) |
Insert a new item (recipient or Approval) in the tree. The Definition screen is displayed, where you define the recipient or Approval. The new item is added after the item marked I (at the same level and with the same parent). You can change the level and/or parent of the new item. |
|
P (SEE/HIDE PARENT) |
This option allows you to display or hide the parent line of the recipient or Approval. |
Commands of the Recipient/Approval Tree List Screen
Table 59 Recipient/Approval Tree List Screen Commands
|
Command |
Description |
|---|---|
|
NEXT |
This command is relevant only for the Recipient Tree, and not for the Approval Tree. A name can be used only once as a user name in a Recipient Tree, but it can be used an unlimited number of times as a synonym in the tree. If you specify a recipient name (or prefix) next to one of the levels in the Recipient Tree entry panel, the first recipient whose user name (or synonym) conforms with that name at that level is displayed at the top of the Recipient Tree screen. To display (at the top of the screen) the next recipient who conforms to the specified criteria, enter the NEXT command on the COMMAND line. Synonyms are not displayed in the Recipient Tree screen. If a matching synonym is found, the cursor is positioned on the name of the user to whom the synonym belongs. |
|
CHKTREE |
The CHKTREE command checks the validity of your tree. Type CHKTREE on the command line and press Enter. This check is performed automatically (by default) when you save a tree. For more information, see Exiting a Recipient/Approval Tree List Screen.
Press END (PF03/P15) to return to the Recipient/Approval Tree screen. Correct the errors and either perform CHKTREE again or exit from the screen. |
Recipient Definition Screen
The Recipient Definition screen is accessed by specifying option S for the selected recipient in the Recipient Tree List screen. This screen enables you to see and update information about a recipient.
Figure 64 Recipient Definition Screen
----------------------- CONTROL-D RECIPIENT DEFINITION -------------------(T.S)
COMMAND ===>                                                    SCROLL===> CRSR
+-----------------------------------------------------------------------------+
  RECIPIENT  PROD      RECIPIENT LEVEL 55   PARENT MGT        PARENT LEVEL 20
  DESC       PRODUCTION DEPARTMENT
  DESC
  ===========================================================================
  SYNONYM    PRODUCTION
  SYNONYM
  AUTHORIZE            $SYSDATA
  ADDRESS
  ===========================================================================
  INDEX    Y           USER BANNER Y                    REPORT BANNER Y
  DEF DEST
  ===========================================================================
                         P C   P A R A M E T E R S
   AUTHORIZED Y
   PC PATH
   PC RETAIN 006       (days)       MF RETAIN 006       (days)
   MAX SIZE  00056000  (lines)      TRANSMIT FROM 0300 TO 0600  (hhmm)
======= >>>>>>>>>>>> END OF RECIPIENT DEFINITION PARAMETERS <<<<<<<<<<<< ======
FILL IN RECIPIENT DEFINITION.                                          17.45.40
Exit the Recipient Definition screen by pressing the END key (PF03/PF15).
This screen displays the following parameters for the selected recipient:
Parameters marked with the symbol M can have many occurrences. When you fill in the last occurrence of the parameter on the screen, a new empty occurrence of that parameter is added.
Table 60 Recipient Definition Screen Required Fields
|
Field |
Description |
|---|---|
|
RECIPIENT |
Name of the recipient. Maximum length: 8 characters. |
|
RECIPIENT LEVEL |
Level of the recipient. Two digits, leading zero required. |
|
PARENT |
Name of the recipient’s parent. Maximum length: 8 characters. |
|
PARENT LEVEL |
Level of the recipient’s parent. |
Table 61 Recipient Definition Screen Optional Fields
|
Field |
Description |
|---|---|
|
DESCM |
Description of the recipient. To download reports to PC, add the following DESC:
where:
|
|
SYNONYMM |
Another name for the recipient. Maximum Length of Each Synonym: 20 characters. Synonyms may not be unique and may contain embedded spaces. |
|
AUTHORIZEM |
Name of online users authorized to access the reports of the recipient and its descendants. A name prefix can be specified. |
|
$SYSDATAM |
Is the authorized user or also authorized to access $SYSDATA entries and to create or modify global rulers. Valid Values:
Default: Blank space, which implies N. |
|
ADDRESSM |
Location to which the user bundle is sent during distribution. Maximum number of lines: 10. The address can be printed in the user banner. If **P is specified, the address of the parent is used. |
|
INDEX |
Print a report index at the beginning of the user bundle. Valid Values:
Default: Y |
|
USER BANNER |
Print a user banner at the beginning and end of the user’s bundle. Valid Values:
Default: Y |
|
REPORT BANNER |
Print a report banner at the beginning and end of each report in the bundle. Valid Values:
Default: Y |
|
DEF DEST |
Default destination (node and user ID) of printed reports for the recipient. Each node and user ID can be 1–8 characters. If Control-D/Delivery Server is installed, reports can be distributed to a Unix or Windows environment by setting the node value to CTDS. For more information, see Control-D/Delivery Server. This parameter is taken into account at decollation time. It does not affect reports that are already decollated. |
Table 61a Recipient Definition Screen PC Download Parameters
|
Parameter |
Description |
|---|---|
|
AUTHORIZED |
Indicates whether the user can receive reports via Control-D/WebAccess Server.
|
|
The following parameters are displayed only if AUTHORIZED is set to Y: |
|
|
PC PATH |
PC path to which reports are downloaded (drive:\directory). It is highly recommended that each user have a unique (sub)directory on the PC. |
|
PC RETAIN |
Number of days to keep user reports on the PC. Valid Values: 000–999 |
|
MF RETAIN |
Number of days to keep the bundle ready for transmission on the mainframe. Valid Values: 000–999 Reports remain on the mainframe in WAIT TRANSMISSION mode until transmitted or until the number of days specified in MF RETAIN is exceeded. |
|
MAX SIZE |
Maximum number of lines to download to the PC in one bundle (up to 8 digits). |
|
TRANSMIT |
Time interval during which transfer of reports from mainframe to PC is allowed. Format: From hhmm to hhmm. |
Approval Definition Screen
The Approval Definition screen is accessed by specifying option S for the selected Approval in the Approval Tree List screen. This screen enables you to see and update information about an Approval.
Figure 65 Approval Definition Screen
--------------------------CONTROL-D APPROVAL DEFINITION-------------------------(T.S)
COMMAND ===>                                                          SCROLL===> CRSR
+-----------------------------------------------------------------------------------+
APPROVAL FINACE    APPROVAL  LEVEL 15     PARENT CTDAPRV               PARENT LEVEL 10
DESC 2 CTD APPROVAL
DESC
=====================================================================================
AUTHORIZE  CTDWEB
AUTHORIZE  M
AUTHORIZE  Q
AUTHORIZE  K
AUTHORIZE
=====================================================================================
=====>>>>>>>>>>>>>>>>>>>>> END OF APPROVAL DEFINITION PARAMETERS <<<<<<<<<<<<<======

FILL IN APPROVAL DEFINITION
Exit the Approval Definition screen by pressing the END key (PF03/PF15).
This screen displays the following parameters for the selected Approval:
Parameters marked with the symbol M can have many occurrences. When you fill in the last occurrence of the parameter on the screen, a new empty occurrence of that parameter is added.
Table 62 Approval Definition Screen Required Fields
|
Field |
Description |
|---|---|
|
APPROVAL |
Name of the Approval. Maximum length: 8 characters. |
|
APPROVAL LEVEL |
Level of the Approval. Two digits, leading zero required. |
|
PARENT |
Name of the Approval's parent. Maximum length: 8 characters. |
|
PARENT LEVEL |
Level of the Approval's parent. |
Table 62a Approval Definition Screen Optional Fields
|
Field |
Description |
|---|---|
|
DESCM |
Description of the Approval. Optionally, enter EMAIL and EMAILCC addresses in DESC fields, to send messages to certain users from the CTDAPRV utility regarding report approvals:
Copy
For more information about valid email values for the IOAMAIL facility, see the INCONTROL for z/OS Administrator Guide. |
|
AUTHORIZEM |
Name of CTD/WA users authorized to access the reports of the Approval. To define multiple users in one AUTHORIZE field, you can specify a name prefix that ends with an asterisk wildcard. If this is the parent Approval of multiple Approvals designed to approve in Parallel mode, do NOT specify any AUTHORIZE values. |
Exiting a Recipient/Approval Tree List Screen
Press END (PF03/PF15) to exit the Recipient/Approval Tree. The Exit Option window is opened.
Figure 65a Recipient/Approval Tree List Screen Exit Option Window
 --------------------- CONTROL-D RECIPIENT/APPROVAL TREE --------------------(T)
 COMMAN  +--------------------------------------------------------+ LL===> CRSR
 LEVELS  |           PLEASE SELECT EXIT OPTION                    |
     10  |                                                        |
         |   SAVE    CREATE                                       |
         |                                                        |
         |   CHECK Y                                              |
         |                                                        |
         |   LIBRARY CTD.PROD.PARM                                |
         |   MEMBER  CTDTREE                                      |
         |                                                        |
         +--------------------------------------------------------+
             30 BR129FC  THE FOREIGN CURRENCY DEPARTMENT
             30 BR129SA  THE SAVINGS DEPARTMENT
                 55 BMIAMI   THE CONTROL-D USER
                       90 PRODCNTL PRODUCTION Control USER
                       90 UNIDENT  UNIDENTIFIED REPORTS
                       90 NULL     IDENTIFIED REPORTS NOT NEEDED
 ====== >>>>>>>>>>>>>>>>>>>>>>>> END OF TREE >>>>><<<<<<<<<<<<<<<<<<<<<< ======
 OPTIONS:  D DELETE   I INSERT   S SELECT   P SEE/HIDE PARENT          15.32.55
Enter Y or N in either the SAVE or CREATE field. It is possible to change the name of the library or the name of the tree (member) in the Exit Option window. If you enter N in either field, no changes are made and you return to the entry panel.
The CHECK field indicates whether or not to check the syntax of the Recipient/Approval Tree.
-
Y (Yes): Check or sort the tree before it is saved.
-
N (No): Save the tree without performing a check or sort.
Default: Y
Whenever the monitor loads the Recipient Tree and the Approval Tree, an automatic check or sort is performed. Only valid recipients and Approvals are loaded. Error messages are written to the IOA Log file when invalid items are detected.
Syntax Checking
If you respond Y to save or create a new tree and Y to check the syntax, the syntax of the tree is checked.
-
If there are no errors in the tree, the tree is automatically sorted by hierarchy and saved (or created). You are returned to the entry panel.
-
If errors exist, the Recipient/Approval Tree List screen disappears and appropriate messages are displayed on a Message List screen. If the messages span more than one screen, you can scroll the list forward and backward. Press END (PF03/P15) to return to the Recipient/Approval Tree List screen. Correct the errors and exit from the screen.
RESET Command
If you have entered an Exit Option window but you do not want to exit the Recipient/Approval Tree screen, press RESET (PF04/PF16). You are returned to the Recipient/Approval Tree List screen without saving the tree.
CANCEL Command
To exit the Recipient/Approval Tree List screen without checking the tree syntax and without opening an Exit Option window, type CANCEL on the command line and press Enter. Any modifications to the tree are not saved and you return to the entry panel is displayed.
User Reports (Online Viewing)
To enter the User Reports facility, select option U on the IOA Primary Option menu. The Control-V User Reports entry panel is displayed.
User Reports facility screens enable the Control-V user to:
-
Display a list of reports based on index values, report status and other criteria.
-
Retrieve pages or sections of a report via index values.
-
Display a list of indexes available for a report.
-
View report index values and the number of times each value occurs.
-
View, edit and print report pages or sections.
-
Request immediate printing or reprinting of report pages.
-
Change various report printing parameters including destination, form, output print class, and number of copies to print.
-
Cancel the scheduled printing of a report.
-
Edit (reformat) a report so that it looks different from the original when viewed or printed.
-
Delete a report.
-
Designate new recipients for a report.
-
Add notes or messages to a report.
-
Authorize other users to view a report.
Indexes play a central role in retrieving reports for online viewing and immediate printing. Report indexes enable users to determine if desired information is available and to retrieve only the desired information for online viewing or printing.
The process of online report retrieval via index values is discussed on the following pages.
Using Indexes for Report Retrieval
The User Reports facility provides online screens that enable the user to perform the following functions:
-
Identify the report from which pages should be retrieved.
-
User Report List: Facilitates using all the available functions provided by the User Reports facility.
-
Quick Access Report List: Facilitates using the Quick Access Method (described below) for report retrieval.
An index name and index values can be used as report selection criteria.
-
-
Identify the indexes to be used for retrieval.
-
User Reports Entry Panel: Provides a field for a main index name.
-
Index Window: Lists main indexes that have been defined for a report.
-
Subindex Window: Lists subindexes that exist for any specified value in a higher level index.
-
Quick Access Panel: Displays a complete index path.
-
-
Specify a value for the selected indexes.
-
User Reports Entry Entry Panel: Provides fields for a main index and its value.
-
Values of Index Panel: Displays an alphabetized list of available values.
-
Quick Access Panel: Provides a value field for each index in an index path.
-
-
Specify viewing or immediate printing for the selected report pages.
-
User Report List: Provides options for viewing or printing.
-
Values of Index Panel: Provides options for viewing or printing (if accessed via an Index or Subindex window).
-
Quick Access Panels: Provides commands for viewing or printing.
-
The following diagram shows how these online screens are used to retrieve report pages. A description of the diagram follows.
Report Access using Index Values
Figure 66 Report Access Using Index Values
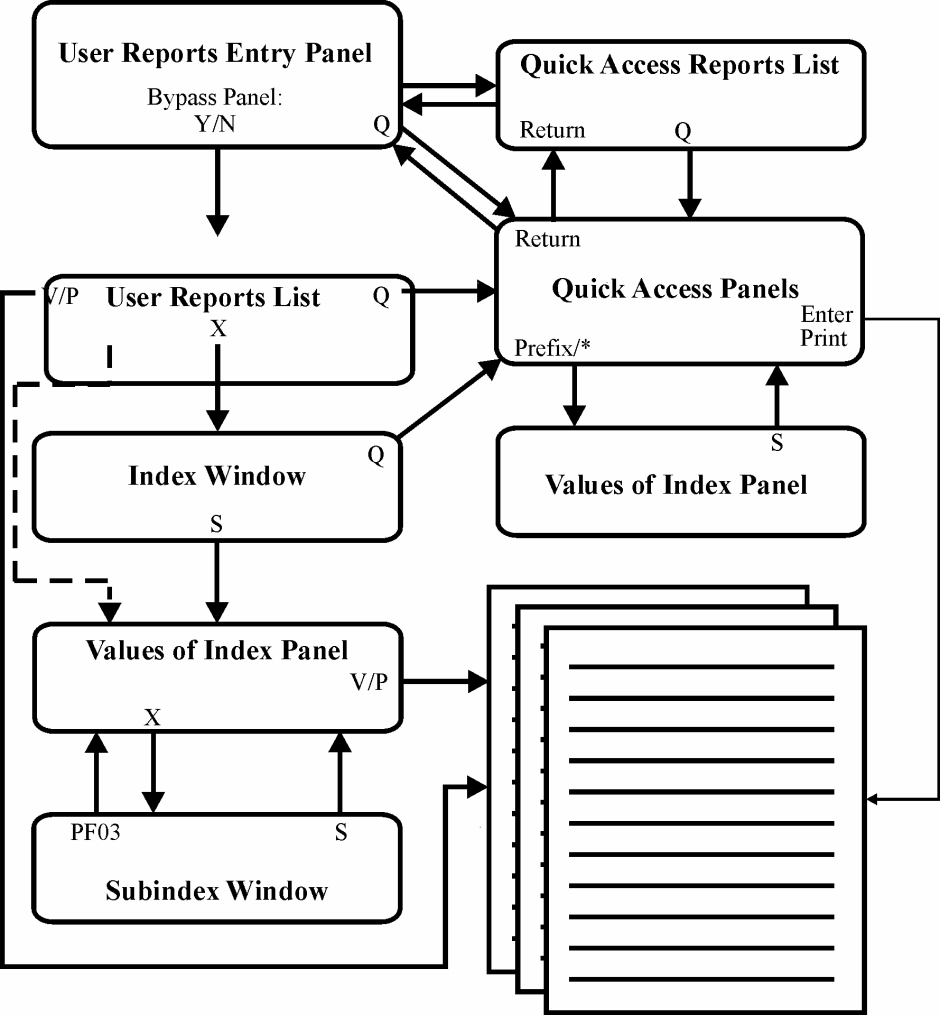
Each arrow in the diagram points from an option or command to the screen displayed when that option or command is executed. (The dashed line indicates a shortcut that bypasses the Quick Access Report list if only one report had been listed, or that bypasses the Index Window if only one index had been listed.) Available options:
Table 63 Quick Access Panel Options
|
Option |
Description |
|---|---|
|
P |
Initiate Immediate Printing of report pages pointed to by the specified index values. |
|
Q |
Display the Quick Access Report list or Quick Access panels. |
|
S |
Display the Values of Index panel for the specified index, or select an index value to be inserted in a Quick Access panel. |
|
V |
View report pages pointed to by the specified index values. |
|
X |
Display the Index window or Subindex window. |
There are three basic methods of specifying index values for report retrieval:
Table 64 Methods for Specifying Index Values for Report Retrieval
|
Method |
Description |
|---|---|
|
Quick Access Method |
Available from the User Reports entry panel, the User Report list, or the Index window. |
|
Index / Subindex Window Method |
Available from a User Report list. |
|
Hit List |
Available from the User Reports entry panel. |
These methods are described below.
Quick Access Method
Retrieval via the Quick Access Method is especially useful when the index hierarchy has many levels and when the user is familiar with the reports and indexes available.
The Quick Access Method utilizes Quick Access panels that can be accessed from the User Reports entry panel, from any Report list, or from the Index window (described in the following section). Quick Access panels allow the user to quickly display the available index paths for a report, select the required index path, and specify index values that are used for report retrieval. Each index path is displayed in a separate Quick Access panel. The user can display each Quick Access panel until the required path is displayed.
Once the required path is displayed in a Quick Access panel, the user specifies the values to be used for retrieval.
If the required values are known, the user can specify them in the Quick Access panel to view or print the selected report pages. When retrieving a report section via a migrated index, provide as many values as possible to improve performance.
If the required values are not known, specifying a prefix or asterisk displays the Values of Index panel with possible values from which to choose. When the user selects a value, the value is automatically inserted in the Quick Access panel. The selected report pages or sections can then be viewed or printed.
Index / Subindex Window Method
Retrieval via the Index / Subindex Window Method is especially useful when the index hierarchy does not have many levels. Index and Subindex windows list the available main indexes and subindexes.
These windows can only be accessed from the User Report list. The user proceeds from level to level in the index hierarchy, examines the available index names and values, and specifies index values until the retrieval criteria are specified.
Through the User Report list, the main indexes for the selected report can be displayed in the Index window.
Once the user has reviewed the main indexes in the Index window and selected the desired main index, the user can proceed in either of two ways:
-
Display the Quick Access panels. From this point, retrieval continues as described in "Quick Access Method" above.
-
Display the values for the selected main index in the Values of Index panel.
Once a value has been specified in the Values of Index panel, the user can proceed in one of two ways:
-
View or initiate immediate printing of the report pages pointed to by the specified index value.
-
Display the Subindex window that lists the next level of subindexes available under the specified higher index value.
In the Subindex window, the user selects the next lower index level and enters its Values of Index panel to specify the desired value for the selected subindex. The specified value can be used in one of the two ways outlined above.
Each time the user displays the Subindex window, the index names listed in it and the values displayed by the Values of Index panel are for the next lower level index in an index path.
Hit List Method
A "Hit List" is a list of reports selected according to:
-
an index name or mask, and
-
(optionally) an index value or prefix that are specified as part of the report selection criteria.
The determination of which reports are listed in the User Report list or Quick Access Report list occurs in stages:
-
In the first stage, reports are filtered by report attributes specified in the User Reports entry panel (such as report name, user ID, report date range) and the Show Options window (such as report status).
-
In the second stage, reports are filtered by main index name or mask. If the selection criteria contain a main index name or mask without an index value or prefix, reports are selected if they contain the specified index.
-
In the third stage, reports are filtered by index value or prefix.
-
If the selection criteria contain an index value or prefix for a nonresident main index, reports are selected if they contain the specified index. Nonresident indexes are not searched for index values.
-
If the selection criteria contain an index value or prefix for a resident main index, reports are selected if they contain pages or sections pointed to by the specified index values.
-
It is often possible to bypass Index windows and Quick Access panels when accessing reports that qualify as a Hit List based on an index value or prefix. For example:
-
If a single index value was retrieved by Hit List filtering, only the report sections indexed by this value are printed or viewed without the need for additional filtering via an Index window or Values of Index panel.
-
If only one index satisfies the retrieval criteria, the Index window is bypassed when accessing the index.
-
If only one report is retrieved, the Quick Access Report list is bypassed when using the Quick Access method.
After retrieving reports that qualify as a Hit List, the user can:
-
Use regular commands and options, such as View and Print, which access only the retrieved sections of the report.
-
Use Quick Access panels. From this point, retrieval continues as described in "Quick Access Method" above (see Report Access using Index Values ).
-
Display the indexes and values as described in "Index/Subindex Window Method" above (see Report Access using Index Values). Only indexes that match the Hit List index retrieval criteria are accessed.
Retrieval Considerations
The following information can be helpful when deciding how to retrieve indexed reports:
-
In general, the Quick Access Method is more efficient in terms of the time and resources required for retrieval. This is especially true if some or all of the required indexes have migrated and are no longer on DASD.
-
Each Index and Subindex window provides the maximum information about indexes available at the next level in an index path but these windows provide no information about other index levels. Each Quick Access panel provides the maximum information about one index path but that panel provides no information about other index paths.
-
When viewing or printing reports, there are advantages if all the selected reports have the same nonresident main index, or have the same DASD-resident main index and contain exactly the same main index value or prefix. For more information, see Hit List Method.
-
If a user’s access to Control-V is limited to Direct Online Viewing (DOLV) and BYPASS PANEL is set to Q in the User Reports entry panel, the first screen displayed is the Quick Access Report list (if the user has several reports), or the Quick Access panels (if the user has only one report).
Job Archiving Retrieval
A Job Archiving facility is available for a special JOBSDSN1 decollation and consolidation process that creates one large index of the archived jobs. Display type J facilitates the retrieval and viewing of production job SYSOUTs. For more information, see User Reports Entry Panel (Display Type J).
Entry Panel
Selecting option U on the IOA Primary Option menu displays the User Reports entry panel unless the panel is bypassed as described below.
The User Reports entry panel is the main user interface to Control-V information about reports. The OPTIONS field of the entry panel allows you to specify the kind of Report list you want to display:
-
Permanent: An inventory of reports processed by Control-V.
-
Active/Migrated: Recently or soon to be processed reports and/or reports that migrated from DASD to various storage devices.
-
History: Reports backed up on tape or cartridge.
Default: Active/Migrated
The other fields enable you to specify the criteria used to select the reports that are displayed. A list of all reports that conform to the specified criteria is displayed on the User Report list or Quick Access Report list.
The default Control-V security mechanism enables each user to see and update only their reports and the reports of their subordinates in the Recipient Tree.
There are three display types for the Control-D/V User Reports entry panel: V (Default panel), A (All fields), and J (Job display).
The fields in display types V, A, and J are described later in this chapter.
The entry panel default display (V) is illustrated below.
Figure 67 User Reports Entry Panel
 ------------------ CONTROL-D/V - USER REPORTS ENTRY PANEL ----------------(U)
 COMMAND ===>
   OPTIONS ===>                1. PERMANENT  2. ACTIVE/MIGRATED  3. HISTORY


       REPORT NAME   ===>
                                          Report name, prefix or mask
       USER          ===>                 Recipient name or prefix
       DATE FROM     ===>     TO          Report date or relative day
       JOBNAME       ===>                 Job name, prefix or mask

       SHOW MIGRATED ===> Y               Include migrated reports

       INDEX         ===>                 Index name, prefix or mask
       VALUE         ===>


       DISPLAY TYPE===> D                 BYPASS PANEL ===> N


 SELECT AN OPTION, FILL IN THE SELECTION CRITERIA, AND PRESS ENTER
In the entry panel and Show Options window, the default 1-character equivalents for YES and NO are Y and N. installation parameters $USRYES and $USRNO in member $$FRM of the IOA MSG library can be used to set different 1-character equivalents for YES and NO.
Changing Entry Panel Display Types
While in the Control-D/V User Reports entry panel, the entry panel display type can be changed through the DISPLAY command. Format of the command is:
DISPLAY xwhere x is a one letter code which identifies the desired display type. DISPLAY can be abbreviated to DI.
For a list of display types, enter DISPLAY ? to show the Display Options window. To select a display type in the window, enter S in the OPTION field next to the ID. To exit the window without selecting a display type, press the END key (PF03/PF15).
DI Adisplays the All Fields display.
Predefined entry panel display:
-
V: Default display.
-
A: All Fields display.
-
J: Job display.
User Reports Entry Panel Fields (Display Type V)
Specify any of the following selection criteria to control which reports are displayed in User Report lists. The symbol C indicates that the field allows character masking.
Table 65 User Reports Entry Panel Fields (Display Type V)
|
Field |
Description |
|---|---|
|
REPORT NAMEC |
Report name (as set during decollation). |
|
USERC |
User (recipient) name. The default is all recipients for which the user has authorization, if security module CTDSE04 is implemented. Otherwise, the default is the (first) root of the Recipient Tree. |
|
DATE FROM/TO |
Earliest and latest report date for reports to be included in the Report list. Date criteria are checked against the following types of dates:
Dates can be specified in the following formats:
Entering a FROM date without a TO date implies the FROM and TO dates are the same. The specified dates are retained when exiting and reentering the User Reports entry panel. |
|
JOBNAME |
Name of the job that created the report. |
|
SHOW MIGRATED |
This parameter determines if active and/or migrated reports are displayed in the User Reports lists. Valid values:
|
|
INDEXC |
Index name or mask (1 - 20 characters with no embedded blanks). Valid mask characters:
An index name or mask is used to select reports and filter indexes displayed in the Index window. If only one index matches a mask, the Index window is not displayed but the values of that index are displayed in the Values of Index panel when accessing the index. If only one report matches the selection criteria, the Quick Access Report list is not displayed when using the Quick Access method. |
|
VALUE |
Index value (1 through 50 characters including embedded blanks). Enclose the value with single (’) or double (") quote marks only if trailing blanks must be included. If the index is disk resident and contains the specified value (or only one "match" for the specified prefix), that value is used to select report sections for View and Print commands. Otherwise, the Values of Index panel is scrolled to the page that contains the "match" for the specified value (as a prefix), when accessing the index. |
|
DISPLAY TYPE |
Desired Report list display type (or format). Valid values:
Additional report list display types can be defined. |
|
BYPASS PANEL |
This parameter determines whether the entry panel is bypassed on subsequent entry to the User Reports facility. When the entry panel is bypassed, the last entered set of entry panel values determine which reports are displayed in the User Report list or Quick Access Report list. Valid Values:
If you enter Q in this field but want to display the User Reports entry panel when you next enter the User Reports facility, use the RETURN command to return to the entry panel before exiting the User Reports facility and reset the value of this field to N. |
|
V (View) |
The User Report list is skipped and the first report on the User Report list is automatically viewed. Subsequent reports listed on the first screen of the User Report list are automatically viewed one after the other. If the User Report list contains more than the number of reports that can be listed on one screen, the User Report list is displayed after the last report on the first screen has been viewed. Otherwise, the User Reports entry panel is displayed. |
Show Options Window
Type SHOW on the command line of the User Reports entry panel (display V) or the User Report list. Press Enter to display a Show Options window that contains additional criteria for limiting the reports displayed in the User Report list. The Show Options window is illustrated below:
Figure 68 User Reports Show Option window
------------------ CONTROL-D/V  -  USER REPORTS ENTRY PANEL ----------------(U)
COMMAND ===>   +--------------------------------------------------------------+
              |                  PLEASE SELECT SHOW OPTIONS                  |
              |                                                              |
    OPTIONS = |  CHILD        ===> Y                    Y-with children      |
              |  REMARK / CCs ===>                      Remark or CC of job  |
              |  USER REMARK2 ===>                      Remark2/prefix/mask  |
     REPORT N |       REMARK3 ===>                      Remark3/prefix/mask  |
     USER     |  CATEGORY     ===>                      Category or mask     |
     DATE FRO |  TIME FROM    ===>        TO            Report time          |
     JOBNAME  |                                                              |
              |  SELECT BY STATUS:                                           |
              |                                                              |
              |  DECOLLATED   ===> Y      WAIT DECOLLATION   ===> N          |
              |  WAIT PRINT   ===> Y      RESTORED ONLY      ===> N          |
              |  PRINTED      ===> Y      WAIT RESTORE ONLY  ===> N          |
              |  NOT PRINTED  ===> Y      WAIT BACKUP ONLY   ===> N          |
              |                                                              |
              |  DISPLAY OPTIONS:                                            |
     DISPLAY  |                                                              |
              |  SHOW RULERS  ===> N      SHOW Control CHARS ===> Y          |
              +--------------------------------------------------------------+

SELECT AN OPTION FILL IN THE SELECTION CRITERIA AND PRESS ENTER        07.52.01
Show Options Window Fields
Table 66 Show Options Window - Selection Criteria
|
Criteria |
Description |
|---|---|
|
CHILD |
This parameter determines whether the reports displayed in the User Report list are restricted to those of the user (recipient) or also include reports belonging to the user’s children in the Recipient Tree.
|
|
REMARK / CCs |
For job MSGCLASS output – Highest condition code of the job or the type of failure in case of failure. For all output – A user-specified remark entered via Decollating parameter DO REMARK or entered on the User Report list. The following job statuses are collected from job MSGCLASS output and can be used as selection criteria:
The following status codes are also valid selection criteria:
Selection can be based on remarks generated by the DO REMARK statement by entering the remark string value. The greater than operator (>) can be applied to condition codes (for example, >C0204 selects all jobs that ended with a condition code greater than 204). Character masking (described earlier in this chapter) is supported in the selection string. |
|
REMARK2 |
A user-specified remark entered using the DO REMARK2 decollating parameter or entered on the User Report list. |
|
REMARK3 |
A user-specified remark entered using the DO REMARK3 decollating parameter or entered on the User Report list. |
|
CATEGORY |
Site-defined category name (such as DAILY or MONTHLY). |
|
TIME FROM/TO |
Earliest and latest report processing time of day. Time format is hhmm. Time criteria are matched against:
If TIME FROM is "later" than TIME TO, time is calculated from the FROM time until midnight and from midnight until the TO time (for example, FROM 1000 TO 0800 means anytime except between 8:00 a.m. and 10:00 a.m.). |
Table 67 User Reports Show Option Window – Select by Status Parameters
|
Parameter |
Description |
|---|---|
|
SELECT BY STATUS When the following parameters are set to Y, only reports that meet selected report status criteria are displayed: |
|
|
DECOLLATED |
Reports that have been decollated and are available for Online viewing but are not printed (unless specifically requested by the Print option). |
|
WAIT Print |
Reports waiting to be printed. |
|
PRINTED |
Reports that have already been printed. |
|
NOT PRINTED |
Reports that were not printed or only partially printed. |
|
WAIT DECOLLATION |
Reports that have not yet been processed by Control-V. |
|
RESTORED ONLY |
Reports that have been restored. |
|
WAIT RESTORE ONLY |
Reports waiting to be restored. |
|
WAIT BACKUP ONLY |
Reports waiting to be backed up (that is, report deletion has been postponed because the reports have not been backed up yet). |
Table 68 User Reports Show Option Window – Display Option
|
Option |
Description |
|---|---|
|
SHOW RULERS |
This parameter determines whether or not report rulers are listed in the User Reports lists.
Default: N |
|
SHOW Control CHARS |
This parameter determines whether or not printing control characters are displayed in the Report Viewing screen.
Default: N |
Bypassing the Entry Panel
When you enter Y (Yes) in the BYPASS PANEL field on the entry panel, the User Report List screen is displayed whenever you enter the User Reports facility. The User Report list is discussed in User Reports (Online Viewing).
You can enter Q (Quick Access) in the BYPASS PANEL field on the entry panel to display the Quick Access Report list or Quick Access panel whenever you enter the User Reports facility. The Quick Access Report list or Quick Access panel are discussed in Quick Access Report List.
When bypassing the entry panel, the last selection values previously set in the entry panel are applied to the User Report list.
Reaccessing the Entry Panel
After you have set the BYPASS PANEL field to Y, you can access the entry panel by pressing the END key (PF03/PF15) from a Report List screen.
After you have set the BYPASS PANEL field to Q, you can access the entry panel by using the RETURN command from the Quick Access Report list or pressing the RETURN key (PF04/PF16) from the Quick Access Panel.
To access the entry panel the next time you enter the User Reports facility, set the value of the BYPASS PANEL field to N or V. For more information, see the description of the BYPASS PANEL field in Table 65.
User Reports Entry Panel (Display Type A)
Display type A of the User Reports entry panel combines the options and fields in display type V of the User Reports entry panel with the fields in the Show Options window for display type V. Display type A functionality is identical to the combined functionality of display type V and its Show Options window.
To obtain display type A, type DISPLAY (or its abbreviation DI) followed by a space and the letter A on the command line of the User Reports entry panel and press Enter. Display U of the Control-D/V User Reports entry panel is illustrated below:
Figure 69 User Reports Entry Panel (Display Type A)
-------------------- CONTROL-D/V - USER REPORTS ENTRY PANEL  ---------------(U)
COMMAND/OPTION  ===>                      1. PERMANENT 2. ACTIVE/MIG 3. HISTORY
SELECT BY:
   REPORT NAME  ===>
   USER         ===>                      Recipient name or prefix
   CHILD        ===> Y                    Y-with children
   JOB NAME     ===>                      Job name, prefix or mask
   REMARK/ CCs  ===>                      Remark or CC of job
   USER REMARK2 ===>                      Remark2, prefix or mask
        REMARK3 ===>                      Remark3, prefix or mask
   CATEGORY     ===>                      Category or mask
   DATE FROM    ===>        TO            Report date or relative day
   TIME FROM    ===>        TO            Report time
   MIGRATED     ===> N                    Include migrated reports
   INDEX        ===>                      Index name, prefix or mask
   VALUE        ===>
SELECT BY STATUS / DISPLAY OPTIONS:
   Decollated   ===> Y                    Wait decollation   ===> N
   Wait print   ===> Y                    Restored only      ===> N
   Printed      ===> Y                    Wait restore only  ===> N
   Not printed  ===> Y                    Wait backup only   ===> N
   Bypass panel ===> N                    Show rulers        ===> N
   Display type ===> D                    Show control chars ===> Y
SELECT AN OPTION, FILL IN THE SELECTION CRITERIA, AND PRESS ENTER      08.40.07
The description and usage of each field is identical to that of display type V. For complete information about each field see User Reports Entry Panel Fields (Display Type V)).
To obtain display type V (or J), type DISPLAY (or its abbreviation DI) followed by a space and the letter V (or J) on the command line of the User Reports entry panel and press Enter. Display V (or J) of the Control-D/V User Reports entry panel is displayed.
User Reports Entry Panel (Display Type J)
Display J of the Control-D/V User Reports entry panel facilitates access to reports produced by the Job Archiving facility. For more information about this facility, see the Control-D and Control-V chapter of the INCONTROL for z/OS Administrator Guide.
Display J of the User Reports entry panel is illustrated below.
Figure 70 User Reports Entry Panel (Display Type J)
-------------------- CONTROL-D/V - USER REPORTS ENTRY PANEL  ---------------(U)
COMMAND/OPTION  ===>                     1. PERMANENT 2. ACTIVE/MIG 3. HISTORY
 SELECT BY:
      REPORT NAME   ===>
                                                 Report name, prefix or mask
      USER          ===> PRODJCL                 Recipient name or prefix
      CHILD         ===> Y                       Y-with children
      CATEGORY      ===>                         Category or mask
      DATE FROM     ===>        TO               Report date or relative day
      SHOW MIGRATED ===> Y                       Include migrated reports
 INDEX VALUE SELECTION:
      JOBNAME       ===>                         Job name, prefix or mask
      JOBID         ===>                         Job number, prefix or mask
      CCs           ===>                         CC of job
      TIME FROM     ===>        TO               Report time
      SYSTEM ID     ===>                         SMF ID, prefix or mask
 DISPLAY OPTIONS:
      BYPASS PANEL  ===> N                       SHOW RULERS        ===> N
      DISPLAY TYPE  ===> J ( EXPANDED ==> Y  )   SHOW CONTROL CHARS ===> Y
The entry panel is divided into the following sections:
Table 69 User Reports Entry Panel Sections
|
Section |
Description |
|---|---|
|
SELECT BY |
Report selection criteria. |
|
INDEX VALUE SELECTION |
Special criteria for selection of reports produced by the Job Archiving facility. |
|
DISPLAY OPTIONS |
Options that affect the format of User Report lists and the reports that are viewed. |
INDEX VALUE SELECTION contains criteria used to select one of the following:
-
Original reports created by the generic mission
-
Reports with the jobname ARCHIVE created as part of the consolidation process.
The INDEX VALUE criteria are used to make a search of the JOBNAME index to select the matching entries. The JOBNAME field is used both as a report selection criterion and as an argument to the index content search.
For a non-consolidated job, specifying JOBNAME ARCHIVE as a selection criterion in User Reports Entry Panel (Display Type J) will result in an empty Report List (message IOAE53E THERE IS NO DATA TO DISPLAY).
When the display is set to J in the User Reports entry panel, the Active and History Report List display defaults to J. For more information see "Display Type J (Job)" in User Report List Display Types.
For entries that belong to either group, the user can enter line command X to receive a list of JOBNAMEs that are included in the entry. If only one entry would be displayed, the index value list of the JOBNAME index is displayed.
The index value list has a single value for entries before consolidation, and multiple values for entries after consolidation. The user can use line command V to view the full output of the job, or line command X to see entries in the DDNAMES subindex for the selected job.
To obtain display J, type DISPLAY (or its abbreviation DI) followed by a space and the letter J on the command line of the User Reports entry panel and press Enter.
To display the list of jobname records for both consolidated and unconsolidated reports, type Y in the EXPANDED field and press Enter. This option avoids the additional steps of first displaying the report list of consolidated and unconsolidated reports, and then typing X in the OPTION field to see the jobname records for the specific report. For an example of a display of jobname records, see Index Window.
The description and usage of each field is identical to that of display V. For complete information about each field, see User Reports Entry Panel Fields (Display Type V)).
Index Value Selection
The parameters in this chapter specify consolidated index value search arguments.
Table 70 Consolidated Index Value Search Arguments
|
Argument |
Description |
|---|---|
|
JOBNAME |
Job name, prefix or mask (used for selecting either original reports or consolidated reports with that jobname). |
|
JOBID |
Job number. |
|
CCs |
Completion code of job. Use for selecting reports with the specified completion code. The following selection criteria can be specified:
|
|
TIME FROM |
Time in hhmm format. Jobs that ended before the specified time are not selected. |
|
[TIME] TO |
Time in hhmm format. Jobs that ended after the specified time are not selected. |
|
SYSTEM ID |
SMF ID, prefix or mask of the system in which the job ran. |
To obtain display V or A, type DISPLAY (or its abbreviation DI) followed by a space and the letter V or A on the command line of the User Reports entry panel and press Enter. The requested display of the Control-D/V User Reports entry panel is displayed.
Entry Panel Options: Kinds of Report Lists
Select one of the following kinds of Report lists by entering the appropriate option number in the OPTION field:
-
Permanent Report List: A list of all reports that the user can receive at any time. Modifications to the data on this list (such as the migration schedule) are valid for every subsequent execution of the report until modified in the future.
-
Active/Migrated Report List: A list of reports that recently have been or soon will be decollated, and/or reports that have migrated to various storage devices. The SHOW MIGRATED field in the User Reports entry panel determines whether the list contains only reports that have migrated, only reports that have not migrated, or both.
-
History Report List: A list of all reports that are currently backed up on tape or cartridge. The list is used to request a restore of lost reports. The length of time for which reports are backed up is determined by the INCONTROL administrator.
If you do not specify an option number and simply press Enter, the default is option 2, the Active/Migrated Report list.
Figure 71 User Reports Report Lists
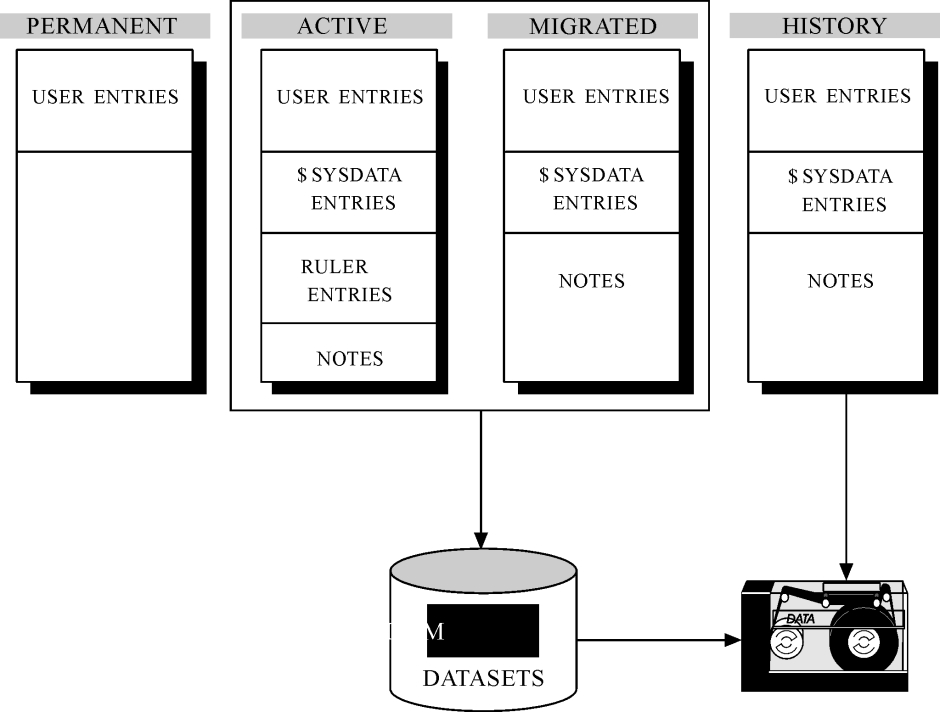
Report Lists
Report lists display a list of reports available for processing (viewing, printing, restoring, and so on).
There are two types of Report lists:
-
User Report List: Various display types are available.
-
Quick Access Report List: The display type cannot be changed.
Header Line
The header line at the top of the screen indicates the User Report list display type (or Q to designate the Quick Access Report list) and the main selection criteria values specified in the entry panel.
ACTIVE LIST  <A>   JOB PRDRPT01 REP SALARY REPORT       USR MGT       CHILD (U)
COMMAND ===>                                                    SCROLL===> CRSR
Table 71 User Report List Header Line
|
Header Field |
Values |
|---|---|
|
type _of LIST |
type_of is Permanent, Active or History. |
|
<display_type> |
display_type is code letter D – Default, L– Long, U – User, J – Job, S – SDSF, or A – All Fields. |
|
JOB job_name |
job_name is the job name (or prefix or mask – as specified). |
|
REP report_name |
report_name is the first 20 characters of the report name (or prefix or mask – as specified). |
|
USR user_name |
user_name is the user (recipient) name (or prefix or mask – as specified). |
|
CHILD (or blank) |
If this field contains the word CHILD (because parameter CHILD was set to Y), reports of the user’s children (as defined in the Recipient Tree) are included in the Report list. If this field is blank (by default or because parameter CHILD was set to N), only the user’s own reports are included in the Report list. |
Quick Access Report list – The display type cannot be changed.
Sort Order
Reports that match User Reports entry panel and Show Options window selection criteria are sorted in the following order:
User ID, job name or report name (depending on an installation parameter value), Active/Migrated status (if parameter Show Migrated is set to Y), and decollation date and time.
The INCONTROL administrator can modify this default sort order for any user by modifying parameter SUS2SRTI in the User profile member. In addition, the SORT command (described later in this chapter) enables the user to change the order of the reports displayed in the User Report list.
Additional Info (Option A)
Entering A (Additional Info) in the OPTION field of a listed report alternately displays and hides additional information about the selected report.
Use this option to show a full report name if its length is longer than 20 characters.
User Report List Display Types
The User Report list is displayed when the BYPASS PANEL field of the User Reports entry panel is set to Y or N. The various display types are discussed on the following pages. Display types can be changed via the DISPLAY command that is described in Commands of the User Report List.
Display Type D (Default)
Below are examples of Default display types of Permanent, History and Active User Report lists intended for use by the INCONTROL administrator and operations personnel. Fields labeled below are discussed on the next page.
Figure 72 User Report List Display Type D (Default) – Permanent List
PERMANENT LIST <D> JOB          REP                      USR MGT      CHILD (U)
COMMAND ===>                                                    SCROLL===> CRSR
O USER     REPORT NAME   more+  JOB      COP FORM C DEST    UDEST        WTR
  MGT      EMPLOYEES REPORT     PREMPLR2 DFT STD  X RMT2
  MGT      BANKING REPORT       M22RPTS  000 STD  X RMT2
  MKT      EMPLOYEES REPORT     PREMPLR2 DFT STD  X
Figure 73 User Report List Display Type D (Default) – History List
HISTORY LIST   <D> JOB          REP                      USR MGT      CHILD (U)
COMMAND ===>                                                    SCROLL===> CRSR
O USER     REPORT        more + ODATE     PAGES    LINES   STATUS
  MGT      BANKING REPORT       08/08/00     40     1839   Wait restore
  MKT      EMPLOYEES REPORT     08/08/00    328    14361   Backed up
Figure 74 User Report List Display Type D (Default) – Active List
ACTIVE LIST    <D> JOB          REP                      USR MGT      CHILD (U)
COMMAND ===>                                                    SCROLL===> CRSR
O USER     REPORT       more +  ODATE     PAGES    LINES V N STATUS
  DEV      EMPLOYEES REPORT     08/08/00      2       91 V A Printed
  DEV      EMPLOYEES REPORT     08/08/00      1       10 V   Wait Print
  MGT      EMPLOYEES REPORT     08/08/00      1       27     Printed
  MGT      EMPLOYEES REPORT     08/08/00      1       18   G Wait Print
  MGT      BANKING REPORT       08/08/00     23     1062     Decollated
  MGT      BANKING REPORT       08/08/00      5      256 V T Decollated
  MKT      EMPLOYEES REPORT     08/08/00      3      131     Printed
  MKT      EMPLOYEES REPORT     08/08/00    286    10864     Wait Print
  PROD     INVENTORY REPORT     08/08/00     97     4127 V   Printed
  PROD     INVENTORY REPORT     08/08/00     10      426     Wait Print
  PROD     EMPLOYEES REPORT     08/08/00      8      369 V T Printed
  PROD     EMPLOYEES REPORT     08/08/00      3      169     Wait Print
====== >>>>>>>>>>>>>>>>>> NO MORE REPORTS IN THE LIST <<<<<<<<<<<<<<<<<< ======
 P PRINT     V VIEW     U UPDATE     I INSERT     A ADD INFO     E EDIT
 X INDEX     N NOTE     G GIVETO     D DELETE     Q QUICK ACCESS       08.02.09
Table 72 Fields in the Default (D) Display Type
|
Field |
Description |
|---|---|
|
USER |
Name of the report recipient as defined in the decollating mission. |
|
REPORT (NAME) more + |
First 20 characters of the full name of the report as defined in the decollating mission. |
|
ODATE |
Original scheduling date (date report was originally scheduled to be run). |
|
PAGES |
Number of pages in the report. |
|
LINES |
Number of lines in the report. |
|
V |
View indicator. Usage is optional and is determined by parameter SUSRVEW in the User profile member. If not used, it is blank. This field may be used as a 1-character flag:
Can also be used as a 1, 2, or 3 digit counter:
|
|
STATUS |
Current status of the report. For more information, see Statuses in the Report Lists. |
|
JOB |
Name of the job that creates the report. |
|
COP |
Copy count to be used when the report is printed. Valid values are 0 up to the maximum number allowed, and DFT (the default number of copies). The maximum and DFT are set in the Report Decollating parameters by authorized personnel. |
|
FORM |
Form to use when printing a report on the mainframe computer. Control-V does not validate this field. Validation is the user’s responsibility. |
|
C |
Output printing class. Can be updated under JES2. Under JES3, output is printed in a system defined class that is not under user control. |
|
DEST/UDEST |
Remote printer JES destination (node and user ID) for printing the report. |
|
WTR |
External writer name. |
|
N |
Note indicator. Indicates the type of notes, if any, attached to the report:
For details about notes, see Notepad Facility. |
Display Type D – Additional Info
Below are examples of the Additional Info option specified in the Default display type of the Permanent, History and Active User Report lists. Fields labeled below are discussed on the next page.
Figure 75 User Report List Display Type D – Additional Info – Permanent List
PERMANENT LIST  JOB          REP                      USR MGT      CHILD (U)
COMMAND ===>                                                    SCROLL===> CRSR
O USER     REPORT NAME   more + JOB      COP FORM C DEST    UDEST        WTR
  MGT      EMPLOYEES REPORT     PREMPLR2 DFT STD  X RMT2
     REPORT NAME: EMPLOYEES REPORT
     From User       :
     Additional Users: DP-MGR
     Print Missions  : STD
     Category:  AFP
     Pagedef: A       Formdef:         Output:           Chars: ****
     Approval: Y   Name: APRV1   Hidden:Y  Store:    SLA: 10
  MGT      BANKING REPORT       M22RPTS  000 STD  X RMT2
Figure 76 User Report List Display Type D – Additional Info – History List
HISTORY LIST   <D> JOB          REP                      USR MGT      CHILD (U)
COMMAND ===>                                                    SCROLL===> CRSR
O USER     REPORT      more +   ODATE     PAGES    LINES STATUS
  MGT      BANKING REPORT       08/08/00     40     1839 Wait restore
    Report name: BANKING REPORT
    Run: 08/08/00 12:57 - 13:03     Decollated: 08/08/00 13:04
    Copies: 001 Form: STD           Class: X
    Remarks: C0000
    Dest  :                         WTR:
    Category: CREATED              Fromuser:          Job: JOBABC         JN: 0372934
    Approval          StatAp           Hidden      Init_Hidden   Multi        SLA
                    Type            Waiting
Figure 77 User Report List Display Type D – Additional Info – Active List
ACTIVE LIST    <D> JOB          REP                      USR VENA     CHILD (U)
COMMAND ===>                                                    SCROLL===> CRSR
O USER     REPORT        more + ODATE     PAGES    LINES V N STATUS
  MGT      BANKING REPORT       08/11/15     66     1304 *   Wait print-Wait bk
    Report name: BANKING REPORT
    Run:          00:00 - 00:00     Decollated: 08/11/15 14:20
    Copies: 001  Form: STD          Class: E
    Remarks: TXTOK1
    Dest  :                         WTR:
    Category: AEGON3               Fromuser:          Job: K56CMD   JN: 0033821
    Additional Users:

    Approval APP1     StatAp Wait Appr Hidden   Init_Hidden   Multi   SLA 963
                      Type            Waiting
Table 73 Additional Info Fields in the Default (D) Display Type
|
Field |
Description |
|---|---|
|
Report name |
Full name of the report as defined in the decollation mission. |
|
Run |
|
|
Decollated |
Date and time the report was decollated. |
|
Copies |
Copy count to be used when the report is printed. Valid values: 0 to the maximum number allowed, and DFT (the default number of copies). The maximum and DFT are set in the report decollating parameters by authorized personnel. |
|
Form |
Form to use when printing a report on the mainframe computer. Control-V does not validate this field. Validation is the user’s responsibility. |
|
Class |
Output printing class. Can be updated under JES2. Under JES3, output is printed in a system defined class that is not under user control. |
|
Dest |
Required remote printer JES destination (node and user ID) for printing the report. |
|
WTR |
External writer name. |
|
Remarks |
Three remarks generated by the DO REMARK, DO REMARK2, and DO REMARK3 options of the report decollating mission. The first remark may also be a Condition code. It is the highest condition code from among the job-execution, or other job-termination codes including the following:
Condition codes and termination codes are available only for MSGCLASS output. If there is more than one remark in each field, remarks are separated by commas. The user can update the remark under certain specific display types. |
|
Category |
Category name (an installation defined term, such as DAILY or MONTHLY). |
|
Job |
Name of the job that creates the report. |
|
JN |
Job ID (JNUM). JES job number of the job that created the report. |
|
Approval |
An approval name, defined in the Approval Tree, comprised of 1 or more users, that can approve this report from Control-D/WebAccess Server. |
|
Hidden |
Determines to whom the report is visible. Valid Values:
Default: Blank |
|
Init_Hidden |
Defines to whom the report is visible just after decollation or the Add this report operation. Valid Values:
Default: Blank |
|
Multi |
Whether the approval status of this report is relevant to more reports. Valid Values:
|
|
Type |
Multi-approval type, either Multistage or Parallel. |
|
Waiting |
The number of end users that are left to complete the Parallel Approval process. |
|
Additional Users |
List of other users to whom this report is distributed in addition to the current user. Updates can be made before the report is decollated. By default, only users in the Recipient Tree can be specified. However, if the SUS2TRE Profile variable is set to N (No), the Recipient Tree is not checked for the specified users. |
|
Print Missions |
Missions used to print the report. The printing mission usually represents the paper type (for example, STD). |
|
Fromuser |
Name of the user from which this report (part) has been received. |
|
Store |
Defines the report for approval. Valid Values:
Default: N. |
|
SLA |
Service Level Agreement - The number of days after the report is generated that the report must be approved. Valid Values:
Default: Blank |
|
StatAp |
Current approval status of the report. Valid Values:
|
For a description of the Pagedef, Formdef, Output, and Chars fields, see "Display Type U – Additional Info".
Display Type U (User)
Below are examples of User display type for the Permanent, Active and History User Report lists. Since only the end user’s own reports are displayed, this display type does not include the USER field. Fields labeled below are discussed on next page.
Figure 78 User Report List Display Type U (User) – Permanent List
PERMANENT LIST <U> JOB          REP                      USR MGT      CHILD (U)
COMMAND ===>                                                    SCROLL===> CRSR
O REPORT NAME  more +  COP FORM C DEST     UDEST    WTR     FROMUSER
  EMPLOYEES REPORT     DFT STD  X RMT2
  BANKING REPORT       000 STD  X RMT2
  INVENTORY REPORT     000 STD  X
Figure 79 User Report List Display Type U (User) – History List
HISTORY LIST   <U> JOB          REP                      USR MGT      CHILD (U)
COMMAND ===>                                                    SCROLL===> CRSR
O REPORT       more +  ODATE     PAGES    LINES V COP STATUS            REMARK
  EMPLOYEES REPORT     08/08/00      1       18   001 Wait restore
  BANKING REPORT       08/08/00      9      558   001 Backed up
  BANKING REPORT       08/08/00      5      256   001 Backed up
Figure 80 User Report List Display Type U (User) – Active List
ACTIVE LIST    <U> JOB          REP                      USR MGT      CHILD (U)
COMMAND ===>                                                    SCROLL===> CRSR
O REPORT       more +  ODATE     PAGES    LINES V COP STATUS            REMARK
  EMPLOYEES REPORT     08/08/00      1       18   001 Wait print
  BANKING REPORT       08/08/00      5      256   001 Decollated
  INVENTORY REPORT     08/08/00    519    23838 3 001 Wait print
  GENERAL LEDGER       08/08/00    220     8354   002 Printed
  ANNUAL REPORT        08/08/00  24385   998704   001 Decollated
  SALARY REPORT        08/08/00    104     4116   001 Printed
====== >>>>>>>>>>>>>>>>>> NO MORE REPORTS IN THE LIST <<<<<<<<<<<<<<<<<< ======
  P PRINT     V VIEW     U UPDATE     I INSERT     A ADD INFO     E EDIT
  X INDEX     N NOTE     G GIVETO     D DELETE     Q QUICK ACCESS      08.02.09
Table 74 Fields in the User (U) Display Type
|
Field |
Description |
|---|---|
|
REPORT (NAME) more + |
First 20 characters of the name of the report as defined in the decollating mission. |
|
ODATE |
Original scheduling date (date the report was originally scheduled to be run). |
|
PAGES |
Number of pages in the report. |
|
LINES |
Number of lines in the report. |
|
VIEW |
View indicator. Usage is optional and is determined by the SUSRVEW parameter in the User profile member. If not used, it is blank. This field can be used as a 1-character flag:
VIEW can also be used as a 1, 2 or 3 digit counter:
|
|
COP |
Copy count to be used when the report is printed. Valid values: 0 to the maximum number allowed, and DFT (the default number of copies). The maximum and DFT are set in the report decollating parameters by authorized personnel. |
|
STATUS |
Current status of the report. For more information, see Statuses in the Report Lists. |
|
REMARK |
Condition code and/or remark. Highest condition code from the job execution, or other job termination codes including system and user abend codes, NCT2 (NOT CATLGD 2) or JFAIL (JCL error).a Remarks can also be generated by the DO REMARK option of the report decollating mission. If there is more than one remark, remarks are separated by commas. The user can update the remark under certain display types. |
|
FORM |
Form to use when printing a report on the mainframe computer. Control-V does not validate this field. Validation is the user’s responsibility. |
|
C |
Output printing class. Can be updated under JES2. Under JES3, output is printed in a system defined class that is not under user control. |
|
DEST/UDEST |
Remote printer JES destination (node and user ID) for printing the report. |
|
WTR |
External writer name. |
|
FROMUSER |
Name of the user from which this report (part) has been received. |
Display Type U – Additional Info
When using option A with display type U, the following Additional Info fields are displayed on the screen. Fields labeled below are discussed on the next page.
Figure 81 User Report List Display Type U – Additional Info – Permanent List
PERMANENT LIST <U> JOB          REP                      USR MGT      CHILD (U)
COMMAND ===>                                                    SCROLL===> CRSR
O REPORT NAME   more + COP FORM C DEST     UDEST    WTR     FROMUSER
  EMPLOYEES REPORT     DFT STD  X RMT2
     REPORT NAME: EMPLOYEES REPORT
     Additional Users:

     Print Missions: STD
     Category:  DAILY                User: MGT      Job: PREMPLR2
     Pagedef: A       Formdef:         Output:           Chars: ****
     Approval: Y   Name:     Hidden:Y  Store:    SLA:
  BANKING REPORT       000 STD  X RMT2
  INVENTORY REPORT     000 STD  X
Figure 82 User Report List Display Type U – Additional Info – History List
HISTORY LIST   <U> JOB          REP                      USR MGT      CHILD (U)
COMMAND ===>                                                    SCROLL===> CRSR
O REPORT        more + ODATE     PAGES    LINES   COP STATUS            REMARK
  EMPLOYEES REPORT     08/08/00      1       18   001 Wait restore
    REPORT NAME: EMPLOYEES REPORT
    Run: 08/08/00 21:19 - 21:34        Decollated: 08/08/00 21:35
    Form: STD         Class: X
    Remarks: C000
    Dest:                              WTR:
    Category: CREATED                 Fromuser:
    Additional Users:
    Approval:   StatAp:    Hidden:   Init_Hidden:      Multi             SLA:
                Type      Waiting
  BANKING REPORT       08/08/00      9      458   001  Backed up
  BANKING REPORT       08/08/00      5      256   001  Backed up
  INVENTORY REPORT     08/08/00    519    23838   001  Backed up
Figure 83 User Report List Display Type U – Additional Info – Active List
ACTIVE LIST    <U> JOB          REP                      USR MGT      CHILD (U)
COMMAND ===>                                                    SCROLL===> CRSR
O REPORT        more + ODATE     PAGES    LINES V COP STATUS            REMARK
  EMPLOYEES REPORT     08/08/00      1       18   001 Wait print
    REPORT NAME: EMPLOYEES REPORT
    Run:          00:00 - 00:00        Decollated: 08/08/00 11:06
    Form: STD  Class: D
    Remarks: C0000
    Dest:                              WTR:
    Category: DAILY3               Fromuser:          Job: M22RPTS  JN: 0033821
    Additional Users:
    Approval APP1     StatAp Wait Appr Hidden   Init_Hidden   Multi   SLA
                      Type            Waiting
  BANKING REPORT       08/08/00      5      256   001 Decollated
  INVENTORY REPORT     08/08/00    519    23838   001 Wait print
  GENERAL LEDGER       08/08/00    220     8354   002 Printed
  ANNUAL REPORT        08/08/00  24385   998704   001 Decollated
  SALARY REPORT        08/08/00    104     4116   001 Printed
====== >>>>>>>>>>>>>>>>>> NO MORE REPORTS IN THE LIST <<<<<<<<<<<<<<<<<< ======

 V VIEW E EDIT P PRINT U UPDT I INS D DEL N NOTE A ADD INFO G GIVETO   13.16.13
Table 75 Additional Info Fields in the User (U) Display Type
|
Field |
Description |
|---|---|
|
Report name |
Full name of the report as defined in the decollation mission. |
|
Run |
|
|
Decollated |
Date and time that the report was decollated. |
|
Form |
Form to use when printing a report in the mainframe computer. Control-V does not validate the syntax of the form or its correctness. Validation is the user’s responsibility. |
|
Class |
Output printing class. Can be updated under JES2. Under JES3, output is printed in a system defined class that is not under user control. |
|
Dest |
Required remote printer JES destination (node and user ID) for printing the report. |
|
WTR |
External writer name. |
|
Remarks |
Three remarks generated by the DO REMARK, DO REMARK2, and DO REMARK3 options of the report decollating mission. The first remark may also be a Condition code. It is the highest condition code from among the job-execution, or other job-termination codes including
Condition codes and termination codes are available only for MSGCLASS output. If there is more than one remark in each field, remarks are separated by commas. The user can update the remark under certain specific display types. |
|
Category |
Category name (a site-defined term, such as DAILY or MONTHLY). |
|
Fromuser |
Name of the user from which this report (part) has been received. |
|
Job |
Name of the job that creates the report. |
|
Approval |
An approval name, defined in the Approval Tree, comprised of 1 or more users, that can approve this report from Control-D/WebAccess Server. |
|
Hidden |
Determines to whom the report is visible. Valid values:
|
|
Init_hidden |
Defines to whom the report is visible just after decollation or the Add this report operation. Valid values:
|
|
Multi |
Whether the approval status of this report is relevant to more reports. Valid values:
|
|
Type |
Multi Approval type, either Multistage or Parallel. |
|
Waiting |
The number of end users that are left to complete the Parallel Approval process. |
|
Additional Users |
List of other users to whom this report is distributed in addition to the current user. Updates can be made before the report is decollated. By default, only users in the Recipient Tree can be specified. However, if the SUS2TRE Profile variable is set to N (No), the Recipient Tree is not checked for the specified users. |
|
Print Missions |
Missions used to print the report. The printing mission usually represents the paper type (for example, STD). |
|
Pagedef |
PAGEDEF (for AFP output). |
|
Formdef |
FORMDEF (for AFP output). |
|
Output |
Name of output statement. |
|
Chars |
Character sets. |
|
Store |
Defines the report for approval. Valid values:
|
|
SLA |
Service Level Agreement - The number of days after the report is generated that the report must be approved. Valid values:
|
|
StatAp |
Current approval status of the report. Valid values:
|
Display Type J (Job)
Below are examples of the Job display type for Active and History Report lists, including the Additional Info fields. Display type J is intended for operations personnel or programmers. It is usually used to view MSGCLASS output. Fields labeled below are discussed on the next page.
Figure 84 User Report List Display Type Job (J) – History List
HISTORY LIST   <> JOB          REP                      USR PRODCNTL CHILD (U)
COMMAND ===>                                                    SCROLL===> CRSR
O JOBNAME   JNUM STARTED        ENDED  PAGES REMARK           STATUS
  PRDRPTS2  8879 08/08/00 08:53 08:58      8 C0000            Backed up
  Ordered: 08/08/00  Decollated: 08/08/00 09:01
  PRDKPL01  9723 08/08/00 09:21 09:28    186 S0C4             Restored
  M22PRO1   8042 08/08/00 09:29 09:35     54 C0000            Backed up
  M22PRO2   8059 08/08/00 09:38 09:54     48 C0000            Backed up
  M010ERM   8068 08/08/00 09:56 10:21     79 C0000            Backed up
  M200EP3   8100 08/08/00 10:25 10:25      3 JFAIL            Backed up
  M22PARM   8218 08/08/00 10:27 10:39     51 C0000            Backed up
  M12AWDT   8423 08/08/00 11:02 11:19      5 C0004            Wait restore
  M08STMIS  9261 08/08/00 11:21 11:42     97 S222             Backed up
Figure 85 User Report List Display Type Job (J) – Active List
ACTIVE LIST    <> JOB          REP                      USR PRODCNTL CHILD (U)
COMMAND ===>                                                    SCROLL===> CRSR
O JOBNAME   JNUM STARTED        ENDED  PAGES    LINES V REMARK
  PRDRPTS2  8879 08/08/00 08:47 08:47      5       78   C0000
  Ordered: 08/08/00 Decollated: 08/08/00 14:42
  PRDKPL01  9723 08/08/00 09:17 09:17      4      186   S0C4
  M22PRO1   8042 08/08/00 09:28 09:32      4       54   C0000
  M22PRO2   8059 08/08/00 09:47 09:56      4       48   C0000
  M010ERM   8068 08/08/00 09:48 10:22     17      679   C0000
  M200EP3   8100 08/08/00 10:29 10:29     15      583   JFAIL
  M22PARM   8218 08/08/00 11:58 11:58      9      251   C0000
  M12AWDT   8423 08/08/00 14:50 14:51     24      855   C0004
  M08STMIS  9261 08/08/00 15:07 15:10    331    16497   S222
  M0869REP  9262 08/08/00 15:08 15:10    320    16021   U1024
  M225MANL  8443 08/08/00 15:08 15:08      8      539   C0000
  M225MSGD  8463 08/08/00 15:21 15:21      9      701   C0012
  M28RPTU   8521 08/08/00 16:07 16:32     12      954   C0016
  M12WTO2   8650 08/08/00 18:20 18:21     83     3641   C0004
  M12AMWTO  8655 08/08/00 18:23 18:24    152     6737   C0000
  PRDKPL01  8657 08/08/00 18:25 18:25      4      185   S0C4
  M14TES1   8690 08/08/00 18:51 18:51      4       47   C0000
  M19SMPJ   8716 08/08/00 19:18 20:06    135     6143   S222
  P PRINT     V VIEW     U UPDATE     I INSERT     A ADD INFO     E EDIT
  X INDEX     N NOTE     G GIVETO     D DELETE     Q QUICK ACCESS      08.02.09
Table 76 Fields in the Job (J) Display Type
|
Field |
Description |
|---|---|
|
JOBNAME |
Name of the job that created the report. |
|
JNUM |
JES job number of the job that created the report. |
|
STARTED |
|
|
ENDED |
|
|
PAGES |
Number of pages in the report. |
|
LINES |
Number of lines in the report. |
|
VIEW |
View indicator. Usage is optional and is determined by the SUSRVEW parameter in the User profile member. If not used, it is blank. This field can be used as a 1-character flag:
VIEW can also be as a 1, 2 or 3 digit counter:
|
|
REMARK |
Condition code and/or remark. Highest condition code from the job execution, or other job termination codes including system and user abend codes, NCT2 (NOT CATLGD 2) or JFAIL (JCL error).a Remarks can also be generated by the DO REMARK option of the decollating mission. If there is more than one remark, remarks are separated by commas. The user can update the remark under certain display types. |
|
STATUS |
Current status of the report. For more information, see Statuses in the Report Lists.. |
Table 77 Additional Info Fields In the Job (J) Display Type
|
Field |
Description |
|---|---|
|
Ordered |
Original scheduling date (date report was originally scheduled to be run). |
|
Decollated |
Date and time that the report (job) was decollated. |
Display Type S (SDSF)
Below are examples of the SDSF display type for Active and History Report lists including the Additional Info fields. (SDSF is an IBM program facility.) This format is similar to the SDSF display of jobs in the Held output queue. Fields labeled below are discussed on the next page.
Figure 86 User Report List Display Type S (SDSF) – History List
HISTORY LIST   <> JOB          REP                      USR PRODCNTL CHILD (U)
COMMAND ===>                                                    SCROLL===> CRSR
O JOBNAME  TYP  JNUM END-DATE C FORM DEST        TOT-RC  PAGES   STATUS
  M08STMIS JOB  2153 08/08/00 0 STD                16497    331   Backed up
  Ordered: 08/08/00  Run: 08/08/00 14:27 To: 14:28 Decollated: 08/08/00 14:42
  M20INSCD JOB  2168 08/08/00 0 STD                   37      3   Backed up
  M12AWDT  JOB  2123 08/08/00 0 STD                  855     24   Backed up
  M225MANL JOB  2202 08/08/00 0 STD                  539      8   Backed up
  M225MSGD JOB  2218 08/08/00 0 STD                  701      9   Wait restore
  PRDKPL01 JOB  2329 08/08/00 0 STD                   39      3   Backed up
  PRDKPL01 JOB  2336 08/08/00 0 STD                   39      3   Backed up
  M12WTO2  JOB  2385 08/08/00 0 STD                 3641     83   Backed up
  M12AMWTO JOB  2409 08/08/00 0 STD                 6737    152   Backed up
Figure 87 User Report List Display Type S (SDSF) – Active List
ACTIVE LIST    <> JOB          REP                      USR PRODCNTL CHILD (U)
COMMAND ===>                                                    SCROLL===> CRSR
O JOBNAME  TYP  JNUM END-DATE C FORM DEST        TOT-RC  PAGES   REMARK
  M22RTT1  JOB  8042 08/08/00 0 STD                   54      4   C0000
  Ordered: 08/08/00  Run: 08/08/00 14:27 To: 14:28 Decollated: 08/08/00 14:42
  M22MNF1  JOB  8059 08/08/00 0 STD                   48      4   C0000
  M200EP3  JOB  8100 08/08/00 0 STD                  583     15   U0016
  M22PARM  JOB  8218 08/08/00 0 STD                  251      9   C0000
  M20INSCD JOB  8365 08/08/00 0 STD                   37      3   JFAIL
  M12AWDT  JOB  8423 08/08/00 0 STD                  855     24   C0004
  M225MANL JOB  8443 08/08/00 0 STD                  539      8   C0000
  M225MSGD JOB  8463 08/08/00 0 STD                  701      9   C0012
  PRDKPL01 JOB  8513 08/08/00 0 STD                   39      3   JFAIL
  PRDKPL01 JOB  8639 08/08/00 0 STD                   39      3   JFAIL
  M12WTO2  JOB  8650 08/08/00 0 STD                 3641     83   C0004
  M12AMWTO JOB  8655 08/08/00 0 STD                 6737    152   C0000
  PRDKPL01 JOB  8657 08/08/00 0 STD                  185      4   S0C4
  M14EMF1  JOB  8690 08/08/00 0 STD                   47      4   C0000
  M19SMPJ  JOB  8716 08/08/00 0 STD                 6143    135   S222
  PRDRPTS2 JOB  8862 08/08/00 0 STD                    5     78   C0000
  PRDRPTS4 JOB  8879 08/08/00 0 STD                   78      5   C0000
  M08STMIS JOB  9261 08/08/00 0 STD                16497    331   S722
  M0869REP JOB  9262 08/08/00 0 STD                16021    320   S222
  P PRINT     V VIEW     U UPDATE     I INSERT     A ADD INFO     E EDIT
  X INDEX     N NOTE     G GIVETO     D DELETE     Q QUICK ACCESS      08.02.09
Table 78 Fields in the SDSF (S) Display Type
|
Field |
Description |
|---|---|
|
JOBNAME |
Name of the job that creates the report. |
|
TYP |
3-letter code of the job ID. |
|
JNUM |
Numeric part of the job ID. |
|
END-DATE |
Date of decollation. |
|
C |
Output printing class. Can be updated under JES2. Under JES3, output is printed in a system defined class that is not under user control. |
|
FORM |
Form to use when printing a report on the mainframe computer. Control-V does not validate this field. Validation is the user’s responsibility. |
|
DEST |
Remote printer JES destination (node and user ID) for printing the report. |
|
TOT-RC |
Total number of records (data lines) in the report. |
|
PAGES |
Number of pages in the report. |
|
REMARK |
Condition code and/or remark. Highest condition code from the job execution, or other job termination codes including system and user abend codes, NCT2 (NOT CATLGD 2) or JFAIL (JCL error).a Remarks can also be generated by the DO REMARK option of the report decollating mission. If there is more than one remark, remarks are separated by commas. The user can update the remark under certain display types. |
|
STATUS |
Current status of the report. For more information, see Statuses in the Report Lists. . |
Table 79 Additional Info Fields in the S (SDSF) Display Type
|
Field |
Description |
|---|---|
|
Ordered |
Original scheduling date (date report was originally scheduled to be run). |
|
Run |
Date and (from/to) time the report was produced (displayed only if MSGCLASS output is decollated). |
|
Decollated |
Date and time that the report was decollated. |
Display Type L (Long)
Below are examples of the Long display type for Permanent, History and Active User Report lists, intended for use by the INCONTROL administrator and operations personnel. Data for each report entry data is located on two lines. Fields labeled below are discussed on the next page.
Figure 88 User Report List Display Type L (Long) – Permanent List
PERMANENT LIST <D> JOB          REP                      USR          CHILD (U)
COMMAND ===>                                                    SCROLL===> CRSR
O USER     REPORT NAME                   COP FORM C DEST     UDEST    JOB/WTR
  MGT      EMPLOYEES REPORT                                           PREMPLR2
                                         DFT STD  X RMT2
  MKT      BANKING REPORT                                             M22RPTS
                                         000 STD  X RMT2
  MKT      EMPLOYEES REPORT                                           PREMPLR2
                                         DFT STD  X
Figure 89 User Report List Display Type L (Long) – History List
HISTORY LIST   <D> JOB          REP                      USR M*       CHILD (U)
COMMAND ===>                                                    SCROLL===> CRSR
O USER     REPORT               ODATE     PAGES    LINES V N JOB/STATUS
  MGT      BANKING REPORT                                    M22RPTS
                                08/08/00     40     1839     Wait restore
  MKT      EMPLOYEES REPORT                                  PREMPLR2
                                08/08/00    328    14361     Backed up
Figure 90 User Report List Display Type L (Long) – Active List
ACTIVE LIST    <D> JOB          REP                      USR M*       CHILD (U)
COMMAND ===>                                                    SCROLL===> CRSR
O USER     REPORT               ODATE     PAGES    LINES V N JOB/STATUS
  MGT      BANKING REPORT                                    M22RPTS
                                08/08/00     40     1839 V T Decollated
  MKT      EMPLOYEES REPORT                                  PREMPLR2
                                08/08/00    328    14361     Wait Print
  DEV      EMPLOYEES REPORT                                  PREMPLR2
                                08/08/00      2       91 V A Printed
  DEV      EMPLOYEES REPORT                                  PREMPLR2
                                08/08/00      1       10 V   Wait Print
  MGT      EMPLOYEES REPORT                                  PREMPLR2
                                08/08/00      1       27     Printed
  MKT      BANKING REPORT                                    M22RPTS
                                08/08/00     23     1062     Decollated
====== >>>>>>>>>>>>>>>   B O T T O M    O F    L I S T   <<<<<<<<<<<<<<< ======
Table 80 Fields in the Long (L) Display Type
|
Field |
Description |
|---|---|
|
REPORT (NAME) |
Full name of the report as defined in the decollating mission. |
|
JOB/WTR |
Name of the job that creates the report in the first line of the report entry. External writer name in the second line of the report entry. |
|
JOB/STATUS |
Name of the job that creates the report in the first line of the report entry. Current status of the report in the second line of the report entry. For more information, see Statuses in the Report Lists. |
For a description of the fields, see Table 72.
Display Type L – Additional Info
Below are examples of the Additional Info option specified in the Long display type of the Permanent, History and Active User Report lists. Additional Info fields are discussed on the next page.
Figure 91 User Report List Display Type L – Additional Info – Permanent List
PERMANENT LIST <D> JOB          REP                      USR          CHILD (U)
COMMAND ===>                                                    SCROLL===> CRSR
O USER     REPORT NAME                   COP FORM C DEST     UDEST    JOB/WTR
  MGT      EMPLOYEES REPORT                                           PREMPLR2
                                         DFT STD  X RMT2
     From User    :
     Additional Users:

     Print Missions :
     Category:
     Pagedef:       Formdef:          Output:              Chars:
     Approval:    Name:    Hidden:    Store:        SLA:
  MKT      BANKING REPORT                                             M22RPTS
                                         000 STD  X RMT2
Figure 92 User Report List Display Type L – Additional Info – History List
HISTORY LIST   <D> JOB          REP                      USR M*       CHILD (U)
COMMAND ===>                                                    SCROLL===> CRSR
O USER     REPORT               ODATE     PAGES    LINES V N JOB/STATUS
  MGT      BANKING REPORT                                    M22RPTS
                                08/08/00     40     1839     Wait restore
    Run: 08/08/00 12:57 - 13:03     Decollated: 08/08/00 13:04
    Copies: 001  Form: STD          Class: X
    Remarks: C0000
    Dest  :                         WTR:
    Category: DAILY3               Fromuser:          Job: M22RPTS  JN: 0033821
    Approval APP1     StatAp Wait Appr Hidden   Init_Hidden   Multi   SLA
                      Type            Waiting
  MKT      EMPLOYEES REPORT                                  PREMPLR2
                                08/08/00    328    14361     Backed up
Figure 93 User Report List Display Type L – Additional Info – Active List
ACTIVE LIST    <D> JOB          REP                      USR MGT      CHILD (U)
COMMAND ===>                                                    SCROLL===> CRSR
O USER     REPORT               ODATE     PAGES    LINES V N JOB/STATUS
  MGT      BANKING REPORT                                    M22RPTS
                                08/08/00     40     1839 V T Decollated
    Run: 08/08/00 12:57 - 13:03     Decollated: 08/08/00 13:04
    Copies: 001  Form: STD          Class: X
    Remarks: C0000
    Dest  :                         WTR:
    Category: DAILY3               Fromuser:          Job: M22RPTS  JN: 0033821
    Approval APP1     StatAp Wait Appr Hidden   Init_Hidden   Multi   SLA
                       Type           Waiting
  MKT      EMPLOYEES REPORT                                  PREMPLR2
                                08/08/00    328    14361     Wait Print
For a description of the fields, see Table 80 and Table 73.
Display Type A (All Fields)
Below are examples of the All Fields display type for Permanent, Active and History Report lists. The fields in these examples are discussed below.
Figure 94 User Reports List Display Type A (All Fields) – Permanent List
PERMANENT LIST <A> JOB          REP                      USR MGT      CHILD (U)
COMMAND ===>                                                    SCROLL===> CRSR
O USER     REPORT NAME                   COP FORM C DEST              JOB/WTR
  DEV      EMPLOYEES REPORT                                           PREMPRS2
                                         DFT STD  X
  From User
  Additional Users:

  Print Missions  : STD
  Category:  DAILY
  Pagedef:         Formdef:         Output:           Chars:
  Approval  Y Name:          Hidden:   Store:   SLA:
------------------------------- end of record ---------------------------------
  MGT      EMPLOYEES REPORT     PREMPRS2 000 STD  X RMT2
  From User:
Figure 95 User Reports List Display Type A (All Fields) – History List
HISTORY LIST   <A> JOB          REP                      USR MGT      CHILD (U)
COMMAND ===>                                                    SCROLL===> CRSR
O USER     REPORT NAME                                        JOB      JOBNUMB
  DEV      EMPLOYEES REPORT                                   PRDDRPT1 5833
  CATEGORY DAILY                    FROMUSER
  Ordered: 08/08/00  Run: 08/08/00 11:42 To: 12:03 Decollated: 08/08/00 12:04
  Status : Wait restore                                        View:
  Remarks: C0000
  Copies : 001 Form : STD           Class: X            P-     42 L-     1683
  Dest:                             WTR:
  Record  ID        : ACC672C4 9E6A8000 RBA: 00000118 UPDT: ACC67755 92F23E00
  Print   Missions  :
  Restore Mission   : RST0060M   Restore date: 08/07/18
  Pagedef:         Formdef:         Output:           Chars: ****
  Approval          StatAp           Hidden   Init_Hidden   Multi   SLA
                    Type            Waiting
------------------------------- end of record ---------------------------------
Figure 96 User Reports List Display Type A (All Fields) – Active List
ACTIVE LIST    <A> JOB          REP                      USR MGT      CHILD (U)
COMMAND ===>                                                    SCROLL===> CRSR
O USER     REPORT NAME                                        JOB      JOBNUMB
  DEV      EMPLOYEES REPORT                                   PRDDRPT1 5833
  CATEGORY: DAILY                   FROMUSER:
  Ordered: 08/08/00  Run:          00:00 To: 00:00 Decollated: 08/08/00 15:20
  Status : Printed                                             View: V
  Remarks:
  Copies : 001 Form : STD           Class: X           P-      2 L-       91
  Dest:                             WTR:               :    A
  Record  ID        : ACED682C 86EFE200 RBA: 00000111 UPDT: ACED8AAC 8F040000
  Print   Missions  : PRT1
  Restore Mission   :            Restore date:
  Pagedef:         Formdef:         Output:           Chars: ****
  Additional Users  :

  Approval          StatAp           Hidden   Init_Hidden   Multi   SLA
                    Type            Waiting
Table 81 Fields in the All Fields (A) Display Type
|
Field |
Description |
|---|---|
|
USER |
Name of the report recipient as defined in the decollating mission. |
|
REPORT NAME |
Full name of the report as defined in the decollating mission. |
|
JOB |
Name of the job that creates the report. |
|
JOBNUM |
JES job number of the job that created the report. |
|
CATEGORY |
Category name (a site-defined term, such as DAILY or MONTHLY). |
|
FROMUSER |
Name of the user from which this report (part) has been received. |
|
Ordered |
The date the report was originally scheduled to be run. |
|
Run/To |
Date and (from/to) time the report was produced (displayed only if output is decollated). |
|
Decollated |
Date and time that the report was decollated. |
|
Status |
Current status of the report. For more information, see Statuses in the Report Lists. |
|
Remarks |
Condition code and/or remark. Highest condition code from the job execution, or other job termination codes including system and user abend codes, NCT2 (NOT CATLGD 2) or JFAIL (JCL error).a Remarks can also be generated by the DO REMARK option of the report decollating mission. If there is more than one remark, remarks are separated by commas. The user can update the remark under certain display types. |
|
VIEW |
View indicator. Usage is optional and is determined by parameter SUSRVEW in the User profile member. If not used, it is blank. This field can be used as a 1-character flag:
VIEW can also be used as a 1, 2 or 3 digit counter:
|
|
Copies |
Copy count to be used when the report is printed. Valid values are 0 to the maximum number allowed, and DFT (the default number of copies). The maximum and DFT are set in the report decollating parameters by authorized personnel. |
|
Form |
Form to use when printing a report on the mainframe computer. Control-V does not validate this field. Validation is the user’s responsibility. |
|
Class |
Output printing class. Can be updated under JES2. Under JES3, output is printed in a system defined class which is not under user control. |
|
Dest |
Remote printer JES destination (node and user ID) for printing the report. |
|
WTR |
External writer name. |
|
P |
Number of pages in the report. |
|
L |
Number of lines in the report. |
|
Record ID |
Timestamp indicating when the record was created. |
|
Print Missions |
Missions used to print the report. The printing mission usually represents the paper type (for example, STD). |
|
Restore Mission |
Mission used to restore the report from tape or cartridge to disk. |
|
Restore Date |
Date that the restore mission was executed. |
|
Pagedef |
PAGEDEF (for AFP output). |
|
Formdef |
FORMDEF (for AFP output). |
|
Output |
Name of output statement. |
|
Chars |
Character set. |
|
Approval |
An approval name, defined in the Approval Tree, comprised of 1 or more users, that can approve this report from Control-D/WebAccess Server. |
|
(Approval) Status |
Current status of the Approval process. For more information, refer to the Control-D/WebAccess Server User Guide. |
|
Hidden |
Determines to whom the report is visible. Valid values:
|
|
Init_hidden |
Defines to whom the report is visible just after decollation or the Add this report operation. Valid values:
|
|
Multi |
Whether the approval status of this report is relevant to more reports. Valid values:
|
|
Type |
Multi Approval type, either Multistage or Parallel. |
|
Waiting |
The number of end users that are left to complete the Parallel Approval process. |
|
Additional Users |
List of other users to whom this report is distributed, in addition to the current user. Updates can be made before the report is decollated. By default, only users in the Recipient Tree can be specified. However, if the SUS2TRE Profile variable is set to N (No), the Recipient Tree is not checked for the specified users. |
|
Note |
Note indicator. Indicates the type of notes, if any, attached to the report:
For details about notes, see Notepad Facility. |
|
RBA |
Address of the record in the file. |
|
UPDT |
Timestamp indicating when the record was last changed. |
|
SLA |
Service Level Agreement - The number of days after the report is generated that the report must be approved. Valid values:
|
|
StatAp |
Current approval status of the report. Valid values:
|
Display Type A – Additional Info
When using option A with display type A, the following Additional Info fields are displayed on the Active and History Report list screens. Labeled fields are discussed below.
Figure 97 User Report List Display Type A – Additional Info – History List
HISTORY LIST   <A> JOB          REP                      USR MGT      CHILD (U)
COMMAND ===>                                                    SCROLL===> CRSR
O USER     REPORT NAME                                        JOB      JOBNUMB
  DEV      EMPLOYEES REPORT                                   PRDDRPT1 5833
  CATEGORY DAILY                    FROMUSER
  Ordered: 08/08/00  Run: 08/08/00 11:42 To: 12:03 Decollated: 08/08/00 12:04
  Status : Wait restore                                        View:
  Remarks: C0000
  Copies : 001 Form : STD           Class: X            P-     42 L-     1683
  Dest :                            WTR:
  Record  ID        : ACC1B390 7957FC00 RBA: 00000225 UPDT: ACC2C775 B5A4B000
  Print   Missions  :
  Restore Mission   : RST0060M   Restore date: 08/07/18
  Pagedef:         Formdef:         Output:           Chars: ****
  Approval          StatAp           Hidden   Init_Hidden   Multi   SLA
                    Type            Waiting
     CDAM-FILE NAME ( 008 )                       FIRST-RBA      LAST-RBA
  01 CDAM.PREMPRS2.J09812.D0601311.S99.N001D00    00000000010128 00000000010A6B
     Sysdata ID : BF9628BF 29B1B740      From page : 00000001  Pages : 00000010
  02 CDAM.PREMPRS2.J09812.D0601311.S99.N002100    00001E01014408 00001E01014645
     Sysdata ID : BF9628BF 29B1B345      From page : 00000011  Pages : 00000020
  03 CDAM.PREMPRS2.J09812.D0601311.S99.N002100    00001E0101467C 00001E01014887
     Sysdata ID : BF9628BF 29B15677      From page : 00000021  Pages : 00000030
  04 CDAM.PREMPRS2.J09812.D0601311.S99.N002100    00001E010148BE 00001E01014938
     Sysdata ID : BF9628BF 29B13567      From page : 00000031  Pages : 00000040
  05 CDAM.PREMPRS2.J09812.D0601311.S99.N002100    00001E0101496D 00001F01010379
     Sysdata ID : BF9628BF 29B17654      From page : 00000041  Pages : 00000050
  06 CDAM.PREMPRS2.J09812.D0601311.S99.N002100    00001F010103B0 00001F0101042A
     Sysdata ID : BF9628BF 29B15678      From page : 00000051  Pages : 00000060
  07 CDAM.PREMPRS2.J09812.D0601311.S99.N002100    00001F0101045D 00001F010108DE
     Sysdata ID : BF9628BF 29B18530      From page : 00000061  Pages : 00000070
  08 CDAM.PREMPRS2.J09812.D0601311.S99.N002100    00001F01010915 00001F0101098F
     Sysdata ID : BF9628BF 29B1B4679     From page : 00000071  Pages : 00000080
Figure 98 User Report List Display Type A – Additional Info – Active List
ACTIVE LIST    <A> JOB          REP                      USR MGT      CHILD (U)
COMMAND ===>                                                    SCROLL===> CRSR
O USER     REPORT NAME                                        JOB      JOBNUMB
  DEV      EMPLOYEES REPORT                                   PRDDRPT1 5833
  CATEGORY: DAILY                   FROMUSER:
  Ordered: 08/08/00  Run:          00:00 To: 00:00 Decollated: 08/08/00 15:20
  Status : Printed                                             View: V
  Remarks:
  Copies : 001 Form : STD           Class: X           P-      2 L-       91
  Dest:                             WTR:               :
  Record  ID        : ACC1BBFD DE290800 RBA: 00000229  UPDT: ACC2C775 C7C61000
  Restore Mission   :            Restore date:
  Pagedef:         Formdef:         Output:           Chars: ****
  Additional Users  :

  Approval          StatAp           Hidden   Init_Hidden   Multi   SLA
                    Type            Waiting
     CDAM-FILE NAME ( 001 )                       FIRST-RBA      LAST-RBA
  01 CTD.D90.K56CMD.J33821.D3121420.S92.N002500   00000000010128 0000000201208F
     Sysdata ID : D16B47A0 6EAC0F12      From page : 00000000  Pages : 00000008
  02
     Sysdata ID :                        From page :           Pages :
Table 82 Additional Info Fields in the All Fields (A) Display Type
|
Field |
Description |
|---|---|
|
CDAM-FILE NAME |
Name of the CDAM file that contains the report. |
|
sequence-num |
Sequence number of the CDAM file (1 – 20). More than 20 CDAM files can be used but only the first 20 are displayed. |
|
tot-num |
Total number of CDAM files pointed to by the record. |
|
FIRST-RBA / LAST-RBA |
Relative byte address of the first and last record of the CDAM file belonging to the report. |
Statuses in the Report Lists
The STATUS field indicates the current report stage. The following statuses may appear:
Table 83 User Report List STATUS Field Values
|
Value |
Description |
|---|---|
|
Wait decollation |
Report has not yet been processed. Records with this status are created by utility CTDCP2A. |
|
Decollated |
Report has been processed and is available for viewing. The report does not print unless specifically requested by the P (Print) option. |
|
Decollated-notok |
Report has been processed to completion, but an error occurred during processing, or a DO NOTOK has been activated. The report does not print unless specifically requested by the P (Print) option. |
|
Wait migr |
The report has been decollated and indexed but has not yet migrated. The report and indexes are available for viewing. |
|
Migrated |
The report has migrated to a storage device. The report and indexes are available for viewing. |
|
Wait print |
Printing of the report has been requested but the report has not yet been printed. The report is available for viewing. |
|
Printed |
Report has been printed. It is available for viewing. |
|
Not printed |
Report was scheduled for printing but, for some reason, did not print or did not print completely. |
|
Wait bkp |
Report is no longer needed for viewing but is waiting to be backed up, after which it is automatically deleted from the Active Report list. |
|
Backed up |
Regular status in the History list. |
|
Wait restore |
A restore request is pending. |
|
Restored |
A restore request for this report has been executed. The report has been restored from tape or cartridge to disk. The report is available for viewing (and printing by request). |
The Approval STATUS field indicates the current Approval report stages. The following statuses may appear:
Table 84 User Report List Approval and Subscribe STATUS Field Values
|
Value |
Description |
|---|---|
|
Wait Appr |
An Approval process has been ordered and the report is waiting for approval. |
|
Approved |
The report has been approved as a result of Approval processing. |
|
Rejected |
The report has been rejected as a result of Approval processing. |
|
Frc App |
The report was force approved by the CTDAPRV utility. |
|
Frc Rej |
The report was force rejected by the CTDAPRV utility. |
User Report List Search Continuation Window
If user report search confirmation is implemented at your site, the Search Continuation window (shown below) is opened when a specified number of records have been rejected during a User Report file search. The current number of rejected and selected records is displayed in the window.
The Search Continuation window allows the user continue the search until all records have been examined, or to cancel the search.
Figure 99 User Report Search Continuation Window
ACTIVE LIST   <D>  JOB          REP                      USR          CHILD (U)
COMMAND ===>                                                    SCROLL===> CRSR
O USER     REPORT               ODATE     PAGES    LINES V N STATUS

               +---------------------------------------------+
               |                                             |
               |    NUMBER OF REJECTED RECORDS:   000500     |
               |    NUMBER OF SELECTED RECORDS:   000009     |
               |                                             |
               |    PLEASE SELECT ONE OF THE FOLLOWING: _    |
               |                                             |
               |    1 - STOP SEARCH IMMEDIATELY              |
               |    2 - ASK AGAIN AFTER 000500 RECORDS       |
               |    3 - UNCONDITIONAL SEARCH                 |
               |                                             |
               +---------------------------------------------+


P PRINT     V VIEW     U UPDATE     I INSERT     A ADD INFO     E EDIT
X INDEX     N NOTE     G GIVETO     D DELETE     Q QUICK ACCESS       15.34.53
To perform a search, select one of the following choices and press Enter.
3 – UNCONDITIONAL SEARCHSearches all records in the User Report file.
The search continues uninterrupted unless and until you select option 1 (Stop Search Immediately).
2 – ASK AGAIN AFTER number RECORDSSearches the User Report file until the specified number of rejected records is met, and then pauses. The search number can be modified. Valid values are 000001 through 999998, or 999999 (see the Note below). Default:500.
Continue the search by pressing Enter.
Stop the search by selecting option 1 (Stop Search Immediately).
If you enter 999999, the search is unlimited and the Search Continuation window is not displayed in future searches. In this case, only the INCONTROL administrator is able to reset this number.
If any records are selected, the User Report List is displayed listing those records.
During the search, the following information is displayed at the top of the window:
-
Number of rejected records. Lists the cumulative number of records rejected.
-
Number of selected records. Lists the cumulative number of records selected.
For example, if after the first search 500 records are rejected and 20 records are selected, the number of rejected records displayed is 500 and the number of selected records displayed is 20. If after the next search 30 more records are selected, the number of rejected records displayed is 1000 and the number of selected records displayed is 50. In this example, a total of 1050 records were searched.
If any records are selected during the search, the User Report List is displayed listing those records. If no records are selected, the Search Continuation Window is closed and a message is displayed.
Options of the User Report List
The following options can be applied to individual reports: (The INCONTROL administrator can change predefined options (letters). For details, see the INCONTROL for z/OS Installation Guide.)
Table 85 Options of the User Report List
|
Option |
Description |
|---|---|
|
P (PRINT) |
(Active User Report list) Print entire report or selected pages via a specific index value (or via a prefix that matches a unique index value). |
|
X (INDEX) |
(Active User Report list) List the report’s indexes (which match any specified index mask) in the Index window where the user can select an index to display its Values of Index panel or its Quick Access panel. The Index window is not displayed if it would contain only one index; the Values of Index panel for that index is displayed instead. For more information, see Index Window. |
|
V (VIEW) |
(Active User Report list) View entire report or the pages selected via a specific index value (or via a prefix that matches a unique index value). Create and modify "rulers" that enhance the appearance of viewed reports. |
|
N (NOTE) |
(Active User Report list) Open a Note Window for the report. For more information, see Notepad Facility |
|
U (UPDATE) |
(All User Report lists) Update the User Report list with changes made to non-protected (Can be updated) fields. Update requests are recorded in the IOA Log file. A confirmation window may be displayed, depending on profile variable SUSRUPDW. |
|
G (GIVETO) |
(Active User Report list) Provide a copy of the report to another user after the report is decollated. |
|
I (INSERT) |
(Active and Permanent User Report lists) This option is for experienced operations personnel. Insert a new report data line. Fill in data (user name, report name, copy count, and so on) and press Enter. In order to insert a line containing a long report name (more than 20 characters in length), use the display type L (Long). Inserted lines can be deleted by the D (Delete) option. |
|
D (DELETE) |
(All User Report lists) Delete the entire report. Delete requests are recorded in the IOA Log file. A confirmation window may be displayed, depending on profile variable SUSRDELW. A warning message appears in the confirmation window if the report has been processed by Approval post-processing. The delete action for a report that is in an Approval process forces an Approval abort action for this report. If parameter MULTI is set to S is specified for the Approval process, the delete action will affect all reports waiting for the completion of this Approval process. |
|
A (ADD INFO) |
(All User Report lists) Toggle between displaying and hiding additional report information. |
|
Q (QUICK ACCESS) |
(Active User Report list) Display the Quick Access panels of a report to retrieve and view report pages based on report index values. |
|
E (EDIT) |
(Active User Report list) Access the Report Editing (Ruler) screen directly from the Active User Report list to edit reports that have not migrated. For more information, see Editing (Reformatting) Reports. |
|
R (RESTORE) |
(History User Report list) Restore a report from tape or cartridge to disk. |
|
C (NO-RESTORE) |
(History User Report list) Cancel a restore request. |
Commands of the User Report List
General Commands
Use the scrolling conventions to scroll the User Report list forward (PF08/PF20) and backward (PF07/PF19). Use the FIND command to search for a specified string in the Report list. Use the END command (PF03/PF15) to exit the Report list and return to the previously displayed screen. Use the RETURN command to exit the Report list and return to the User Reports entry panel. Use the =X command to exit the entire Online User Reports facility and return to your normal operating environment.
Table 86 User Report List – General Commands
|
Command |
Description |
|---|---|
|
REFRESH |
The REFRESH command (PF04/PF16) refreshes the display of the current User Report list. The selection criteria are activated again and a new list is produced containing reports that were added to the list since the last time the list was entered. The command also refreshes the status of the existing reports in the list. |
|
DISPLAY |
While in a User Report list, you can change the display type by using the DISPLAY command. Format: DISPLAY x where x is the identifying letter for the desired display type. DISPLAY can be abbreviated DI. DISPLAY U displays the User display type of the User Report list. |
|
RULER |
Rulers are sets of screen editing rules that can be used to modify the appearance of reports. The RULER command can be used in the Active (but not the Permanent or History) User Report list to alternately turn the "ruler show mode" on and off. When the "ruler show mode" is ON, rulers currently defined for each report are displayed on the Active Report list. The default mode is set in parameter SHOW RULERS of the Show Options window. |
|
SHOW |
Enter SHOW on the Command line of the User Report list and press Enter. The Show Options window is displayed. This Show Options window enables users to enter additional selection criteria and then redisplay the User Report list. For more information, see Show Options Window. |
|
SORT |
Records in the User Report list are automatically displayed in default sort order. (The INCONTROL administrator can modify the default sort order for each user.) Command SORT enables the user to change the order in which User Report list records are displayed. (For more information see "SORT PARAMETERS Window" below.) Command SORT can be specified with or without parameters. If specified without parameters, the Sort Parameters window (below) is opened. This window allows the user to specify a sort based on one or more (maximum 5) fields in ascending or descending order. The sortable fields are listed in the Sort Parameters window. |
SORT PARAMETERS Window
Figure 100 SORT PARAMETERS Window
ACTIVE LIST     JOB          REP                      USR ADMIN    SORT  (U)
COMMAND ===>                                                    SCROLL===> CRSR
O USER     REPORT               ODATE     PAGES    LINES V N STATUS
  JONES    NEW DAY REPORT
                                08/08/00      3        6     Wait print
  JONES    NEW DAY REPORT
+----------------------------------------------------------------------------+
|                                                                            |
|                              SORT PARAMETERS                               |
|                                                                            |
|        1   USER                        7   DECOLLATION DATE + TIME         |
|        2   JOB NAME                    8   REMARK                          |
|        3   REPORT NAME                 9   JOBID                           |
|        4   CATEGORY                   10   FORMS                           |
|        5   ODATE                      11   COPIES                          |
|        6   RUN DATE + TIME            12   PRINT MISSION                   |
|                                                                            |
|        SPECIFY FIELD NUMBER AND A OR D FOR SORT ORDER                      |
|                                                                            |
|        SORT FIELDS ===> 03 - A    05 - D       -         -         -       |
|                                                                            |
|        ENTER Y TO PERFORM SORT  Y                                          |
|                                                                            |
+----------------------------------------------------------------------------+
Fill in the Sort Parameters window as follows:
Table 87 SORT PARAMETERS Window Fields
|
Field |
Description |
|---|---|
|
SORT FIELDS |
Enter sort order parameters: field number to the left of the hyphen and A (ascending) or D (descending) to the right of the hyphen. |
|
ENTER Y TO PERFORM SORT |
Enter Y to exit the window and sort the User Report list. Enter N to exit the window and return to the User Report list without performing the sort. |
When reentering the User Report list, records are displayed in default sort order. However, the sort order parameters last used in the Sort Parameters window are retained in the window.
The Sort Parameters window is bypassed if the SORT command includes one or more parameters. The maximum number of parameters is 5. Each parameter is preceded by a blank and consists of a sort field number and the letter A (ascending) or D (descending). The sort field numbers are identical to those displayed in the Sort Parameters window.
For example, SORT 3A 5D specifies a sort by REPORT NAME (ascending) and ODATE (descending).
The default sort order of the User Report list can be modified using parameter SUS2SRTI in the User profile member. For more information, see the Control-D and Control-V chapter of the INCONTROL for z/OS Administrator Guide.
Displaying "Stored" Reports
"Stored" reports are created by a printing mission with parameter STORE set to YES. Typically, they are displayed in Control-D/WebAccess Server using Control-D/Page On Demand. For more information, see STORE: Mission-Specific Parameter.
By default, entries of "stored" reports are not displayed in the Active User Report List screen. However, they are displayed in the Active User Report List screen if command STORED is entered on this screen’s command line.
Valid command arguments:
Table 88 STORE Command Arguments
|
Argument |
Description |
|---|---|
|
YES |
Both "stored" and "non-stored" reports are displayed in the Active User Report List screen. Default for the command. |
|
ONLY |
Only "stored" reports are displayed in the Active User Report List screen. |
|
NO |
"Stored" reports are not displayed in the Active User Report List screen. (Default if the command is not entered.) |
You can modify "stored" report viewing by changing the User profile parameter SUS2STOR. For more information, see the INCONTROL for z/OS Administrator Guide > "IOA administration" > "IOA Profiles" > "Profile Variables."
Quick Access Report List
The Quick Access Report list is displayed when the BYPASS PANEL field of the User Reports entry panel is set to Q and more than one report satisfies the selection criteria.
In the Quick Access Report list, option Q displays Quick Access panels for the selected report. If option Q is specified for more than one report at a time, the requests are stacked in the order listed. When the Quick Access panel for the first report is displayed, use the END command (PF03/PF15) to access the Quick Access panel for the next report in the stack.
Below is an example of the Quick Access Report list. Labeled fields are discussed below.
Figure 101 Quick Access Report List
ACTIVE LIST        JOB          REP                      USR MGT      CHILD (U)
COMMAND ===>                                                    SCROLL===> CRSR
O USER     REPORT               ODATE     PAGES
  DEV      EMPLOYEES REPORT
                                08/08/00      1
  MGT      EMPLOYEES REPORT
                                08/08/00      1
  MGT      BANKING REPORT
                                08/08/00      5
  MKT      EMPLOYEES REPORT
                                08/08/00    286
  PROD     INVENTORY REPORT
                                08/08/00     10
  PROD     EMPLOYEES REPORT
                                08/08/00      3
  WAREHSE  INVENTORY REPORT
                                08/08/00   1866
====== >>>>>>>>>>>>>>>>>> NO MORE REPORTS IN THE LIST <<<<<<<<<<<<<<<<<< ======
SELECT A REPORT BY FILLING Q IN THE OPTION FIELD
Press REFRESH (PF04/PF16) to redisplay the Quick Access Report list.
Press END (PF03/PF15) to exit to the previously displayed screen.
Type RETURN in the COMMAND field and press Enter to return to the User Reports entry panel.
To change the value in the BYPASS PANEL field of the User Reports entry panel, type RETURN in the COMMAND field and press Enter to return to the User Reports entry panel before exiting the User Reports facility.
Fields in the Quick Access Report List
Table 89 Fields in the Quick Access Report List
|
Field |
Description |
|---|---|
|
USER |
Name of the report recipient as defined in the decollating mission. |
|
REPORT |
Full name of the report as defined in the decollating mission. |
|
ODATE |
Original scheduling date (date report was originally scheduled to be run). |
|
PAGES |
Number of pages in the report. |
Quick Access Report List Option
The Quick Access option (Option Q) enables you to display the Quick Access panels of a report to retrieve and view report pages based on report index values.
Only display type Q is available for the Quick Access Report list.
Quick Access Panels
Quick Access panels enable the user to display the index paths defined for a report and to view or print report sections based on index and subindex values. Quick Access panels are displayed by entering Q in the User Reports entry panel BYPASS PANEL field or as an option in the Index window or the Active User Report list.
Figure 102 Quick Access Panel
--------------------------  CONTROL-V QUICK ACCESS  ---------------------(U.Q)
COMMAND ===>                                                 USER ===> N44

REPORT NAME:  CENSUS RESIDENTIAL
JOB NAME:     CENSUS5
DATE:         06/06/00
  +--------------------------------------------------------------------------+
  |INDEX                    VALUE                                            |
  |                                                                          |
  |CITY                 -   JACKSONVILLE                                     |
  |                                                                          |
  |AREACOD              -   32217                                            |
  |                                                                          |
  |STREET               -   CASTELLON DR, N                                  |
  |                                                                          |
  |BLDG_NO              -   2345                                             |
  |                                                                          |
  |APT_NO               -                                                    |
  +--------------------------------------------------------------------------+

CMDS: END , ENTER , NEXT , PREV , PRINT , RETURN , SHPF                09.06.20
Each index path for a report is fully displayed in its own Quick Access panel. Use the up and down or scrolling keys to display the next (PF08/PF11/PF20/PF23) or previous (PF07/PF10/PF19/PF22) Quick Access panel.
If the same index exists in the next or previous panel, the value specified for that index is retained when displaying the next or previous panel. If the same index does not exist, its value is lost and must be specified again, if necessary, when a Quick Access panel that does contain that index is displayed.
Values entered on a single Quick Access panel are used as selection criteria to select report sections. If a value is not specified for a subindex, that subindex and all subindexes below it (if any) are ignored. Report sections that are pointed to by the index values specified on the Quick Access panel are retrieved. Each retrieved section may be one or more pages depending on how the report was indexed. (Both record-level and page-level index values retrieve report pages. However, report lines are highlighted if they matched a record-level index value.)
If an asterisk, prefix or unmatched value is specified in an index value field, the Values of Index panel is displayed with the available values for that index beginning with the first value (if an asterisk is specified) or with the value that most nearly matches the prefix or value specified.
Figure 103 Values of Index Panel
VALUES OF INDEX: CITY                                                   (U.Q.X)
COMMAND ===>                                                    SCROLL===> CRSR
O VALUE
  BRUSSELS
  BUENOS AIRES
  CARACAS
  DUSSELDORF
  HONG KONG
  ISTANBUL
  LONDON
  LOS ANGELES
  MADRID
  MILAN
  PARIS
  SEOUL
  SINGAPORE
  TOKYO
  TORONTO
  VIENNA
  ZURICH
======== >>>>>>>>>>>>>>> NO MORE VALUES FOR THIS INDEX <<<<<<<<<<<<<<< ========


USE S TO SELECT A VALUE AND PRESS PF3 OR ENTER TO RETURN               10.03.39
Use option S (Select) in the Values of Index panel to select the desired value. Press Enter to return to the Quick Access panel. The selected value is displayed in the Quick Access panel value field for the appropriate index.
Fields of the Quick Access Panel
Table 90 Fields of the Quick Access Panel
|
Field |
Description |
|---|---|
|
USER |
Name of the user assigned to the report. |
|
REPORT NAME |
Name of the report. |
|
JOB NAME |
Name of the job that produced the report. |
|
DATE |
Original scheduling date of the report. |
|
INDEX |
Dynamically generated index and subindex names. |
|
VALUE |
Values specified by the user for the displayed indexes. Entering an asterisk or prefix in this field causes the Values of Index panel for the corresponding index to be displayed. |
Commands of the Quick Access Panel
The following commands can be entered on the command line of the Quick Access panel:
Table 91 Commands of the Quick Access Panel
|
Command |
Description |
|---|---|
|
END |
Display the Quick Access panels for other specified reports, if any. Exit the Quick Access panel and return to the previously displayed screen. |
|
ENTER |
After specifying the desired values for the indexes whose names are displayed, pressing Enter (with or without typing ENTER on the command line) displays the report or report sections pointed to by those index values. |
|
NEXT |
Display the next Quick Access panel when more than one index path satisfies the previously specified index name or mask criteria. |
|
PREV |
Display the previous Quick Access panel when more than one index path satisfies the previously specified index name or mask criteria. |
|
|
After entering the desired values for the indexes whose names are displayed, this command prints the report or report sections pointed to by those index values. Both immediate and deferred report printing options are available. For more information, see Printing Reports. |
|
RETURN |
Return to the User Reports entry panel. |
|
SHPF |
Display a window defining the PFKeys described below. |
PFKeys for the Quick Access Panel
Press PF24 in the Quick Access panel to display the available PFKeys:
Table 92 PFKeys for the Quick Access Panel
|
PFKey |
Description |
|---|---|
|
PF01/PF13 |
Help. |
|
PF03/PF15 |
Display the Quick Access panel for other reports, if any, then End. |
|
PF04/PF16 |
Return to entry panel if BYPASS PANEL is set to Q and the Report list was not displayed; otherwise, return to the previously displayed screen. |
|
PF06/PF18 |
=6. |
|
PF07/PF19 |
Previous index path. |
|
PF08/PF20 |
Next index path. |
|
PF10/PF22 |
Previous index path. |
|
PF11/PF23 |
Next index path. |
|
PF24 |
Show PFKeys. |
Values of Index Panel
The Values of Index panel lists all the values of a specified index. This panel enables you to view or print report sections based on index values, to list the subindex names that exist for an index value, or to select a value to be inserted in a Quick Access panel.
The Values of Index panel is displayed when:
-
Option S is specified for an index in the Index window (described below)
-
Only one index would have been displayed in the Index window.
-
An asterisk, prefix or unmatched value is entered in a Quick Access panel value field. The Values of Index panel lists values of the selected index in alphabetical order.
If a value is specified in the User Reports entry panel, and the index does not contain that value but does contain values that match it as a prefix, the Values of Index panel is scrolled to the page that contains the matching values.
Figure 104 Values of Index Panel – Example
VALUES OF INDEX:  COUNTRIES                                           (U.S.X)
COMMAND ===>                                                  SCROLL===> CRSR
O VALUE                                              N # OF SECTIONS # OF PAGES
   ARGENTINA                                                00000001 00000003
   AUSTRALIA                                                00000003 00000009
   AUSTRIA                                                  00000001 00000003
   BELGIUM                                           T      00000002 00000002
   BRAZIL                                                   00000002 00000006
   CANADA                                                   00000002 00000006
   CHILE                                                    00000001 00000001
   COLUMBIA                                                 00000001 00000001
   DENMARK                                           T      00000002 00000002
   ECUADOR                                                  00000001 00000001
   EGYPT                                                    00000001 00000001
   FINLAND                                                  00000001 00000001
   FRANCE                                                   00000003 00000006
   GERMANY                                                  00000002 00000004
   GREECE                                                   00000001 00000001
   HONG KONG                                                00000001 00000001
   INDIA                                                    00000001 00000003
   IRELAND                                                  00000002 00000002
   JAPAN                                                    00000001 00000003

 OPTIONS:  V - VIEW  P - PRINT  X - SUBINDEXES                         09.38.36
Use the scrolling conventions to scroll the Values of Index panel forward (PF08/PF20) and backward (PF07/PF19).
Fields of the Values of Index Panel
Table 93 Fields of the Values of Index Panel
|
Field |
Description |
|---|---|
|
O (Option) |
Enter a 1-character option for: viewing or printing selected report pages, displaying the Subindex window, or selecting a value for use in the Quick Access panel. For more information see Options of the Index Window |
|
VALUE |
Value of the selected index. |
|
N |
Note indicator. Indicates the type of notes, if any, attached to the report:
For details about notes see Notepad Facility. |
|
# OF SECTIONS |
Number of nonconsecutive report sections (RBA ranges) pointed to by this index value. Consecutive report sections are combined and counted as one section. Nonconsecutive pages in a single report section are counted as separate sections. |
Options of the Values of Index Panel
Table 94 Options of the Values of Index Panel
|
Option |
Description |
|---|---|
|
V |
View the report pages pointed to by the selected index value. |
|
P |
Display the Print Options window that enables you to print some or all of the pages selected by an index value. For more information see Printing Reports Both immediate and deferred report printing options are available. For more information, see Printing Reports. |
|
X |
Display the Subindex window. This window lists the available subindexes (by subindex name, not value) that exist under the specified value. |
|
S |
Select one value for use in the Quick Access panel, then press Enter to return to the Quick Access panel. The selected value is automatically inserted in the appropriate value field in the Quick Access panel. This option is only available when the Values of Index panel is displayed in response to an asterisk, prefix or unmatched value specified in a value field of the Quick Access panel. |
FIND Command
The FIND command can be entered on the Command line of the Values of Index panel. The cursor moves to the next location of the specified value if it exists on the displayed screen and remains at its current location if the specified value is not visible on the screen. For additional information, see Commands and PFKeys.
LOCATE Command
The LOCATE command can be entered on the Command line of the Values of Index panel. This command requires an index value or prefix (not masked) as a parameter. If the specified value or prefix exists, the display of index values is scrolled to that value or prefix. Otherwise, the display of index values is scrolled to the nearest index value that does exist.
JOBNAME panel
A special case of the Values of Index panel is used to display jobname records.
The VALUES OF INDEX: JOBNAME panel displays the jobname records for all reports matching the selection criteria. For more information, see User Reports Entry Panel (Display Type J)).
For additional information about any of the listed records, enter A (Additional Info) in the OPTION field.
Figure 105 Values of Index Panel – JOBNAME
VALUES OF INDEX: JOBNAME                                                (U.J.X)
COMMAND ===>                                                  SCROLL===> CRSR
O VALUE                                              N # OF SECTIONS # OF PAGES
======== >>>>>>>>>>>>>>>>   T O P   O F   R A N G E    <<<<<<<<<<<<<<<< =======
 N30EIGHT J0412392      C0000 271011 1354 1354            00000001   00000003
 N30EIGHT J0412393      C0000 271011 1354 1354            00000001   00000003
 N30EIGH0 J0412403      C0000 271011 1359 1359            00000001   00000003
 N30EIGH1 J0412394      C0000 271011 1359 1359            00000001   00000003
 N30EIGH2 J0412395      C0000 271011 1359 1359            00000001   00000003
 N30EIGH3 J0412396      C0000 271011 1359 1359            00000001   00000003
 N30EIGH4 J0412397      C0000 271011 1359 1359            00000001   00000003
 N30EIGH5 J0412398      C0000 271011 1359 1359            00000001   00000003
 N30EIGH6 J0412399      C0000 271011 1359 1359            00000001   00000003
 N30FOUR5 J0412421      C0000 271011 1403 1403            00000001   00000003
 N30FOUR6 J0412422      C0000 271011 1403 1403            00000001   00000003
 N30FOUR7 J0412423      C0000 271011 1403 1403            00000001   00000003
 N30FOUR8 J0412424      C0000 271011 1403 1403            00000001   00000003
 N30FOUR9 J0412425      C0000 271011 1403 1403            00000001   00000003
 N30NINE  J0412426      C0000 271011 1405 1405            00000001   00000003
 N30NINE0 J0412427      C0000 271011 1405 1405            00000001   00000003
 N30NINE1 J0412428      C0000 271011 1405 1405            00000001   00000003
 N30NINE2 J0412429      C0000 271011 1405 1405            00000001   00000003
 ======== >>>>>>>>>>>>>>> NO MORE VALUES FOR THIS INDEX <<<<<<<<<<<<<<< ========


 OPTIONS:    V -VIEW    P -PRINT   X -SUBINDEXES                        12.06.05
Index Window
This window is displayed when option X is specified for a report in the Active User Report list.
The Index window enables a user to display the Values of Index panel or the Quick Access Panel for a main index.
The Index window lists all main indexes of the report, indicates the media on which each index currently resides, and indicates whether or not a copy of the index remains on disk when the index migrates to another storage media.
All indexes defined in the report’s decollating mission that satisfy the criteria specified in the User Reports entry panel are listed in the Index window. To reduce the time and effort required to access the desired section of a report, the Index window is not displayed if only one index would be listed. Instead, the Values of Index panel for that index is displayed.
Figure 106 Index Window
ACTIVE LIST    JOB          REP REPORT40             USR          <D> CHILD (U)
COMMAND ===>                                                   SCROLL===> CRSR
O USER     REPORT               ODATE     PAGES    LINES V N STATUS
  MRKTG    REPORT40
           +-------------------------------------------------------+
X MRKTG    |                                                       |
           |  MAIN INDEXES                                         |  d
====== >>> |  REPORT REPORT43                                      |  << ======
           |                                                       |
           |  O INDEX                      MEDIA     RESIDENT      |
           |    SALES-REP                  CART         Y          |
           |    SALES-MGR                  CART         Y          |
           |    MKTG-AREA                  CART         Y          |
           |    ZIP-CODE                   CART         N          |
           |    PHONE-CODE                 CART         N          |
           |                                                       |
           |                                                       |
           |                                                       |
           |                                                       |
           |  USE S TO SELECT AN INDEX   Q FOR QUICK ACCESS PANEL  |
           +-------------------------------------------------------+

  P PRINT     V VIEW     U UPDATE     I INSERT     A ADD INFO     E EDIT
  X INDEX     N NOTE     G GIVETO     D DELETE     Q QUICK ACCESS      08.02.09
Use the PF03 or PF04 key to redisplay the previously displayed User Report list.
Fields of the Index Window
Table 95 Fields of the Index Window
|
Field |
Description |
|---|---|
|
O(ption) |
Option field. For more information see Options of the Index Window. |
|
INDEX |
Name of each report main index. |
|
MEDIA |
Name of the media on which each index resides. |
|
RESIDENT |
Indicates whether or not a copy of the index remains on disk when the index migrates with the report to another storage media.
|
Options of the Index Window
Table 96 Options of the Index Window
|
Option |
Description |
|---|---|
|
S (SELECT) |
Display the Values of Index panel that contains a sorted list of all the values in the report for the selected main index. |
|
Q (QUICK ACCESS) |
Display Quick Access panels that correspond to the specified report and main index. These panels enable a user to directly view specific pages and sections of the report by specifying a set of index values in one of the panels. |
Subindex Window
The Subindex window is displayed when option X is specified for a value in the Values of Index panel. This window lists the names of subindexes that exist under that index value.
Figure 107 Subindex Window
VALUES OF INDEX: COUNTRIES                                              (U.S.X)
COMMAND ===>                                                    SCROLL===> CRSR
O VALUE                                               N # OF SECTIONS
  ARGENTINA                                                  00000001
  AUSTRALIA     +------------------------------------------------------------+
  AUSTRIA       |                                                            |
  BELGIUM       |  SUBINDEXES                                                |
  BRAZIL        |  VALUE CANADA                                              |
X CANADA        |                                                            |
  CHILE         |   O INDEX                                                  |
  COLUMBIA      |     STATE/PROVINCE                                         |
  DENMARK       |     CITY                                                   |
  ECUADOR       |     ZIPCODE                                                |
  EGYPT         |     STREET                                                 |
  FINLAND       |     BLDG_NO                                                |
  FRANCE        |                                                            |
======== >>>>>> |                                                            |=
                |                                                            |
                |                                                            |
                | USE S  TO SELECT AN INDEX                                  |
                +------------------------------------------------------------+

OPTIONS:  V - VIEW   P - PRINT  X - SUBINDEXES                         11.23.09
Use option S to display a Values of Index panel listing values in the selected subindex. Use the END command (PF03/PF15) to return to the previously displayed Values of Index panel.
Fields of the Subindex Window
Table 97 Fields of the Subindex Window
|
Field |
Description |
|---|---|
|
O |
Option field. For more information see "Options of the Subindex Window" below. |
|
INDEX |
Names of the available subindexes at the current level in the index hierarchy. |
Options of the Subindex Window
Table 98 Options of the Subindex Window
|
Field |
Description |
|---|---|
|
S |
Display a Values of Index panel listing the available values in the specified subindex |
GIVETO Option – Distributing Reports to Other Users
The G (GIVETO) option requests that a copy of a decollated report be provided to another user. By default, only users in the Recipient Tree can be specified. However, if the SUS2TRE Profile variable is set to N (No), the Recipient Tree is not checked for the specified users.
This option opens the Give To window in the Report list.
This option can only be specified for reports that have been decollated. Before the reports have been decollated, copies of reports can be assigned to other users by specifying the user names in the Additional Users field.
Figure 108 GIVE TO Option Window
ACTIVE LIST   <D>  JOB          REP                      USR          CHILD (U)
COMMAND ===>                                                    SCROLL===> CRSR
O USER     REPORT               ODATE     PAGES    LINES V N STATUS
  JONES    REPORT7
                                08/0 +----------------------------+ ted
G ROBERT   REP42                     | CONFIRM       : Y          |
                                <----| GIVE TO USER  : ACCTMGR    |
  ROBERT   REP44                     | INCLUDE NOTES : Y          |
                 T              08/0 +----------------------------+
  ACTG02   INVTORY
                                08/08/00      4        4 V   Decollated
====== >>>>>>>>>>>>>>>>>> NO MORE REPORTS IN THE LIST <<<<<<<<<<<<<<<<<< ======
 V VIEW E EDIT P PRINT U UPDT I INS D DEL N NOTE A ADD INFO G GIVETO   13.16.13
The Give To window enables you to specify who is to receive a copy of the report and whether or not notes are to be included with the copy of the report.
The following values can be specified:
Table 99 GIVE TO Option Window Fields
|
Field |
Description |
|---|---|
|
CONFIRM |
Valid values:
|
|
GIVE TO USER |
Specify the name of the user who should receive a copy. Only user names in the Recipient Tree can be specified. |
|
INCLUDE NOTES |
Indicate whether or not notes are included with the copy of the report.
|
Pressing the REFRESH key (PF04/PF16) adds to the Report list the copies given to other users. The name of the user that provided the report is displayed in the FROMUSER field of the User Report List screen.
Copies of reports provided by the G (Give To) option have a status of Decollated. They can be printed by entering option P (Print), or viewed by specifying option V (View).
Copies of reports have no Subscribe status.
Copies of reports have Approval status of the original reports if the Approval process has finished. If the Approval process has not finished, a warning message is issued in the Give To window. In this case, copies of the reports have no Approval status.
Printing Reports
Option P opens the Print Option window that enables you to request Immediate Printing or special cases of Deferred Printing. It is used to print reports that are not scheduled for printing or to request additional printouts of reports which are scheduled for printing or which have already printed.
Figure 109 Print Option Window
ACTIVE LIST   <D> JOB          REP                      USR ACTG      CHILD (U)
COMMAND ===>     +----------------------------------------------------------+
O USER     REPOR |                                                          |
  JOHN     TEST1 |  PRINT OPTION ===>                                       |
                 |                                                          |
  MATHEW   REPOR |    1  Immediate Printing                                 |
                 |    2  Deferred Printing (by Print Mission)               |
  PETER    REPOR |    X  Exit (no action)                                   |
                 |                                                          |
P ROBERTS  REP43 |    COPIES  001             FORM STD      CLASS S         |
                 |                                                          |
  SMITHA   TEST1 |    DEST                    WTR                           |
                 |                                                          |
  THOMAS   TEST3 |    FROM PAGE 000001 TO PAGE 000042  RULER DEFAULT        |
====== >>>>>>>>> |                                                          |
                 |    PRINT MISSIONS STDPRNT                                |
                 |                                                          |
                 |    PAGEDEF           FORMDEF                             |
                 |                                                          |
                 |  REPORT REP43                                            |
                 |  USER ROBERTS  JOB M83REPM                               |
                 |                                                          |
                 +----------------------------------------------------------+
 V VIEW E EDIT P PRINT U UPDT I INS D DEL N NOTE A ADD INFO G GIVETO  13.16.13
If a single index and an exact index value were specified, report sections for that index value are printed. Otherwise, the entire report is printed.
If the Print Option window is opened from the Quick Access panel or the Values of Index panel, the screen includes the TYPE field (see Table 100) next to the PRINT MISSIONS field. In this Print Option window, only one print mission can be specified.
You can choose one of three options on the Print Option window:
Table 100 Print Option Window Fields
|
Field |
Description |
|---|---|
|
1 |
Immediate Printing. The report is sent to the printer specified in the DEST field immediately. |
|
2 |
Deferred Printing. The report is printed later with other reports that are received in your bundle. The status of the report entry changes to WAIT PRINT. |
|
X |
Take no action. Exit the Print Option window. |
Option 1 is usually used to print on a remote printer which is located near the user. Option 2 is usually used when the user does not have a remote printer and wants to add a copy of a report to the next regular bundle.
The following parameters can be modified in the Print Option window:
Table 101 Print Option Window Parameters
|
Parameter |
Description |
|---|---|
|
COPIES |
Number of copies to print. This number cannot be greater than the maximum defined for this report in the decollating parameters. |
|
FORM |
Form to use when printing the report. |
|
CLASS |
Output class in which the report should be printed. |
|
DEST |
Remote destination (node and user ID) where the report should be printed (or blank for the default printer). If the Optional Wish WD1458 is set to APPLY=YES, the node value can be set to LOCAL to print the report on the printer whose designation is LOCAL. If the node value is set to FILE, the report is printed to the file referenced by DD statement CTDOUT1. If Control-D/Delivery Server is installed, reports can be distributed to a Unix or Windows environment by setting the node value to CTDS. For details see Control-D/Delivery Server. |
|
WTR |
Use this field to specify the name of an external writer on which the report should be printed. (If your data center is using TS-PRINT, this field usually designates the VTAM name of the printer.) |
|
FROM PAGE TO PAGE |
Enables you to print a range of pages from a retrieved report. If the entire report has been retrieved, the value displayed in TO PAGE is the number of pages in the entire report. If only a section of a report has been retrieved, these parameters are blank. If the entire report has been retrieved, specify the desired page range using actual report page numbers. If only a section of a report has been retrieved via an index, specify the desired page range using page numbers relative to the beginning of the retrieved section. For example, if the report section retrieved is pages 46 through 55 from a 100-page report and you want to print the pages numbered 49-52 in the report, enter FROM PAGE 000004 TO PAGE 000007. |
|
RULER |
For Immediate Printing, you can use any ruler name or print without a ruler (as is). For Deferred Printing, the default print ruler is used if it exists; otherwise, no ruler is used. |
|
PRINT MISSIONS |
List of printing missions by which this report can be printed is displayed (0 to 4 names). Even if more than one printing mission name is specified, a report is printed only once by the specified printing mission which is activated first. Printing mission names should be significant to the user. For example, the name may represent the paper type (STD) or the time of printing (NIGHT). When you use Print Option 2 (Deferred Printing), at least one printing mission name must be supplied. Be sure to use a name which is valid at your site. If you use Print Option 1 (Immediate Printing), the content of this field is not relevant and can remain unchanged. |
|
TYPE |
(Indexes only) Specifies the scope of the print mission by index (that is, printing the sections of reports corresponding to the index values). The valid values are:
|
Restoring Reports
Option R is used in the User History Report list or the User Active/Migrated report list for Migrated reports to request that a report be restored from cartridge, tape, or OAM collection to disk. This option opens the Restore window in the Report List screen.
Figure 110 Restore Window
HISTORY LIST  <D>  JOB          REP                      USR MGT      CHILD (U)
COMMAND ===>                                                    SCROLL===> CRSR
O USER     REPORT               ODATE     PAGES    LINES STATUS
  MGT      BANKING REPORT            +-------------------------------+
                                     | CONFIRM           :           |
R MKT      EMPLOYEES REPORT    <-----| BY RESTORE MISSION: RST0060M  |
                                     +-------------------------------+
  PROD     INVENTORY REPORT
                                08/08/00      8      369 Backed up
  PROD     EMPLOYEES REPORT     08/08/00      3      169 Backed up
                                08/08/00   1254    51492 Backed up
  WAREHSE  INVENTORY REPORT
                                08/08/00   1866    80238 Backed up
====== >>>>>>>>>>>>>>>   B O T T O M    O F    L I S T   <<<<<<<<<<<<<<< ======


OPTIONS: R RESTORE  C NO-RESTORE U UPDATE  D DELETE  A ADD INFO        11.02.43
The Restore window contains the name of the default restore mission. You can do any of the following:
-
Type Y (Yes) to confirm the restore request.
-
Change the mission name (it is recommended that you consult with your INCONTROL administrator before doing so).
-
Type N (No) and press Enter if you decide not to restore.
Restore requests are processed according to site-defined restore schedules and not immediately. When a restore request is entered, the request is recorded and the report status changes to WAIT RESTORE. When the restore is completed, the sysout is on disk and the restored entry appears on both the Active and History lists with a status of Restored.
Canceling a Restore Request
Option C is used to cancel a restore request that has already been entered but not yet processed.
Notepad Facility
The Notepad facility enables the user to append notes to reports. A note can be read, modified or deleted using the Note window. Depending on the site security mechanism, other users may or may not access these notes for viewing and/or modification.
Notes appended to a report migrate with the report. Notes can be appended to a migrated report.
Notes appended to a report are backed up with the report to the History User Report file. These notes are restored with the report when it is restored to the Active User Report file. Notes are kept on the mainframe and are accessible via the Control-V Online Interface and Control-D/WebAccess Server using Control-D/Page On Demand.
Two types of notes can be defined:
Table 102 Notepad Facility Note Types
|
Type |
Description |
|---|---|
|
General notes |
General notes can be attached to reports in the Active Report List screen, one note to a report. The General Note window for a report can be opened by entering option N (Note) for the report. |
|
Tag notes |
Tag notes can be attached to specific substrings of a report in the Report Viewing screen. The method of opening Tag notes is described later in this chapter. |
In the Default (D) display type of the Active Report list, the existence of report notes is indicated in the N (Note) field as follows:
Table 103 N (Note) Field Values
|
Value |
Description |
|---|---|
|
blank |
The report does not contain a note. |
|
G |
The report contains a General note. |
|
T |
The report contains at least one Tag note. |
|
A |
(All.) The report contains both General and Tag notes. |
Multiple Versions
Both general notes and tag notes can have multiple versions. For more information about tag notes, see "Tag Notes" later in this chapter.
When a Note window is opened and a note exists, the last version is displayed in Browse mode. At this point, the user can do any of the following:
-
Produce a new version of the note in Edit mode by pressing the NEW key (PF04/PF16). The version number of the new note is one higher than the last existing version number.
-
Display the previous or next version of the note in Browse mode by pressing the PREV key (PF10/PF22) or NEXT key (PF11/PF23).
-
Change the mode of the currently displayed note to Edit by pressing the UPDATE key(PF06/PF18).
When a note is in Edit mode, the user can edit or modify the note and/or perform the following actions:
-
Clear the contents of the Note window by pressing the CLEAR key (PF07/PF19).
-
Save a new or changed version of the note by pressing the SAVE key (PF05/PF17).
-
Delete the displayed version of the note by pressing the DELETE key (PF08PF20).
-
Display the previous or next version of the note in Browse mode by pressing the PREV key (PF10/PF22) or NEXT key (PF11/PF23).
To exit the Note window, press the END key (PF03/PF15).
A confirmation window is displayed when saving or deleting a note, or when scrolling from a new or changed version of a note to the next or previous version.
When a version of a note is deleted, the version numbers of the remaining notes are not changed. The next version of the note (if any) is displayed in Browse mode. If the latest version of a note is deleted, the last previous version (if any) is displayed in Browse mode.
The user exit can be modified to prevent changes and deletions to existing note versions.
General Note Window
The General Note window is displayed when N is specified in the OPTION field of the Active User Report list. If a Note window is opened for an existing (previously created) note, the window is opened in Browse mode.
For information about the Tag Note Window, see Tag Notes.
Figure 111 General Note Window – Browse Mode
ACTIVE LIST    <D> JOB          REP                      USR          CHILD (U)
COMMAND ===>      +---------------------NOTE PAD FACILITY----------(GENERAL)-+
 O USER     REPORT | BROWSE     VERSION  0001     N44        07/07/00 17:01:33|
   WAREHSE  MAINT  | JOHN,                                                    |
   WAREHSE  SHORTG | COMPARE THIS HALF-YEAR INVENTORY WITH THE END-OF-YEAR    |
   WAREHSE  ONORDR | INVENTORY TO DETERMINE IF ANY HIGH VOLUME ITEMS ARE      |
   WAREHSE  INSTCK | UNDERSTOCKED.                                            |
   WAREHSE  3RDQTR |                                                          |
   WAREHSE  4THQTR |                                                          |
   WAREHSE  1STQTR |                                                          |
 N WAREHSE  2NDQTR |                                                          |
   WAREHSE  INVENT |                                                          |
   WAREHSE  INVENT |                                                          |
   WAREHSE  ORDERS |    F3:END               F6:UPDATE                        |
   WAREHSE  ORDERS +----F4:NEW---------------F10:PREV-------------F11:NEXT----+
   DEVEL    REP-JCLARC-PROD      04/07/00     34     1376 V   Decollated
   DEVEL    JCLARC-PROD          04/07/00     34     1376     Decollated
   DEVEL    JCLARC-PROD          04/07/00     22      890     Decollated
   DEVEL    NEW NIGHT REPORT     05/07/00      5       10 V T Decollated
   DEVEL    NEW DAY REPORT       05/07/00      3        6     Decollated
   DEVEL    NIGHT REPORT ONE IND 05/07/00      5       10     Decollated

 P PRINT     V VIEW     U UPDATE     I INSERT     A ADD INFO     E EDIT
 X INDEX     N NOTE     G GIVETO     D DELETE     Q QUICK ACCESS       17.00.41
The bolded USER ID above indicates the user ID of the user that created or last updated the note. The bolded date and time above indicates the date and time the note was created or last updated.
Note Window Commands
The commands available in a particular mode (Browse or Edit) are listed at the bottom of the Note window. All commands, and the PFKeys that implement them, are listed below:
Table 104 Note Window Commands
|
Command |
PFKey |
Description |
|---|---|---|
|
END |
PF03/PF15 |
Close the window when you finish creating, viewing, modifying, or deleting a note. A confirmation window may be displayed. |
|
NEW |
PF04/PF16 |
Add a new version of an existing note. An empty Note Window is displayed. |
|
SAVE |
PF05/PF17 |
Save or create the note version that is currently being edited. A confirmation window is displayed. |
|
UPDATE |
PF06/PF18 |
Place a Browse mode window in Edit mode to modify an existing note. |
|
CLEAR |
PF07/PF19 |
Erase the contents of the current window. |
|
DELETE |
PF08/PF20 |
Delete the current version of a note. A confirmation window is displayed. |
|
PREV |
PF10/PF22 |
Scroll back to the previous version of a note. Display it in Browse mode. |
|
NEXT |
PF11/PF23 |
Scroll forward to the next version of a note. Display it in Browse mode. |
When a new Note window is opened, or when PF06/PF18 is pressed in an existing Note window, the window is displayed in Edit mode.
Figure 112 General Note Window – Edit Mode
ACTIVE LIST    <D> JOB          REP                      USR          CHILD (U)
COMMAND ===>      +---------------------NOTE PAD FACILITY----------(GENERAL)-+
O USER     REPORT | EDIT       VERSION  0001     M83B     07/07/00 14:08:38  |
  DEVEL    TEST-B | JOHN,                                                    |
  WAREHSE  E-O-YR | COMPARE THIS HALF-YEAR INVENTORY WITH THE END-OF-YEAR    |
  WAREHSE  INVENT | INVENTORY TO DETERMINE IF ANY HIGH VOLUME ITEMS ARE      |
  WAREHSE  1STQTR | UNDERSTOCKED.                                            |
N WAREHSE  2NDQTR |                                                          |
  WAREHSE  ON_ORD |                                                          |
  WAREHSE  BCKORD |                                                          |
  WAREHSE  DAMAGE |                                                          |
  ACTG     JAN    |                                                          |
  ACTG     FEB    |                                                          |
  ACTG     MAR    |    F3:END               F7:CLEAR             F8:DELETE   |
  ACTG     APR    +----F5:SAVE--------------F10:PREV-------------F11:NEXT----+
  ACTG     MAY                  06/01/00    116     7308 0   Decollated
  ACTG     JUN                  07/07/00    137     8631 *   Decollated
  PROD     0001                 02/10/00    107     6741 8   Decollated
  PROD     0002                 03/10/00    102     6426 1   Decollated
  PROD     0003                 04/10/00    150     9450 5   Decollated
  PROD     0004                 05/10/00     96     6048 1   Decollated
P PRINT     V VIEW     U UPDATE     I INSERT     A ADD INFO     E EDIT
X INDEX N NOTE G GIVETO D DELETE Q QUICK ACCESS 13.14.57-
Type information in the window in free text format.
-
To erase existing text in a Note window, press PF07/PF19.
-
Press PF08/PF20 to delete the note. Confirmation is required to delete a previously created note.
-
Enter Y (Yes) to delete the note.
-
Enter N (No) to close the Note window without deleting the note.
-
Exiting a Note Window
Press PF03/PF15 to exit a Note window. Confirmation may be required to close the window.
The Note window is closed without confirmation in the following situations:
-
The window is empty and the note is a new note (the note is not created).
-
No changes have been made to a previously existing note (the note is kept).
Otherwise, confirmation is requested as follows:
-
CREATE confirmation is requested for a new note.
-
SAVE confirmation is requested for a non-empty, previously existing note.
-
DELETE confirmation is requested for a previously existing note.
Figure 113 General Note Window – Exit Command
ACTIVE LIST    <D> JOB          REP                      USR          CHILD (U)
COMMAND ===>      +---------------------NOTE PAD FACILITY----------(GENERAL)-+
O USER     REPORT | EDIT       VERSION  0001     N44       07/07/00 11:00:52 |
  DEVEL    TEST-B | JOHN,                                                    |
  WAREHSE  E-O-YR | COMPARE THIS HALF-YEAR INVENTORY WITH THE END-OF-YEAR    |
  WAREHSE  INVENT | INVE +--------------------------------------------+      |
  WAREHSE  1STQTR | UNDE |          PLEASE SELECT EXIT OPTION         |      |
N WAREHSE  2NDQTR |      |                                            |      |
  WAREHSE  ON_ORD |      |                 SAVE Y (Y/N)               |      |
  WAREHSE  BCKORD |      +--------------------------------------------+      |
  WAREHSE  DAMAGE |                                                          |
  ACTG     JAN    |                                                          |
  ACTG     FEB    |                                                          |
  ACTG     MAR    |    F3:END               F7:CLEAR             F8:DELETE   |
  ACTG     APR    +----F5:SAVE--------------F10:PREV-------------F11:NEXT----+
  ACTG     MAY                  06/07/00    116     7308 0   Decollated
  ACTG     JUN                  07/07/00    137     8631 *   Decollated
  ACTG     JUL                  07/07/00    103     6489 6   Decollated
  PROD     0001                 02/07/00    107     6741 8   Decollated
  PROD     0002                 03/07/00    102     6426 1   Decollated
  PROD     0003                 04/07/00    150     9450 5   Decollated
  PROD     0004                 05/08/00     96     6048 1   Decollated
P PRINT     V VIEW     U UPDATE     I INSERT     A ADD INFO     E EDIT
X INDEX N NOTE G GIVETO D DELETE Q QUICK ACCESS 13.14.57-
Enter Y (Yes) to create, save, or delete the note as requested in the confirmation prompt.
-
Enter N (No) to close the window without saving any changes.
Report Viewing
The V (View) option is used to display reports online in the Report Viewing screen.
When option V is specified in an Active User Report list whose selection criteria did not include a specific index with a specific value (or value prefix matched by a unique value), the Report Viewing screen displays the whole report.
When option V is specified in a Values of Index panel, in an Active User Report list whose selection criteria included a specific index with an existing value, or in a Quick Access panel, the Report Viewing screen displays the first report page that is pointed to by the specified index value. The section retrieved may consist of one page or many pages depending on how the report was indexed.
Figure 114 Report Viewing Screen
------------- CONTROL-D/V REPORT VIEWING   NOTES    2   PAGE      1 OF       10
COMMAND ===>                                                   SCROLL ===> CRSR
USER PROD     JOBNAME M83REPM  JOBNUMB 0010022 DATA 080800 RULER
REPORT EMPLOYEES REPORT
----+----1----+----2----+----3----+----4----+----5----+----6----+----7----+----8
            E M P L O Y E E S     R E P O R T    -----    FOR PRODUCTION  DEPAR
EMPLOYEE     EMPLOYEE     OFFICE  ANNUAL  SOCIAL        NO. OF      JOB CLASS
   NO.         NAME         NO.    SAL    SECURITY NO.  DEPENDENTS    CODE
--------  --------------  ------  ------  ------------  ----------  ---------
 66474    C. POHLHAMMER     23    39,500   XXX-YY-ZZZZ      2
 66475    G. MEREDITH       09    40,000   XXX-YY-ZZZZ      3
 66491    P. MILLER         12    31,500   XXX-YY-ZZZZ      1
 66498    K. BOYLE          22    39,500   XXX-YY-ZZZZ      2
 66501    R. BERLE          14    39,500   XXX-YY-ZZZZ      2
 66513    C. KING           12    30,000   XXX-YY-ZZZZ      2
 66519    G. BROWNE         02    36,500   XXX-YY-ZZZZ      2
 66524    R. SOLOMON        04    35,000   XXX-YY-ZZZZ      3
 66526    S. CUNNINGHAM     21    39,500   XXX-YY-ZZZZ      2
 66529    M. TABER          22    39,500   XXX-YY-ZZZZ      2
 66530    A. WINGER         23    39,500   XXX-YY-ZZZZ      2
 66531    B. BOOKSPAN       05    47,000   XXX-YY-ZZZZ      4
 66533    R. MULU           29    39,500   XXX-YY-ZZZZ      2
 66539    E. SMART          02    29,000   XXX-YY-ZZZZ      4
 66540    N. MATTOZZI       11    29,000   XXX-YY-ZZZZ      2
CMDS: FIND str (PREV), EDIT, RULER on/off/name, VALUE, N n P p         14.48.10
Default color definitions for the Report Viewing screen are specified in the User profile. To change these definitions, see your INCONTROL administrator. You can use rulers (described later in this chapter) to override default color definitions.
Viewing Migrated Reports
When viewing reports that have migrated to optical disk or cartridge, the user receives a message indicating that data retrieval is in progress.
Users accessing IOA via the TSO or ISPF interface receive the following message:
Data is being retrieved
from external storage
Please wait
Users accessing IOA via other interfaces using IOA Online monitor services receive the following message:
Data is being retrieved
from external storage
Please wait
IOA Online monitor users should press Enter each time this message is displayed.
Header Fields in the Report Viewing Screen
The following fields are displayed in the Report Viewing screen header:
Table 105 Header Fields in the Report Viewing Screen
|
Field |
Description |
|---|---|
|
NOTES |
Total number of notes appended to the report. |
|
USER |
User name of the report recipient. |
|
REPORT |
Name of the report. |
|
JOBNAME |
Name of the job that produced the report. |
|
JOBNUMB |
Number of the job that produced the report. |
|
DATA |
ODATE (original scheduling date) of the report. |
|
RULER |
Name of the current ruler (if any) for the report. |
|
PAGE m OF n |
Number of current page displayed and the number of pages in the report (if an entire report was retrieved). |
Report Viewing Screen Commands
General Commands
Use the scrolling conventions to scroll the retrieved section of the report forward (PF08/PF20) or backward (PF07/PF19).
Use the LEFT (PF10/PF22) and RIGHT (PF11/PF23) commands to shift the report data horizontally.
Use the FIND (or FIND PREV) command to locate a string in the report.
Use the NEXTPAGE n command (abbreviated N n) to scroll forward n report pages. The top of the page is displayed. If n is not specified, the report scrolls forward one page.
Use the PREVPAGE n command (abbreviated P p) to scroll backward p report pages. The top of the page is displayed. If p is not specified, the report scrolls backward one page.
Use the END command (PF03/PF15) to exit the Report Viewing screen and return to the previously displayed screen.
Use the =X command to exit the Report Viewing screen and the entire Online User Reports facility. You are then returned to your normal operating environment.
Table 106 Report Viewing Screen Commands
|
Commands |
Description |
|---|---|
|
SHOWPAGE |
The SHOWPAGE command alternately turns Show Page Control Characters mode on and off. When the mode is off, page control characters are not displayed. When the mode is on, lines starting with control characters ‘X8B’ and X‘89’ are displayed. When the mode is on, a special line appears at the beginning of each page: Copy
This line designates where Control-V positions the beginning of the page (for example, control character 1). The line is internally generated and is not printed. It is very useful, particularly for reports that do not contain page control characters. Show Page mode can be turned on when a ruler is not active. When a ruler is turned on, Show Page mode is turned off. |
|
SPAGE |
When a complete report has been retrieved, the SPAGE (Select Pages) command enables the user to specify one or more report pages or page ranges for immediate printing. For more information on using the SPAGE command, refer to Selecting Report Pages for Printing. |
|
SHOWCC |
The SHOWCC command alternately turns Show Control Characters mode on and off. When the mode is turned on and the leftmost portion of the report is visible on the screen, column 1 of the report, which contains control characters, is displayed. When the mode is turned off, the report is shifted one character to the left and the control characters are hidden. The mode in use upon entering the Report Viewing screen is determined by the value (Y/N) of the SHOW Control CHARS field in the Show Options window. |
|
EDIT |
The EDIT command (PF04/PF16) allows you to edit (reformat) reports by use of rulers. Report editing and rulers are discussed later in this chapter. |
|
VALUE |
The VALUE command displays the index value (if any) that was used to select the displayed report. This index value is displayed instead of the ruler line. Pressing Enter clears the index value and displays the ruler line again. |
|
HEX |
The HEX command alternately turns HEX mode on and off. When HEX mode is on, each line is displayed in HEX format. This command is not available when a page mode ruler is active. For more information see Page Mode Rulers. |
|
LOCVAL |
The LOCVAL command locates the next occurrence of a report line that contains a specified record-level index value. This command moves the cursor to the next line pointed to by the specified value and scrolls that line to the top of the viewing area. To use this command, type LOCVAL on the command line and press Enter, or press the PF09 key. This command is only available when a report is viewed via the Values of Index Panel. Display the appropriate record-level index in the Values of Index Panel and use option V to select the value that points to the report lines you want to display. The LOCVAL command can be automatically executed when a report is displayed. Set profile variable SOLVLVC in member $PROFVAR of the IOA PARM library to Y (Yes). The report automatically scrolls to the first line pointed to by the selected record-level index value. |
|
WRAP |
The WRAP command alternately turns WRAP mode on and off. When WRAP mode is on, data is wrapped to the next line of the screen, as needed, according to length of the data and the width of the screen. When WRAP mode is off, up to 256 characters in a line can be displayed by scrolling past the edge of the screen. Remaining data past 256 characters is not displayed. This command is available only when SHOWCC/SHOWPAGE mode is on. It is not available when a ruler is active. Even when WRAP mode is on, Tag Notes cannot be attached to a substring past the 256th character in a line. For more information on Tag Notes, see Tag Notes. |
Selecting Report Pages for Printing
When a complete report has been retrieved, the SPAGE (Select Pages) command enables the user to specify one or more report pages or page ranges for immediate printing from the Report Viewing screen. (By default, PF12/PF24 is defined as the SPAGE command in the Report Viewing screen.)
Enter command SPAGE in the command line (or press PF12/PF24) once for each page or page range to be included (or excluded from an otherwise included page range). Upon pressing END (PF03/PF15), the Selected Pages Print Option Window (described below) is displayed.
Any number of SPAGE commands can be entered, with the first parameter set to INCLUDE or EXCLUDE in any order. EXCLUDE ranges are excluded from the INCLUDE ranges. If only EXCLUDE ranges are specified, the Selected Pages Print Option window is not displayed and no pages are printed.
Command SPAGE is not currently supported when viewing reports retrieved using an index value.
SPAGE Format
SPAGE INCLUDE|EXCLUDE FROM-PAGE TO-PAGE
SPAGE RESET
where:
-
INCLUDE|EXCLUDE determines whether pages specified by the page range are included in or excluded from the immediate printing of the report. INCLUDE and EXCLUDE can be abbreviated as I and E. If neither INCLUDE nor EXCLUDE is specified, the default is INCLUDE. Any page specified in both an include and an exclude range is excluded and not printed.
-
FROM-PAGE is the lowest page number in a range specified for inclusion or exclusion. A number from 1 to the report section’s last page number can be specified. The number specified must not be greater than TO-PAGE.
If an * (asterisk ) or blank space is specified, FROM-PAGE is set to the page number associated with the current screen’s top report line. If only FROM-PAGE is specified, that one page is selected for printing. If neither FROM-PAGE nor TO-PAGE is specified, the page number associated with the current screen’s top report line is selected for printing.
-
TO-PAGE is the highest page number in a range specified for inclusion or exclusion. A number from the value of FROM-PAGE to the report section’s last page number can be specified. If a higher number is specified, it is automatically changed to the report section’s last page number.
TO-PAGE can be specified as +n, where n is a number from 1 to 99999999, to produce a range that includes the FROM-PAGE plus the following n pages. If an asterisk (*) is specified, TO-PAGE is set to the page number associated with the current screen report line. If TO-PAGE is not specified, the default is the value of FROM-PAGE.
-
RESET cancels all previously specified page ranges. RESET can be abbreviated as R.
Selected Pages Print Option Window
If any valid SPAGE commands were entered while viewing a report, the Selected Pages Print Option window is displayed when the END command (PF03/PF15) is used to return to the User Report List screen. This window allows the user to immediately print the selected pages.
Figure 115 Selected Pages Print Option Window
ACTIVE LIST     JOB          REP                      USR          CHILD (U)
  COMMAND ===>     +----------------------------------------------------------+
  O USER     REPOR |                                                          |
    ACCTG    DAYRE |  Selected pages print option ===>                        |
    ACCTG    DAYRE |                                                          |
  V ACCTG    REPOR |    1  Immediate Printing                                 |
    ADMIN    REPOR |    X  Exit (no action)                                   |
    ADMIN    REPOR |                                                          |
    ADMIN    REPOR |    COPIES  001             FORM STD      CLASS X         |
    ADMIN    REPOR |                                                          |
    MFG      REPOR |    DEST                    WTR           RULER DEFAULT   |
    MFG      INVEN |                                                          |
    MFG      INVEN |    PAGEDEF         FORMDEF                               |
    MFG      ONORD |                                                          |
    MFG      ONORD | REPORT REPORTW                                           |
    MFG      ONORD | USER ACCTG    JOB TAXEST                                 |
    MKT      REGIO +----------------------------------------------------------+
    MKT      REGION2              08/08/00     87      212 V   Wait print
    MKT      REGION3              08/08/00     25      919     Wait print
    MKT      REGION4              08/08/00     87      212 V   Wait print
    MKT      REGION6              08/08/00     25      919     Wait print
   V VIEW E EDIT P PRINT U UPDT I INS D DEL N NOTE A ADD INFO G GIVETO 13.16.13
The following parameters can be modified in the Selected Pages Print Option window: COPIES, FORM, CLASS, DEST, WTR, and RULER. These parameters are documented in the description of the Print Option window in Printing Reports.
You can choose one of two options on the Selected Pages Print Option window:
-
1: Immediate Printing. The report is sent to the printer specified in the DEST field immediately.
-
X: Take no action. Exit the window.
Editing (Reformatting) Reports
Rulers
A ruler is a set of screen editing rules that can be used to make an existing report look different on the screen. Rulers are report specific. You can define any number of view and print rulers, but only one Mask Ruler for a particular report. The Mask Ruler prevents unauthorized users from viewing or printing sensitive data in report. Only authorized users can see and print reports without masking.
Report Editing (Ruler) Screen
Entering the EDIT command (PF04/PF16) in the Report Viewing screen or specifying option E for any entry except for a global ruler entry that is not associated with a specific report in the Active User Report List screen displays the Report Editing (Ruler) screen. This screen allows you to specify ruler selection criteria. Select the desired option (1, 2, 3 or 4), fill in the selection criteria, and press Enter.
Figure 116 Report Editing (Ruler) Screen
------------------------  CONTROL-D - REPORT EDITING  --------------------(U.E)
COMMAND/OPT ===>
USER PROD          REPORT EMPLOYEES REPORT            JOB PREMPRS2
  RULER NAME  ===> DEFAULT              Name or blank for default ruler
  RULER TYPE  ===> VIEW                 View or Print or Mask
  REPORT NAME ===>                      To copy a ruler - full report name
  JOB NAME    ===>                      To copy a ruler - full job name
  USER NAME   ===>                      To copy a ruler - full user name
  1   EDIT        report lines and columns for view and print
  2   INCLUDE     lines based on strings
  3   EXCLUDE     lines based on strings
  4   COLOR/MASK  lines based on strings for view and mask
PLEASE SELECT OPTION, OR PRESS PF3 TO SAVE/EXIT THE RULER              11.58.26
Figure 117 Ruler Selection Fields
   RULER NAME  ===> JCLSCAN              Name or blank for default ruler
   RULER TYPE  ===> VIEW                 View or Print or Mask
   REPORT NAME ===> JCL-MSG              To copy a ruler - full report name
   JOB NAME    ===> D4X0030              To copy a ruler - full job name
   USER NAME   ===>                      To copy a ruler - full user name
The selection criteria that can be applied are:
Table 107 Report Editing (Ruler) Screen Selection Criteria
|
Criteria |
Description |
|---|---|
|
RULER NAME |
Ruler name. Each edit format (ruler) has its own name. You can define different view and print rulers and the single mask ruler for the same report and use them according to your requirements. If the ruler name is omitted, a search is made for the name DEFAULT (that is, the default ruler). The field is filled automatically for mask ruler if the ruler exists. |
|
RULER TYPE |
Edit options can be applied for report viewing (VIEW), for printing (PRINT), or for report masking (MASK). |
|
REPORT NAME |
Name of a report from which to copy the ruler. |
|
JOB NAME |
Name of the job from which to copy the ruler. |
|
USER NAME |
Name of a user from which to copy the ruler. |
The report name, job name and user name should be filled in when you want to copy a previously defined ruler that is not defined for the report, job, or user. For example, to copy a ruler named JCLSCAN which you have already defined for report name JCL-MSG and job D4X0030, use the data in the screen segment above.
You do not have to fill in the user name. The user ID of the current entry is assumed. Whenever the report name, job name or user name is omitted, the values of the current entry are assumed.
The mask ruler is applied before view and print rulers. Only authorized users have access to mask rulers.
Ruler Edit Options
Below is a brief description of the four types of ruler edits that can be performed. An in-depth explanation of these ruler edits follows the brief description.
The mask ruler is applied before view and print rulers. Only authorized users have access to mask rulers.
-
Edit Lines and Columns for VIEW and PRINT.
This option allows you to:
-
Define header and footer lines that remain on the screen as you scroll through the report.
-
Insert overlay lines to make the report more readable or to condense header information.
-
Delete unwanted lines, including unnecessary header lines.
-
Establish Dynamic Extraction parameters to condense and relocate dynamically changing header information.
-
Reformat columns so that fields can be relocated in your report. You can omit undesired fields and you can repeat fields.
-
Freeze columns so they do not move when you shift your display left and right.
-
Define colors within your online report display.
-
-
Include Lines Based on Strings.
The Include option for VIEW and PRINT allows you to select report lines for inclusion in the report based on the appearance of strings in specified column locations. Report lines not conforming to the specified string criteria are not included in the report display (or printout).
The Include option for masking allows you to select report lines for masking based on the appearance of strings in specified column locations. Report lines not conforming to the specified string criteria are not masked in the report display or printout.
This option allows you to:
-
Limit the string selection to specified line ranges.
-
Specify color for lines included in the report for VIEW and PRINT.
-
-
Exclude Lines Based on Strings.
The Exclude option for VIEW and PRINT allows you to select report lines for exclusion from the report based on the appearance of strings in specified column locations. Report lines conforming to the specified string criteria are not included in the report display (or printout).
The Exclude option for masking allows you to select report lines for exclusion from masking based on the appearance of strings in specified column locations. Report lines conforming to the specified string criteria are not included in the masked lines in the report display or printout.
This option allows you to:
-
Limit the string selection to specified line ranges.
-
-
Color/Mask Lines Based on Strings.
The Color/Mask option allows you to define colors or masking for your report, based on strings that appear in the report in the specified lines and columns.
Edit Lines and Columns for View and Print
When you enter option 1 (Edit Lines and Columns for View and Print) on the Report Editing (Ruler) screen, the screen Figure 118 is displayed.
Figure 118 Edit Lines and Columns on the Report Editing (Ruler) Screen
-----------------  CONTROL-D - EDIT REPORT LINES AND COLUMNS  ----------(U.E.1)
COMMAND ===>                                         SP CHAR    SCROLL===> CRSR
USR PROD     REP EMPLOYEES REPORT     JB PREMPRS2 RULER DEFAULT   TYPE VIEW
O ----+----1----+----2----+----3----+----4----+----5----+----6----+----7----+-
  1            E M P L O Y E E S     R E P O R T    -----    FOR PRODUCTION  DE
   EMPLOYEE     EMPLOYEE     OFFICE  ANNUAL  SOCIAL        NO. OF      JOB CLAS
      NO.         NAME         NO.    SAL    SECURITY NO.  DEPENDENTS    CODE
   --------  --------------  ------  ------  ------------  ----------  --------
    66474    C. POHLHAMMER     23    39,500   XXX-YY-ZZZZ      2
    66475    G. MEREDITH       09    40,000   XXX-YY-ZZZZ      3
    66491    P. MILLER         12    31,500   XXX-YY-ZZZZ      1
    66498    K. BOYLE          22    39,500   XXX-YY-ZZZZ      2
    66501    R. BERLE          14    39,500   XXX-YY-ZZZZ      2
    66513    C. KING           12    30,000   XXX-YY-ZZZZ      2
    66519    G. BROWNE         02    36,500   XXX-YY-ZZZZ      2
    66524    R. SOLOMON        04    35,000   XXX-YY-ZZZZ      3
    66526    S. CUNNINGHAM     21    39,500   XXX-YY-ZZZZ      2
    66529    M. TABER          22    39,500   XXX-YY-ZZZZ      2
    66530    A. WINGER         23    39,500   XXX-YY-ZZZZ      2
    66531    B. BOOKSPAN       05    47,000   XXX-YY-ZZZZ      4
    66533    R. MULU           29    39,500   XXX-YY-ZZZZ      2
    66539    E. SMART          02    29,000   XXX-YY-ZZZZ      4
    66540    N. MATTOZZI       11    29,000   XXX-YY-ZZZZ      2
OPTIONS: H HEADER F FOOTER D DELETE C COLUMNS I INSERT B BEFORE        11.59.53
The screen contains one page of the report. This sample page is used to define the line and column editing criteria. You can use the scrolling conventions to scroll backward, forward, left and right on the page. If you enter this screen from the Active Report list, the first page of the report is displayed. If you enter this screen from the Report Viewing screen, the currently viewed page is displayed.
Each data line of the page is preceded by an option field. Valid options:
Table 108 Options for Edit Lines on the Report Editing (Ruler) Screen
|
Option |
Description |
|---|---|
|
H (HEADER) |
This line of the report page is fixed as a header when scrolling. Normally, because of the difference between the number of lines in a report page and in a screen, the header of the report disappears when you scroll forward on a page. Lines marked as HEADER remain at the top of the screen when you scroll the report. When the beginning of the next report page is reached, the header of that report page becomes the header on the screen. Any number of lines can be marked as headers. Multiple header lines must be contiguous (except for lines marked D for Delete) and begin with the first line on the page. |
|
F (FOOTER) |
Similar to header line definition, footers begin at the bottom line of the report page. In all other respects, they operate like headers. |
|
I (INSERT) |
Insert a user-defined overlay line after the line in which the option has been specified. A new line is displayed on the screen. This line is marked O (Overlay). Information can be typed on this line. To fill in more than 77 columns, shift left and right. |
|
B (BEFORE) |
Same as INSERT, but inserts the overlay line before the line on which the option has been specified. |
|
D (DELETE) |
If this option is specified on an original page line (that is, any line other than an overlay line), the line does not appear on the screen when the report is viewed. The line identification is positional from the top of the page, unless the deleted line is part of the footer, in which case the identification is positional from the bottom of the page. |
|
C (COLUMNS) |
This option identifies the selected line as a "model" line to be used in a cut and paste operation that allows column reformatting. Details of column reformatting are discussed later in this chapter. This option causes the Column Editing screen to be displayed (discussed later in this chapter). |
Using the I (Insert) option, overlay lines can be periodically inserted between report detail lines to make the report easier to read (for example, a blank line can be inserted between every five records).
Used together, the D (Delete) and I (Insert) options enable you to rearrange header line information. By inserting overlay lines into which you can type header line information, and by deleting the original header lines, the following useful edits can be performed:
-
Header lines information can be rewritten to appear only in the first 80 columns, to conform to the screen width.
-
Header line information can be condensed from many header lines into one or two Header lines, leaving more report detail lines displayed on the screen.
Consider the following report page:
Figure 119 Edit Lines and Columns on the Report Editing (Ruler) Screen – Example
-----------------  CONTROL-D - EDIT REPORT LINES AND COLUMNS  ----------(U.E.1)
COMMAND ===>                                         SP CHAR    SCROLL===> CRSR
USER PROD    JOB PREMPRS2 RULER DEFAULT   TYPE VIEW
REPORT EMPLOYEES REPORT
O ----+----1----+----2----+----3----+----4----+----5----+----6----+----7----+-
D 1            E M P L O Y E E S     R E P O R T    -----    FOR PRODUCTION  DE
H  EMPLOYEE     EMPLOYEE     OFFICE  ANNUAL  SOCIAL        NO. OF      JOB CLAS
H     NO.         NAME         NO.    SAL    SECURITY NO.  DEPENDENTS    CODE
O  ========  ==============  ======  ======  ============  ==========  ========
D  --------  --------------  ------  ------  ------------  ----------  --------
    66474    C. POHLHAMMER     23    39,500   XXX-YY-ZZZZ      2
    66475    G. MEREDITH       09    40,000   XXX-YY-ZZZZ      3
    66491    P. MILLER         12    31,500   XXX-YY-ZZZZ      1
    66498    K. BOYLE          22    39,500   XXX-YY-ZZZZ      2
    66501    R. BERLE          14    39,500   XXX-YY-ZZZZ      2
O  ----------------------------------------------------------------------------
    66513    C. KING           12    30,000   XXX-YY-ZZZZ      2
    66519    G. BROWNE         02    36,500   XXX-YY-ZZZZ      2
    66524    R. SOLOMON        04    35,000   XXX-YY-ZZZZ      3
    66526    S. CUNNINGHAM     21    39,500   XXX-YY-ZZZZ      2
    66529    M. TABER          22    39,500   XXX-YY-ZZZZ      2
O  ----------------------------------------------------------------------------
    66530    A. WINGER         23    39,500   XXX-YY-ZZZZ      2
    66531    B. BOOKSPAN       05    47,000   XXX-YY-ZZZZ      4
OPTIONS: H HEADER F FOOTER D DELETE C COLUMNS I INSERT B BEFORE 12.06.26-
The top line of the report does not appear when the report is displayed.
-
The second and third lines of the report are always used as a fixed Header line.
-
The user did not like the fourth line of the report; deleted it; and replaced it with a new overlay (O) line, which is used as a fixed header.
-
Unmarked lines are scrollable lines.
-
An overlay line has been added every five lines. It is used as an "eye leader" for easy reading of the report data.
The result is as follows:
Figure 120 Edit Lines and Columns on the Report Editing (Ruler) Screen – Example Results
----------------- CONTROL-D REPORT VIEWING -------------- PAGE      1 OF      3
COMMAND ===>                                                   SCROLL ===> CRSR
USER PROD    JOBNAME PREMPRS2 JOBNUMB 0009812 DATA 080800 RULER DEFAULT
REPORT EMPLOYEES REPORT
---+----1----+----2----+----3----+----4----+----5----+----6----+----7----+----
EMPLOYEE     EMPLOYEE     OFFICE  ANNUAL  SOCIAL        NO. OF      JOB CLASS
   NO.         NAME         NO.    SAL    SECURITY NO.  DEPENDENTS    CODE
========  ==============  ======  ======  ============  ==========  ========
 66474    C. POHLHAMMER     23    39,500   XXX-YY-ZZZZ      2
 66475    G. MEREDITH       09    40,000   XXX-YY-ZZZZ      3
 66491    P. MILLER         12    31,500   XXX-YY-ZZZZ      1
 66498    K. BOYLE          22    39,500   XXX-YY-ZZZZ      2
 66501    R. BERLE          14    39,500   XXX-YY-ZZZZ      2
----------------------------------------------------------------------------
 66513    C. KING           12    30,000   XXX-YY-ZZZZ      2
 66519    G. BROWNE         02    36,500   XXX-YY-ZZZZ      2
 66524    R. SOLOMON        04    35,000   XXX-YY-ZZZZ      3
 66526    S. CUNNINGHAM     21    39,500   XXX-YY-ZZZZ      2
 66529    M. TABER          22    39,500   XXX-YY-ZZZZ      2
----------------------------------------------------------------------------
 66530    A. WINGER         23    39,500   XXX-YY-ZZZZ      2
 66531    B. BOOKSPAN       05    47,000   XXX-YY-ZZZZ      4
 66533    R. MULU           29    39,500   XXX-YY-ZZZZ      2
 66539    E. SMART          02    29,000   XXX-YY-ZZZZ      4
CMDS: FIND str, FIND str PREV, EDIT, RULER on/off/name, N n P n       12.06.51
Dynamic Extraction Parameters
Information that you retype into overlay lines remains constant, and is therefore useful only if the original information remains constant (such as a report title).
Report information that may change from day to day or even from page to page (for example, date, department number) can be rearranged using Dynamic Extraction parameters.
Dynamic Extraction parameters allow you to extract dynamically changing information from various locations in the report and place it into one or more header overlay lines.
Dynamic Extraction parameters make use of a special identifying character (of your choice), which you specify in the SP CHAR field (for example, the % character).
Dynamic Extraction parameters are defined in the overlay lines.
The basic format is:
dLnCn ...d
where
-
d is the special character (user-defined in the SP CHAR field of the Edit Lines screen) that marks the beginning and end of the parameter.
-
Ln is the line from which you want to extract a field. n represents the line number (1 - 256).
-
Cn is the first column of the field from which you want to extract. n represents the column number (1 - 256).
You simultaneously create the Dynamic Extraction parameter and identify where the value should be copied in an overlay line, as follows:
-
Write the Dynamic Extraction parameter in the overlay line so that the beginning special character identifies the first column of the target location.
-
Type the same special character in the last column of the target location. This also identifies how many characters are copied from the source location.
An additional format is:
dP1LnCn ...d
This parameter always extracts the value from the first page of the report and carries it forward to every page of the report. You must enter the ruler from the first page of the report (in the Report Viewing screen), or from the Report list, to use this format. This parameter functions when entering the Report Viewing screen with a ruler in effect, but not when deactivating and subsequently reactivating a ruler (using the RULER command) on a page other than the first page of the report.
As a variation to the two Dynamic Extraction parameter formats, you can specify that the line number is to be counted from the bottom of the page (instead of the top). To do this, format the line number in the parameter as LLn (Lower Line number), instead of Ln.
Thus, the parameters dLnCn and dP1LnCn would become dLLnCn and dP1LLnCn respectively, where LLn identifies the number of lines from the last line.
The Dynamic Extraction parameters are supported during Online viewing only.
The following report contains 11 header lines and only eight data lines. The information in the first seven lines can be condensed to one overlay line (and the seven lines deleted). This would almost double the number of data lines displayed.
Figure 121 Dynamic Extraction Parameter– Example
----------------- CONTROL-D REPORT VIEWING -------------- PAGE      1 OF      9
COMMAND ===>                                                  SCROLL ===> CRSR
USER DEMO    JOBNAME REPORT1  JOOBNUMB 0004544 DATA 080800 RULER DEFAULT
REPORT INVENTORY REPORT
 ---+----1----+----2----+----3----+----4----+----5----+----6----+----7----+----
1DATE:   08.08.00
 UPDATE: 08.09.00
                                  INVENTORY REPORT
                                  ----------------
 WAREHOUSE NO: 1001       DEPARTMENT:  100  -  FINAL ASSEMBLY SHOP
               ----                    ---------------------------
                                    SHELF   QNTY   QNTY       QNTY      QNTY IN
 ITEM NO.      DESCRIPTION          LIFE    UNIT   AVAIL      ORDER     PROCESS
 -----------   ----------------     -----   ----   -------    -------   ------
 1233-781-21   RIVET D. 0.1 ACR     NONE    KG      100.00     250.00
 1233-781-25   RIVET D. 0.5 ACR     NONE    KG      500.00     500.00
 1233-781-27   RIVET D. 0.7 ACR     NONE    KG      100.00     100.00
 2200-700-22   RUBBER RING D. 2.2   1 MON   EA       10.00      10.00
 2200-700-27   RUBBER RING D. 2.7   1 MON   EA       15.00       5.00
 2201-750-00   MAIN WHEEL           8 MON   EA       85.00      15.00
 2201-751-00   NOSE WHEEL           8 MON   EA       40.00      10.00
 2201-800-22   METAL O RING 2.2     NONE    EA       20.00      30.00
 CMDS: FIND str, FIND str PREV, EDIT, RULER on/off/name, N n P n       10.07.03
In the Edit Report Lines and Columns screen:
-
The special character % is defined.
-----------------  CONTROL-D - EDIT REPORT LINES AND COLUMNS  ----------(U.E.1)
COMMAND ===>                                         SP CHAR  % SCROLL===> CRSR
USER DEMO    JOB JDEMO    RULER DEFAULT   TYPE VIEW
REPORT INVENTORY REPORT
O ----+----1----+----2----+----3----+----4----+----5----+----6----+----7----+---
Header lines are defined and an overlay line is inserted.
-
The overlay line is filled in with the desired text and Dynamic Extraction parameters. For example, parameter %L2C10 % (which is eight characters in length) extracts eight columns of information beginning from line 2, column 10 (the Update date).
-
Unnecessary header lines are deleted using option D.
 O ----+----1----+----2----+----3----+----4----+----5----+----6----+----7----+-
                  .                    .              .
  H                ----                    ---------------------------
  O  INVENTORY REPORT - WRHS: %L6C16%DEPT:%L6C38%DTE: %L1C10 %   UPD: %L2C10 %
  H
  H                                     SHELF   QNTY   QNTY       QNTY       QNTY
The results are as follows:
Figure 122 Dynamic Extraction Parameter– Example Results
----------------- CONTROL-D REPORT VIEWING -------------- PAGE      1 OF      9
COMMAND ===>                                                   SCROLL ===> CRSR
USR DEMO    JOBNAME JDEMO   JOBNUMB 0004544 DATA 080800 RULER ORDER1
REPORT INVENTORY REPORT
---+----1----+----2----+----3----+----4----+----5----+----6----+----7----+----
INVENTORY REPORT - WRHS: 1001   DEPT:  100  DTE: 08.08.00   UPD: 08.08.00
                                   SHELF   QNTY   QNTY       QNTY       QNTY IN
ITEM NO.      DESCRIPTION          LIFE    UNIT   AVAIL      ORDER      PROCESS
-----------   ----------------     -----   ----   -------    -------    ------
1233-781-21   RIVET D. 0.1 ACR     NONE    KG      100.00     250.00
1233-781-25   RIVET D. 0.5 ACR     NONE    KG      500.00     500.00
1233-781-27   RIVET D. 0.7 ACR     NONE    KG      100.00     100.00
2200-700-22   RUBBER RING D. 2.2   1 MON   EA       10.00      10.00
2200-700-27   RUBBER RING D. 2.7   1 MON   EA       15.00       5.00
2201-750-00   MAIN WHEEL           8 MON   EA       85.00      15.00
2201-751-00   NOSE WHEEL           8 MON   EA       40.00      10.00
2201-800-22   METAL O RING 2.2     NONE    EA       20.00      30.00
2274-711-21   WASHER D. 0.1        NONE    KG       10.50      10.50
2274-711-25   WASHER D. 0.5        NONE    KG      450.00     400.00
2274-811-21   BOLT 1/8             NONE    KG       50.00      25.00
2274-811-27   BOLT 1/32            NONE    KG       55.00      50.00
2284-811-21   NUT 1/8              NONE    KG       55.00      20.00
2284-811-27   NUT 1/32             NONE    KG       55.00      50.00
CMDS: FIND str, FIND str PREV, EDIT, RULER on/off/name, N n P n       10.07.03
Column Editing (Reformatting)
To edit (reformat) report columns, enter C (Columns) next to the line selected as the "model" line in the Edit Lines and Columns screen. The Column Editing screen is then displayed.
Figure 123 Control-D Column Editing Screen
-------------------  CONTROL-D - EDIT REPORT COLUMNS  ----------------(U.E.1.C)
COMMAND ===>                                                    LINES 001 - L01
USER PROD    JOB PREMPRS2 RULER EMPVAC    TYPE VIEW
REPPORT EMPLOYEES REPORT
THE ORIGINAL LINE
----+----1----+----2----+----3----+----4----+----5----+----6----+----7----+----
 EMPLOYEE     EMPLOYEE     OFFICE  ANNUAL  SOCIAL        NO. OF      JOB CLASS

Use the following 5 lines to Cut & Paste, Color and Freeze columns
CUT   :

PASTE :

COLOR :

HILITE:

FREEZE:

THE RESULTING LINE
----+----1----+----2----+----3----+----4----+----5----+----6----+----7----+----

 EMPLOYEE     EMPLOYEE     OFFICE  ANNUAL  SOCIAL        NO. OF      JOB CLASS

TO SHIFT, PLACE CRSR ON THE DESIRED LINE AND USE PF10-LEFT, PF11-RIGHT 12.38.12
The original line displays the selected model line.
The resulting line displays the model line as reformatted.
Both the original and resulting lines include a column number line for easy reference.
Line editing lines, summarized below, enable you to cut and paste the model line, define colors, and highlight and freeze particular columns:
-
Cut Columns: Cuts the report line into sections to be included in the reformatted report.
-
Paste: Repositions the "cut" sections.
-
Color Columns: Defines colors for columns included in the report.
-
Hilite Columns: Defines highlights for columns included in the report.
-
Freeze Columns: Defines columns to remain in their original positions if the display is shifted left or right.
When reformatting, you can use the LEFT/RIGHT commands to shift display lines.
Defining the Cut
You must mark every column range that you want to reposition in the resulting line. Each column range must start with a letter or a digit (except the letter E). The end of the range is marked by the letter E. Control-V fills each range with the character – to improve visibility.
To move right, use the space bar and not the arrow key.
Defining the Paste
-
Column Pasting: To reposition columns, place the letter or digit identifier in any column of the "paste" input line. This causes the columns range to be "moved" to the new position. You may define other characters in the new edited line. Any character in the paste line that is not a cut identifier is treated as a filler string.
-
Color: To specify a color for a column, enter the color code in the column on the color line.
Available only on terminals with seven – color support.
Table 109 Color Codes for Color Line
|
Code |
Definition |
|---|---|
|
R |
Red |
|
G |
Green |
|
B |
Blue |
|
P |
Pink |
|
Y |
Yellow |
|
T |
Turquoise |
|
W |
White |
-
Highlighting – To highlight columns, specify the desired highlight code in the desired columns on the "Hilite" line.
Available only on terminals with seven–color support.
Table 110 Highlight Codes for "Hilite" Line
|
Code |
Definition |
|---|---|
|
U |
Underscore |
|
R |
Reverse video |
|
B |
Blink |
|
blank |
Regular |
-
Column Freezing: Type the letter F in the Freeze line to freeze any column you would like retained in its original position (even when the display is shifted).
-
Seeing the Result: After you have defined the cut, paste, freeze, color and highlight, press Enter and the modified line is displayed in the Resulting line.
Specifying a Line Range
The Line Range fields (on the right side of the COMMAND line) enable you specify a line range for the desired cut and paste. This is especially useful if you want to exclude headers and footers from the cut and paste operation.
Line Range works as follows:
-
The defined range specifies line numbers within a report page, not line numbers relative to the whole report. For example, a value of 010 refers to the tenth line on each page, not the tenth line in the report.
-
Line number values can be defined either in the format n or Ln. n may be any integer from 00 to 256. Line numbers are counted from the top of the page in format n and from the bottom of the page in format Ln.
-
Example: If the top three and bottom two lines are header or footer lines which you do not want formatted, specify a line range of 004 – L03.
Modifying a Line Range
The column editing (formatting) for any line or line range can be modified or redefined. Later specifications for a line (range) supersede earlier ones. However, the original definition is retained for any part of a line range that is not explicitly redefined.
For example, if column editing is specified for the line range 001 – L01 and then respecified for the line range 003 – L02, the original specification is still in effect for lines 001, 002 and L01. To remove the ruler specification for lines 001, 002 and L01, the original specification must be cleared.
Checking the Ruler in the Report
You may check how the ruler works in the report by using the Quick Ruler Definition key (PF04/PF16) which switches between the current ruler definition screen (in this case the Column Editing screen) and the Report Viewing screen. When using this key, the ruler edits are applied to the report in the Report Viewing screen, enabling you to see if the ruler works as you want, or if further revision is necessary, before exiting the ruler.
When you are satisfied with the ruler edits, switch back to the ruler definition screen and exit. For more information see "Exiting the Ruler Definition Environment" later in this chapter.
Perform the following edits in the Column Editing screen:
Figure 124 Column Editing (Reformatting) – Example
-------------------  CONTROL-D - EDIT REPORT COLUMNS  ----------------(U.E.1.C)
COMMAND ===>                                                    LINES 001 - L01
USER PROD    JOB PREMPRS2 RULER EMPVAC    TYPE VIEW
REPORT EMPLOYEES REPORT
THE ORIGINAL LINE
----+----1----+----2----+----3----+----4----+----5----+----6----+----7----+----
 EMPLOYEE     EMPLOYEE     OFFICE  ANNUAL  SOCIAL        NO. OF      JOB CLASS
Use the following 5 lines to Cut & Paste, Color and Freeze columns
CUT   :
 1-------E2---------------E3------E4------E5------------E6----------E7---------
PASTE :
 2              | 3      | 4      | 6
COLOR :
HILITE:
FREEZE:
THE RESULTING LINE
----+----1----+----2----+----3----+----4----+----5----+----6----+----7----+----
     EMPLOYEE   | OFFICE | ANNUAL | NO. OF


TO SHIFT, PLACE CRSR ON THE DESIRED LINE AND USE PF10-LEFT, PF11-RIGHT 13.01.08
Press the Quick Ruler Definition key (PF04/PF16) to check the results. The Report Viewing screen appears as follows:
Figure 125 Column Editing (Reformatting) – Example Result
----------------- CONTROL-D REPORT VIEWING -------------- PAGE      1 OF      3
COMMAND ===>                                                   SCROLL ===> CRSR
USER PROD    JOB PREMPRS2 09812 DT 080800 RULER EMPVAC    TYPE VIEW
REPORT EMPLOYEES REPORT
---+----1----+----2----+----3----+----4----+----5----+----6----+----7----+----
    EMPLOYEE   | OFFICE | SICK | VAC
      NAME     |   NO.  | DAYS | DAYS
=============== ======== ====== ======
 C. POHLHAMMER |   23   |  01  |  07
 G. MEREDITH   |   09   |  00  |  01
 P. MILLER     |   12   |  00  |  02
 K. BOYLE      |   22   |  01  |  07
 R. BERLE      |   14   |  01  |  07
--------------------------------------
 C. KING       |   12   |  00  |  00
 G. BROWNE     |   02   |  00  |  07
 R. SOLOMON    |   04   |  01  |  07
 S. CUNNINGHAM |   21   |  01  |  07
 M. TABER      |   22   |  04  |  07
--------------------------------------
 A. WINGER     |   23   |  00  |  07
 B. BOOKSPAN   |   05   |  03  |  08
 R. MULU       |   29   |  01  |  07
 E. SMART      |   02   |  09  |  07
CMDS: FIND str, FIND str PREV, EDIT, RULER on/off/name, N n P n       13.01.14
Press the Quick Ruler Definition key (PF04/PF16) again to return to the ruler.
Exiting the Column Editing Screen
Enter the END command (PF03/PF15). The column definition is kept in memory.
If you do not want to keep the last changes you made in the Column Editing screen, use the CANCEL or RESET command to exit the screen.
Include Lines Based on Strings
This option enables you to define lines to be displayed, printed, or masked based on line contents. The screen in Figure 126 is displayed when you enter option 2 for view or print ruler. The screen in Figure 126a is displayed when you enter option 2 for mask ruler.
Figure 126 Include Lines Based on Strings on the Report Editing (Ruler) Screen
----------------  CONTROL-D - INCLUDE LINES BASED ON STRINGS  ----------(U.E.2)
COMMAND ===>                                                  Apply on header N
STR                                  COL     -     LINE     -     COLOR   HL
STR                                  COL     -     LINE     -     COLOR   HL
STR                                  COL     -     LINE     -     COLOR   HL
STR                                  COL     -     LINE     -     COLOR   HL
STR                                  COL     -     LINE     -     COLOR   HL
STR                                  COL     -     LINE     -     COLOR   HL
STR                                  COL     -     LINE     -     COLOR   HL
STR                                  COL     -     LINE     -     COLOR   HL
STR                                  COL     -     LINE     -     COLOR   HL
STR                                  COL     -     LINE     -     COLOR   HL
STR                                  COL     -     LINE     -     COLOR   HL
STR                                  COL     -     LINE     -     COLOR   HL
STR                                  COL     -     LINE     -     COLOR   HL
STR                                  COL     -     LINE     -     COLOR   HL
STR                                  COL     -     LINE     -     COLOR   HL
STR                                  COL     -     LINE     -     COLOR   HL
STR                                  COL     -     LINE     -     COLOR   HL
STR                                  COL     -     LINE     -     COLOR   HL
STR                                  COL     -     LINE     -     COLOR   HL
STR                                  COL     -     LINE     -     COLOR   HL
PLEASE FILL IN THE SELECTION STRINGS                                   13.02.28
The Include screen for view and print limits the records included in a report to those records containing specified strings in specified locations:
-
STR is the string used for comparison.
-
COL is the column range for the string comparison.
-
LINE is the line range for the string comparison.
Figure 126a Include Lines Based on Strings on the Report Editing (Ruler) Screen for Masking
----------------  CONTROL-D - INCLUDE LINES BASED ON STRINGS  ----------(U.E.2)
COMMAND ===>
STR                                  COL     -     LINE     -
STR                                  COL     -     LINE     -
STR                                  COL     -     LINE     -
STR                                  COL     -     LINE     -
STR                                  COL     -     LINE     -
STR                                  COL     -     LINE     -
STR                                  COL     -     LINE     -
PLEASE FILL IN THE SELECTION STRINGS                                   13.02.28
The Include screen for mask ruler limits the records included in the masking process to those records containing specified strings in specified locations.
A maximum of 20 different search strings, with line and column ranges, can be defined. Searches begin with the first include string specified and progress to the last Include string specified. Multiple include strings have an "OR" relationship: Once a line is matched to an include string, the line is included (and the specified color and highlighting applied); no further string searches are made on that line.
Include lines can contain logical comparison operators. The operators must start in the first column of the STRING field. The comparison is made character after character (it is not an algebraic comparison). The format of the comparison operators is as follows:
STRING ===> .op.string-
op is the comparison operator. Periods on both sides of the operator are mandatory.
-
The following operators are supported:
-
.GT.: Greater than.
-
.LT.: Less than.
-
.GE.: Greater than or equal to.
-
.LE.: Less than or equal to.
-
.NE.: Not equal to.
-
-
string is the string used for comparison. The string can contain leading blanks. It can also be embedded in quotes.
Example 1
STRING ===> OVERDRAWNIf the line contains the string OVERDRAWN (in the specified columns), the line is included in the report. The absence of a logical operator (for example, .LT.) means that "equals" is the implied logical operator (that is, an exact match is sought).
Example 2
STRING ===> .NE.BALANCEDIf the line does not contain the string BALANCED (in the specified columns), the line is included in the report.
Example 3
STRING ===> .GT. 10000If the line contains an amount greater than 10000 (in the specified columns), the line is included in the report. The comparison includes the three leading blanks.
Apply on Header
The Apply on Header field specifies whether the Include criteria should (Y) or should not (N) be applied to report header and footer lines, as follows:
-
Y (Yes): Apply the Include criteria to the header and footer lines. Header and footer lines are included in the report only if they conform to the Include criteria.
-
N (No): Do not apply the Include criteria to header and footer lines. Header and footer lines are included in the report regardless of Include criteria.
Default: N
Line Range Fields
The Line Range fields allow you to limit the Include search to a specific line range on each page as follows:
The defined range specifies line numbers within a report page, not line numbers relative to the whole report. For example a value of 010 refers to the tenth line on each page, not the tenth line in the report.
Line number values can be defined either in the format n or Ln. n may be any integer from 001 – 256. Line numbers are counted from the top of the page in format n and from the bottom of the page in format Ln.
When a line range is specified, lines that are not within the specified range are included in the report.
If you specify a line range of 004–L03, only the fourth line from the top through the third line from the bottom is checked and they are included only if they meet the Include criteria. The first three and last two lines are not included in the check and therefore are included in the report.
Color the Line
If you fill in the color and highlight fields for the included string, the entire line is colored.
Available only on terminals with seven-color support.
Table 111 Color Codes for Line Range Fields
|
Code |
Definition |
|---|---|
|
R |
Red |
|
G |
Green |
|
B |
Blue |
|
P |
Pink |
|
Y |
Yellow |
|
T |
Turquoise |
|
W |
White |
Table 112 Highlight Codes for Line Range Fields
|
Code |
Definition |
|---|---|
|
U |
Underscore |
|
R |
Reverse video |
|
B |
Blink |
|
blank |
Regular |
The "Include Lines Based on Strings" option can be used for viewing the results of a job run. For example, it is possible to display only those lines containing step names with condition codes. It is also possible to include other lines, such as JCL errors, abend codes, NOT CATLGD 2, and so on.
This option can also be used to differentiate records by string content. For example, use one Include line to display records greater than $100,000 in red; use another Include line to display records greater than $50,000 in blue; and use a third Include line to display records greater than $10,000 in yellow.
Exclude Lines Based on Strings
The Exclude option (Option 3 – Exclude lines based on strings) operates almost identically to the Include option. For view and print ruler it differs in that it determines lines to be excluded from the report based on strings. For mask ruler it differs in that it determines lines to be excluded from the masking process based on strings. Since it identifies lines to be excluded, color and highlight parameters are unnecessary and do not appear in the Exclude screen. Logical operators work on the Exclude screen just as they do on the Include screen.
Rulers Containing Both Include and Exclude Criteria
When your ruler contains both include and exclude criteria, the include strings are searched first and the exclude strings afterwards. A line meeting both inclusion and exclusion criteria, or a line not meeting either include or exclude criteria, is excluded.
Color/Mask Lines Based On Strings for view and mask
The option for viewing allows you to specify report viewing colors for specific lines and columns based on string occurrences in the report page. String specification in the Color Lines screen does not limit record inclusion or exclusion in the report, and color and highlight definitions are more flexible in the Color Lines screen than in the Include and Exclude screens.
The option for masking allows you to specify report masking for specific lines and columns based on string occurrences in the report page. String specification in the Mask Lines screen does applied for records defined in the Include and Exclude screens.
When this option is chosen, either the screen of Figure 127, for view ruler, or Figure 127a, for mask ruler, is displayed.
Figure 127 Color Lines Based On Strings Screen
-------------  CONTROL-D - COLOR / MASK LINES BASED ON STRINGS  -------(U.E.4)
COMMAND ===>                                                  Apply on header Y
ON STR                                             COL     -     LINE     -
   COLOR   HILITE    ON: STRING    or  LINE    or  COL     -     LINE     -
ON STR                                             COL     -     LINE     -
   COLOR   HILITE    ON: STRING    or  LINE    or  COL     -     LINE     -
ON STR                                             COL     -     LINE     -
   COLOR   HILITE    ON: STRING    or  LINE    or  COL     -     LINE     -
ON STR                                             COL     -     LINE     -
   COLOR   HILITE    ON: STRING    or  LINE    or  COL     -     LINE     -
ON STR                                             COL     -     LINE     -
   COLOR   HILITE    ON: STRING    or  LINE    or  COL     -     LINE     -
ON STR                                             COL     -     LINE     -
   COLOR   HILITE    ON: STRING    or  LINE    or  COL     -     LINE     -
ON STR                                             COL     -     LINE     -
   COLOR   HILITE    ON: STRING    or  LINE    or  COL     -     LINE     -
ON STR                                             COL     -     LINE     -
   COLOR   HILITE    ON: STRING    or  LINE    or  COL     -     LINE     -
ON STR                                             COL     -     LINE     -
   COLOR   HILITE    ON: STRING    or  LINE    or  COL     -     LINE     -
ON STR                                             COL     -     LINE     -
   COLOR   HILITE    ON: STRING    or  LINE    or  COL     -     LINE     -
PLEASE FILL IN THE SELECTION STRINGS                                   13.03.02
Figure 127a Color Lines Based On Strings Screen
--------------  CONTROL-D - COLOR / MASK LINES BASED ON STRINGS  ------(U.E.4)
COMMAND ===>
ON STR                                             COL     -     LINE     -
   MASK              ON: STRING    or  LINE    or  COL     -     LINE     -
ON STR                                             COL     -     LINE     -
   MASK              ON: STRING    or  LINE    or  COL     -     LINE     -
ON STR                                             COL     -     LINE     -
   MASK              ON: STRING    or  LINE    or  COL     -     LINE     -
PLEASE FILL IN THE SELECTION STRINGS                                   17.09.17
Each String and Color definition is comprised of two lines:
-
ON STR Line
Identifies the string and its column (and line) range. If the string is found, coloring is applied as specified in the next (COLOR) line.
Table 113 ON STR Line Fields
Field
Description
ON STR
The search string is specified in this field.
COL
Column range in which the search is made for the string. Maximum column range is 001 – 256.
LINE
Line range in which the search is made for the string. Line number values can be defined in either n format or Ln format. Line numbers in n format are counted from the top of the page; line numbers in Ln format are counted from the bottom of the page. Maximum line range is 001 – 256; the line range applies to each page of the report.
Logical operators are recognized in string specification (as described under the topic Include Lines Based on Strings).
-
COLOR Line
This line specifies the color (and/or highlight) code to be applied, and how it should be applied:
Table 114 Color Line for Color Lines Based on Strings Screen
Code
Definition
COLOR
Desired color code.
Valid Values:
-
R: Red
-
G: Green
-
B: Blue
-
P: Pink
-
Y: Yellow
-
T: Turquoise
-
Q: White
HILITE
Desired highlight code.
Valid Values:
-
U: Underscore
-
R: Reverse video
-
B: Blink
-
blank – Regular
ON
Specify how the color and highlight codes should be applied if the string is found in the specified location.
Indicate Y (Yes) in one of the following Y/N fields:
-
STRING: Color and highlight the found string only
-
LINE: Color and highlight the entire line where the string is found
-
COL/LINE Range: Color and highlight the column and line range specified in these fields. These values might differ from the COL and LINE where the string is found
-
The Color Lines screen also has an Apply on Header field that optionally applies the color criteria if the string is found in the header line.
MASK Line
This line specifies the mask character to be applied, and how it should be applied.
Table 114a Mask Line for Masked Lines Based on Strings Screen
|
Code |
Definition |
|---|---|
|
MASK |
Desired mask character filling the data. |
|
ON |
Specify how the mask character should be applied if the string is found in the specified location. Indicate Y (Yes) in one of the following Y/N fields:
|
Below is an example of a Color Lines Based on Strings definition, followed by an indication of the resulting color coding in the report.
Figure 128 Color Lines Based on Strings Example
--------------  CONTROL-D - COLOR / MASK LINES BASED ON STRINGS  -------(U.E.4)
COMMAND ===>                                                  Apply on header N

ON STR 11                                          COL 030 - 031 LINE     -
   COLOR B HILITE    ON: STRING    or  LINE Y  or  COL     -     LINE     -
ON STR .GT. 05                                     COL 101 - 102 LINE     -
   COLOR R HILITE    ON: STRING Y  or  LINE    or  COL     -     LINE     -
ON STR .GT. 10                                     COL 107 - 108 LINE     -
   COLOR G HILITE    ON: STRING Y  or  LINE    or  COL     -     LINE     -
ON STR                                             COL     -     LINE     -
   COLOR   HILITE    ON: STRING    or  LINE    or  COL     -     LINE     -
ON STR                                             COL     -     LINE     -
   COLOR   HILITE    ON: STRING    or  LINE    or  COL     -     LINE     -
ON STR                                             COL     -     LINE     -
   COLOR   HILITE    ON: STRING    or  LINE    or  COL     -     LINE     -
ON STR                                             COL     -     LINE     -
   COLOR   HILITE    ON: STRING    or  LINE    or  COL     -     LINE     -
ON STR                                             COL     -     LINE     -
   COLOR   HILITE    ON: STRING    or  LINE    or  COL     -     LINE     -
ON STR                                             COL     -     LINE     -
   COLOR   HILITE    ON: STRING    or  LINE    or  COL     -     LINE     -
ON STR                                             COL     -     LINE     -
   COLOR   HILITE    ON: STRING    or  LINE    or  COL     -     LINE     -
PLEASE FILL IN THE SELECTION STRINGS                                   17.53.56
In the above example:
-
If columns 30 and 31 contain the value 11, color the entire line blue.
-
If columns 101 and 102 contain a value greater than 05, then color the string red.
-
If columns 107 and 108 contain a value greater than 10, color the string green.
Exiting the Ruler Definition Environment
When you enter the END command (PF03/PF15) from the Ruler Definition entry panel and you have already entered a ruler, an Exit Option window is displayed.
Figure 129 Ruler Definition Environment Exit Option Window
------------------------  CONTROL-D - REPORT EDITING  --------------------(U.E)
COMMAND/OPT ===>                            +---------------------------------+
USR PROD     REP EMPLOYEES REPORT           |                                 |
                                            |    PLEASE SELECT EXIT OPTION    |
                                            |                                 |
  RULER NAME  ===> EMPVAC                   |    Exit option ===>             |
  RULER TYPE  ===> VIEW                     |                                 |
  REPORT NAME ===>                          |     1  KEEP ruler active        |
  JOB NAME    ===>                          |     2  CLEAR (no ruler)         |
  USER NAME   ===>                          |     3  SAVE ruler as:           |
                                            |                                 |
                                            |    Ruler name  ===> EMPVAC      |
  1   EDIT    report lines and columns      |    Ruler type  ===> VIEW        |
                                            |                                 |
  2   INCLUDE lines based on strings        +---------------------------------+

  3   EXCLUDE lines based on strings

  4   COLOR   lines based on strings


PLEASE SELECT OPTION, OR PRESS PF3 TO SAVE/EXIT THE RULER         13.04.15
You can choose between three options:
-
KEEP Ruler Active: The ruler remains in memory and is activated on the same report or job. It is not saved in the file for future use. The ruler is erased from memory if you enter a new ruler name (using the RULER command), or if you enter into a new user or report entry.
-
CLEAR: The ruler is erased from memory. The report or job is shown without a ruler. If the ruler previously existed, it is not erased from the file, but any changes to the ruler definition are not saved.
-
SAVE Ruler As: The ruler is saved in the file with the name and type specified in the RULER NAME and RULER TYPE fields. By default these fields contain the same name and type used when the ruler definition began. You can change the ruler name and the ruler type when saving rulers. If a previous ruler with the same name exists, it is overwritten by the new ruler. For a View ruler, the new name is the current active ruler.
A Mask ruler can only be created for a specific report. The Mask rulers are stored only in the Permanent User file, not in the Active User file. You can delete a Mask ruler from the Permanent User file using U,1-screen.
Quick Ruler Definition PFKey (PF04/PF16)
While defining a new ruler, it may be cumbersome to use the Exit Option window to switch between the Report Viewing screen and the Edit screen to evaluate the ruler. The Quick Ruler Definition PFKey allows you to bypass the Exit Option window.
The Quick Ruler Definition key is not available when the Ruler Definition environment was entered through option E from the Active User Report list.
The Quick Ruler Definition PFKey alternately displays the current ruler definition screen and the Report Viewing screen. It applies the edits you are currently defining to the report, so that you can evaluate the ruler. If you are satisfied with the results, you can switch back to the Edit screen to SAVE or KEEP the ruler.
More About Rulers
A ruler can be defined as the DEFAULT ruler for a report. If a DEFAULT ruler exists for the report, the report is automatically displayed according to the DEFAULT ruler when you enter the Report Viewing screen. If no DEFAULT ruler exists for the report, the report is displayed without a ruler (that is, in its original format) when you enter the Report Viewing screen.
RULER Command
The RULER command is used to activate (turn on), deactivate (turn off), and switch between rulers.
Table 115 RULER Command Formats
|
Format |
Description |
|---|---|
|
RULER name |
Makes the named ruler your current ruler and turns it on. |
|
RULER OFF |
Turns off your current ruler. |
|
RULER ON |
Turns on your current ruler. |
|
RULER (without the OFF, ON or name qualifier) |
Alternately turns your current ruler on and off. |
|
RULER MASK |
Alternately turns your current mask ruler on and off. |
The RULER command can be abbreviated RU, but OFF, ON and the ruler name cannot be abbreviated.
The RULER command can be used in the Active User Report List screen to toggle the ruler show mode on and off. For details see Commands of the User Report List.
Global Rulers ($ruler)
Users authorized by the INCONTROL administrator (that is, users authorized in the Recipient Tree to access $SYSDATA records) can define rulers for global usage. This is done by prefixing the ruler name with $ in the Exit Option window.
Global rulers can be created, modified, or deleted by authorized users only. However, all users can access global rulers in report viewing. Global rulers do not belong to a specific user, report, or job. Using Control-D Exit CTDX004, it is possible to use a global ruler or the default ruler. For details about global rulers, see the description of Exit CTDX004 in the Exits chapter of the INCONTROL for z/OS Administrator Guide.
For example, ruler $JOBCHK is a predefined ruler that restricts lines in MSGCLASS output to common messages and strings relevant to production personnel.
Page Mode Rulers
Rulers which refer to a specific line on a page are called page mode rulers. When the ruler is activated, report pages are displayed with a separator line (like "Bottom of Page"). The HEX command is not available when a page mode ruler is active. (For more information see "HEX Command" in Report Viewing Screen Commands.)
Tag Notes
Tag notes can be attached to specific substrings of a report in the Report Viewing screen. For more information see "Notepad Facility" earlier in this chapter for an explanation of notes.
Tag notes are linked to rulers. A Tag note that is defined when no ruler is active is accessible only when no ruler is active. A Tag note defined when any ruler is active is accessible only when that same ruler is active.
The top line of the Report Viewing screen indicates the total number of Tag notes in the report for the current ruler (A), if any.
To define a Tag note for a substring, use the arrow keys to position the cursor on the first character of the substring to be tagged and press PF06. Then use the arrow keys to move the cursor to the last character of the substring to be tagged and press PF06 again. The Tag Note window is opened. Both general notes and tag notes can have multiple versions. For details about creating, modifying, and deleting a version of a note, Tag Notes.
Figure 130 Tag Note Window
 --------------- CONTROL-D REPORT VIEWING   NOTES        PAGE        OF
 COMMAND ===>      +---------------------NOTE PAD FACILITY--------------(TAG)-+
 USR ACTG1         | EDIT       VERSION  0001     N44       08/08/00 21:56:14 |
 REPORT EMPLOYEES R|                                                          |
----+----1----+--- |                                                          |
====== NEW PAGE == |                                                          |
 DATE:   05.05.00  |                                                          |
 UPDATE: 05.05.00  |                                                          |
                   |                                                          |
                   |                                                          |
                   |                                                          |
 WAREHOUSE NO: 100 |                                                          |
               --- |                                                          |
                   |                                                          |
                   |    F3:END               F7:CLEAR             F8:DELETE   |
                   +----F5:SAVE--------------F10:PREV-------------F11:NEXT----+
 ITEM NO.      DESCRIPTION          LIFE    UNIT   AVAIL      ORDER     PROCESS
 -----------   ----------------     -----   ----   -------    -------   ------

 1233-781-21   RIVET D. 0.1 ACP
                                    NONE    KG      100.00    250.00
 1233-781-25   RIVET D. 0.1 ACP
                                    NONE    KG      100.00    250.00
 1233-781-27   RIVET D. 0.1 ACP
                                    NONE    KG      100.00    250.00
 CMDS: FIND str (PREV), EDIT, RULER on/off/name, N n P p               21.56.07
There are two ways to open an existing Tag note: use the arrow keys to position the cursor on any column of the tagged substring and press PF06, or type GETNOTE on the command line, position the cursor on any column of the tagged substring, and press Enter. The Tag Note window is opened and the existing Tag note is displayed.
By default, tagged substrings are displayed in red. If the report line is red, the tagged substring is displayed in yellow. On monochrome terminals, the tagged substring is highlighted.
If a tagged substring has been moved as a result of subsequent ruler edits, the tag is not identified (via color or highlighting) when the Report Viewing screen is displayed and an appropriate message is issued. Pressing PF06 colors (or highlights) the tagged columns.
The original substring location (that is the columns, not the substring) is actually tagged.
Even when WRAP mode is on, notes can only be attached to substrings within the first 256 characters of data on a line.
SHOWNOTE Command
The SHOWNOTE command (abbreviated SHOWN) alternately changes (toggles) the color of tagged substrings from red (or yellow) to the color of the report lines.
LOCNOTE Command
The LOCNOTE command (abbreviated LOCN) locates the next report note.
Using the Report Viewing Screen To View AFPDS Reports On 3270 Monitors
This option enables AFPDS (AFP Category 5) reports to be viewed in the Report Viewing screen on 3270 monitors. Text is extracted from the AFP report and displayed according to positions defined in the AFP report for this text. Text from overlays is not displayed.
To activate the AFP viewing option, issue command RUL $AFPxxx from the Report Viewing screen. This command invokes a special filter that displays only the text of the current report. Ruler $AFPxxx is applied to the extracted text. Specify only the ruler name prefix in the command (that is, RUL $AFP), so that any ruler (prefixed $AFP) can activate the AFP filter.
When extremely large or small fonts are used, calculation of text positions can result in overlapping text. The calculation algorithm in cases of extremely large or small font can be adjusted by specifying, a multiplication or division factor in the report’s REMARK field.
Parameters C and L allow expansion or shrinkage during the graphic-to-text conversion. Format of the parameter is:
{C=xnn},{L=xnn}
where
-
C is the column factor.
-
L is the line factor.
-
x is the factor operator. Valid values are "*" (multiply) and "/" (divide). To enlarge the font, enter * as the factor operator; To decrease the font, enter / as the factor operator.
-
nn is the two-digit factor applied as an integer in base of 10 units. For example, to enlarge a font by 50%, enter a factor of 15, which is used a 1.5 multiplication. To double the font size, enter 20, and so on.
Any factor combination can be specified: column only, line only, both column and line (separated by commas), or neither.
The program searches for a C or L parameter in the REMARK field. If neither are found, the original calculation is used. Otherwise, the factor is applied to the conversion algorithm.
-
To expand line spacing by 50%, enter L=*15, which effectively means that the filter formula is multiplied by 1.5.
-
To shrink the line spacing by 50%, enter L=/15.
-
To expand the column spacing by 30%, enter C=*13.
$SYSDATA Records
A special user ID ($SYSDATA) is used to display a list of the original reports (before decollation). This user ID is reserved for authorized persons only. $SYSDATA records appear only in Active, Migrated and History Report lists.
The values specified in the fields of the User Reports entry panel shown below produce a list of $SYSDATA records for Control-V migrated reports.
Figure 131 User Reports Entry Panel Values to Produce $SYSDATA Records in Control-V Migrated Reports
-------------------- CONTROL-D/V - USER REPORTS ENTRY PANEL  ---------------(U)
COMMAND ===>


    OPTIONS ===>               1. PERMANENT  2. ACTIVE/MIGRATED  3. HISTORY


     REPORT NAME   ===>                       Report name, prefix or mask
     USER          ===> $SYSDATA              Recipient name or prefix
     DATE FROM     ===>        TO             Report date or relative day
     JOBNAME       ===>                       Job name, prefix or mask

     SHOW MIGRATED ===> O                     Include migrated reports

     INDEX         ===>                       Index name, prefix or mask
     VALUE         ===>


     DISPLAY TYPE  ===> D                     BYPASS PANEL ===> N
Two basic formats for $SYSDATA records are predefined:
-
Short format: Displayed when you request any display type for user $SYSDATA. If you activate the A (Additional Info) option on an entry, you receive the Long format.
-
Long format: Displayed when you activate the A (Additional Info) option for user $SYSDATA.
$SYSDATA Short formats for the History and Active Report lists are shown below:
Figure 132 $SYSDATA Short Format for History List
HISTORY LIST   <D> JOB          REP                      USR $SYSDATA CHILD (U)
COMMAND ===>                                                    SCROLL===> CRSR
O JOB       JNUM PROCSTEP PGMSTEP  DDNAME    PAGES    LINES DEC-DATE  RETAIN
  M022AIB   7736 JES2              $SYSMSGS      1       66 08/08/00 08/08/00
  M022AIB   7958 JES2              SYSPRINT     98     2478 08/08/00 08/08/00
Figure 133 $SYSDATA Short Format for Active List
ACTIVE LIST    <> JOB          REP                      USR $SYSDATA CHILD (U)
COMMAND ===>                                                    SCROLL===> CRSR
O JOB       JNUM PROCSTEP PGMSTEP  DDNAME    PAGES    LINES DECOLLATION-TIME
  M225MSGD  8463 JES2              $SYSMSGS      1       93 08/08/00 - 11:01
  M225MSGD  8463 KSL               DAKSLOUT      5      483 08/08/00 - 11:01
  M225MSGD  8463 KSL               DAKSLREP      1       60 08/08/00 - 11:01
  PRDKPL01  8639 JES2              $JES2LOG      1        9 08/08/00 - 11:02
  PRDKPL01  8639 JES2              $JCLIMG       1       25 08/08/00 - 11:02
  PRDKPL01  8639 JES2              $SYSMSGS      1        5 08/08/00 - 11:02
  PRDKPL02  8657 JES2              $JES2LOG      1       25 08/08/00 - 11:03
  PRDKPL02  8657 JES2              $JCLIMG       1       30 08/08/00 - 11:03
  PRDKPL02  8657 JES2              $SYSMSGS      2      130 08/08/00 - 11:03
  PRDKPL03  9723 JES2              $JES2LOG      1       25 08/08/00 - 11:03
  PRDKPL03  9723 JES2              $JCLIMG       1       31 08/08/00 - 11:03
  PRDKPL03  9723 JES2              $SYSMSGS      2      130 08/08/00 - 11:03
  PREMPRS1  8879 JES2              $JES2LOG      1       15 08/08/00 - 11:02
  PREMPRS1  8879 JES2              $JCLIMG       1       11 08/08/00 - 11:02
  PREMPRS1  8879 JES2              $SYSMSGS      1       44 08/08/00 - 11:02
  PREMPRS1  8879 STEP1             SYSPRINT      1        4 08/08/00 - 11:02
  PREMPRS1  8879 STEP2             SYSPRINT      1        4 08/08/00 - 11:02
  PREMPRS2  9812 STEP1             SYSUT2        9      427 08/08/00 - 11:06
  PREMPRS2  9812 STEP2             SYSUT2        8      328 08/08/00 - 11:06
  P PRINT     V VIEW     U UPDATE     I INSERT     A ADD INFO     E EDIT
  X INDEX     N NOTE     G GIVETO     D DELETE     Q QUICK ACCESS      08.02.09
Fields in the $SYSDATA Short Format
Table 116 Fields in the $SYSDATA Short Format
|
Field |
Description |
|---|---|
|
JOB |
Name of the job that created the report. |
|
JNUM |
Job number. |
|
PROCSTEPa |
Step name in the JCL procedure that creates the report. |
|
PGMSTEPa |
Job step name that creates the report. |
|
DDNAMEa |
Name of the DD statement under which the report was created. |
|
PAGES |
Number of pages in the report. |
|
LINES |
Number of lines in the report. |
|
DECOLLATION TIME |
Date and time of report decollation (in Active Report list). |
|
DEC-DATE |
Date of decollation (in History Report list). |
|
RETAIN |
Retention date. Last date the archived report is kept (in History Report list). |
Active and History Report $SYSDATA Records (Additional Info)
Below is the $SYSDATA Long format that is displayed when activating option A (Additional Info) for an entry on the History or Active Report list.
Figure 134 $SYSDATA Long Format for History List
HISTORY LIST   <A> JOB          REP                      USR $SYSDATA CHILD (U)
COMMAND ===>                                                    SCROLL===> CRSR
O JOB       JNUM PROCSTEP PGMSTEP  DDNAME    PAGES    LINES DEC-DATE  RETAIN
  MMUPRE03   422          STEP1    SYSUT2        9      427 08/08/00 08/08/00
  CDAM: IOAP.C.MMUPRE03.J00422.D1071127.S91.N002900    Extents: 00
  Retention days     : 0032
  Record  ID         : C172A534 A71D9C2B RBA: 00002209 UPDT: C1767ACF 41AB1E81
  Backup  Missions   : VENABKP
  Backup  Volumes    : WORK0F
  Restore Mission    :
  Creation Date      : D07308 - T150433            Status: Backed up
  Printing Parameters: RECFM: UA   ALOPT:          LRECL: 080    BLKSZ: 00080
                       CLASS: T    APA  : N        TRC  : 0
                       OPTCD:      PGDEF:          FMDEF:        MODIF:
  Resource set count :
  Approval Status: Approved  Hidden:   Init_Hidden: Y
Figure 135 $SYSDATA Long Format for Active List
ACTIVE LIST    <A> JOB          REP                      USR $SYSDATA CHILD (U)
COMMAND ===>                                                    SCROLL===> CRSR
O JOB       JNUM PROCSTEP PGMSTEP  DDNAME    PAGES    LINES DECOLLATION-TIME
  M89RKSL  28695          JES2     JESMSGLG      1       25 08/08/00 - 11:21
  CDAM: CTDP.R5.M89RKSL.J28695.D3601121.S91.N004700    Extents: 00
  Record  ID         : AC2D25AE 54529000 RBA: 000004E0 UPDT: AC2D25AE 54529000
  Backup  Missions   :
  Backup  Volumes    :
  Restore Mission    :
  Migration Mission  :
  Creation Date      : D99360 - T112113       Status: Decollated
  Printing Parameters: CLASS: X  FORMS: STD   RECFM: UA     ALOPT :
                       APA  : N  FCB  : ****  LRECL: 00133  WTR   :
                       ACIF : N  UCS  : ****  BLKSZ: 00133  OUTPUT:
                       TRC  : N  FLASH:       OPTCD:        MODIF :
                                 LINCT: 0100  PGDEF:        FMDEF :
                       CHARS:      ,      ,      ,
   Job Parameters    : SYSID:      JTYPE:              ACCOUNT:
                       ENTRY:          -
   Resource set count :
   Approval Status: Approved  Hidden:   Init_Hidden: Y
   Resource set count:
   Approval status: Approved     Hidden:          Init_Hidden:

  M89RKSL   28695         JES2     JESJCL        3      231 08/08/00 - 11:21
  PRDKPL01  8639          JES2     JESYSMSG     13      357 08/08/00 - 11:21
P PRINT     V VIEW     U UPDATE     I INSERT     A ADD INFO     E EDIT
X INDEX     N NOTE     G GIVETO     D DELETE     Q QUICK ACCESS       08.02.09
Fields in the Active and History Report $SYSDATA Long Format
Table 117 Fields in the Active and History Report $SYSDATA Long Format
|
Field |
Description |
|---|---|
|
CDAM |
Name of the CDAM dataset containing the report and number of CDAM extents. |
|
Record ID |
Internal record identifier. |
|
Backup Missions |
Name of backup missions that back up this report. |
|
Backup Volumes |
Tape volume serial numbers on which the report is backed up. |
|
Restore Mission |
Name of restore mission used to restore the report. |
|
Migration Mission |
Name of migration mission used to migrate the report (in the Active/Migrated file only). The user can change the value of this field. |
|
Creation Date |
Sysout creation date in Julian format: Dyyjjj – Thhmmss. |
|
Resource set count |
Record ID of the resource set record. |
|
Approval Status |
Current status of Approval post-processing when MULTI=S. |
|
Hidden |
Current status of report visibility when MULTI=S. |
|
Init_hidden |
Initial visibility of report status as defined in the mission when MULTI=S. |
Printing Parameters
Table 118 $SYSDATA Printing Parameters
|
Parameter |
Description |
|---|---|
|
CLASS |
Printing (sysout) class. |
|
FORMS |
JCL FORMS parameter. |
|
RECFM |
Record format. |
|
ALOPT |
CDAM allocation option. |
|
APA |
Report to be viewed in Control-D/WebAccess Server by using the AFP viewer. Valid values: Y/N. |
|
FCB |
JCL FCB parameter. |
|
LRECL |
Logical record length. |
|
WTR |
JCL external writer name. |
|
ACIF |
Report to be processed by ACIF utility during Deferred printing. Valid values: Y/N. |
|
UCS |
JCL UCS parameter. |
|
BLKSZ |
Original blocksize. |
|
OUTPUT |
Name of output statement. |
|
TRC |
Table Reference Character. |
|
FLASH |
JCL FLASH parameter. |
|
OPTCD |
JCL OPTCD parameter. |
|
MODIF |
JCL MODIFY parameter. |
|
LINCT |
Number of lines per page. |
|
PGDEF |
PAGEDEF (for AFP output). |
|
FMDEF |
FORMDEF (for AFP output). |
|
CHARS |
Up to four character sets. |
|
Job Parameters |
Job parameters of the job that created the report. |
|
SYSID |
System ID. |
|
JTYPE |
Type of job. |
|
ACCOUNT |
Job account information. |
|
ENTRY |
Operating system timestamp of the job entering the system. |
|
Resource set count |
A key of the Resource Set Record, in the Permanent User file, that lists all resources used by the report. |
|
Approval status |
Current approval status of the report. Valid Values:
|
|
Hidden |
Determines to whom the report is visible. Valid Values:
Default: Blank |
|
Init_Hidden |
Defines to whom the report was visible just after decollation or the Add this report operation. Valid Values:
Default: Blank |
|
Status |
General status of the SYSDATA entry. |
|
RBA |
Address of the record in the file. |
|
UPDT |
Timestamp indicating when the record was last changed. |
|
Retention Days |
Number of days to keep the backup (in History list). |
Migrated Report $SYSDATA Records
Below is the $SYSDATA Long format that is displayed when requesting the All Fields display type, or when activating option A (Additional Info), for an entry on the Migrated Report list.
Figure 136 Migrated Report List
    -------------------- Primary Migrated CDAM ----------------------------------
    CDAM NAME: OPV.CTDP.E2.RPT00E09.J28089.E3081354.N007800
    Media: FTK1      Migrate Volume:             Platter:
    Migration date / Last refresh date: 08/08/00
    -------------------- Secondary Migrated CDAM --------------------------------
    CDAM NAME: OPZ.CTDP.E2.RPT00E09.J28089.G3081354.N007800
    Media: DISK      Migrate Volume:    WORK01   Platter:
    Migration date / Last refresh date: 04/06/00
    -------------------- Migration Log Information ------------------------------
    Number of entries: 04
    01 OPZ.CTDP.E2.RPT00E09.J28089.F3081354.N007800 Secondary  Deleted
       Mig. date: 04/03/00 Media: DISK     Volume: WORK01   Platter:
    02 OPZ.CTDP.E2.RPT00E09.J28089.E3081354.N007800 Secondary  Deleted
       Mig. date: 08/08/00 Media: DISK     Volume: WORK01   Platter:
    03 OPZ.CTDP.E2.RPT00E09.J28089.D3081354.N007800 Secondary  Deleted
       Mig. date: 04/03/00 Media: DISK     Volume: *U       Platter:
    04 OPV.CTDP.E2.RPT00E09.J28089.D3081354.N007800 Primary    Deleted
       Mig. date: 04/03/00 Media: FTK1     Volume:          Platter:
    05
       Mig. date:          Media:          Volume:          Platter:
    06
  P PRINT     V VIEW     U UPDATE     I INSERT     A ADD INFO     E EDIT
  X INDEX     N NOTE     G GIVETO     D DELETE     Q QUICK ACCESS       12.14.35
Primary Migrated CDAM
Table 119 Primary Migrated CDAM Fields – Migrated Report List
|
Field |
Description |
|---|---|
|
CDAM NAME |
File name of the report on the migrated media. |
|
Media |
Name of current media. |
|
Migrate Volume |
Volume of the current media. Relevant only for CART, DASD and OSS media. |
|
Platter |
Name of the platter where the migrated data is stored. Relevant only for OSS media. |
|
Migration date/Last refresh date |
Migration date or last refresh date (if refresh has occurred). |
Secondary Migrated CDAM
Fields A through E (above) are repeated for secondary migration CDAM files.
Migration Log Information
Information on both Primary an d Secondary migration is recorded in this section.
Table 120 Migration Log Information
|
Field |
Description |
|---|---|
|
Number of entries. |
Number of migration log entries currently in use. Limit: 8. |
|
The first line consists of: |
|
|
Entry number |
The latest entry appears on the top line and becomes entry 01. The previous entry becomes entry 02, and so on. |
|
CDAM name |
File name of the report produced by migration. |
|
Log entry type |
Log entry type. Valid values:
|
|
Status |
Status of the migrated report. Valid values:
|
|
Secondary |
Copy produced by secondary migration. |
|
The second line consists of: |
|
|
Mig. date |
The date (in the standard date format of the site) that migration was performed. |
|
Media |
Name of the media on which the report resided in the last previous generation. |
|
Volume |
Volume of the media in the last previous generation. Relevant only for CART, DASD and OSS media. |
|
Platter |
Name of the platter in the last previous generation. Relevant only for OSS media. |
Options of the $SYSDATA List
To request one of the following options, specify the option in the O (Option) field to the left of the job name and press Enter:
Table 121 Options of the $SYSDATA List
|
Option |
Description |
|---|---|
|
V |
View the original sysout. You cannot activate or define a ruler on the original sysout, but all the other "regular" report viewing functions are operational. |
|
D |
Delete the original sysout entry and the compressed datasets associated with it. User records referencing this report are not deleted. However, if a user tries to view or print this report after it is deleted, that user receives a message that the report has been deleted. (You can use the CTDDELRP utility to delete the user records.) |
|
A |
Additional information (described on a previous page). |
|
U |
Update changes to unprotected fields. |
Control-D/Delivery Server
Control-D/Delivery Server is a separately licensed product for report distribution to a Unix or Windows environment. If Control-D/Delivery Server is installed at your site, you can use the features described below to specify an external "logical destination" for Control-D reports. For information about activating this feature, see the Control-D and Control-V chapter of the INCONTROL for z/OS Administrator Guide.
Specifying an External Destination
Use a 2-part DEST, DEF DEST, or OVERRIDE DEST field to specify an external destination. Enter the reserved keyword CTDS in the first sub-field and enter the external destination in the second sub-field. This specification can be made in any of the following screens:
Table 122 Screens in which an External Destination Can be Specified
|
Option |
Screen |
Field Name |
|---|---|---|
|
U.P |
Report List screen's Print window |
DEST |
|
T.S |
Recipient Tree Definition screen |
DEF DEST |
|
M.S |
Printing Mission Definition screen |
OVERRIDE DEST |
|
A.Z |
Printing Mission Zoom screen |
OVERRIDE DEST |
The example below illustrates how to specify an external destination in the Print window (option U.P).
Figure 137 Print Window – Specifying an External Destination
 ------------------------------------------------------------------
 PRINT OPTION ===> 1

      1  Immediate Printing
      2  Deferred Printing (by Print Mission)
      X  Exit (no action)

      COPIES  001             FORM STD       CLASS R

      DEST  CTDS     ROBERT   WTR

      FROM PAGE        TO PAGE         RULER DEFAULT

      PRINT MISSIONS PRT1     PRT22    PRT56

      PAGE DEF                      FORM DEF

      REPORT

      USER STEVE        JOB ARCHIVE
If the external destination is not known or the desired destination is not yet defined, enter CTDS in the first sub-field and leave the second sub-field blank to display the Control-D External Destinations Screen. This screen lists Control-D/Delivery Server destination types and their descriptions.
Control-D External Destinations Screen
The Control-D External Destinations screen lists the external destinations defined in Control-D. These destinations are kept in the Permanent User Reports file and are used by Control-D for the Control-D/Delivery Server interface.
This screen can be used to select, modify, copy, or delete an existing destination or to insert a new destination.
If, in any of the screens listed in the above table, the user specifies the reserved keyword CTDS in the first DEST sub-field and specifies blanks or an invalid destination in the second DEST sub-field, the Control-D External Destinations screen is displayed.
Figure 138 Control-D External Destinations Screen
---------------------- CONTROL-D EXTERNAL DESTINATIONS  -------------- (U.CTDS)
COMMAND ===>                                                    SCROLL===> CRSR
O DEST      TYPE     DESCRIPTION
 FTB2P     ft       send AFP/XEROX reports to FT in PDF format
 FTPDF     ft       send PDF report to File Transfer
 FTTXT     ft       send text report to File Transfer
 FTT2P     ft       send text report to File Transfer in PDF format
 LFSB2P    fs       send AFP/XEROX reports to LFS in PDF format
 LFSPDF    fs       send PDF reports to local file system
 LFSTXT    fs       send text report to local file system
 LFST2P    fs       send text reports to LFS in PDF format
 LPRB2P    lpr      send AFP/XEROX reports to printer
 LPRPDF    lpr      sent PDF report to printer
 LPRTXT    lpr      sent text report to printer
 MAILB2P   email    send AFP/XEROX reports by e-mail in PDF format
 MAILPDF   email    send PDF reports by e-mail
 MAILTATT  email    send text reports by e-mail as attachments
 MAILTXT   email    send text reports by e-mail (body)
 MAILT2P   email    send text reports by e-mail in PDF format
===== >>>>>>>>>>>>>>>   B O T T O M    O F    L I S T    <<<<<<<<<<<<<<< ======


S SELECT A ADD INFO U UPDATE C COPY I INSERT D DELETE 18.02.37-
Press REFRESH (PF04/PF16) to redisplay the Control-D External Destinations screen.
-
Press END (PF03/PF15) to return to the previously displayed screen (for example, Print window).
Header Fields in the Control-D External Destinations Screen
The following fields are displayed in the Control-D External Destinations screen header:
Table 123 Header Fields in the Control-D External Destinations Screen
|
Field |
Description |
|---|---|
|
O(ption) |
Option field. For more information see Options of the Control-D External Destinations Screen. |
|
DEST |
Names of predefined external destinations (uppercase only). |
|
TYPE |
Type of Destination. One of the following values can be displayed:
|
|
DESCRIPTION |
Description of the destination. Maximum length: 50 characters. |
Options of the Control-D External Destinations Screen
Table 124 Options of the Control-D External Destinations Screen
|
Option |
Description |
|---|---|
|
S (SELECT) |
Selects a specific external destination and returns this destination to the previous screen. |
|
A (ADD INFO) |
Provides additional information (host and port data plus CTDDS attributes) for a specific external destination. Specifying option A again (while additional information is displayed) causes the additional information to not be displayed. |
|
U (UPDATE) |
Updates the Control-D external destination with changes made to unprotected fields. |
|
C (COPY) |
Copies an external destination entry to create a new entry. A confirmation window is displayed. |
|
I (INSERT) |
Opens a line for inserting a new external destination. Enter the DEST, TYPE and DESCRIPTION fields for the new destination. When you press Enter, fields for the required CTDDS ATTRIBUTES are displayed. (For more information see the description of the CTDDS ATTRIBUTES field below.) Fill in the appropriate data, enter U in the option field, and press Enter to save the new destination. If a HOST or PORT is not specified, the default host and port specified in member CTDSPARM of the CTD PARM library is used. |
|
D (DELETE) |
Deletes the specified external destination from the list. A confirmation window is displayed. |
Usage of the options in this screen and in related screens is controlled by Control-D user Exit CTDX026 and security module CTDSE26. For more information, see member CTDX026 in the IOA SAMPEXIT library.
Control-D External Destinations – Additional Information
When option A is specified in the O(ption) column to the left of an external destination, the following additional fields are displayed for that destination:
Table 125 Control-D External Destinations – Additional Information
|
Field |
Description |
|---|---|
|
HOST |
Name or IP address of the host where the Control-D/Delivery Server is installed. When specifying an IP address, use either IPv4 addresses or IPv6 addresses (full or abbreviated). For examples of IPv6 addresses, refer to message ECAP9UE. If compression is to be used, specify ',C' following the IP address or host name. When using a full-length IPv6 address (39 characters), specify C following the IP address, without a comma. |
|
PORT |
Port number of the Control-D/Delivery Server Session Manager component. If a HOST or PORT was not specified, the default host and port specified in member CTDSPARM of the CTD PARM library is displayed. |
|
PATH |
Folder on the UNIX or Windows computer to which the report is transferred from the mainframe. The folder specified by PATH should be specified in the security definition file of the Control-D/Delivery Server Session Manager component. If PATH is not specified, the report is transferred to the temporary directory of the CONTROL-D installation. |
|
CONVERT TO ASCII |
Indicator that determines whether or not transmitted data is converted to ASCII. Valid Values:
When CONVERT TO ASCII is set to R, original control characters cannot be sent to Control-D/Delivery. If SEND WITH CC is set to Y, it is adjusted to N; if set to C, it is adjusted to P. |
|
SEND WITH CC |
Indicator that determines whether carriage control characters are sent with the transmitted data, stripped off, or with page break separator. Valid Values:
|
|
CTDDS ATTRIBUTES |
The destination TYPE determines which attributes are displayed. For information about destination attributes, see the Control-D Delivery Server Administrator Guide. This attribute area can include the following fields, which are resolved during printing.
Sets of standard logical destinations are loaded into the Permanent User File during installation. For an existing CTD environment, these destinations can be loaded by the job FORMCTDS from the BASE INSTCTD library (submit the job using Option 3-Tailor job, under the Maintain your Environment, ICE refresh option). |
|
CTDDS ATTRIBUTES (continued) |
The parameter TRNTAB=tabname can be specified in the CTDDS ATTRIBUTES field, if the parameter CONVERT TO ASCII is set to YES.
The parameters MF_BANNER and MF_NOBANNER can be specified in the CTDDS ATTRIBUTES field, as well. These parameters direct Control-D to process all reports distributed from Control-D on mainframe via Control-D/ Delivery server using exit CTDAPA, CTDDJDE, or CTDTP1 (depending on the printer type).
Parameter MF_NOSTARTFF instructs Control-D not to send PAGE SEPARATOR x'0C' to Control-D/Delivery at the beginning of a report. |
The various destination types and the names of the default CTDDS Attributes for each destination type are listed in member $$CTDSAT of the Control-D OUTPARMS library.
In the example below, additional information about external destination "DOCUMT" is displayed. This is an e-mail destination which requires an e-mail address (for example, [email protected]) in the RECIPIENT field.
Figure 139 Control-D External Destinations, Additional Information – Example 1
---------------------- CONTROL-D EXTERNAL DESTINATIONS  -------------- (U.CTDS)
COMMAND ===>                                                    SCROLL===> CRSR
O DEST     TYPE     DESCRIPTION
  LASER1   LPR      Laser Printer #1
  DOCUMT   Email    Documentation Dept E-Mail
HOST 172.16.2.115                             PORT 1948  CONVERT TO ASCII Y
PATH                                                     SEND WITH CC     N
CTDDS ATTRIBUTES
HOST=Houston   [email protected]
sender=DS         subject=CTD
ds_banner=        ds_title=
  MKT      FS       Marketing File System
  LASER2   LPR      Laser Printer #2
  HUMRES   FS       Human Resource File System
  LAWDEPT  Email    Law Department E-mail
  REMOTE   FT       Remote File Transfer
  SALES    Email    Sales E-Mail
===== >>>>>>>>>>>>>>>   B O T T O M    O F    L I S T    <<<<<<<<<<<<<<< ======


S SELECT  A ADD INFO  U UPDATE  C COPY  I INSERT  D DELETE             18.02.37
The following example shows how to deliver a text report via Control-D/Delivery with emulation of EBCDIC Machine or ASA Control Characters using CR and CRLF line separators. The Control Characters are transformed in mainframe together with a translation of EBCDIC to ASCII. Control-D/Delivery does not make any changes and delivers the received report as is.
Figure 139a Control-D External Destinations, Additional Information – Example 2
---------------------- CONTROL-D EXTERNAL DESTINATIONS  -------------- (U.CTDS)
COMMAND ===>                                                    SCROLL===> CRSR
O DEST     TYPE     DESCRIPTION
  RAUL_T2T fs       TXT without BANNER stored in C:\CTD Delivery\ dvj2
HOST 172.16.2.115                             PORT 1948  CONVERT TO ASCII R
PATH                                                     SEND WITH CC     N
CTDDS ATTRIBUTES
DIR="C:\CTD Delivery"
original_type=%TYPE%
filename="%REPORT%_%ODATE%_%TIMESTAMP%"
transformer_to=TXT
Note that the value that you set for SEND WITH CC depends on the value of optional wish WD3630 (DON'T SUPPRESS PAG FILE CREATION WHILE TRANSFER TO CTD4DS).
-
For ID=WD3630,APPLY=NO (the default value), set SEND WITH CC to N.
-
For ID=WD3630,APPLY=YES, set SEND WITH CC to P.
In addition, to enable this conversion, define a shell transformer named TXT_D_2_TXT_D in Control-D/Delivery, with the following attributes:
-
Basic attributes:
Attribute
Value
Default
No
Display Name
txt
From Extension
txt
Program
-
On Windows: bmc-ctd-si-shell-transformer.dll
-
On Linux: libbmc-ctd-si-shell-transformer.so
To Extension
txt
-
-
Advanced attributes:
Attribute
Value
Input Mode
Doc
Output Mode
Doc
Param
-
On Windows: cmd /c "copy "%%IN%%" "%%OUT%%""
-
On Linux: cp "%%IN%%" "%%OUT%%"
-
Copy Confirmation Window
Specifying option C displays a confirmation window with the following fields:
Table 126 Control-D External Destinations Copy Confirmation Window
|
Field |
Description |
|---|---|
|
CONFIRM COPY |
Confirms whether or not to create a new external destination by copying the existing entry. Valid values:
|
|
COPY TO DEST |
New external destination name to which the external destination entry is copied. |
Figure 140 Control-D External Destinations Copy Confirmation Window
---------------------- CONTROL-D EXTERNAL DESTINATIONS  -------------- (U.CTDS)
COMMAND ===>                                                    SCROLL===> CRSR
O DEST     TYPE     DESCRIPTION
  LASER1   LPR      Laser Printer #1
  DOCUMT   Email    Documentation Dept E-Mail
  MKT      FS                 +--------------------------+
  LASER2   LPR                | CONFIRM COPY  :          |
C HUMRES   FS            <----| COPY TO DEST  :          |
  LAWDEPT  Email              +--------------------------+
  REMOTE   FT       Remote File Transfer
  SALES    Email    Sales E-Mail
===== >>>>>>>>>>>>>>>   B O T T O M    O F    L I S T    <<<<<<<<<<<<<<< ======


S SELECT  A ADD INFO  U UPDATE  C COPY  I INSERT  D DELETE             18.02.37
---------------------- CONTROL-D EXTERNAL DESTINATIONS  -------------- (U.CTDS)
COMMAND ===>                                                    SCROLL===> CRSR
O DEST      TYPE     DESCRIPTION
 FTB2P     ft       send AFP/XEROX reports to FT in PDF format
 FTPDF     ft       send PDF report to File Transfer
 FTTXT     ft       send text report to File Transfer
 FTT2P     ft       send text report to File Transfer in PDF format
 LFSB2P    fs       send AFP/XEROX reports to LFS in PDF format
 LFSPDF    fs       send PDF reports to local file system
 LFSTXT    fs       send text report to local file system
 LFST2P    fs       send text reports to LFS in PDF format
 LPRB2P    lpr      send AFP/XEROX reports to printer
 LPRPDF    lpr      sent PDF report to printer
 LPRTXT    lpr      sent text report to printer
 MAILB2P   email    send AFP/XEROX reports by e-mail in PDF format
 MAILPDF   email    send PDF reports by e-mail
 MAILTATT  email    send text reports by e-mail as attachments
 MAILTXT   email    send text reports by e-mail (body)
===== >>>>>>>>>>>>>>>   B O T T O M    O F    L I S T    <<<<<<<<<<<<<<< ======


S SELECT  A ADD INFO  U UPDATE  C COPY  I INSERT  D DELETE             18.02.37
Delete Confirmation Window
Entering option D displays a confirmation window with the following fields:
Table 127 Control-D External Destinations Delete Confirmation Window
|
Field |
Description |
|---|---|
|
CONFIRM DELETE |
Confirms whether or not to delete an existing external destination entry. Valid values:
|
Figure 141 Control-D External Destinations Delete Confirmation Window
---------------------- CONTROL-D EXTERNAL DESTINATIONS  -------------- (U.CTDS)
COMMAND ===>                                                    SCROLL===> CRSR
O DEST     TYPE     DESCRIPTION
  LASER1   LPR      Laser Printer #1
  DOCUMT   Email    Documentation Dept E-Mail
  MKT      FS                 +--------------------+
D LASER2   LPR           <----| CONFIRM DELETE :   |
  HUMRES   FS                 +--------------------+
  LAWDEPT  Email    Law Department E-mail
  REMOTE   FT       Remote File Transfer
  SALES    Email    Sales E-Mail
===== >>>>>>>>>>>>>>>   B O T T O M    O F    L I S T    <<<<<<<<<<<<<<< ======


S SELECT  A ADD INFO  U UPDATE  C COPY  I INSERT  D DELETE             18.02.37
Tracking and Control – Active Missions Screen
The Control-V Active Missions screen displays the status of all missions in the Active Missions Environment. The Active Missions Environment contains all missions that have executed recently, are about to execute in the near future, or are currently executing. On the screen you can view the status of the missions and modify the missions’ scheduling and execution parameters. The SHOW option is used to modify selection criteria online.
To enter the Active Missions Environment Screen, select option A on the IOA Primary Option menu.
Figure 148 Active Missions Environment Screen
------------------- CONTROL-D/V ACTIVE MISSIONS ENVIRONMENT ----------------(A)
COMMAND ===>                                                    SCROLL===> CRSR
O NAME     ODATE  TYP OWNER    ------------------STATUS ------------------ UP
  INTR0002 080800 REP M331     WAITING FOR JOB
  GPLIR17A 080800 REP M335     J06015 ENDED "OK"
  GPLIR18  080800 REP M335     WAIT SCHEDULE
  PRDKPL01 080800 REP M01      J06029 ENDED "OK"
  PRDKPL02 080800 REP M01      J06095 ENDED "OK"
  PRDKPL2W 080800 REP M01      J06156 ENDED "OK"
  PRDDRPT1 080800 REP M01      J06072 ENDED "OK"
  PRDDRPT2 080800 REP M01      J06435 ENDED "OK"
  PLRPT010 080800 REP M08A     J07028 DECOLLATING
  MTRPTU6C 080800 REP MT12     J06871 ENDED- NOT "OK"
  EBDMM4D  080800 REP M24      J07019 ENDED "OK"
  SPFORM1  080800 PRT M02      HELD WAIT SCHEDULE
  BKP0031D 080800 BKP M02      BACKUP IN PROCESS
  RST0060M 080800 CRS M02      WAIT SCHEDULE
  CBJBRUN  080800 REP M25A     WAIT SCHEDULE
  SPFORM2  080800 PRT M02      PRINTING ON U1004
  STD      080800 PRT M02      PRINTING ON U1002
  BKP0180D 080800 BKP M02      WAIT PROCESS
  PRODYHRP 080800 REP M02A     J07031 DECOLLATING
  PRODYH72 080800 REP M02A     WAIT SCHEDULE
OPT: ? WHY H HOLD D DELETE F FREE L LOG Z ZOOM R RERUN P PRINT Control 12.01.11
It is assumed that the user wants to see the most recently ordered missions first. Therefore, upon entry to the Active Missions screen, the missions at the bottom of the Active Missions list are displayed.
Use the scrolling conventions to scroll the Active Missions list forward and backward.
Exit the Active Missions screen by pressing END (PF03/PF15).
On color terminals, missions are color coded by status. The default color for various statuses is:
Table 136 Default Colors for Active Missions Screen
|
Status |
Description |
|---|---|
|
Blue or White |
Missions that have not begun processing (that is, waiting to be scheduled or processed) |
|
Yellow |
Missions that have begun but not finished executing (for example, executing, waiting for a job, and so on) |
|
Red |
Missions that ended NOTOK |
|
Green |
Missions that ended OK |
|
Pink |
Missions requiring special operator action (for example, In Queue – Waiting for Printer) |
See your INCONTROL administrator to change the color definitions.
Format Commands of the Active Missions Screen
Table 137 Commands of the Active Missions Screen
|
Command |
Description |
|---|---|
|
GROUP |
Alternately displays and hides the GROUP. Type the command in the COMMAND field, and press Enter. When displayed, the name of the group appears after the mission status. |
|
CATEGORY |
Alternately displays and hides the CATEGORY. Type the command in the COMMAND field and press Enter. When displayed, the name of the category appears after the mission status. |
|
DESC |
Alternately displays and hides the DESCRIPTION. Type the command in the COMMAND field and press Enter. When displayed, the description appears after the mission status. Only the first description line of the mission is available in the Active Missions screen. |
Fields of the Active Missions Screen
The information displayed for each mission includes:
Table 138 Fields of the Active Missions Screen
|
Field |
Description |
|---|---|
|
O |
Option to be activated on the mission. |
|
NAME |
The mission name for report decollating missions. This is usually the job name. |
|
ODATE |
Original scheduling date of the mission. For more information, seeDate Definition Concepts. |
|
TYP |
Mission types:
|
|
OWNER |
User ID (owner) of the mission, for security purposes. |
|
Monitor Status |
Indicates whether the Control-D monitor is UP or DOWN. |
|
STATUS |
Mission status (see Table 138). |
|
GROUP |
Group name of the mission (see the description of the GROUP command in Table 137). |
|
CATEGORY |
Category of the mission (see the description of the CATEGORY command in Table 137). |
|
DESC |
Description of the mission (see the description of the DESC command in Table 137). |
The information displayed in the STATUS field includes the following:
Table 139 Mission Statuses
|
Status |
Description |
|---|---|
|
WAIT SCHEDULE |
The mission (migration, printing, backup, restore) is waiting to be scheduled. |
|
WAIT PROCESS |
The report decollating mission is waiting to be scheduled. |
|
DECOLLATING |
The report decollating mission is currently decollating a report. |
|
ENDED OK |
Mission finished executing OK. |
|
ENDED OK – NO REPORTS |
There are no reports waiting to be decollated by this mission. The report decollating mission finished executing OK. |
|
ENDED OK – WITH WARNINGS |
The mission finished executing OK but encountered some problems. Use option L to determine the reasons. |
|
DECOLLATED OK |
The report decollating mission finished decollating OK. |
|
ENDED NOT OK |
Mission ended NOTOK. Use option L to determine the reason. |
|
DECOLLATED NOT OK |
The report decollating mission finished decollating NOTOK. Use option L to determine the reason. |
|
HELD |
Mission is in hold status. |
|
REQUESTED HELD |
A hold request has been issued for the mission but the request has not yet been accepted by the monitor. |
|
REQUESTED FREE |
A free request has been issued for a held mission but the request has not yet been accepted by the monitor. |
|
REQUESTED RERUN |
A rerun request has been issued for the mission but the request has not yet been accepted by the monitor. |
|
DELETED |
The mission order has been deleted by an authorized user. |
|
REQUESTED CHANGE |
Mission parameters have been changed via the Zoom option but the request has not yet been accepted by the monitor. |
|
TO BE SUSPENDED |
The mission is active during the time the New Day procedure is activated. The mission (or current cycle of a cyclic mission) finishes executing after the New Day procedure has ended. |
|
SUSPENDED |
A mission, which was active as the New Day procedure executed, finished executing after the New Day procedure ended and the Control-D monitor was reactivated. This mission (or additional cycles of a cyclic mission) is not processed further and cannot be rerun. |
|
GENERIC |
The report decollating mission is of GENERIC type, that is, triggered by the appearance of job output on specified classes. For details see GENERIC: General Parameter (Decollating Mission). |
|
WAITING FOR JOB |
The report decollating mission is eligible for processing and is currently waiting for a job with the same name as the decollating mission to appear on the JES output queue. If there is already a job on the output queue with the same name and the mission remains in the WAITING FOR JOB status, it means that Control-V has already processed the job, and is currently waiting for a new job (with the same name). Search the Active Missions file for a report decollating mission for the same job name and the same job ID as the job on spool. This mission is used by Control-V as an identifier that the job has already been decollated. If you want to force Control-V to decollate the same job again, place this mission (the one that ended) in HOLD status. For a GENERIC report decollating mission, job output is searched for only in the classes specified in Control-D installation parameter GENCLAS. Therefore, a generic mission can be in WAITING FOR JOB status even if an output for the job exists on the spool in another class. |
|
WAITING FOR PRINTER |
The printing mission is eligible for printing, but all active printers are busy (that is, printing). (If no printers have been opened, refer to the Control-D and Control-V chapter of the INCONTROL for z/OS Administrator Guide for instructions.) If all printers are busy, Control-V waits until a printer is free and then lets the highest priority printing mission print. |
|
IN QUEUE WAITING FOR PRINTER |
This printing mission is waiting for an available printer (as explained above). It is the first one to start executing when a printer is available. |
|
PRINTING INITIALIZATION INITIALIZING PRINTING PLAN |
A printing mission is being prepared for printing. |
|
BUILDING PRINT PLAN |
The printing mission is currently preparing the printing plan (that is, determining which reports to print and the sort order). This status remains until Control-V begins putting reports on spool. |
|
PRINTING ON dest |
The printing mission is currently printing to the specified local printer destination (or JNAME under JES3). |
|
PRINT POST PROCESSING |
Printing finished. Post-processing parameters are currently being executed. |
|
HOLD IN PROCESS |
A hold request has been issued for a printing mission while the mission is printing. The mission stops printing at the end of the current user report. |
|
(RESTARTED) |
A held printing mission has been restarted (by a FREE command) and continues to print from the point at which printing was held. |
|
BACKUP IN PROCESS |
A backup mission is currently executing. |
|
RESTORE IN PROCESS |
A restore mission is currently executing. |
|
MIGRATE IN PROCESS |
A migration mission is currently executing. |
Specifying Retrieval Criteria
Different mission retrieval criteria can be specified by using the SHOW command. Type SHOW on the command line and press Enter, or press PF02/PF14. A Show Option window is displayed. Change the selection criteria and press Enter. Only missions conforming to the selection criteria are displayed.
Figure 149 Active Missions Screen Show Option Window
------------------- CONTROL-D/V ACTIVE MISSIONS ENVIRONMENT ----------------(A)
COMMAND ===>       +----------------------------------------------------------+
O NAME     ODATE   |                 PLEASE SELECT SHOW OPTION                |
  INTR0002 050500  |  MISNAME                                                 |
  GPLIR17A 050500  |  CATEGORY                                                |
  GPLIR18  050500  |                                                          |
  PRDKPL01 050500  |  IN PROCESS     Y | ENDED          Y | STATE          Y  |
  PRDKPL02 050500  |  ------------------------------------------------------  |
  PRDKPL2W 050500  |  WAIT SCHEDULE  Y | ENDED "OK"     Y | FREE           Y  |
  PRDDRPT1 050500  |  WAIT FOR JOB   Y | NOT "OK"       Y | HELD           Y  |
  PRDDRPT2 050500  |  WAIT FOR PRNTR Y |                  | ON REQUEST     Y  |
  PLRPT010 050500  |  EXECUTING      Y |                  | DELETED        N  |
  MTRPTU6C 050500  |  PRINTING       Y |                  |                   |
  EBDMM4D  050500  |  OTHER          Y |                  |                   |
  SPFORM1  050500  |       ===== TASK TYPE =====                              |
  BKP0031D 050500  |  REP PRT BKP/MIG RST EMR NOEMR CYC NOCYC                 |
  RST0060M 050500  |   Y   Y     Y     Y   Y    Y    Y    Y                   |
  CBJBRUN  050500  |  GROUP                                                   |
  SPFORM2  050500  |  COND NAME                                               |
  STD      050500  |  COND TYPE: IN Y OUT Y COND Y                            |
  BKP0180D 050500  |  USERID                                                  |
  PRODYHRP 050500  +----------------------------------------------------------+
  PRODYH72 050500
OPT: ? WHY H HOLD D DELETE F FREE L LOG Z ZOOM R RERUN P PRINT Control 12.31.09
The direction of the search when you exit the Show Option window can be specified. If you press:
-
Enter, the search starts with the mission at the top of the screen and continues downward.
-
PF07/PF19 (UP), the search starts at the top of the Active Missions list and continues downward.
-
PF08/PF20 (DOWN), the search starts at the bottom of the Active Missions list and continues upward.
The selection criteria marked with the symbol P act on a prefix basis. For example, entering D4 in the MISNAME field retrieves missions whose name starts with D4.
The available selection criteria are:
Table 140 Active Missions Screen Show Option Window Search Criteria
|
Criteria |
Description |
|---|---|
|
MISNAMEP |
Show only missions with the specified names. A maximum of five different names (either job name or mission name) can be specified. |
|
CATEGORYP |
Show only missions of the specified categories. A maximum of two different categories can be specified. |
|
MISSION STATUS |
Show only missions which conform to the status selection criteria. Mark the wanted statuses Y and the unwanted statuses N. Status selection criteria: |
|
IN PROCESS |
If marked Y, all missions that have not yet finished and are being processed are displayed. If marked N, only completed missions are displayed.
|
|
ENDED |
If marked Y, all completed missions are displayed. If marked N, only missions "in process" are displayed.
|
|
STATE |
If marked Y, the following status criteria are "matched" to determine whether or not a mission is displayed.
|
|
TASK TYPE |
Enter Y to include or N to exclude the following:
|
|
GROUPP |
Show only missions of the specified groups. Two different groups can be specified. |
|
COND NAMEP |
An additional cross reference for all missions that have a specified prerequisite condition. Two prerequisite condition names can be specified. |
|
COND TYPE |
Enter Y to search for or N to not search for:
|
|
USERIDP |
Show only missions of the specified user IDs. A maximum of five user IDs can be specified. |
Options of the Active Missions Screen
To request one of the following options, specify the option in the O (Option) field to the left of the mission name and press Enter:
Table 141 Options of the Active Missions Screen
|
Option |
Description |
|---|---|
|
? (WHY) |
Why does the mission wait for scheduling or decollation? The Why screen (described below), which shows the reasons for WAIT SCHEDULE and WAIT PROCESS statuses, is displayed. |
|
H (HOLD) |
Hold the mission. Control-V operations concerning the mission are held. The HOLD request is recorded in the IOA Log file. The status of the mission is changed to REQUESTED HELD. If the monitor is active, the status changes to HELD after a few seconds. In some cases, a HOLD request may be rejected by the monitor. |
|
D (DELETE) |
Delete the mission. Control-V only allows deletion of WAIT SCHEDULE (WAIT DECOLLATION) missions, or missions that have finished executing. To DELETE a mission, the mission must be in the HELD status. The DELETE request is recorded in the IOA Log file. |
|
F (FREE) |
Free a held mission. All Control-V operations concerning the mission are freed (that is, resumed). The FREE request is recorded in the IOA Log file. The status of the mission is changed to REQUESTED FREE. If the monitor is active, the FREE request is accepted after a few seconds. |
|
L (LOG) |
The IOA Log screen (described later in this chapter) is displayed showing all IOA Log file messages for the specified mission. |
|
Z (ZOOM) |
"Zoom in" on mission details. The Zoom screen (described later) is displayed. |
|
R (RERUN) |
Rerun the mission. (For more information see the "Rerun Option" later in this chapter.) |
|
P (PRINT CONTROL) |
For printing missions only: Print Control (described later in this chapter) allows you to print part of a bundle, to reprint all or part it, and to monitor and control the printing process as the bundle prints. |
|
B (BYPASS) |
Display the BYPASS window (described later). This option is used to bypass input conditions and/or the time limit for the mission. |
Why Screen
The Why screen is displayed when option ? (WHY) is entered on the Active Missions Screen. The Why screen shows the reasons for WAIT SCHEDULE and WAIT PROCESS statuses.
Figure 150 Active Missions Why Screen
------------------------- STD      IS WAITING FOR: -----------------------(A.?)
COMMAND ===>                                                    SCROLL===> CRSR
OPT DESCRIPTION
    TIME LIMIT        FROM   0100            UNTIL    0700
    CONDITION        PRODL-REPORTS-READY     ODATE    0502
    CONDITION        PRODB-REPORTS-READY     ODATE    0502
======= >>>>>>>>>>>>>>>>>        END OF "WHY" LIST    <<<<<<<<<<<<<<<< ========
OPTION:  A ADD CONDITION                                               23.10.40
If the list is longer than one page, use the scrolling PFKeys to scroll forward and backward on the Why screen.
To return to the Active Missions screen, press END (PF03/PF15).
The possible WHY reasons are:
-
NOTHING – MISSION WILL BE ACTIVATED SOON (IF Control-D MONITOR IS ACTIVE)
-
IN HOLD STATE
-
TIME LIMIT FROM hhmm UNTIL hhmm
-
NEXT CYCLIC RUN FROM hhmm
-
CONDITION condition-name ODATE date
where
-
condition-name is the prerequisite condition required by the mission.
-
date is the original scheduling date (in mmdd or ddmm format, depending on the site standard).
-
Adding Conditions in the Why Screen
If the Why screen indicates that a job is waiting for prerequisite conditions, the indicated conditions can be manually added from the Why screen by entering option A (Add Condition) in the OPT (Option) field next to the condition.
Specify option A for every condition to be added, and press Enter.
When adding conditions, a confirmation window may be displayed depending on User profile customization:
By default, when option A is specified in the Why screen, a confirmation window is displayed only when the condition’s date reference contains the generic characters **** or $$$$. Addition of conditions without generic date references is performed without confirmation from the user.
If, however, the User profile has been customized accordingly, the following confirmation window is always displayed when option A is specified:
Figure 151 Active Mission Why Screen Add Confirmation Window
------------------------- PRUPDT02 IS WAITING FOR: -----------------------(A.?)
COMMAND ===>                                                    SCROLL===> CRSR
OPT DESCRIPTION                                     +-------------------------+
                                                    |  CONFIRM     MMDD 0909  |
 A  CONDITION        PROD-PRUPDT03-GO      <--------|  ASK FOR EACH ONE Y     |
 A  CONDITION        PROD-PRUPDT03-CHECK            +-------------------------+
 A  CONDITION        PROD-PRUPDT03-FLAG      ODATE    0909
====== >>>>>>>>>>>>>>>>>>>        END OF "WHY" LIST     <<<<<<<<<<<<<<<< =====
OPTION:  A ADD CONDITION                                               18.15.36
Fill in or modify the fields of the confirmation window as follows, and press Enter:
Table 142 Active Mission Why Screen Add Confirmation Window Fields
|
Field |
Description |
|---|---|
|
date |
Date of the listed condition. If the date reference of the listed condition contains the generic characters **** or $$$$, the date field of the window is unprotected and you must explicitly enter the date in the date field. If the date reference of the listed condition is a specific date (in either mmdd or ddmm format, depending on the standard in use at the site), the date field of the window is protected and its value cannot be changed. |
|
CONFIRM |
Confirms whether or not to process the Add Condition request. Valid values are:
|
|
ASK FOR EACH ONE |
This line is displayed only if more than one Add Condition is requested. It determines whether or not individual confirmation is required for each Add Condition request. Valid values are:
|
Mission Log Screen
The Mission Log screen is displayed when the L (Log) option is entered on the Active Missions screen. The Mission Log screen shows all IOA Log file messages of the specified mission.
Figure 152 Active Missions Messages Log Screen
-------------------- LOG MESSAGES FOR MISSION(S) PRDRPT10 ----------------(A.L)
COMMAND ===>                                                    SCROLL===> CRSR
SHOW LIMIT ON ==>                                          DATE 080800 - 080800
DATE   TIME   ODATE  USERID   CODE    ------ M E S S A G E --------------------
080800 013343 080800 M33A     CTD511I REP PRDRPT10 ODATE 090998 PLACED ON
                                      ACTIVE MISSIONS FILE-
080800 013347 080800 M33A     SCD203I REP PRDRPT10 ELIGIBLE FOR PROCESSING
080800 013348 080800 M33A     REP267I PRDRPT10 PRDRPT10/JOB02292 DECOLLATION
                                      FROM SPOOL STARTED
080800 014015 080800 M33A     REP251I REP PRDRPT10 PRDRPT10/JOB02292
                                      DECOLLATION ENDED "OK"
080800 014015 080800 M33A     SCD208I REP PRDRPT10 PROCESSING ENDED "OK"
======== >>>>>>>>>>>>>>>>   NO  MORE  LOG  MESSAGES   <<<<<<<<<<<<<<<< ========
CMDS: SHOW, GROUP, CATEGORY, SHPF                                      13.14.26
Usage of the Mission Log screen is explained in IOA Log Facility.
To return to the Active Missions screen, press END (PF03/PF15).
Zoom Screens
The Zoom screen is displayed when the Z (Zoom) option is entered on the Active Missions screen. The Zoom screen "zooms in" on mission details – it describes the specific parameters of the mission.
A different Zoom screen appears according to mission type:
Table 143 Active Missions Zoom Screen Types
|
Type |
Description |
|---|---|
|
Decollating |
Similar to the Report Decollating Definition screen. |
|
Printing |
Similar to the Printing Mission Definition screen. |
|
Migration |
Data for stage 01 migration (mission type MIG) and for other migrations stages (mission type MSM) are displayed in separate Zoom screens according to mission type. |
|
Backup |
Similar to the Backup Mission Definition screen. |
|
Restore |
Similar to the Restore Mission Definition screen. |
Some of the displayed parameters can be modified. Information on most Zoom screen fields can be found in the pages of this chapter which explain the corresponding Mission Definition fields.
Sample Zoom screens for the various types of missions are illustrated on the following pages. Zoom screen fields that do not appear on the Mission Definition screen are labeled in the sample screens and defined below:
Table 144 Zoom Screen Fields Not on the Mission Definition Screen
|
Field |
Description |
|---|---|
|
JOB (See Figure 153) |
Job number in JES (only for report decollating missions and only after decollation). |
|
STARTED (See Figure 155) |
Printing mission start time. |
|
TIMESTAMP (B1) (See Figure 157) |
A number assigned to the migration or backup or restore ANALYZE step to uniquely identify the mission. |
|
ODATE (C) (See Figure 155) |
Original scheduling date assigned to the mission. |
|
NEXT TIME (D) (See Figure 155) |
Cyclic missions that use the INTERVAL option – the next possible execution time. |
The values assigned to the prerequisite condition date references (via IN and OUT parameters and DO COND statements) are the real date values derived from symbols of the mission parameters, such as ODAT and PREV. Only specific dates (or STAT, ****, $$$$) can be used as prerequisite condition date references.
Figure 153 Report Decollating Mission Zoom
------- CONTROL-D/V CATEGORY DAILY                JOB  PLRPT010 ----------(A.Z)
COMMAND ===>                                                    SCROLL===> CRSR
+-----------------------------------------------------------------------------+
  CATEGORY DAILY                  JOBNAME PLRPT010 GENERIC N    MONITOR
  OWNER    M22      TASKTYPE REP  GROUP   PL-PRODUCTION         JOBID
  DESC     EMPLOYEE REPORTS
  ===========================================================================
  IN       PLRPT010-ENDED-OK    0909
  WHEN IN QUEUE Y CLS   TIME FROM      UNTIL      INTERVAL 000  PRIORITY
  DSN                                                           MAXWAIT 00
  ===========================================================================
  OUT
  SHOUT WHEN NOTOK                                TO OPER2            URG R
   MSG ==== REPORT DECOLLATION FOR PLRPT010 ENDED  N O T O K ====
  SHOUT WHEN                                      TO                  URG
   MSG
  ===========================================================================
  DEF COPIES 01 LVL    USER UNIDENT              DEST          MAX COPIES 10
  ===========================================================================
  SET        = %%        =                                           C   CS
  ===========================================================================
  ON CLASS      = D         EXTWTR               DEST          FORM
  PRT COPIES    LVL    USER                      DEST          MAX COPIES
      PRINT/CDAM PARMS =
  WHEN LINE 00001 - 00001 COL 00014 - 00046 PRINT Y REF NXT N CT     AND/OR O
ENTER SAVE   TO UPDATE CHANGES.                                        14.12.30
Figure 154 Migration Mission Zoom Screen
---- CONTROL-V CATEGORY MLMIG01              MIG MISSION MLMIG01  --------(A.Z)
COMMAND ===>                                                    SCROLL===> CRSR
+-----------------------------------------------------------------------------+
  CATEGORY  MLMIG01                          MISSION MLMIG01
  OWNER     N54A         TASKTYPE MSM        GROUP
  TIMESTAMP 14431179     ODATE    291298     MAXWAIT 00
  DESC
  ===========================================================================
  IN
  TIME FROM      TO      NOT LATER THAN      PRIORITY
  ===========================================================================
  OUT
  SHOUT WHEN                                      TO                   URGN
   MSG
  ===========================================================================
  RETENTION DAYS 01096 FORCE N SECONDARY MICLIM     INTERVAL     NEXT TIME
  CENTERA RETENTION CLASS
  ===========================================================================
  STAGE 01 PRIMARY   MEDIA NAME DISK     AGE 0030 REFRESH EVERY
           PREFIX
           SECONDARY MEDIA NAME                   REFRESH EVERY
  STAGE 02 PRIMARY   MEDIA NAME FTK1     AGE 0060 REFRESH EVERY
           FSET MAGDISK    VSET MAGDISK
           SECONDARY MEDIA NAME                   REFRESH EVERY
ENTER SAVE   TO UPDATE CHANGES                                         08.49.17
In the Migration Mission Zoom screen, parameters FORCE, PREFIX, FSET and VSET can be changed.
Figure 155 Printing Mission Zoom Screen
---- CONTROL-D CATEGORY DAILY                PRT MISSION STD      --------(A.Z)
COMMAND ===>                                                    SCROLL===> CRSR
+-----------------------------------------------------------------------------+
 CATEGORY DAILY                              MISSION STD        MONITOR
 OWNER    M22         TASKTYPE PRT           GROUP
 BATCH                SKELETON               FREE               TIMEOUT
 OVERRIDE CLASS       DEST                   EXTWTR             FORM
 STARTED              ODATE    090998        MAXWAIT 00
 WRITER OPTION
 DESC     PRINTING MISSION FOR ALL STANDARD FORM REPORTS
 ===========================================================================
 INCLUDE USER BRANCH25
 EXCLUDE USER
 INCLUDE ODATE
 EXCLUDE ODATE
 SORT PARAMETERS: 1-USER  2-JOB   3-REPORT NAME 4-CATEGORY  5-LEVEL 6-TREE
                  7-FORMS 8-CHARS 9-MODIFY T-DECOL TIME E-USER DEFINED
 ENTER SORT SEQ : 1,2,3,4,5,6,7
 ===========================================================================
 IN
 TIME FROM      TO      NOT LATER THAN      PRIORITY
 ON PAGE#               ON LINE#            INTERVAL          NEXT TIME
 ===========================================================================
 OUT
 SHOUT WHEN NOTOK                                TO OPER2             URGN R
ENTER SAVE   TO UPDATE CHANGES.                                        13.05.38
If Control-D/Delivery Server is installed, reports can be distributed to a Unix or Windows environment by setting the first field of parameter OVERIDE DEST (the node) to CTDS. For details see Control-D/Delivery Server.
Figure 156 Backup Mission Zoom Screen
---- CONTROL-D CATEGORY DAILY                BKP MISSION BKP0007D --------(A.Z)
COMMAND ===>                                                    SCROLL===> CRSR
+-----------------------------------------------------------------------------+
  CATEGORY  DAILY                            MISSION BKP0007D
  OWNER     M22          TASKTYPE BKP        GROUP
  TIMESTAMP 14593226     ODATE    080800     MAXWAIT 00
  DE©SC      BACKUP REPORTS FOR 7 DAYS
  ===========================================================================
  IN        OP-START-BACKUP-007D 0909
  TIME FROM      TO      NOT LATER THAN      PRIORITY
  ===========================================================================
  KEEP DAYS 0007 GENERATIONS                 INTERVAL     NEXT TIME
  ===========================================================================
  OUT
  SHOUT WHEN NOTOK                                TO OPER2             URGN R
   MSG BACKUP MISSION BKP0007D ENDED NOTOK
  SHOUT WHEN                                      TO                   URGN
   MSG
======= >>>>>>>>>>>>>>> END OF BACKUP MISSION PARAMETERS <<<<<<<<<<<<<<<< =====
ENTER SAVE   TO UPDATE CHANGES                                         13.47.09
Figure 157 Restore Mission Zoom Screen
---- CONTROL-D CATEGORY DAILY                RST MISSION RST0060M --------(A.Z)
COMMAND ===>                                                    SCROLL===> CRSR
+-----------------------------------------------------------------------------+
  CATEGORY  DAILY                            MISSION RST0060M
  OWNER     M22          TASKTYPE RST        GROUP
  TIMESTAMP 23050490     ODATE    080800     MAXWAIT 00
  DESC      RESTORE REPORTS EVERY 60 MINUTES
  ===========================================================================
  IN
  TIME FROM      TO      NOT LATER THAN      PRIORITY
  INTERVAL  060          NEXT TIME      1405
  ===========================================================================
  OUT
  SHOUT WHEN NOTOK                                TO OPER2             URGN R
   MSG RESTORE MISSION RST0060M ENDED NOTOK
  SHOUT WHEN                                      TO                   URGN
   MSG
======= >>>>>>>>>>>>>>> END OF RESTORE MISSION PARAMETERS <<<<<<<<<<<<<<< =====
ENTER SAVE   TO UPDATE CHANGES                                         13.46.45
Modifying Mission Parameters in the Zoom Screen
Some Zoom screen fields are protected and cannot be modified, depending on the status of the mission.
To modify mission parameters on the Active Missions file, the mission must be in HELD status before you enter the Zoom screen to make the desired changes.
Figure 158 Modifying Mission Parameters in the Zoom Screen
------- CONTROL-D/V CATEGORY DAILY                JOB  PLRPT010 ----------(A.Z)
COMMAND ===>                                                    SCROLL===> CRSR
+-----------------------------------------------------------------------------+
  CATEGORY DAILY                  JOBNAME PLRPT010 GENERIC N    MONITOR
  OWNER    M22      TASKTYPE REP  GROUP   PL-PRODUCTION         JOBID
  DESC     EMPLOYEE REPORTS
  ===========================================================================
  IN       PLRPT010-ENDED-OK    0909
  WHEN IN QUEUE Y CLS   TIME FROM      UNTIL      INTERVAL 000  PRIORITY
  DSN                                                           MAXWAIT 00
  ===========================================================================
  OUT
  SHOUT WHEN NOTOK                                TO OPER2            URG R
   MSG ==== REPORT DECOLLATION FOR PLRPT010 ENDED  N O T O K ====
  SHOUT WHEN                                      TO                  URG
   MSG
  ===========================================================================
  DEF COPIES 01 LVL    USER UNIDENT              DEST          MAX COPIES 10
  ===========================================================================
  SET        = %%        =                                           C   CS
  ===========================================================================
  ON CLASS      = D         EXTWTR               DEST          FORM
  PRT COPIES    LVL    USER                      DEST          MAX COPIES
      PRINT/CDAM PARMS =
  WHEN LINE 00001 - 00001 COL 00014 - 00046 PRINT Y REF NXT N CT     AND/OR O
ENTER SAVE   TO UPDATE CHANGES.                                        14.12.30
Exiting the Zoom Screen
Changes made in the Zoom screen can be saved only if the mission has been placed in HELD status before entering the Zoom screen.
When saving changes, the status of the mission is REQUESTED CHANGE HELD. Wait until the REQUESTED CHANGE status disappears (indicating that the monitor has accepted the change), and then free the mission.
The method of exiting the Zoom screen and saving changes can be customized through the User profile.
By default, END (PF03/PF15) performs a cancel, and the changes are not saved (that is, no changes are made to the mission entry on the Active Missions file). To save changes, the SAVE command must be specified.
If customized by the INCONTROL administrator, END (PF03/PF15) displays a confirmation window if changes have been made, and then performs a save.
Figure 159 Zoom Screen EXIT Option Window
------- CONTROL-D/V CATEGORY DAILY                JOB  PLRPT010 ----------(A.Z)
COMMAND ===>         +---------------------------------------+  SCROLL===> CRSR
+------------------  |                                       |----------------+
 CATEGORY DAILY      |   CONFIRM CHANGES ==>     (Y/N)       |  MONITOR
 OWNER    M22      T |                                       |  JOBID
 DESC     EMPLOYEE R +---------------------------------------+
 =================                                             =============
 IN       PLRPT010-ENDED-OK      0909
 WHEN IN QUEUE Y CLS     TIME FROM      UNTIL      INTERVAL 000  PRIORITY
 DSN                                                             MAXWAIT 00
 ===========================================================================
 OUT
 SHOUT WHEN NOTOK                                TO OPER2            URG R
  MSG ==== REPORT DECOLLATION FOR PLRPT010 ENDED  N O T O K ====
 SHOUT WHEN                                      TO                  URG
  MSG
 ===========================================================================
 DEF COPIES 01 LVL    USER UNIDENT              DEST          MAX COPIES 10
 ===========================================================================
  SET        = %%        =                                           C   CS
  ===========================================================================
 ON CLASS      = D         EXTWTR               DEST          FORM
 PRT COPIES    LVL    USER                      DEST          MAX COPIES
     PRINT/CDAM PARMS =
 WHEN LINE 00001 - 00001 COL 00014 - 00046 PRINT Y REF NXT N CT     AND/OR O
ENTER CANCEL TO IGNORE CHANGES. 14.21.02-
Enter Y (Yes) in the window to save the changes.
-
Enter N (No) in the window to cancel the changes.
To bypass the confirmation window, exit the Zoom screen as follows:
-
Enter SAVE in the Zoom screen to save changes.
-
Enter CANCEL in the Zoom screen to cancel changes.
Rerun Option
The R (Rerun) option is used to rerun the mission. This option is for missions that have already ended. The mission is returned for possible execution by Control-V (it is activated when all runtime conditions are met). The RERUN request is recorded in the IOA Log file.
The mission status is changed to REQUESTED RERUN. If the monitor is active, the request is accepted after a few seconds.
Entering the Rerun option on a printing mission opens the Rerun window.
Rerun Window
Figure 160 Active Missions Environment Rerun Window
------------------- CONTROL-D/V ACTIVE MISSIONS ENVIRONMENT ----------------(A)
COMMAND ===>                                                    SCROLL===> CRSR
O NAME     ODATE  TYP OWNER    ------------------STATUS ------------------ UP
  INTR0002 080800 REP M331     WAITING FOR JOB
  GPLIR17A 080800 REP M335     J06015 ENDED "OK"
  GPLIR18            +--------------------------------+
  PRDKPL01           |  CONFIRM REPRINT        (Y/N)  |
  STD       <--------|  REBUILD PRINT PLAN     (Y/N)  |
  PRDKPL02           +--------------------------------+
  PRDKPL2W 080800 REP M01      J06156 ENDED "OK"
  PRDDRPT1 080800 REP M01      J06072 ENDED "OK"
  PRDDRPT2 080800 REP M01      J06435 ENDED "OK"
  PLRPT010 080800 REP M08A     J07028 DECOLLATING
  MTRPTU6C 080800 REP MT12     J06871 ENDED- NOT "OK"
  EBDMM4D  080800 REP M24      J07019 ENDED "OK"
  SPFORM1  080800 PRT M02      HELD WAIT SCHEDULE
  BKP0031D 080800 BKP M02      BACKUP IN PROCESS
  RST0060M 080800 CRS M02      WAIT SCHEDULE
  CBJBRUN  080800 REP M25A     WAIT SCHEDULE
  SPFORM2  080800 PRT M02      PRINTING ON U1004
  BKP0180D 080800 BKP M02      WAIT PROCESS
  PRODYHRP 080800 REP M02A     J07031 DECOLLATING
  PRODYH72 080800 REP M02A     WAIT SCHEDULE
OPT: ? WHY H HOLD D DELETE F FREE L LOG Z ZOOM R RERUN P PRINT Control 12.01.11
The Rerun window offers the option of rerunning the printing mission with the existing Print Plan (that is, reprinting the same bundle), or rebuilding the Print Plan and then rerunning the mission.
Use the same Print Plan to reprint the same bundle (or part of it). The Print Plan can be adjusted through user-defined print control symbols. (For more information see the Print Control – Print Plan Screen.)
Rebuild the Print Plan to print reports that have not yet been printed. The rebuilt Print Plan contains unprinted reports selected from the Active User Reports file.
Print Control – Print Plan Screen
Before a printing mission executes, a Print Plan containing all the reports to be printed by the mission is automatically built. This Print Plan is displayed in the Print Plan screen. Enter option P in the option field of a printing mission entry in the Active Missions screen to display the Print Plan screen for the mission.
The screen header line contains the category and name of the printing mission. If the printing mission is currently printing, the status PRINTING appears in the upper right corner.
A status line (B) contains the following information about the printing mission:
Table 145 Print Plan Screen Header Fields
|
Field |
Description |
|---|---|
|
TOTAL PAGES |
Total number of pages in the mission |
|
CURRENT PAGE NUMBER |
Mission page number currently printing |
|
REPORT PAGE NUMBER |
Report page number currently printing |
Use the scrolling conventions to scroll the Print Plan screen forward and backward.
To return to the Active Missions screen, press END (PF03/PF15).
Figure 161 Print Plan Screen
----- PRINT PLAN CATEGORY DAILY                MISSION STD      PRINTING--(A.P)
COMMAND ===>                                                    SCROLL===> CRSR
TOTAL PAGES      5524 CURRENT PAGE NUMBER     4705  REPORT PAGE NUMBER      5
O USER     REPORT NAME          JOBNAME  JOBID    PAGES    LINES  PRINTED  STAT
  BR129LO  INVENTORY REPORT     PRIVNR2  04500      163     7937     7937    P
  MGT      EMPLOYEES REPORT     PRDEMPS1 08655      152     6737     6737    P
  MGT      BANK STATEMENTS      PRBNKUPT 09261     1402    47649    47649    P
  MGT      BRANCH REPORTS       PRBRCHR4 08210     2983   161081           D W
  MGT      EXPENSE UPDATES      PREXPR1  09261      331    16497      250    A
  DEV      INVENTORY REPORT     PRINVR2  04500      320    16021             W
  DEV      EMPLOYEES REPORT     PRDEMPS1 08655      152     6737           < W
  DEV      DEVELOPMENT EXPENSES PREXPR2  08657       21     1107             W
========= >>>>>>>>>>>>>>>>>>>> BOTTOM OF PRINT PLAN <<<<<<<<<<<<<<<<< ========


OPTIONS:  > SKIP TO REPORT  < STOP AT REPORT  D DELETE   U UNDELETE    15.50.42
Report Fields in the Print Plan Screen
Details of each report in the Print Plan are displayed in the following fields of the Print Plan screen:
Table 146 Report Fields in the Print Plan Screen
|
Field |
Description |
|---|---|
|
USER |
Name of the report recipient. |
|
REPORT NAME |
Name of the report. |
|
JOBNAME |
Name of the job that generated the report. |
|
JOBID |
Job ID of the job that generated the report. |
|
PAGES |
Number of pages in the report. |
|
LINES |
Number of lines in the report. |
|
PRINTED |
Number of lines already printed. |
|
STAT |
A print control symbol and a print status separated by a blank. Valid print control symbols are:
These symbols are explained in Print Control Options of the Print Plan Screen. Valid print statuses are:
|
Reports are listed in the Print Plan in their scheduled print sequence, from top to bottom.
When the printing mission is printing, one report shows an Active (A) status (currently printing). If the print sequence has not been altered, reports above the currently printing report show a Printed (P) status and reports below it show a Wait Printing (W) status.
Print Control Options of the Print Plan Screen
The print sequence of reports in the Print Plan can be adjusted by entering valid Print Control options, as described in the following table:
Table 147 Print Control Options of the Print Plan Screen
|
Option |
Description |
|---|---|
|
> |
Skip to report. |
|
< |
Stop at report without printing this report. |
|
D |
Delete this report from the Print Plan. |
|
U |
Erase a delete, stop, or skip sign from the Print Plan. |
Type the desired options in the reports O (Option) field and press Enter. The option symbol is then displayed in the first column of the STAT field of the report.
All actions performed in the Print Plan screen are recorded in the IOA Log file.
Skip to Report – >
The > symbol specifies that Print Control should skip to the indicated report. Entering this symbol may cause one or both of the following windows to be displayed:
If a > symbol entered earlier is still in the screen when you enter this symbol again, the Confirm Override window is opened.
Figure 162 Skip to Report Confirm Override Window
----- PRINT PLAN CATEGORY DAILY                MISSION STD      PRINTING--(A.P)
COMMAND ===>                                                    SCROLL===> CRSR
TOTAL PAGES      5524 CURRENT PAGE NUMBER     4705  REPORT PAGE NUMBER      5
O USER                +------------------------------------+ NES  PRINTED  STAT
  BR129LO             |  One SKIP to report (">") already  | 937     7937    P
> MGT       <---------|  defined. Confirm override  (Y/N)  | 737     6737    P
  MGT                 +------------------------------------+ 649    47649  > P
  MGT      BRANCH REPORTS       PRBRCHR4 08210     2983   161081           D W
  MGT      EXPENSE UPDATES      PREXPR1  09261      331    16497      250    A
  DEV      INVENTORY REPORT     PRINVR2  04500      320    16021             W
  DEV      EMPLOYEES REPORT     PRDEMPS1 08655      152     6737             W
  DEV      DEVELOPMENT EXPENSES PREXPR2  08657       21     1107             W
========= >>>>>>>>>>>>>>>>>>>> BOTTOM OF PRINT PLAN <<<<<<<<<<<<<<<<< =========
OPTIONS: > SKIP TO REPORT < STOP AT REPORT D DELETE U UNDELETE 15.50.42-
Enter Y (Yes) in the window to override the earlier skip instruction with the new skip instruction.
-
Enter N (No) in the window to leave the earlier skip instruction in effect (and cancel the new one).
If a report is currently printing when the > symbol is entered, the Skip Selection window is opened:
Figure 163 Skip Selection Window
----- PRINT PLAN CATEGORY DAILY                MISSION STD      ----------(A.P)
COMMAND ===  +---------------------------------------------+    SCROLL===> CRSR
TOTAL PAGES  |  Mission has started printing.              |  E NUMBER       5
O USER       |  Confirm request          (Y/N)             |  ES  PRINTED  STAT
  BR129LO    |  SKIP at end of current   C-chunk,R-report  |  37     7937    P
> MGT        +---------------------------------------------+  37     6737    P
  MGT      BANK STATEMENTS      PRBNKUPT 09261     1402    47649    47649    P
  MGT      BRANCH REPORTS       PRBRCHR4 08210     2983   161081           D W
  MGT      EXPENSE UPDATES      PREXPR1  09261      331    16497      250    A
  DEV      INVENTORY REPORT     PRINVR2  04500      320    16021             W
  DEV      EMPLOYEES REPORT     PRDEMPS1 08655      152     6737             W
  DEV      DEVELOPMENT EXPENSES PREXPR2  08657       21     1107             W
========= >>>>>>>>>>>>>>>>>>>> BOTTOM OF PRINT PLAN <<<<<<<<<<<<<<<<< =========

OPTIONS: > SKIP TO REPORT < STOP AT REPORT D DELETE U UNDELETE 15.50.42-
Enter Y (Yes) in the window to confirm the skip request. Then specify C to skip at the end of the current chunk or R to skip at the end of the current report.
-
Enter N (No) in the window to cancel the skip request.
Stop at Report – <
The < symbol specifies that printing should stop when the indicated report is reached.
The report indicated with the < symbol is not printed. Only reports prior to the < symbol are printed. You can print a single report by assigning the symbols > and < to consecutive reports.
If the printing mission is already printing, the < symbol must be placed after the report that is currently printing.
Figure 164 Stop at Report Confirm Override Window
----- PRINT PLAN CATEGORY DAILY                MISSION STD      PRINTING--(A.P)
COMMAND ===>                                                    SCROLL===> CRSR
TOTAL PAGES      5524 CURRENT PAGE NUMBER     4705  REPORT PAGE NUMBER       5
O USER                +------------------------------------+ NES  PRINTED  STAT
  BR129LO             |  One STOP AT report ("<") already  | 937     7937    P
< MGT       <---------|  defined. Confirm override  (Y/N)  | 737     6737    P
  MGT                 +------------------------------------+ 649    47649    P
  MGT      BRANCH REPORTS       PRBRCHR4 08210     2983   161081           D W
  MGT      EXPENSE UPDATES      PREXPR1  09261      331    16497      250    A
  DEV      INVENTORY REPORT     PRINVR2  04500      320    16021             W
  DEV      EMPLOYEES REPORT     PRDEMPS1 08655      152     6737           < W
  DEV      DEVELOPMENT EXPENSES PREXPR2  08657       21     1107             W
========= >>>>>>>>>>>>>>>>>>>> BOTTOM OF PRINT PLAN <<<<<<<<<<<<<<<<< =========

OPTIONS: > SKIP TO REPORT < STOP AT REPORT D DELETE U UNDELETE 15.50.42-
If no < symbol is used, printing continues until the end of the printing mission.
-
If a < symbol entered earlier is still on the screen when you enter another < symbol, the Confirm Override window is opened:
-
Enter Y (Yes) in the window to override the earlier stop instruction with the new stop instruction.
-
Enter N (No) in the window to leave the earlier stop instruction in effect (and cancel the new one).
Delete – D
D (Delete) identifies reports that are not to be printed. Although the report listing is not removed from the Print Plan file, D indicates that the report is to be bypassed during printing.
Delete symbols remain after the reports have been bypassed. If the printing mission is rerun with the same Print Plan, the deleted reports are bypassed again.
Undelete – U
Deleted reports can be "undeleted" by entering option U (Undelete); the "delete" is immediately removed. Whether or not an undeleted report actually prints depends on its location relative to the currently printing report.
U also cancels a stop or skip sign on the same line.
Bypass Option
The B (Bypass) option is used to bypass input conditions and/or the time limit for the mission. This option is for missions with either WAIT SCHEDULE or WAIT PROCESS statuses.
Figure 165 Bypass window
   Q23AJOB0           +---------------------------------+
   Q23AJOB1           |  IN Criteria:        N  (Y/N)   |
 B Q23AJOB2  <--------|  Time Limit          N  (Y/N)   |
   Q23AJOB3           +---------------------------------+
AutoRefresh Mode
The Active Missions screen supports AutoRefresh mode. The screen display in AutoRefresh mode is automatically updated periodically with the most current data.
AutoRefresh mode can only be activated under native TSO or under ISPF. AutoRefresh mode is activated by the AUTO command. The format of the command is
AUTO nwhere n is any number of seconds from 1 through 99.
The screen is updated when the AUTO command is issued, and then periodically updated according to the interval (in seconds) specified in the AUTO command. A counter at the top of the screen displays the number of times that the screen has been refreshed.
For example, the AUTO 5 command refreshes the screen every 5 seconds.
Cancelling AutoRefresh Mode
Under native TSO, the recommended method of cancelling AutoRefresh mode is as follows:
-
For short interval values – Press Enter. Whenever Enter is pressed, or a command is issued, AutoRefresh mode is automatically cancelled at the end of the current interval.
-
For long interval values – Press Attn (PA1) once.
Under ISPF, press Attn (PA1) or Esc once to cancel AutoRefresh mode.
When using a terminal emulation program, you must ensure that the Esc key is properly mapped and sent as an Attn (PA1) key.
Control-D Objects Facility
The Control-D Objects facility enables you to create and maintain the following Control-D objects:
Accessing the Control-D Objects Facility
To enter the Control-D Objects facility, select option DO on the IOA Primary Option menu and press Enter. The Control-D Objects entry panel is displayed.
Figure 166 Control-D Objects Entry Panel
 ------------------------ CONTROL-D OBJECTS ENTRY PANEL --------------------(DO)
 COMMAND ===>


  SPECIFY TYPE OF THE OBJECT:            1 - Report Cliques
                                         2 - Resource Sets
                                         3 - Resources
                                         4 - Clique Resources
                                         5 - Approval objects


 USE THE COMMAND SHPF TO SEE PFK ASSIGNMENT                             17.39.20
To select one of these options, type the option number in the SPECIFY TYPE OF THE OBJECT field, and then press Enter.
Report Cliques
This option allows you to define or modify Report Cliques that are used in report transformation. Transformation is the process of extracting data from print stream reports (such as AFP or Xerox) and converting them into a viewable format (such as PDF or HTML). A Report Clique includes all the information necessary to transform a print stream report. To use transformation in decollation, you define a decollation mission definition with the CLIQUE subparameter set to a Report Clique name.
For more information on defining decollation missions that use Report Cliques, see ON Statement: Decollating Parameter (Decollating Mission). For more information on preparing print stream reports for transformation, see Decollation of Report Types. For more information about rendering to PDF see the "Control-D and Control-V" chapter of the INCONTROL for z/OS Administrator Guide.
Entry Panel
After you select option 1 from the Control-D Objects Entry Panel, the Control-D Reports Cliques Entry Panel is displayed.
Figure 167 Control-D Reports Cliques Entry Panel
 -------------------- CONTROL-D REPORTS CLIQUES ENTRY PANEL ---------------(DO.1)
 COMMAND ===>


      CLIQUE NAME   ===>                       Report clique name or mask
      CLIQUE FORMAT ===>                       1.TXT 2.AFP 3.XRX 4.PDF
      OWNER         ===>                       Report clique owner
      DATE FROM     ===>        TO             Report clique last update date


FILL IN THE SELECTION CRITERIA AND PRESS ENTER 16.13.36-
To display all of the Report Cliques: Leave all of the selection criteria fields blank, then press Enter. The Control-D Reports Cliques screen is displayed listing all of the Report Cliques.
-
To display a selected set of the Report Cliques: Type a value in at least one of the selection criteria fields as described in Table147, then press Enter. The Control-D Reports Cliques screen is displayed listing the set of Report Cliques that you selected.
Table 148 Report Clique Selection Criteria Fields
|
Field |
Description |
|---|---|
|
CLIQUE NAME |
The name or mask for the Report Cliques to be displayed. From 1 through 12 characters. Valid characters are a-z, A-Z, 0-9, - (hyphen), and _ (underscore). |
|
CLIQUE FORMAT |
The format of the Report Cliques to be displayed. Valid values are:
|
|
OWNER |
The user ID of the owner of the Report Cliques to be displayed. |
|
DATE FROM and DATE TO |
The date range within which Report Cliques were created. |
Reports Cliques List Screen
After selecting the selection criteria from the Control-D Reports Cliques Entry Panel, the Control-D Reports Cliques List screen is displayed with the set of Report Cliques you selected.
Figure 168 Control-D Reports Cliques List
 ----------------------- CONTROL-D REPORT CLIQUES LIST  -----------------(DO.C)
 COMMAND ===>                                                   SCROLL===> CRSR
 OPT  --- NAME ---            CHANGED      OWNER       FORMAT
      LQCLIQUEAXA1         11/02/02 17:37  N52W         AFP
      LQCLIQUEHEW1         11/02/02 17:35  N52A         XRX
      LCDSSAMP             13/03/02 20:04  N52W         XRX
      LEONID               27/05/03 11:05  M33W         AFP
      LEONIDT              16/03/04 18:46  M33          TXT
      LEONID123456         07/03/02 14:58  M33W         AFP
      LIMPDF               28/08/03 12:28  N16B         PDF
      LQRINA3              11/02/02 18:14  N30A         AFP
 ======= >>>>>>>>>>>>>>>>>  E N D    O F    L I S T  <<<<<<<<<<<<<<<<< =======


 OPTIONS:  S SELECT D DELETE                       COMMANDS: NEW        17.16.56
Options of the Control-D Reports Cliques List
For existing Report Clique definitions, you have the option to either select or delete a definition.
To request one of the following options, type the option in the OPT field to the left of the Report Clique name, and press Enter.
Table 149 Options of the Control-D Reports Cliques List
|
Option |
Description |
|---|---|
|
S (SELECT) |
Display the Control-D Report Clique definition screen for the selected Report Clique. Only one Report Clique can be selected at a time. For a description of the parameters on the Control-D Report Clique definition screen, see Control-D Report Clique Definition Screen. |
|
D (DELETE) |
Delete a Report Clique. |
Create a New Report Clique Definition
To create a new Report Clique definition, do the following:
-
In the command field of the Control-D Reports Clique List screen, type the following command:
-
NEW format
-
where format is a valid report clique format (either AFP,TXT, XRX, or PDF)
-
-
Press Enter. The Control-D Report Clique definition screen is displayed for the report clique format that you selected.
If you enter only the NEW command, or the NEW command with an invalid report clique format, the SELECT FORMAT window is displayed. To select a report clique format from this window, type S in the column to the left of the report clique format, and press Enter.
Figure 169 Reports Cliques Select Format Window
 ----------------------- CONTROL-D REPORT CLIQUES LIST  -----------------(DO.C)
 COMMAND ===>                                                   SCROLL===> CRSR
 OPT  --- NAME ---            CHANGED      OWNER       FORMAT
      LQCLIQ+—————————————————+2/02 17:37  N52W         AFP
      LQCLIQ| SELECT FORMAT:  |2/02 17:35  N52A         XRX
      LCDSSA|                 |3/02 20:04  N52W         XRX
      LEONID| =============== |5/03 11:05  M33W         AFP
      LEONID|    TXT          |3/04 18:46  M33          TXT
      LEONID|    AFP          |3/02 14:58  M33W         AFP
      LIMPDF|    XRX          |8/03 12:28  N16B         PDF
      LQRINA|    PDF          |2/02 18:14  N30A         AFP
 ======= >>>|  S  SELECT      | D    O F    L I S T  <<<<<<<<<<<<<<<<< =======
            +—————————————————+


 OPTIONS:  S SELECT D DELETE                       COMMANDS: NEW        17.16.56
Control-D Report Clique Definition Screen
After either selecting an existing Report Clique definition or after creating a new Report Clique definition, the Control-D Report Clique definition screen is displayed.
The screen that is displayed depends on the type of report that is defined for the Report Clique. The following are sample screens for TEXT, AFP, Xerox, and PDF reports.
Figure 170 Control-D Report Clique Screen for Text Reports
 --------------- CONTROL-D REPORT CLIQUE              FORMAT TXT ---------(DO.Z)
 COMMAND ===>                                                    SCROLL===> CRSR
 ----- Property -----------------  ----- Value ----------  (Edit)  ------------C
 ==== >>  T O P   O F   R E P O R T   C L I Q U E   P R O P E R T I E S << ====
 1. General Parameters
 Owner of Report Clique           = N30A
 Page Width In Inches             = 0
 Page Height In Inches            = 0
 OS390 Resource Library List Name = *
 Fail on missing resources        = Decollate
                                      Never/Always/Decollate
 Default Resource Directory        =                                           N
 Report Encoding                   = Latin1
 Report Language                   = English
 Print Control Char                = None
                                       ASA/Machine/None
 TRC character used                = N (Y/N)
 3. Row Col Parameters
 Number of Rows                   = 150
 Number of Columns                = 150
 Text Orientation 0               = Y (Y/N)
 Text Orientation 90              = Y (Y/N)
 Text Orientation 180             = Y (Y/N)
 Text Orientation 270             = Y (Y/N)
 Fonts To Ignore                  =                                            N
 Include External Overlays        = Y (Y/N)
 Include Internal Overlays        = Y (Y/N)
 4. Rendering Parameters
 Rotation                         = 0
                                      0/90/180/270
 Shadowing                        = OnlyHigh
                                      Yes/No/OnlyHigh
 Shadowing Style                  = Gray
                                      Gray/Pattern
 Half Tone                        = Y (Y/N)
 Max Render Pages                 = 2000
 Font Mapping Table Name          = FONTMAP
 Split Words                      = N (Y/N)
 Color                            = Y (Y/N)
 Font File Name                   = Default                                    N
 Font Name                        =                                            N
 Font Size                        = 10
 5. PDF Rendering Parameters
 Add Background Image             = None                                       N
 Print                            = Y (Y/N)
 Copy                             = Y (Y/N)
 Modify                           = Y (Y/N)
 Font Subsetting                  = Y (Y/N)
 Master Password                  = NONE
 Pdf Resolution                   = 300
 Pdf Raster                       = None
                                      None/All/Graphics/Text
 Encoding                         = NONE
 Code Page                        = 0
 6. Html Rendering Parameters
 XResolution                      = 96
 YResolution                      = 96
 Background Image Url             =                                            N
 Use EOT Fonts                    = Y (Y/N)
 Use PFR Fonts                    = Y (Y/N)
 X Offset                         = 0
 Y Offset                         = 0
 Background Color                 = None
                                      None/White/Black/Blue/Gray/Red/Yellow/
                                      Brown/Aque/LawnGreen/Beige/Green
 Foreground Color                 = None
                                      None/White/Black/Blue/Gray/Red/Yellow/
                                      Brown/Aque/LawnGreen/Beige/Green
 Image XResolution                = 0
 Image YResolution                = 0
 7. Pcl Rendering Parameters
 PCL Paper Source                 = A4
                                      A4/Letter/Executive/Legal/Ledger/A3/
                                      Monarch/Com-10/International_Dl/
                                      International_C5/International_B5
 PCL Resolution                   = 300
                                      300/600
 PCL Scale                        = 0
 PCL Y Offset                     = 0
 PCL X Offset                     = 0
 ==== >>  E N D   O F   R E P O R T   C L I Q U E   P R O P E R T I E S << ====
                                                                        17.22.55
Figure 171 Control-D Report Clique Screen for AFP Reports
 --------------- CONTROL-D REPORT CLIQUE              FORMAT AFP ---------(DO.Z)
 COMMAND ===>                                                    SCROLL===> CRSR
 ----- Property -------      -------- Value -----------------                --C
 1. General Parameters
 Owner of Report Clique           = M52
 Page Width In Inches             = 0
 Page Height In Inches            = 0
 OS390 Resource Library List Name = *
 Fail on missing resources        = Decollate
                                      Never/Always/Decollate
 Default Resource Directory       =                                            N
 2. AFP Parameters
 AFP Formdef Name                 =
 AFP Input Type                   = AfpCategory5
                                      AfpCategory4/AfpCategory5
 AFP Pagedef Name                 =
 Record Delimiter                 = rdw
                                      rdw/fixed
 Length of input records          = 133
 Print Control Character          = ASA
                                      ASA/MACHINE
 Code of input AFP                = EBCDIC
                                      EBCDIC/ASCII
 TRC character used               = N (Y/N)
 3. Row Col Parameters
 Number of Rows                   = 150
 Number of Columns                = 150
 Text Orientation 0               = Y (Y/N)
 Text Orientation 90              = Y (Y/N)
 Text 1Orientation 180            = Y (Y/N)
 Text Orientation 270             = Y (Y/N)
 Fonts To Ignore                  =                                            N
 Include External Overlays        = Y (Y/N)
 Include Internal Overlays        = Y (Y/N)
 4. Rendering Parameters
 Rotation                         = 0
                                      0/90/180/270
 Shadowing                        = OnlyHigh
                                      Yes/No/OnlyHigh
 Shadowing Style                  = Gray
                                      Gray/Pattern
 Half Tone                        = Y (Y/N)
 Max Render Pages                 = 2000
 Font Mapping Table Name          = FONTMAP
 Split Words                      = N (Y/N)
 Color                            = N (Y/N)
 5. PDF Rendering Parameters
 Add Background Image             = None                                       N
 Print                            = Y (Y/N)
 Copy                             = Y (Y/N)
 Modify                           = Y (Y/N)
 Font Subsetting                  = Y (Y/N)
 Master Password                  = NONE
 PDF Resolution                   = 300
 PDF Raster                       = None
                                      None/All/Graphics/Text
 Encoding                         = NONE
 Code Page                        = 0
 6. HTML Rendering Parameters
 XResolution                      = 96
 YResolution                      = 96
 Background Image Url             =                                            N
 Use EOT Fonts                    = Y (Y/N)
 Use PFR Fonts                    = Y (Y/N)
 X Offset                         = 0
 Y Offset                         = 0
 Background Color                 = White
                                      White/Black/Blue/Gray/Red/Yellow/Brown/
                                      Aque/LawnGreen/Beige/Green
 Foreground Color                 = Black
                                      White/Black/Blue/Gray/Red/Yellow/Brown/
                                      Aque/LawnGreen/Beige/Green
 Image XResolution                = 0
 Image YResolution                = 0
 7. PCL Rendering Parameters
 PCL Paper Source                 = A4
                                      A4/Letter/Executive/Legal/Ledger/A3/
                                      Monarch/Com-10/International_Dl/
                                      International_C5/International_B5
 PCL Resolution                   = 300
                                      300/600
 PCL Scale                        = 0
 PCL Y Offset                     = 0
 PCL X Offset                     = 0
 ==== >>  E N D   O F   R E P O R T   C L I Q U E   P R O P E R T I E S << ====
                                                                        17.22.55
Figure 172 Control-D Report Clique Screen for Xerox Reports
 --------------- CONTROL-D REPORT CLIQUE              FORMAT XRX ---------(DO.Z)
 COMMAND ===>                                                    SCROLL===> CRSR
 ----- Property -------      -------- Value -----------------                --C
 1. General Parameters
 Owner of Report Clique           = M52
 Page Width In Inches             = 0
 Page Height In Inches            = 0
 OS390 Resource Library List Name = *
 Fail on missing resources        = Decollate
                                      Never/Always/Decollate
 Default Resource Directory       =                                            N
 2. Xerox Parameters
 Record Delimiter                 = rdw
                                      rdw/fixed
 JSL Name                         =
 JDE Name                         =
 SysCatalog Name                  = syscatlg
 DEBUG                            = N (Y/N)
 Debug File Name                  =                                            N
 Error File Name                  =                                            N
 From X Offset                    = 0
 From Y Offset                    = 0
 Page Data X Offset               = 0
 Page Data Y Offset               = 0
 Line Advance method for          = Max
                                      Max/Last
 Report identifier                =                                            N
 Scan Origin Point                = 22
 Dot Origin Point                 = 100
 3. Row Col Parameters
 Number of Rows                   = 150
 Number of Columns                = 150
 Text 0 Degrees                   = Y (Y/N)
 Text 90 Degrees                  = Y (Y/N)
 Text 180 Degrees                 = Y (Y/N)
 Text 270 Degrees                 = Y (Y/N)
 Fonts To Ignore                  =                                            N
 Include External Overlays        = Y (Y/N)
 Include Internal Overlays        = Y (Y/N)
 4. Rendering Parameters
 Rotation                         = 0
                                      0/90/180/270
 Shadowing                        = OnlyHigh
                                      Yes/No/OnlyHigh
 Shadowing Style                  = Gray
                                      Gray/Pattern
 Half Tone                        = Y (Y/N)
 Max Render Pages                 = 2000
 Font Mapping Table Name          = FONTMAP                                    N
 Split Words                      = N (Y/N)
 Color                            = N (Y/N)
 5. PDF Rendering Parameters
 Add Background Image             = None                                       N
 Print                            = Y (Y/N)
 Copy                             = Y (Y/N)
 Modify                           = Y (Y/N)
 Font Subsetting                  = Y (Y/N)
 Master Password                  = NONE
 PDF Resolution                   = 300
 PDF Raster                       = None
                                      None/All/Graphics/Text
 Encoding                         = NONE
 Code Page                        = 0
 6. HTML Rendering Parameters
 XResolution                      = 96
 YResolution                      = 96
 Background Image Url             =                                            N
 Use EOT Fonts                    = Y (Y/N)
 Use PFR Fonts                    = Y (Y/N)
 X Offset                         = 0
 Y Offset                         = 0
 Background Color                 = None
                                      None/White/Black/Blue/Gray/Red/Yellow/
                                      Brown/Aque/LawnGreen/Beige/Green
 Foreground Color                 = None
                                      None/White/Black/Blue/Gray/Red/Yellow/
                                      Brown/Aque/LawnGreen/Beige/Green
 Image XResolution                = 0
 Image YResolution                = 0
 7. PCL Rendering Parameters
 PCL Paper Source                 = A4
                                      A4/Letter/Executive/Legal/Ledger/A3/
                                      Monarch/Com-10/International_Dl/
                                      International_C5/International_B5
 PCL Resolution                   = 300
                                      300/600
 PCL Scale                        = 0
 PCL Y Offset                     = 0
 PCL X Offset                     = 0
==== >>  E N D   O F   R E P O R T   C L I Q U E   P R O P E R T I E S << ====
                                                                        11.44.58
Figure 173 Control-D Report Clique Screen for PDF Reports
 --------------- CONTROL-D REPORT CLIQUE PASSPDF_SMPL FORMAT PDF ---------(DO.Z)
 COMMAND ===>                                                    SCROLL===> CRSR
 ----- Property -----------------  ----- Value ----------  (Edit)  ------------C
 1. General Parameters
 Owner of Report Clique           = N30A
 Page Width In Inches             = 0
 Page Height In Inches            = 0
 OS390 Resource Library List Name = *
 Fail on missing resources        = Decollate
                                      Never/Always/Decollate
 Default Resource Directory       =                                            N
 PDF Document Options             =                                            N
 PDF Size In Memory in MB bytes   = 0
 PDF Interactive Elements         = ALL                                        N
 Tagged PDF's tags will remain    = N (Y/N)
 PDF/A conformance level          = none                                       N
 PDF Output Options               =                                            N
 Decollation by bookmarks         = Yes
                                      No/Yes/YesBM/Only
 Decollation region first line    = 0
 Decollation region last  line    = 40
 Decollation region first column  = 1
 Decollation region last  column  = 200
 Print debug info                 = N (Y/N)
 Decollation space area           =                                            N
 3. Row Col Parameters
 Number of Rows                   = 500
 Number of Columns                = 500
 Text Orientation 0               = Y (Y/N)
 Text Orientation 90              = Y (Y/N)
 Text Orientation 180             = Y (Y/N)
 Text Orientation 270             = Y (Y/N)
 Fonts To Ignore                  =                                            N
 Include External Overlays        = Y (Y/N)
 Include Internal Overlays        = Y (Y/N)
 Include Comments in Rowcol Page  = Y (Y/N)
 4. Rendering Parameters
 Rotation                         = 0
                                      0/90/180/270
 Shadowing                        = OnlyHigh
                                      Yes/No/OnlyHigh
 Shadowing Style                  = Gray
                                      Gray/Pattern
 Solid Shading Region Above Text  = N (Y/N)
 Render by order of AFP objects   = Y (Y/N)
 Use records' boundires of AFP    = N (Y/N)
 Half Tone                        = Y (Y/N)
 Max Render Pages                 = 2000
 Font Mapping Table Name          = FONTMAP
 Split Words                      = N (Y/N)
 Color                            = N (Y/N)
 Font File Name                   = Default                                    N
 Font Size                        = 10
 5. PDF Rendering Parameters
 Add Background Image             = None                                       N
 PDF Version                      = Auto
 Print                            = Yes
                                      Yes/No/Default
 Copy                             = Yes
                                      Yes/No/Default
 Modify                           = Yes
                                      Yes/No/Default
 Assembly                         = Default
                                      Yes/No/Default
 Copy for Accessibility           = Default
                                      Yes/No/Default
 Commenting                       = Default
                                      Yes/No/Default
 High Resolution Printing         = Default
                                      Yes/No/Default
 Filling of the form fields       = Default
                                      Yes/No/Default
 Font Subsetting                  = Y (Y/N)
 PDF Put images in PNG format     = Y (Y/N)
 Master Password                  = NONE
 PDF User Password                = NONE                                       N
 PDF Resolution                   = 300
 PDF Raster                       = None
                                      None/All/Graphics/Text
 Encoding                         = NONE
 Code Page                        = 0
 PDF Debug                        = N (Y/N)
 PDF Logging                      =                                            N
 Digital Sign: For This Report    = N (Y/N)
 Digital Sign: Key Store File     =                                            N
 Digital Sign: Key Store Type     = JKS
                                      JKS/PKCS12
 Digital Sign: Key Store Password =                                            N
 Digital Sign: Alias in Key Store =                                            N
 Digital Sign: Hash Algorithm     = SHA256
                                      SHA256/SHA384/SHA512/RIPEMD160
 6. HTML Rendering Parameters
 XResolution                      = 96
 YResolution                      = 96
 Background Image Url             =                                            N
 Use EOT Fonts                    = Y (Y/N)
 Use PFR Fonts                    = Y (Y/N)
 X Offset                         = 0
 Y Offset                         = 0
 Background Color                 = Black
                                      None/White/Black/Blue/Gray/Red/Yellow/
                                      Brown/Aqua/LawnGreen/Beige/Green
 Foreground Color                 = None
                                      None/White/Black/Blue/Gray/Red/Yellow/
                                      Brown/Aqua/LawnGreen/Beige/Green
 Image XResolution                = 0
 Image YResolution                = 0
 7. PCL Rendering Parameters
 PCL Paper Source                 = A4
                                      A4/Letter/Executive/Legal/Ledger/A3/
                                      Monarch/Com-10/International_Dl/
                                      International_C5/International_B5
 PCL Paper Tray                   = 0
 PCL Resolution                   = 300
                                      300/600
 PCL Scale                        = 0
 PCL Y Offset                     = 0
 PCL X Offset                     = 0
Continuation Lines
If a Report Clique parameter has a value (either Y or N) set in the C (Continue) field on the right side of the screen, this indicates that you can add continuation lines to that parameter value, if needed. By default, the C field is set to N (No).
-
To add a continuation line: Type Y in the Cfield of the line you want to continue, and press Enter. A blank, new line is displayed below the continued line, allowing you to enter up to 42 extra characters.
-
To close a continuation line: Type N in the Cfield directly above the line to be closed, and press Enter. The line below the continued line is closed.
Common Report Clique Parameters
Parameters common to all types of Report Cliques are described in the following table.
Table 150 Common Report Clique Parameters
|
Name of Parameter in the DO Screen |
Name of Parameter Specified in the TRANSTO Member |
Description |
|---|---|---|
|
General Parameters |
||
|
Report Format |
reportformat |
Type (format) of the report. Valid Values: AFP, XRX, PCL, TXT, PDF, PS. Each report type, except PDF, has its own unique parameter section described later in this chapter. |
|
Report Clique Name |
reportcliquename |
Unique name assigned to the Report Clique. Default: Untitled. |
|
Owner of Report Clique |
owner |
User ID of the Report Clique owner. |
|
Report Clique Change Date |
changedate |
Date that the Report Clique was last changed. |
|
Report Clique Change Time |
changetime |
Time that the Report Clique was last changed. |
|
Page Width in Inches |
pagewidthininches |
Page width, measured in inches. If the page width is smaller than the report width, the report is truncated. If the page width is larger than the report width, the page has extra space. Default: 0. This indicates that the width of the report page taken from the report definition.
|
|
Page Height in Inches |
pageheightininches |
Page height, measured in inches. If the page height is smaller than the report height, the report is truncated. If the page height is larger than the report height, the page has extra space. Default: 0. This indicates that the height of the report page taken from the report definition.
|
|
||
|
OS390 Resource Library List Name |
os390resourceliblistname |
Name of a set of System Resource Libraries from which all default resources are taken. Up to 8 characters. Blanks are not allowed. Default: * The Resource Library list names are defined in the $$TRNRES member in the CTDPARM library. |
|
Fail on missing resources |
failonmissingresources |
Indicates whether to abort the transformation if non-critical resources are missing. Valid Values:
Default: Decollate |
|
Row Col Parameters |
||
|
Include Comments in Rowcol Page |
rowcolincludecomments |
(Optional) Yes or No. Indicates whether to add the report comments at the end of the rowcol page, in orientation 0. Default: No For AFP, this parameter applies to the data from the TLE and NOP records of AFP pages. |
|
Number of Rows |
rowcolnrows |
Number of grid rows into which the report page is divided. Default: 150 |
|
Number of Columns |
rowcolncolumns |
Number of grid columns into which the report page is divided. Default: 150 |
|
Text Orientation 0 |
rowcoltext_0_degrees |
Yes or No. Indicates whether the transformer checks for text at 0 degrees. Default: Yes |
|
Text Orientation 90 |
rowcoltext_90_degrees |
Yes or No. Indicates whether the transformer checks for text at 90 degrees. Default: Yes |
|
Text Orientation 180 |
rowcoltext_180_degrees |
Yes or No. Indicates whether the transformer checks for text at 180 degrees. Default: Yes |
|
Text Orientation 270 |
rowcoltext_270_degrees |
Yes or No. Indicates whether the transformer checks for text at 270 degrees. Default: Yes |
|
Fonts to Ignore |
rowcolfontstoignore |
(Optional) A list of fonts, separated by commas, that are ignored. Default: None (all fonts included). For AFP fonts, the font name must begin with C0. For example, specify C0H1001B even if the font name is C1H1001B. |
|
Include External Overlays |
rowcolincludeexternaloverlays |
(Optional) Yes or No. Indicates whether text in external overlays is included in transformation. Default: Yes. |
|
Include Internal Overlays |
rowcolincludeinternaloverlays |
(Optional) Yes or No. Indicates whether text in internal overlays is included in transformation. Default: Yes. |
|
Rendering Parameters |
||
|
Rotation |
rotation |
Degree of clockwise rotation of the report. Valid Values: 0, 90, 180, 270. Default: 0. |
|
Shadowing |
shadowing |
Indicates whether shadowing should appear. Valid Values:
Default: Only High. |
|
Shadowing Style |
shadowingstyle |
Specifies the type of shadowing. Valid Values:
Default: Gray |
|
Half Tone |
halftone |
Yes or No. Indicates whether the Halftone algorithm (which allows grays) is used for drawing bitmap images. Valid Values:
Default: Yes |
|
Max Render Pages |
maxrenderpages |
Maximum number of pages to transform. Default: 2000 |
|
Font Mapping Table Name |
fontmappingtablename |
(Optional) Name of the table that is used for font mapping. Default: fontmap |
|
Split Words |
splitwords |
(Optional) Indicates whether to split words and recalculate their location. Valid Values:
Default: No |
|
Color |
color |
(Optional) Specifies whether the resulting output is in color. Valid Values:
Default: Yes |
|
PDF Rendering Parameters |
||
|
Add Background Image |
addbackgroundimage |
(Optional) File name of an image (for example copy.gif) that is added over each page of the PDF file. The image must reside in the default resource directory (installation/transformer/res). Supported image types are those supported by PDFlib: gif, tif, jpg, png, bmp. The image is always displayed from the left bottom corner of the page. Default: No image. |
|
|
pdfprint |
(Optional) Indicates whether printing the PDF file is allowed (that is, permission is granted). Valid Values:
Default: Y |
|
Copy |
pdfcopy |
(Optional) Indicates whether copying the PDF file is allowed (that is, permission is granted). Valid Values:
Default: Y |
|
Modify |
pdfmodify |
(Optional) Indicates whether modifying the PDF file in Acrobat is allowed (that is, permission is granted). Valid Values:
Default: Y If a PRINT mission generates a PDF report with STORE=Y and Modify = N, the PDF is protected against extracting anything. With these settings, Application Server cannot extract data (from an indexed report) to create a partial report according to the required index. |
|
Font Subsetting |
pdffontsubsetting |
(Optional) Limits font embedding to only those characters that are actually used in the PDF document (instead of all characters in the font). Valid Values:
Default: Y |
|
Master Password |
pdfmasterpassword |
Indicates whether a master password is required to change any security settings (such as permissions, user password, or master password). Default: None |
|
PDF User Password |
pdfuserpassword |
Defines the password for password protection of PDF reports created using indexes. Default: None |
|
PDF Resolution |
pdfresolution |
Resolution of the PDF image file. Higher resolutions produce better quality images, while lower resolutions produce smaller files and faster transformations. Valid Values: 72–300. Default: 300 |
|
PDF Raster |
pdfraster |
Specifies which elements are rastered on a bitmap and inserted into the PDF as a background image. Valid Values:
|
|
PDF Encoding |
encoding |
(Optional) Text encoding. Supported language encoding. Valid Values:
Default: None |
|
Code Page |
code_page_num |
(Optional) Code page used. Default selected according to the PDF Encoding parameter. |
|
HTML Rendering Parameters |
||
|
XResolution |
xresolution |
X-resolution of the output PNG or HTML. This does not affect PDF output. Higher values create a longer image. Valid Values: 10–300 Default: 96 |
|
YResolution |
yresolution |
Y-resolution of the output PNG or HTML. This does not affect PDF output. Higher values create a wider image. Valid Values: 10–300 Default: 96 |
|
Background Image Url |
htmlbackgroundimageurl |
(Optional) URL of an image that is displayed as a background for the HTML page. The image is always displayed from the top left corner of the page. No default. |
|
Use EOT Fonts |
htmluseeotfonts |
Yes/No indicator whether EOT fonts are used if EOT Web-enabled fonts are mapped in the font-mapping table. Default: Yes |
|
Use PFR Fonts |
htmlusepfrfonts |
Yes/No indicator whether PFR fonts are used if PFR Web-enabled fonts are mapped in the font-mapping table. Default: Yes |
|
X Offset |
htmlxoffset |
Causes text and images to move horizontally. Negative numbers shift the data left, and positive numbers shift the data right. Values are specified in pixels, based on the original document resolution. Default: 0 |
|
Y Offset |
htmlyoffset |
Causes the text and images to move vertically. Negative numbers shift the data up, and positive numbers shift the data down. Values are specified in pixels, based on the original document resolution. Default: 0 |
|
Background Color |
htmlbackgroundcolor |
Color of the HTML background. Optional. Default: None (the default color set by the browser is used). |
|
Foreground Color |
htmlforegroundcolor |
Color of the HTML foreground. Optional. Default: None (the default color set by the browser is used). |
|
Image XResolution |
imagexres |
Specifies the X resolution of the output BACKGROUND image. The actual HTML size is determined by the X/Y resolution parameter. The quality of printed HTML graphics is better with higher resolution. When Image XResolution is not set, but Image YResolution is set, the same value is used for Image XResolution. Valid Values:
Default: 0 |
|
Image YResolution |
imageyres |
Specifies the Y resolution of the output BACKGROUND image. The actual HTML size is determined by the X/Y resolution parameter. The quality of printed HTML graphics is better with higher resolution. When Image YResolution is not set, but Image XResolution is set, the same value is used for Image YResolution. Valid Values:
Default: 0 |
| PCL Rendering Parameters | ||
|
PCL Paper Source |
pclpapersource |
(Optional) Name of the PCL paper source (paper size). Default: A4 |
|
PCL Resolution |
pclprinterresolution |
PCL printout resolution in bpi (bytes per inch). Valid Values:
Default: 300 |
|
PCL Margins |
pclmargine |
Obsolete. (Optional) Indicates whether the page is created with margins. Valid Values:
Default: Yes The PCL Margins parameter (from releases 3.2.00 and 3.5.00) was replaced with the following three parameters. |
|
PCL Scale |
pclscale |
(Optional) Percent by which to decrease the size of the output page. This is useful if the PCL margins cause printed data to be lost. Valid Values:
Default: 0 (no scaling).s |
|
PCL Y Offset |
pclyoffset |
(Optional) Shifts the text and images on the rendered page vertically, according to the number of pixels specified. Negative numbers shift the data up, and positive numbers shift the data down. Valid Values:
Default: 0 (no shift). |
|
PCL X Offset |
pclxoffset |
(Optional) Shifts the text and images on the rendered page horizontally, according to the number of pixels specified. Negative numbers shift the data left, and positive numbers shift the data right. Valid Values:
Default: 0 (no shift). |
Parameters Unique to Text Report Cliques
Report Clique parameters that are unique to Text reports are described in the following tables.
Table 151 General Parameters—Unique to Text Report Cliques
|
Name of Parameter in the DO Screen |
Name of Parameter Specified in the TRANSTO Member |
Description |
|---|---|---|
|
Report Encoding |
reportencoding |
This parameter specifies the report encoding. The report is translated from the specified coding to Latin1 in LEGACY mode or to UTF-8 in UNICODE mode, and then kept in the translated encoding. Default: Latin1 in LEGACY; or UTF-8 in UNICODE |
|
Report Language |
reportlanguage |
This parameter is used only when working in UNICODE mode. It specifies the report language, and is used to select the correct font. Default: English |
|
Report Normalized Encoding |
normalizedencoding |
The parameter specifies the internal report encoding in Control-D. The report is translated from the encoding specified in Report Encoding parameter to Normalized encoding, and is kept in the Normalized encoding. This parameter is valid only for Legacy mode, in UNICODE mode Normalized Encoding is always UTF-8. Optional. Default: Latin1 in Legacy mode or UTF-8 in UNICODE mode. |
|
Print Control Char |
printcontrolchar |
The Text report contains Print Control characters which should be used when viewing the report. Valid Values:
Default: None |
|
TRC character used |
inputtrc |
The parameter determines if TRC character exists in report. Valid Values:
Default: No |
Table 152 Decollation Parameters—Unique to Text Report Cliques
|
Name of Parameter in the DO Screen |
Name of Parameter Specified in the TRANSTO Member |
Description |
|---|---|---|
|
The following three parameters are mutually exclusive: only one should be specified. If more than one is specified, the results are unpredictable. |
||
|
Page Delimiter String |
pagedelimitesrstring |
String used to indicate End of Page. |
|
Page Delimiter Hex |
pagedelimiterhex |
Hex value used to indicate End of Page. |
|
Page Delimiter Dec |
pagedelimiterdec |
Decimal value used to indicate End of Page. |
|
The following four parameters are mutually exclusive: only one should be specified. If more than one is specified, the results are unpredictable. |
||
|
Line Delimiter String |
linedelimiterstring |
String used to indicate the end of a line. |
|
Line Delimiter Hex |
linedelimiterhex |
Hex value used to indicate the end of a line. Default: X’0D0A’ (crlf-carriage return line feed). |
|
Line Delimiter Dec |
linedelimiterdec |
Decimal value used to indicate the end of a line. |
|
Line Delimiter Length |
linedelimiterlength |
Specifies a fixed length (number of characters) for each line, for example: 80 (80 characters). Valid Values:
|
|
The following parameters are NOT mutually exclusive. |
||
|
Page Delimiter At End |
pagedelimiteratend |
Indicates whether the page delimiter is located at the end of the page:
|
|
Line Delimiter Delete |
linedelimiterdelete |
Line delimiter is deleted from the Normalized data. Text view is always without line delimiter. |
|
Page Delimiter Delete |
pagedelimiterdelete |
Page delimiter is deleted from the Normalized data. Text view is always without line delimiter. |
|
Page Delimiter Pos |
pagedelimiterpos |
(Optional) Indicates in which column of the line the delimiter is located. Default: 0 (delimiter located at beginning of line). |
|
Max Chars in Line |
maxcharsinline |
Maximum number of characters allowed in a line. If this value is exceed, an error occurs. Valid Values:
Default: 1000 |
|
Max Lines in Page |
maxlinesinpage |
Maximum number of lines allowed in a page. When this maximum is reached, a new page is started. (This parameter can be used to make additional page breaks beyond those made by Page Delimiter parameters.) Valid Values:
Default: 1000 |
|
Line Delimiter Type |
linedelimitertype |
Type of line delimiter used for the report. Valid Values:
Default: Delimited |
|
Add Line Feed |
addlinefeed |
(Optional) Indicates whether to add line feed at end of each line. Valid Values:
Default: No |
Table 153 Rendering Parameters—Unique to Text Report Cliques
|
Name of Parameter in the DO Screen |
Name of Parameter Specified in the TRANSTO Member |
Description |
|---|---|---|
|
Font File Name |
fontfilename |
Name of the font file that is used for text reports. Default: Determined according to the Report Encoding and Report Language parameters. (For example, when the encoding is Latin 1 the default file name is cour.ttf, which is the True Type file name of Courier New). |
|
Font Name |
fontname |
The name of the font that is used for text reports. When a true type font collection (TTC) is specified for the Font File Name, this parameter must be specified. |
|
Font Size |
fontsize |
(Optional) The size of the font in points. Valid Values:
Default: 10 |
Parameters Unique to AFP Report Cliques
The following Report Clique parameters are unique to AFP reports.
Table 154 Parameters Unique to Advanced Function Presentation (AFP) Report Cliques
|
Name of Parameter in the DO Screen |
Name of Parameter Specified in the TRANSTO Member |
Description |
|---|---|---|
|
Afp Formdef Name |
afpformdefname |
Name of the FORMDEF used in the report. Default: The first FORMDEF in the resource section of the report. |
|
AFP Input Type; |
afpinputtype |
The type of AFP input. Valid Values:
Default: AfpCategory5 Anything less than AfpCategory5 is treated as AfpCategory4. |
|
Afp Pagedef Name |
afppagedefname |
(Optional) The name of the Pagedef used in the report. Used for AFP Category 4 input only. Default: First Pagedef in the resource section of the report. |
|
Record Delimiter |
afprecdelim |
The input report record type. Valid Values:
|
|
Length of input records |
recordlength |
The record length of input fixed-type AFP records. Used for AFP Category 4 input only. (For rdw-type records, this parameter is ignored.) Maximum number is 32760. Default: 133 |
|
Print control character |
afpprintcontrolchar |
The type of Print control characters used. Used for AFP Category 4 input only. Valid Values:
Default: ASA |
|
Code of input AFP |
afpinputcode |
The code of the AFP input. Used for AFP Category 4 input only. This parameter refers to the original encoding of the report. Reports translated from EBCDIC to ASCII do work (because the Code Pages used are for EBCDIC reports). Valid Values:
Default: EBCDIC |
|
TRC character used |
afpinputtrc |
The parameter determines if TRC character exists in report. Used for AFP Category 4 input only. Valid Values:
Default: No |
Parameters Unique to Xerox Report Cliques
The following parameters are required; because there are no default values you must supply values.
-
JSL Name: JSL filename.
-
JDE Name: JDE section name in the JSL.
Report Clique parameters that are unique to Xerox reports are described in the following table.
Table 155 Parameters Unique to Xerox Report Cliques
|
Name of Parameter in the DO Screen |
Name of Parameter Specified in the TRANSTO Member |
Description |
|---|---|---|
|
Record Delimiter |
xeroxrecdelim |
Input report record type. One type (RDW) is used by all reports during decollation. Valid Values:
In OS/390 fixed files are processed as rdw. |
|
Jsl Name |
xeroxjslname |
JSL file name. |
|
Jde Name |
xeroxjdename |
JDE section name in the JSL. |
|
SysCatalog Name |
xeroxsyscatalogname |
( Optional) Name of the member containing references to other JSL resources that are referenced by the report. Default: syscatlg. If the JSL resource referenced by the report refers to a JDE/PDE that is not found in the JSL, a line must be added to the syscatlg resource located in the default resource directory, installation_folder\transformer\res. SYSCATTYPE=PDE,RESNAME=PP0010,FILE=PDE001,CRDATE=1997250,CRT IME=132200,SIZE=0,PATH='PDE001.JSL'; In this example, the JDE/PDE name is PP0010, located in the PDE001 JSL file. |
|
DEBUG |
debug |
( Optional) Specifies whether debug messages are sent to a file. Valid Values:
Default: No |
|
Debug File Name |
debugfile |
( Optional) Name of the file that receives debug messages. Default: None |
|
Error File Name |
errorfile |
( Optional) Name of the file that receives error messages. Default: None |
|
Form X Offset |
formxoffset |
( Optional) Number of pixels to shift the page form horizontally. Negative numbers shift the page left, and positive numbers shift the page right. Default: 0 |
|
Form Y Offset |
formyoffset |
( Optional) Number of pixels to shift the page form vertically. Negative numbers shift the page up, and positive numbers shift the page down. Default: 0 |
|
Page Data X Offset |
pagedataxoffset |
( Optional) Number of pixels to shift only the data in the page horizontally (the overlays do not move). Negative numbers shift the data left, and positive numbers shift the data right. Default: 0 |
|
Page Data Y Offset |
pagedatayoffset |
( Optional) Number of pixels to shift only the data in the page vertically (the overlays do not move). Negative numbers shift the data up, and positive numbers shift the data down. Default: 0 |
|
Line Advance Method |
xeroxlcdslineadvancemethod |
( Optional) Method for calculating the line height. Valid Values:
Default: Max |
|
Report Identifier |
report_id |
( Optional) ID of a report that needs special handling. Only use this parameter if requested by BMC Customer Support. No default. |
|
Scan Origin point |
xeroxscanorigin |
( Optional) A Xerox printer has an origin point on the physical page that is used as a reference point for metacode. For example, on 9790 printers, this origin point is scan=22 and dot=100. These value may differ on your printer. If your forms are not aligned with the line-data, then try adjusting the origin point parameters (see Dot Origin point). |
|
Dot Origin point |
xeroxdotorigin |
( Optional) A Xerox printer has an origin point on the physical page that is used as a reference point for metacode. On 9790 printers, this origin point is scan=22 and dot=100. These value may differ on your printer. If your forms are not aligned with the line-data, then try adjusting the origin point parameters (see Scan Origin point). |
Parameters Unique to PDF Report Cliques
Report Clique parameters that are unique to PDF reports are described in the following table.
The Decollation by bookmarks option, listed in the following table, enables the decollation of PDF reports from bookmarks with or without text decollation. If PDF reports are decollated from bookmarks only, there will be a significant reduction in CPU time for the decollation.
To further reduce the CPU time for decollation, a text region in the decollated page can be defined, using the Decollation region options (listed in the table below) by defining the first and last rows and columns. This feature improves the decollation time when the specified region is smaller than the page.
If one of the Decollation region option parameters (first line, last line, first column, or last column) equals zero, then the decollation works for the full text on the page. If all of these parameters are set to zero, the decollation works like in previous versions.
Table 155b General Parameters—Unique to PDF Report Cliques
|
Name of Parameter in the DO Screen |
Name of Parameter Specified in the TRANSTO Member |
Description |
|---|---|---|
|
Default Resource Directory |
( Optional) Full paths of a directory that contains all default resources. WIN(windows full path),UNIX(unix full path) This parameter is not valid for OS/390 |
|
|
PDF Document Options |
( Optional) This parameter is used for special handling of PDF files. The format is: TET=(...tet parms...),PDI=(...pdi parms...) For backwards compatibility, if the parameters are specified without the prefix (TET or PDI), they are parameters for TET.
To process a password-protected PDF report, add the following lines to this parameter (with a valid password instead of "123456"):
To maintain password protection in a new report that you create from a password-protected report based on retrieval by index, do any of the following:
|
|
|
PDF Size In Memory in MB bytes |
The size of a memory that can be used by the transformer to load the PDF report into memory. PDF files that will use more memory, if loaded, will not be loaded to memory, and will use a callback algorithm during decollation. The number specified is in M Bytes. PDF reports that are up to the specified number of MB will be loaded to memory. Range: 0–99999 Default: 0 (use callback for all files). |
|
|
PDF Interactive Elements |
( Optional) A list of supported interactive elements' types that exist in the original PDF report, and will be included as part of the PDF page, during decollation and page extraction when viewing or printing. Valid Values:
<element type1,element type2,....element typeN. weblink, bookmark The supported interactive elements are: weblink, bookmark |
|
|
Tagged PDF's tags will remain |
( Optional) Support copying tags from a decollated PDF document. Valid Values:
Default: No |
|
|
PDF/A conformance level |
The PDF/A formats specified in the ISO 19005 standard series provide a consistent and robust subset of PDF which can safely be archived over a long period of time, or used for reliable data exchange in enterprise and government environments. Set the PDF/A conformance level to one of the following:
If multiple options for PDF standards are specified the lowest compatibility value is used. Default: None |
|
|
PDF Output Options |
( Optional) This parameter is used for special handling of output of PDF files. Use only if requested by BMC Customer Support. |
|
|
Decollation by bookmarks |
Enables decollation of PDF reports using bookmarks. Valid Values:
Default: No |
|
|
Decollation region first line |
Specifies the line in the columnized report which will appear as the first line in the decollated report. Valid Values: 0–500 Default: 0 |
|
|
Decollation region last line |
Specifies the line in the columnized report which will appear as the last line in the decollated report. Valid Values: 0–500 Default: 0 |
|
|
Decollation region first column |
Specifies the column in the columnized report which will appear as the first column in the decollated report. Valid Values: 0–500 Default: 0 |
|
|
Decollation region last column |
Specifies the column in the columnized report which will appear as the last column in the decollated report. Valid Values: 0–500 Default: 0 |
|
|
Decollation space area |
Defines the additional regions for decollation. Up to 4 additional regions can be defined. Each region is defined with the following syntax: (P1 P2 P3 P4) where
If one of these parameters is set to zero, the decollation works for full text on the page.
|
|
|
Print debug info |
Specifies that debug information is written to the SYSPRIN output. Use only if requested by BMC Customer Support. Valid Values:
Default: No |
Exiting the Control-D Report Clique Definition Screen
-
After you have defined or modified the parameters for the Report Clique, enter one of the following commands:
Table 156 Exiting the Report Clique Definition Screen Commands
Command
Description
SAVE
Save the Report Clique, even if no actual changes were made to any parameters. The Control-D Report Clique Save window is displayed (see Figure 174).
END
Keep changes made to the parameters of the Report Clique and return to the Control-D Reports Cliques List screen. If any changes were made, the Control-D Report Clique Save window is displayed (see Figure 174). If no changes were made, you are immediately returned to the Control-D Reports Cliques List screen.
CANCEL
Do not keep the changes made to the parameters of the Report Clique and return to the Control-D Reports Cliques List screen.
If you have either entered the SAVE command, or the END command when actual changes have been made, the Control-D Report Clique Save window is displayed (Figure174). Otherwise, you are returned to the Control-D Reports Cliques List screen.
Figure 174 Control-D Report Clique Save Window
Copy--------------- CONTROL-D REPORT CLIQUE FORMAT XRX ---------(DO.Z)
COMMAND ===> SCROLL===> CRSR
----- Property ------- -------- Value ----------------- --C
Include Ext+———————————————————————————————————————————+
Include Int| |
4. Renderin| DO YOU WANT TO SAVE CHANGES? (Y/N) |
Half Tone | |
XResolution| REPORT CLIQUE NAME: |
YResolution| |
Rotation +———————————————————————————————————————————+
0/90/180/270
Pdf Resolution = 300
Max Render Pages = 2000
Font Mapping Table Name = FONTMAP N
5. Html Parameters
Background Image Url = N
Use EOT Fonts = Y (Y/N)
Use PFR Fonts = Y (Y/N)
X Offset = 0
Y Offset = 0
Background Color = White
White/Black/Blue/Gray/Red/Yellow/Brown/
Aque/LawnGreen/Beige/Green
17.41.35 -
If you are saving the Report Clique, do the following in the Control-D Report Clique Save window:
-
Type Y in the DO YOU WANT TO SAVE CHANGES? field.
-
For a new Report Clique, type a name for the Report Clique in the REPORT CLIQUE field.
-
Press Enter. The changes you have made are saved, and you are returned to the Control-D Reports Cliques List screen.
-
Resource Sets
This option allows you to view or delete Resource Set records that have been created during the transformation process.
During the report transformation process, a special Resource Set record associated with the report is created in the Permanent User File, whose key is stored in an associated SYSDATA record. The Resource Set record references all resources used by the decollated report. For information on how Resource Sets are used in the report transformation process, see Print Stream Reports Using Transformation.
Entry Panel
After you select option 2 from the Control-D Objects Entry Panel, the Control-D Resource Sets Entry Panel is displayed.
Figure 175 Control-D Resource Sets Entry Panel
 --------------------- CONTROL-D RESOURCE SETS ENTRY PANEL ---------------(DO.2)
 COMMAND ===>


      JOB NAME      ===>                       Job name or mask

      RESOURCE NAME ===>                       Resource name or mask

      RESOURCE TYPE ===>                       Resource type


FILL IN THE SELECTION CRITERIA AND PRESS ENTER 17.55.32-
To display all of the Resource Sets: Leave all of the selection criteria fields blank, then press Enter. The Control-D Resource Sets List screen is displayed listing all of the Resource Sets.
-
To display a selected set of the Resource Sets: Type a value in at least one of the selection criteria fields as described in Table147, then press Enter. The Control-D Resource Sets List screen is displayed listing the set of Resource Sets that you selected.
Table 157 Resource Sets Selection Criteria Fields
|
Field |
Description |
|---|---|
|
JOB NAME |
The name or mask for the job name related to the Resource Sets to be displayed. |
|
RESOURCE NAME |
The name or mask for the resource name referenced by the Resource Sets to be displayed. |
|
RESOURCE TYPE |
The type of resource referenced by the Resource Sets to be displayed. |
Resource Sets List Screen
After selecting the selection criteria from the Control-D Resource Sets Entry Panel, the Control-D Resource Sets List screen is displayed with the set of Resource Sets you selected.
Figure 176 Control-D Resource Sets List
 ------------------------ CONTROL-D RESOURCE SETS LIST  ------------------(DO.T)
 COMMAND ===>                                                    SCROLL===> CRSR
 OPT -- JOB -------------- CREATED ------------- COUNT -----
      AFP01             18/12/01 14:53     B6E73E74 6C547E00
      AFP02             11/12/01 16:22     B6DE8533 21128D80
      AFP03             29/11/01 18:28     B6CF8AED 9C356740
      XRX01             29/11/01 18:31     B6CF8BA8 B7A07800
      XRX02             29/11/01 19:01     B6CF9252 3C61F500
      XRX03             02/12/01 13:17     B6D30B1D F0CF1740


 OPTIONS:  S SELECT D DELETE                                            18.03.01
Options of the Control-D Resource Sets List
For existing Resource Set definitions, you have the option to either select or delete a Resource Set.
To request one of the following options, type the option in the OPT field to the left of the Resource Set name, and press Enter.
Table 158 Options of the Control-D Resource Sets List
|
Option |
Description |
|---|---|
|
S (SELECT) |
Display the Control-D Resources List screen for the selected Resource Set. Only one Resource Set can be selected at a time. |
|
D (DELETE) |
Delete a Resource Set. Displays a confirmation window. |
Control-D Resources List Screen
After selecting a Resource Set on the Resource Sets List screen, the Control-D Resources List screen is displayed with the list of resources in the selected Resource Set.
Figure 177 Control-D Resources List Screen for Resource Sets
 -------------------------- CONTROL-D RESOURCES LIST  --------------------(DO.R)
 COMMAND ===>                                                    SCROLL===> CRSR
 OPT -- NAME ------------- CREATED ----- TYPE -- FORMAT -- CHECK SUM -- VERS ---
      AFPSAMP           18/12/01 02:53   CLQ               02624640      01
      C0BICOSH          29/11/01 17:23   FNT      AFP      0189E9B3      01
      C0OCRB12          29/11/01 15:17   FNT      AFP      98ABD182      01
      C0UN5510          29/11/01 17:23   FNT      AFP      2A737E07      01
      C0UN6718          29/11/01 17:23   FNT      AFP      31C20748      01
      C0420080          29/11/01 17:23   FNT      AFP      590806D5      01
      F1B00057          29/11/01 16:21   FDE      AFP      0097E52E      01
      O1B00067          29/11/01 17:23   OLY      AFP      0042F015      01
      T1AAB001          29/11/01 15:17   CCP      AFP      166BF2C4      01
      T1BICOSH          29/11/01 17:23   CCP      AFP      00102BD6      01
      T1V10500          29/11/01 17:23   CCP      AFP      1821E26D      01
 ======= >>>>>>>>>>>>>>>>    E N D    O F    L I S T     <<<<<<<<<<<<<<<< ======


 OPTIONS:  S SELECT                                                     10.38.57
Options of the Control-D Resources List Screen
To request one of the following options, type the option in the OPT field to the left of the resource name, and press Enter.
Table 159 Options of the Control-D Resource Sets List
|
Option |
Description |
|---|---|
|
S (SELECT) |
Display the contents of the resource (screen DO.R.Z for all resources other than CLQ resources). For CLQ resources, the Report Clique parameters of the resource are displayed (screen DO.Z). For non-CLQ resources, the resource contents are displayed in hexadecimal mode. For a description of the parameters of the CLQ type resource, see Control-D Report Clique Definition Screen. |
Exiting the Control-D Resources List Screen
Press END (PF03/PF15) to exit the Control-D Resources List Screen.
Resources
This option allows you to view or delete resources, other that Report Clique resources, that are referenced by Resource Sets that have been created during the transformation process.
During the report transformation process, a special Resource Set record associated with the report is created in the Permanent User File, whose key is stored in an associated SYSDATA record. The Resource Set record references all resources used by the decollated report. For information on how Resource Sets are used in the report transformation process, see Print Stream Reports Using Transformation.
Entry Panel
After you select option 3 from the Control-D Objects Entry Panel, the Control-D Resources Entry Panel is displayed.
Figure 178 Control-D Resources Entry Panel
 ----------------------- CONTROL-D RESOURCES ENTRY PANEL -----------------(DO.3)
 COMMAND ===>


      RESOURCE NAME ===>                       Resource name or mask
      RESOURCE TYPE ===>                       Resource type
      REPORT FORMAT ===>                       1.TXT 2.AFP 3.XRX 4.PDF
      DATE FROM     ===>        TO             Resource creation date


FILL IN THE SELECTION CRITERIA AND PRESS ENTER 16.13.36-
To display all of the Resource Names: Leave all of the selection criteria fields blank, then press Enter. The Control-D Resources List screen is displayed listing all of the resources.
-
To display a selected set of the Resource Names: Type a value in at least one of the selection criteria fields as described in Table159, then press Enter. The Control-D Resources List screen is displayed listing the set of resources that you selected.
Table 160 Resources Selection Criteria Fields
|
Field |
Description |
|---|---|
|
RESOURCE NAME |
The name or mask for the resources to be displayed. From 1 through 12 characters. Valid characters are a-z, A-Z, 0-9, - (hyphen), and _ (underscore). |
|
RESOURCE TYPE |
The type resource referenced by the resources to be displayed. |
|
REPORT FORMAT |
The format of the resources to be displayed. Valid Values:
|
|
DATE FROM and DATE TO |
The date range within which resources were created. |
Resources List Screen
After selecting the selection criteria from the Control-D Resources Entry Panel, the Control-D Resources List screen is displayed with the set of resources you selected.
Figure 179 Control-D Resources List for Resources
 -------------------------- CONTROL-D RESOURCES LIST  --------------------(DO.R)
 COMMAND ===>                                                    SCROLL===> CRSR
 OPT  --- NAME ----------- CREATED ----- TYPE -- FORMAT -- CHECK SUM -- VERS ---
      RESOURC1          04/02/02 18:22   CAT      XRX      1883B89E      01
      RESOURC2          21/02/02 17:49   CAT      XRX      0E40C8F6      01
      RESOURC3          04/03/02 19:25   CAT      XRX      14102223      01
      RESOURC4          13/03/02 18:21   CAT      XRX      13EEE507      01
      RESOURC5          06/02/02 13:53   CCP      AFP      166BF2C4      01

 OPTIONS:  S SELECT D DELETE                                            13.20.03
Options of the Control-D Resources List
For existing resource definitions, you have the option to either select or delete a definition.
To request one of the following options, type the option in the OPT field to the left of the resource name, and press Enter.
Table 161 Options of the Control-D Resources List
|
Option |
Description |
|---|---|
|
S (SELECT) |
Display the resource contents in hexadecimal mode (screen DO.R.Z for all resources other than CLQ resources). |
|
D (DELETE) |
Delete a resource. Displays a confirmation window. |
Exiting the Control-D Resources List Screen
Press END (PF03/PF15) to exit the Control-D Resources List Screen.
Clique Resources
This option allows you to view Report Clique resources that are referenced by Resource Sets that have been created during the transformation process.
During the report transformation process, a special Resource Set record associated with the report is created in the Permanent User File, whose key is stored in an associated SYSDATA record. The Resource Set record references all resources used by the decollated report. For information on how Resource Sets are used in the report transformation process,see Print Stream Reports Using Transformation.
Entry Panel
After you select option 4 from the Control-D Objects Entry Panel, the Control-D Clique Resources Entry Panel is displayed.
Figure 180 Control-D Resources Entry Panel
 ------------------- CONTROL-D CLIQUE RESOURCES ENTRY PANEL --------------(DO.4)
 COMMAND ===>


      RESOURCE NAME ===>                       Clique resource name or mask

      DATE FROM     ===>        TO             Resource creation date


FILL IN THE SELECTION CRITERIA AND PRESS ENTER 16.13.36-
To display all of the Clique Resource Names: Leave all of the selection criteria fields blank, then press Enter. The Control-D Resources List screen is displayed listing all of the resources.
-
To display a selected set of the Clique Resource Names: Type a value in at least one of the selection criteria fields as described in Table161, then press Enter. The Control-D Resources List screen is displayed listing the set of resources that you selected.
Table 162 Clique Resources Selection Criteria Fields
|
Field |
Description |
|---|---|
|
RESOURCE NAME |
The name or mask for the resources to be displayed. From 1 through 12 characters. Valid characters are a-z, A-Z, 0-9, - (hyphen), and _ (underscore). |
|
DATE FROM and DATE TO |
The date range within which resources were created. |
Resources List Screen
After selecting the selection criteria from the Control-D Clique Resources Entry Panel, the Control-D Resources List screen is displayed with the set of Clique Resources you selected.
Figure 181 Control-D Resources List for Clique Resources
 -------------------------- CONTROL-D RESOURCES LIST  --------------------(DO.R)
 COMMAND ===>                                                    SCROLL===> CRSR
 OPT  --- NAME ----------- CREATED ----- TYPE -- FORMAT -- CHECK SUM -- VERS ---
      CLIQUE0           06/02/02 12:11   CLQ               02606E06      01
      CLIQUE1           21/02/02 05:49   CLQ               03D33586      01
      CLIQUE2           12/03/02 06:43   CLQ               04291467      01
      CLIQUE3           19/02/02 06:49   CLQ               0268D40E      01
      CLIQUE4           04/03/02 07:25   CLQ               0448B58B      01
      CLIQUE5           07/02/02 11:18   CLQ               02692FF1      01
 OPTIONS:  S SELECT D DELETE                                            13.20.03
Options of the Control-D Resources List
For existing Clique Resource definitions, you have the option to either select or delete a definition.
To request one of the following options, type the option in the OPT field to the left of the Clique Resource name, and press Enter.
Table 163 Options of the Control-D Resources List
|
Option |
Description |
|---|---|
|
S (SELECT) |
Display the contents of the CLQ (Clique) resource (screen DO.Z). The contents of the CLQ resource cannot be edited. For a description of the parameters of the CLQ type resource, see Control-D Report Clique Definition Screen. |
|
D (DELETE) |
Delete a CLQ resource. Displays a confirmation window. |
Exiting the Control-D Resources List Screen
Press END (PF03/PF15) to exit the Control-D Resources List Screen.
Approval Objects
This option allows displaying and deleting Approval Objects that are created during report decollation. The Report Approval feature enables the implementation of an approval process for reports in the Control-D repository. Administrators can assign reports for approval to a group of 1 or more users, defined by a unique Approval name in the Approval tree. A report assigned to an Approval name can be approved by any user defined in the Approval name, as long as that specific user has permission to view that report.
The Control-D monitor creates Approval Objects for each report that uses the DO APPROV parameters in the decollation mission definition. For more information about defining these objects in decollation missions, see DO APPROV: Decollating Parameter (Decollating Mission).
The Control-D/WebAccess Server uses the objects to identify reports that are candidates for approval processing. The user can filter for reports waiting for approval using Control-D/WebAccess Server. After a report is approved or rejected, the approval status is updated in the report's user record, and the object is deleted.
For more information about defining the Approval process, see the Approving reports section in the INCONTROL for z/OS Administrator Guide.
Entry Panel
After you select option 5 from the Control-D Objects Entry Panel, the Control-D Approvals Entry Panel is displayed.
Figure 182 Control-D Approvals Entry Panel
---------------- CONTROL-D APPROVALS ENTRY PANEL -------------(DO.5)
COMMAND ===>
     APPROVAL      ===>                        Approval name or mask
     RECIPIENT     ===>                        Recipient or mask
     JOB NAME      ===>                        Job name or mask
     CATEGORY      ===>                        Category or mask
     REPORT NAME   ===>
                                               Report name or mask
     DATE FROM     ===>        TO              Object creation date
FILL IN THE SELECTION CRITERIA AND PRESS ENTER 13.48.23-
To display all of the Approval objects: Leave all of the selection criteria fields blank, then press Enter. The Control-D Approvals Object List screen is displayed, listing all of the Approval objects.
-
To display a selected set of the Approval objects: Type a value in at least one of the selection criteria fields as described in Table163, then press Enter. The Control-D Approvals Object List screen is displayed listing the set of Control-D Approval objects that you selected.
Table 164 Approvals Object Selection Criteria Fields
|
Field |
Description |
|---|---|
|
RECIPIENT |
The name or mask of the recipient for reports awaiting approval. |
|
JOB NAME |
The name or mask of the job created for reports awaiting approval. |
|
CATEGORY |
The name or mask of the category for reports awaiting approval. |
|
REPORT NAME |
The name or mask of the report awaiting approval. |
|
DATE FROM and DATE TO |
The date range within which reports awaiting approval were created. |
|
APPROVAL |
Approval name or mask of the report awaiting approval. |
Approvals Object List Screen
After choosing the selection criteria from the Control-D Approvals Entry Panel, the Control-D Approvals Object List screen is displayed with the set of Approvals objects that you selected.
Figure 183 Control-D Approvals Object List
------------- CONTROL-D APPROVALS AND SUBSRCIBE OBJECT LIST ------------(DO.W)
COMMAND ===> SCROLL===> CRSR
OP APPROV/CREATED ---RECORD-ID----- --USER-- --JOB--- ------CATEGORY------ STAT
APP21 C55F3E6B BEF32188 VENA Q23AWF WFTEST1 W
11/01/10 16:35 Report: 1
APP21 C55F3EAA 7EAB6802 VENA Q23AWF WFTEST1 R
11/01/10 16:37 Report: 1
APP21 C55F4221 C7E83D85 VENA Q23AWF WFTEST1 A
11/01/10 16:52 Report: WFPRM
OPTIONS: D DELETE 18.30.04Table 165 Approvals Object List parameters
|
Field |
Description |
|---|---|
|
APPROV |
Approval name |
|
CREATED |
The date and time the object was created. |
|
RECORD ID |
The record ID of the report pointed to by the object. |
|
USER |
The recipient of the report pointed to by the object. |
|
JOB |
The job name of the report pointed to by the object. |
|
CATEGORY |
The category of the report pointed to by the object. |
|
STAT |
Determines, the current status of the Parallel Approval process, as follows:
|
|
Report |
The name of the report pointed to by the object. |
Options of the Control-D Approvals Object List
For existing Control-D Approval objects, you have the option to delete an object.
To request the option, type the option in the OPT field to the left of the line, and press Enter.
Table 166 Options of the Control-D Approvals Object List
|
Option |
Description |
|---|---|
|
D (DELETE) |
Delete an Approvals object. Displays a confirmation window. |
Exiting the Control-D Resources List Screen
Press END (PF03/PF15) to exit the Control-D Approvals Object List Screen.
Condition and Resource Handling Facility
Options 4 and 7 in the IOA Primary Option menu are directly related to the handling of IOA conditions and Control-M resources. The screens displayed by these options are discussed on the following pages.
IOA Conditions/Resources Screen
The IOA Conditions/Resources screen is accessed through Option 4 of the IOA Primary Option menu. It displays information from the IOA Conditions file, which contains the list of all existing prerequisite conditions, and the Control-M Resources file, which contains the list of Quantitative resources and Control resources. The IOA Conditions/Resources screen enables you to do the following
-
View IOA prerequisite conditions.
-
View Control-M Quantitative resources.
-
Add or delete prerequisite conditions or resources or both.
-
Change the available quantity of Control-M Quantitative resources.
For a description of prerequisite conditions, see Prerequisite Condition Concept.
Prior to version 6.0.00 a single file, the IOA Conditions/Resources file, contained all IOA conditions and all Control and Quantitative resources. As of version 6.0.00, the IOA Conditions/Resources file has been replaced by two files:
-
IOA Conditions file: Contains all IOA conditions.
-
Control-M Resources file: Contains all Control and Quantitative resources.
To enter the IOA Condition/Resources screen, select option 4 on the Primary Option menu.
Figure 184 IOA Conditions/Resources Screen
-------------------------- IOA CONDITIONS/RESOURCES ------------------------(4)
COMMAND ===> SCROLL ===> CRSR
PREFIX ===> COND Y ControlControl Y RES Y STAT Y DATE 0909 - 0909
OPT TYPE CONDITION/RESOURCE DATE USE QUANTITY MAX *P RBA IOAID
Control CONTROLM E (00000) 01
RESOURCE TAPEP 0003 0003
RESOURCE CPU1 0098 0100
RESOURCE CPU2 0197 0200
RESOURCE TAPEP Q 0002 (00091) 01
RESOURCE CPU1 Q 0002 (00091) 01
RESOURCE CPU2 Q 0003 (00092) 01
RESOURCE TAPEP R 0002 1 (00093) 01
COND BR-BRIVPCC-ENDED-OK STAT
COND BR-BRCC0001-ENDED-OK STAT
COND BR-BRCC0002-ENDED-OK STAT
COND BR-BRCC0003-ENDED-OK STAT
COND BR-BRCCIND-ENDED-OK STAT
COND BR-BRUPDT02-ENDED-OK STAT
COND BR-BRREP001-ENDED-OK STAT
COND BR-BRREP002-ENDED-OK STAT
COND GL-GLINP001-ENDED-OK STAT
COND EBD-APPL-STARTED STAT
COND CICS-PROD-IS-UP STAT
OPTIONS: D DELETE C CHANGE COMMANDS: ADD 14.07.08To return to the IOA Primary Option menu, press END (PF03/PF15).
Fields of the IOA Conditions/Resources Screen
The information displayed in each screen line is:
Table 167 Fields of the IOA Conditions/Resources Screen
|
Field |
Description |
||||||||
|---|---|---|---|---|---|---|---|---|---|
|
OPT |
Option to be activated on the condition or resource. |
||||||||
|
TYPE |
Type of condition or resource:
|
||||||||
|
CONDITION/RESOURCE |
Name of the condition or resource. |
||||||||
|
DATE |
Original date reference of a prerequisite condition (format mmdd or ddmm depending on the site standard, or the value STAT). |
||||||||
|
For sites where Control-M is active: |
|||||||||
|
USE |
Resource usage indicator for Control or Quantitative resources. Valid values depend on the type of resource. Valid Values for Control Resources:
Valid Values for Quantitative Resources:
|
||||||||
|
QUANTITY |
Quantity of a Quantitative resource. What the quantity represents depends on the value in the USE field, as follows:
|
||||||||
|
MAX |
Maximum available quantity of a Quantitative resource. |
||||||||
|
*P |
Priority of the job requesting a Control-M resource using *-type priority. For more information, see PRIORITY: Runtime Scheduling Parameter (Decollating Mission)). |
||||||||
|
RBA |
Internal Control-M ID (relative block address) of the job currently holding a Control-M resource. An RBA value of 000000 indicates that the resource was added manually. |
||||||||
|
IOAID |
ID of the IOA installation that is using the particular Control or Quantitative resource. This value is significant when multiple IOA installations share the same resources. |
||||||||
Specifying Retrieval Criteria
You can control the type and amount of information displayed in the screen by specifying retrieval criteria.
Table 168 IOA Conditions/Resources Retrieval Criteria
|
Criteria |
Description |
|---|---|
|
PREFIX prefix |
If specified, limits the display to conditions with the specified prefix. To display only conditions containing a specific string, enter the string preceded by an *. If *OK is entered, the following conditions are included in the display: Copy
|
|
COND |
Determines whether prerequisite conditions are displayed. Valid Values:
Default: Y |
|
DATE from – to |
Limits the display of prerequisite conditions to the selected date range. Valid Values:
|
|
STAT |
Determines whether prerequisite conditions with a date value of STAT are displayed. (Applies only if Y is specified for COND.) Valid Values:
|
|
For sites where Control-M is active: |
|
|
Control |
Determines whether Control resources are displayed. Valid Values:
Default: Y |
|
RES |
Determines whether Quantitative resources are displayed. Valid Values:
Default: Y |
Adding Conditions and Resources – The ADD Command
The ADD command adds conditions to the IOA Conditions file and adds resources to the Control-M Resources file. Type this command in the COMMAND field, and press Enter. Format of the command is:
ADD typewhere type is one of the following:
-
COND: Add a prerequisite condition. Special care must be taken when adding prerequisite conditions, because added conditions can trigger job submission.
-
RESOURCE/RES: Add a Quantitative resource. Only authorized personnel should add Quantitative resources.
-
Control/CON: Add a Control resource. A Control resource entry may be added manually even if a job is holding the resource. Only authorized personnel should add Control resources.
When the ADD command is entered, an appropriate window is opened. The window shown below opens when ADD COND is entered.
Figure 185 IOA Conditions/Resources COND Window
-------------------------- IOA CONDITIONS/RESOURCES ------------------------(4)
COMMAN +---------------------------------------------------------+ L ===> CRSR
PREFIX | PLEASE FILL IN COND NAME, DATE AND PRESS ENTER | 0909 - 0909
OPT TY | | A IOAID
CO | NAME ===> DDMM ===> | 00) 01
RE | |
RE +---------------------------------------------------------+
RE
RESOURCE TAPEP Q 0002 (00091) 01
RESOURCE CPU1 Q 0002 (00091) 01
RESOURCE CPU2 Q 0003 (00092) 01
RESOURCE TAPEP R 0002 1 (00093) 01
COND BR-BRIVPCC-ENDED-OK 0909
COND BR-BRCC0001-ENDED-OK 0909
COND BR-BRCC0002-ENDED-OK 0909
COND BR-BRCC0003-ENDED-OK 0909
COND BR-BRCCIND-ENDED-OK 0909
COND BR-BRUPDT02-ENDED-OK 0909
COND BR-BRREP001-ENDED-OK 0909
COND BR-BRREP002-ENDED-OK 0909
COND GL-GLINP001-ENDED-OK 0909
COND EBD-APPL-STARTED 0909
COND CICS-PROD-IS-UP STAT
OPTIONS: D DELETE C CHANGE COMMANDS: ADD 13.52.38Fill in the window fields as described below according to the specified ADD command:
Table 169 IOA Conditions/Resources ADD Command Formats
|
Format |
Description |
|---|---|
|
ADD COND |
Enter the name of the prerequisite condition. The current working date is displayed as the default date. This date can be modified. |
|
ADD RESOURCE or ADD RESa |
Enter the name of the Quantitative resource and the quantity to be added. |
|
ADD Control or ADD CONa |
Enter the name of the Control resource and the control type If a Control resource is manually added with a type of E (Exclusive), no jobs in WAIT SCHEDULE status that require this resource are submitted. If a Control resource is manually added with a type of S (Shared), no jobs in WAIT SCHEDULE status that require exclusive access to this resource are submitted. |
After filling in the window, press Enter to add the condition or resource.
To close the window without adding the condition or resource, press the RESET key (PF04/PF16).
Options of the IOA Conditions/Resources Screen
The following options can be selected for conditions and resources by typing the option in the OPT field to the left of the resource or condition name and pressing Enter. Available options are:
Table 170 Options of the IOA Conditions/Resources Screen
|
Option |
Description |
|---|---|
|
D (DELETE) |
Delete a condition or resource from the list. The event is recorded in the IOA Log file. |
|
C (CHANGEa) |
Change the maximum available quantity of a Quantitative resource. The event is recorded in the IOA Log file. |
These options are discussed in detail on the following pages.
Deleting Conditions and Resources – The DELETE Option
To delete conditions and/or resources, type D (Delete) in the OPT field to the left of the conditions and resources being deleted and press Enter.
A confirmation window may be displayed, depending on User profile customization:
-
By default, conditions and resources are deleted without confirmation from the user.
-
The User profile can be customized to display a confirmation window with an arrow pointing to a delete request (beginning with the first request).
Figure 186 IOA Conditions/Resources DELETE Confirmation Window
-------------------------- IOA CONDITIONS/RESOURCES ------------------------(4)
COMMAND ===> SCROLL ===> CRSR
PREFIX ===> COND Y Control Y RES Y STAT Y DATE 0909 - 0909
OPT TYPE CONDITION/RESOURCE DATE USE QUANTITY MAX *P RBA IOAID
COND SALARY-PRSL01A-OK 0909
COND SALARY-PRSL002-OK 0909 +----------------------+
COND SALARY-PRSL003-OK 0909 | CONFIRM |
D COND CBT-TAPE-ARRIVED 0909 <---------| ASK FOR EACH ONE Y |
D COND KPL-PRKPL03-OK 0909 +----------------------+
COND KPL-PRKPL04-OK 0909
======== >>>>>>>>>>>>>>>> B O T T O M O F L I S T <<<<<<<<<<<<<<<< ========
OPTIONS: D DELETE C CHANGE COMMANDS: ADD 18.48.12If a confirmation window is displayed, fill in the window as follows and press Enter:
Table 171 IOA Conditions/Resources DELETE Confirmation Window Options
|
Option |
Description |
|---|---|
|
CONFIRM |
Whether to process the delete request. Valid Values:
|
|
ASK FOR EACH ONE |
This line is displayed only if more than one delete is requested. It determines whether or not individual confirmation is required for each delete request. Valid Values:
|
Changing the Quantity of a Resource – The CHANGE Option (applicable only if Control-M is active.)
To request a change to the maximum available quantity of a resource, type C (Change) in the OPT field to the left of the resource and press Enter. The following window is opened.
Figure 187 IOA Conditions/Resources CHANGE Option Window
-------------------------- IOA CONDITIONS/RESOURCES ------------------------(4)
COMMAN +---------------------------------------------------------+ L ===> CRSR
PREFIX | PLEASE FILL IN QUANT RES NAME, COUNT AND PRESS ENTER | 0909 - 0909
OPT TY | | A IOAID
CO | NAME ===> TAPEP COUNT ===> | 00) 01
C RE | |
RE +---------------------------------------------------------+
RE
RESOURCE TAPEP Q 0002 (00091) 01
RESOURCE CPU1 Q 0002 (00091) 01
RESOURCE CPU2 Q 0003 (00092) 01
RESOURCE TAPEP R 0002 1 (00093) 01
COND BR-BRIVPCC-ENDED-OK 0909
COND BR-BRCC0001-ENDED-OK 0909
COND BR-BRCC0002-ENDED-OK 0909
COND BR-BRCC0003-ENDED-OK 0909
COND BR-BRCCIND-ENDED-OK 0909
COND BR-BRUPDT02-ENDED-OK 0909
COND BR-BRREP001-ENDED-OK 0909
COND BR-BRREP002-ENDED-OK 0909
COND GL-GLINP001-ENDED-OK 0909
COND EBD-APPL-STARTED 0909
COND CICS-PROD-IS-UP STAT
OPTIONS: D DELETE C CHANGE COMMANDS: ADD 13.52.38The NAME value in the window is protected and cannot be changed.
The COUNT parameter consists of two values: sign and quantity. Fill in the COUNT parameter as follows and press Enter:
Table 172 COUNT Parameter Values
|
Value |
Description |
|---|---|
|
sign |
Valid Values (one character):
|
|
quantity |
Quantity to be used to adjust the maximum quantity of the resource (four digits) according to the specified sign. Leading zeros are required. |
IOA Manual Conditions Screen
The IOA Manual Conditions screen displays a list of prerequisite conditions that should be confirmed manually by operations personnel.
The list of manual conditions is created by utility IOALDNRS. The utility is described in the INCONTROL for z/OS Utilities Guide. This utility is intended for use at sites where Control-M and/or Control-V are installed.
The utility scans the jobs in the Control-M Active Jobs file, and/or missions in the Control-V Active Missions file, for all conditions requested in IN statements that
-
Are not resolved by an OUT statement.
-
Are not resolved by ON PGMST or DO COND statements.
-
Do not exist in the IOA Conditions file.
The utility automatically places the conditions conforming to the above criteria into the IOA Manual Conditions file. This file is used as a checklist for manual operations that operations personnel are expected to perform.
To enter the IOA Manual Conditions screen, select option 7 on the IOA Primary Option menu.
Figure 188 IOA Manual Conditions Screen
--------------------------- IOA MANUAL CONDITIONS --------------------------(7)
COMMAND ===> SCROLL ===> CRSR
PREFIX ===> PENDING Y ADDED Y STAT Y DATE 0909 - 0909
OPT TYPE CONDITION DATE ADDED
COND USR-GOT-TAX-TAPE 0909
COND DBA-RUN-UPDATE 0909 Y
COND OP-EXTERNAL-TAPE-OK 0909 Y
COND USR-GOT-BANK-TAPE 0909
COND OP-SHUT-THE-SYSTEM 0909
COND DBA-START-MPMXXX 0909
COND USR-GOT-SALARY-TAPE 0909 Y
COND OP-COMMUNICATION-DOWN STAT
======== >>>>>>>>>>>>>>>> B O T T O M O F L I S T <<<<<<<<<<<<<<<< ========
OPTIONS: A ADD TO COND/RES LIST (SCREEN 4) E ERASE COMMANDS: NEW 18.33.47To exit the IOA Manual Conditions screen, press END (PF03/PF15).
Fields of the Manual Conditions Screen
The information displayed on each screen line is:
Table 173 Fields of the IOA Manual Conditions Screen
|
Field |
Description |
|---|---|
|
OPT |
Option to be activated on the condition. |
|
TYPE |
Type of condition, meaning, COND for prerequisite condition. |
|
CONDITION |
Condition name. |
|
DATE |
Date reference of prerequisite condition. Format is either mmdd or ddmm depending on the site standard, or the date value STAT. |
|
ADDED |
Indicates whether the condition has been manually added to the IOA Conditions file. Valid Values:
|
Specifying Retrieval Criteria
You can control the type and amount of information displayed in the screen by specifying retrieval criteria.
Table 174 Retrieval Criteria for IOA Manual Conditions Screen
|
Criteria |
Description |
|---|---|
|
PREFIX prefix |
Limits the display to conditions with the selected prefix. Default: Blank (no limit). To display only those conditions containing a specific string, enter the string preceded by an *. If *OK is entered, the following conditions are included in the display: Copy
|
|
PENDING |
Determines whether conditions not yet added are displayed. Valid Values:
|
|
ADDED |
Determines whether added conditions are displayed. Valid Values:
|
|
STAT |
Determines whether prerequisite conditions with a date value of STAT are displayed. Valid Values:
|
|
DATE from – to |
Limits the display of prerequisite conditions to the specified date range. Valid Values:
|
Adding a New Prerequisite Condition – NEW COND Command
To add a prerequisite condition to the IOA Manual Conditions file, type NEW COND in the COMMAND field and press Enter. A window is opened.
Figure 189 IOA Manual Conditions Screen NEW COND Window
--------------------------- IOA MANUAL CONDITIONS --------------------------(7)
COMMAN +---------------------------------------------------------+ L ===> CRSR
PREFIX | PLEASE FILL COND NAME AND DATE AND PRESS ENTER | 0909 - 0909
OPT TY | |
CO | NAME ===> MMDD ===> |
CO | |
CO +---------------------------------------------------------+
CO
COND OP-SHUT-THE-SYSTEM 0909
COND DBA-START-MPMXXX 0909
COND USR-GOT-SALARY-TAPE 0909 Y
COND OP-COMMUNICATION-DOWN 0909
======== >>>>>>>>>>>>>>>> B O T T O M O F L I S T <<<<<<<<<<<<<<<< ========
OPTIONS: A ADD TO COND/RES LIST (SCREEN 4) E ERASE COMMANDS: NEW 18.33.47In the NAME field of the window, type the name of the condition to be added. If the condition has a date other than the current working date, enter the date in the date field of the window, in the format DDMM or MMDD, depending on the site standard.
-
To add the condition, press Enter.
-
To close the window without adding the condition, press RESET (PF04/PF16).
Adding a new condition to the IOA Manual Conditions file does not affect the IOA Conditions file.
Options of the Manual Conditions Screen
To add a condition to the IOA Conditions file or to erase a condition from the Manual Conditions file, specify the appropriate option in the OPT field to the left of the condition name and press Enter. Valid options:
Table 175 Options of the IOA Manual Conditions Screen
|
Option |
Description |
|---|---|
|
A (ADD) |
Add the condition to the IOA Conditions file (Screen 4), and mark it "Added" (Y) in the IOA Manual Conditions file. The event is recorded in the IOA Log file. |
|
E (ERASE) |
Erase (Delete) a condition from the IOA Manual Conditions file. This does not affect the IOA Conditions file. This option is discussed in more detail below. |
Erasing (Deleting) Conditions
To erase prerequisite conditions, type E in the OPT field to the left of the condition names being erased and press Enter.
A confirmation window may be displayed, depending on user profile customization:
-
By default, conditions are deleted without confirmation from the user.
-
If, however, the user profile member has been customized accordingly, a confirmation window is displayed with an arrow pointing to an erase request (beginning with the first request).
Figure 190 IOA Manual Conditions Screen ERASE Confirmation Window
--------------------------- IOA MANUAL CONDITIONS --------------------------(7)
COMMAND ===> SCROLL ===> CRSR
PREFIX ===> PENDING Y ADDED Y STAT Y DATE 0909 - 0909
OPT TYPE CONDITION DATE ADDED
COND DAILY-PROD-KPL-GO 0909
COND SALARY-GROUP-GO 0909
COND SALARY-PROMPTED-OK 0909 +----------------------+
COND SALARY-TAPE-ARRIVED 0909 | CONFIRM |
E COND PROD-PRUPDT03-GO 0909 <---------| ASK FOR EACH ONE Y |
E COND PROD-INTAPE-OK 0909 +----------------------+
COND OP-START-BACKUP-180D 0909
COND OP-START-PRINT-STD 0909
COND OP-START-RESTORE-ADH 0909
======== >>>>>>>>>>>>>>>> B O T T O M O F L I S T <<<<<<<<<<<<<<<< ========
OPTIONS: A ADD TO COND/RES LIST (SCREEN 4) E ERASE COMMANDS: NEW 18.33.47If a confirmation window is displayed, fill in the window as follows and press Enter:
Table 176 Fields of the IOA Manual Conditions Screen ERASE Confirmation Window
|
Field |
Description |
|---|---|
|
CONFIRM |
Indicates whether to process the erase (delete) request. Valid Values:
|
|
ASK FOR EACH ONE |
This line is displayed only if more than one erase is requested. It determines whether individual confirmation is required for each erase request. Valid Values:
|
IOA Log Facility
The IOA Log facility places automatically generated messages, which record every significant event in the life of a job, rule, or mission, in the IOA Log file. Significant events recorded in the IOA Log file include normal processing occurrences, such as mission activated, or completed, as well as error conditions encountered during processing. Shout facility notifications and user remarks can also be recorded in the IOA Log file.
IOA Log Screen
The IOA Log screen enables you to view the information contained in the IOA Log file. To enter the IOA Log screen, select option 5 on the IOA Primary Option menu. Upon entry, the screen displays the most recent messages currently in the IOA Log file.
Figure 191 IOA Log Screen
FILTER: ---------------- IOA LOG --------------------------------(5)
COMMAND ===> SCROLL===> CRSR
SHOW LIMIT ON ==> DATE 080800 - 080800
DATE TIME ODATE USERID CODE ------------- M E S S A G E -------------
080800 092144 080800 M22 SPY254I JOB CT085955 CT085955/01835 SCANNED
080800 092144 080800 M22 TEL208I JOB CT085955 CT085955/01835 ENDED "OK"
080800 092150 080800 M22 SPY254I JOB CT085956 CT085956/01836 SCANNED
080800 092150 080800 M22 TEL208I JOB CT085956 CT085956/01836 ENDED "OK"
080800 092156 080800 IVP SPY254I JOB BRIVPCC BRIVPCC /01843 SCANNED
080800 092157 080800 IVP TEL208I JOB BRIVPCC BRIVPCC /01843 ENDED "OK"
080800 092157 080800 DBA CTM659I FREE OF TASK BRCC0001 ODATE 080800
PERFORMED
080800 092201 080800 M22 SPY281I JOB INTR0004 INTR0004/04371 START
98253.1316 STOP 98253.1316 CPU 0MIN
00.04SEC SRB 0MIN 00.00SEC 0.19
080800 092201 080800 M22 SPY254I JOB INTR0004 INTR0004/04371 SCANNED
080800 092201 080800 M22 TEL206W JOB INTR0004 INTR0004/04371 ABENDED CC
SB37 STEP STEP01
080800 092201 080800 M22 TEL219I JOB INTR0004 INTR0004/04371 ENDED "NOT
OK"
080800 092208 080800 IVP TEL203I JOB BRCC0001 ELIGIBLE FOR RUN
080800 092208 080800 IVP SUB133I JOB BRCC0001 BRCC0002/01958 SUBMITTED
080800 092208 080800 IVP TEL203I JOB BRCC0002 ELIGIBLE FOR RUN
CMDS: SHOW, GROUP, CATEGORY, SHPF 09.43.00To return to the IOA Primary Option menu, press END (PF03/PF15).
Fields of the IOA Log Screen
Table 177 Fields of the IOA Log Screen
|
Field |
Screen |
|---|---|
|
SHOW LIMIT ON |
Identifies which selection criteria other than yes or no were entered in the IOA Log Show Screen window (USERID, MEM/MIS, JOBNAME, CATEGORY, GROUP). For more information, see Filtering the IOA Log Screen Display. |
|
DATE |
Date on which the message was issued. |
|
TIME |
Time at which the message was issued. |
|
ODATE |
Original scheduling date of the mission associated with the message. Format is mmddyy, ddmmyy, or yymmdd, depending on the site standard. When the display type is set to RBA display using the DISPLAY command, the Relative Byte Address (RBA) of the message within the IOA Log file is displayed instead of the ODATE. For more information on changing the screen display, see Changing IOA Log Screen Display Types. |
|
USERID |
User ID of the job issuing the message, or user ID of the user writing to the log. |
|
CODE |
IOA message code. |
|
MESSAGE |
Text of the message. If the message is longer than the space available on the screen, the message is split and continues on the following line. Messages relating to a job have the following format: Copy
|
|
fromdate – todate |
Log information displayed in the screen can be limited to the specified date range in mmddyy, ddmmyy or yymmdd format, depending on the site standard. If the DATE or the ODATE value for a message is in the specified range, the message is included in the IOA Log display. Valid Values:
|
Commands of the IOA Log Screen
The following commands can be specified in the COMMAND field:
Table 178 Commands of the IOA Log Screen
|
Command |
Description |
|---|---|
|
SHOW |
The SHOW command activates the specified screen filter, opens the IOA Log Show Screen window, or opens the Display Filters window, depending on the format of the command. For more information on filtering the IOA Log Screen, see Filtering the IOA Log Screen Display. Valid Formats:
Reserved filter name DEFAULT can be used to activate or edit the default filter for the status screen. For example, SHOW DEFAULT EDIT opens the Show Screen Filter window for the default filter. Only jobs conforming to selection criteria specified in the filter are displayed in the IOA Log screen. For more information, see Filtering the IOA Log Screen Display. |
|
GROUP |
The GROUP Command alternately displays or hides the GROUP name (if any) that is associated with the relevant job, mission or rule definition. When displayed, the name of the group appears after the job, mission or rule status. |
|
CATEGORY |
The CATEGORY command alternately displays and hides the CATEGORY of the relevant Control-D mission. This command applies to Control-D generated messages only. When displayed, the name of the category appears after the mission status. |
Changing IOA Log Screen Display Types
While in the IOA Log screen, the display type can be changed through the DISPLAY command. Format of the command is:
DISPLAY xwhere x is a 1-character code that identifies the desired display type. DISPLAY can be abbreviated DI.
For a list of display types, enter DISPLAY ? to show the Display Options window. To select a display type in the window, type S in the Option field next to the ID. To exit the window without selecting a display type, press the END key (PF03/PF15).
DI Bdisplays the No Reverse display.
Valid predefined displays:
Table 179 IOA Log Screen Predefined Display Types
|
Display |
Description |
|---|---|
|
A |
Show RBA (Relative Byte Address) display (displays the RBA of the message within the IOA Log file in place of the ODATE) |
|
D |
Default display |
|
B |
No Reverse display (display is in No Reverse mode) |
Uppercasing and Lowercasing of Values of Variables
While in the IOA Log Screen, uppercase or lowercase mode can be set using the CAPS command. Format of the command is:
CAPS [{ON | OFF}]In this command:
-
CAPS ON: Forces all user entries to be saved and displayed in uppercase characters, regardless of the case in which they were entered. Default.
-
CAPS OFF: Enables certain user entries to be saved and displayed in lowercase characters.
-
CAPS: Indicates whether CAPS ON or CAPS OFF mode is active.
Name of variables do not support lowercase characters.
Filtering the IOA Log Screen Display
Screen filters can be used to filter the IOA Log screen display.
A filter consists of a set of record selection criteria (selection fields and their values). Only records that conform to the selection criteria specified in the filter are displayed on the screen.
The INCONTROL administrator can predefine filters and place them in the General profile.
Each user can activate an existing filter in the IOA Log screen by entering the SHOW command in the COMMAND line of the IOA Log screen.
Each user can define multiple filters for the screen, through the IOA Log Show Screen window, which is described in"Fields of the IOA Log Show Screen Window" in IOA Log Show Screen Window. User-defined filters belong to, are assigned names by, and can only be activated by, the user who defined them. They are stored in the user profile.
You can see the list of all available filters by opening the Display Filters window.
A predefined default filter (DEFAULT) is defined for the IOA Log screen. Site-defined defaults determine whether the last filter used or the DEFAULT filter is activated upon reentry to the IOA Log screen.
Activating an Existing Filter in the IOA Log Screen
The SHOW command can be used to activate an existing filter when you know the name of the filter.
-
To activate an existing filter in the IOA Log screen, enter the SHOW command in the COMMAND field, as follows:
CopySHOW namewshere name is the name of the filter to be activated.
To activate the DEFAULT filter, use DEFAULT as the name of the filter.
Display Filters Window
When you do not know the name of a filter, you can still activate a filter from the list of available filters by opening the Display Filters window. This window displays the list of all available filters. These include Global filters that are available to all users, as well as user-defined filters that are only available to the individual user. You can activate a filter from the Display Filters window, or switch to the IOA Log Show Screen window, where you can edit or define a filter.
To enter the Display Filters window, type SHOW ? in the COMMAND field of the IOA Log screen and press Enter.
Figure 192 IOA Log Screen Display Filters Window
FILTER: DEFAULT ---------------- IOA LOG ------------------------(5)
COMMAND ===> SCROLL===> CRSR
SHOW LIMIT ON ==> DATE 080800 - 080800
DATE TIME ODATE USERID CODE ------------- M E S S A G E -------------
080800 092144 080800 M22 SPY254I JOB CT085955 CT085955/01835 SCANNED
080800 092144 080800 M22 SEL208I JOB CT085955 CT085955/01835 ENDED "OK"
0 +-----------------------------------+ B CT085956 CT085956/01836 SCANNED
0 | DISPLAY FILTERS | B CT085956 CT085956/01836 ENDED "OK"
0 | CMD ==> SCROLL==> CRSR | B BRIVPCC BRIVPCC /01843 SCANNED
0 | O NAME DESCRIPTION | B BRIVPCC BRIVPCC /01843 ENDED "OK"
0 | CONFIRM | EE OF TASK BRCC0001 ODATE 080800
| DEL | RFORMED
0 | END | B INTR0004 INTR0004/04371 START
| ENDNOTOK | 253.1316 STOP 98253.1316 CPU 0MIN
| ENDOK | .04SEC SRB 0MIN 00.00SEC 0.19
0 | EXEC | B INTR0004 INTR0004/04371 SCANNED
0 | LATE | B INTR0004 INTR0004/04371 ABENDED CC
| WAIT | 37 STEP STEP01
0 | ECSALL | B INTR0004 INTR0004/04371 ENDED "NOT
| =========>>> BOTTOM <<<========== | "
0 | | B BRCC0001 ELIGIBLE FOR RUN
0 | S-SELECT OPTION E-EDIT OPTION | B BRCC0001 BRCC0002/01958 SUBMITTED
0 +-----------------------------------+ B BRCC0002 ELIGIBLE FOR RUN
CMDS: SHOW, GROUP, CATEGORY, SHPF 09.43.00Fields of Display Filters Window
The Display Filters window contains the following fields:
Table 180 Fields of the Display Filters Window
|
Field |
Description |
|---|---|
|
NAME |
Name of the filter as it appears in the General or User profile. |
|
DESCRIPTION |
Description of the filter. |
Options of the Display Filters Window
To request one of the following options, type the option in the OPT field to the left of the filter name and press Enter.
Table 181 Options of the Display Filters window
|
Option |
Description |
|---|---|
|
S (SELECT) |
Filters which entries are displayed in the Automation Log Screen according to the criteria specified in the selected filter. |
|
E (EDIT) |
Opens the IOA Log Show Screen window, where the filter criteria are displayed. You can modify the filter criteria. |
IOA Log Show Screen Window
The IOA Log Show Screen window in the IOA Log screen enables you to create or modify a filter.
-
To open an existing filter for editing, enter the following command:
SHOW filtername EDITwhere filtername is the name of the filter to be displayed in the IOA Log Show Screen window.
-
To edit the currently active filter, it is not necessary to enter the name of the filter or the EDIT keyword. Enter the SHOW command in the COMMAND field, or press PF02/PF14. The following IOA Log Show Screen window is displayed:
Figure 193 IOA Log Show Screen Window
FILTER: DEFA +-------------------- IOA LOG SHOW SCREEN -------------------(5)
COMMAND ===> | FILTER SAVE (Y/N) Desc: |
SHOW LIMIT O | |
DATE TIME | |
080800 14131 | |
| |
| CD+CV : SBSYS REP MIS SHOUT USER GENERAL DAILY MONIT STAT |
080800 14131 | Y Y Y Y Y Y N N N |
080800 14131 | |
080800 14153 | |
| |
080800 14155 | |
| CODE |
| URGENCY: REGULAR Y URGENT Y VERY-URGENT Y |
080800 14155 | TASK TYPE |
080800 14155 | |
080800 14173 | CD: REP PRT BKP/MIG RST EMR NOEMR CYC NOCYC |
| Y Y Y Y Y Y Y Y |
080800 14174 | USERID N54A |
| MEM/MIS MIGDASD |
| JOBNAME |
080800 14174 | CATEGORY |
080800 14174 | GROUP |
080800 14174 | ORDERID |
CMDS: SHOW, +--------------------------------------------------------------+-
To create a new filter, open any existing filter and enter a new name and description in the FILTER and DESC fields (described in "Fields of the IOA Log Show Screen Window," below).
Fields of the IOA Log Show Screen Window
The IOA Log Show Screen window contains the following fields:
Table 182 Fields of the IOA Log Show Screen Window
|
Field |
Description |
|---|---|
|
FILTER |
User-assigned name of the filter. The name entered in the FILTER field can be modified. If changes to a filter have not been saved, an asterisk is displayed to the right of the filter name. For more information, see Closing the IOA Log Show Screen Window. |
|
SAVE (Y/N) |
Specifies whether to save modifications to the filter upon closing the window. |
|
Desc: |
User-defined description of the filter. The description entered here appears next to the name in the Displaying Filters window. |
The INCONTROL administrator can limit which installed INCONTROL products and options each user may access. However, because all INCONTROL products and the messages they issue are integrated, it may be important for users to see the messages of products and options to which they have no access. Therefore, the types of messages for all INCONTROL products are listed in the IOA Log Show Screen window, and by default, the messages of all installed products are listed in the IOA Log screen.
Fields that define the selection criteria to be applied to the screen are described below. Fill in the selection criteria as necessary.
The selection criteria marked with the P symbol act on a prefix basis. For example, typing D4 in the USERID field causes the retrieval of all User IDs whose names start with D4.
Table 183 IOA Log Show Screen Window Selection Criteria
|
Criteria |
Description |
|---|---|
|
CV message type |
To limit the type of log messages displayed, enter Y (Yes) or N (No) under the desired message type. Valid Control-V message type codes:
Selection criteria identified by "CV message type" are specific to Control-V. Other selection criteria, such as those described below, are primarily applicable to other INCONTROL products, but may also be available to Control-V. |
|
CODEP |
Show only IOA Log file messages with the specified message IDs or prefix(es). A maximum of 6 message IDs (or prefixes) can be specified. |
|
URGENCY |
Mark Y (Yes) or N (No) to specify the desired urgency of messages. Urgent and very urgent messages are highlighted. |
|
TASK TYPE |
When mission messages are selected, limit the task types to be displayed. Enter Y to include or N to exclude the following task types:
|
|
USERIDP |
Show only messages of the specified user IDs. A maximum of five user IDs can be specified. Selection criteria MEM/MIS, JOBNAME, CATEGORY, and GROUP (described below) only affect the display of messages related to a mission. Messages not related to a mission are not affected by these selection criteria and are displayed unless suppressed by other selection criteria. |
|
MEM/MISP |
Limit displayed messages to the specified member and mission names. A maximum of five member or mission names can be specified. Messages not related to a mission are not affected by this show limit. |
|
JOBNAMEP |
Limit displayed messages to the specified job names. A maximum of five job names can be specified. Messages not related to a job are not affected by this show limit. |
|
CATEGORYP |
Limit displayed messages to the specified categories. A maximum of two categories can be specified. Messages not related to a mission are not affected by this show limit. |
|
ORDERID |
Limit displayed job messages to the specified order ID. |
IOA Log Show Screen Window (at Sites Where Multiple INCONTROL Products Are Active)
The IOA Log Show Screen window displays different selection criteria depending on which INCONTROL products are operational at your site.
The IOA Log Show Screen window at sites where all INCONTROL mainframe products are active is illustrated below.
Figure 194 IOA Log Show Screen Window at Sites where Multiple INCONTROL Products are Active
FILTER: +-------------------- IOA LOG SHOW SCREEN -------------------(5)
COMMAND ===> | FILTER SAVE (Y/N) Desc: |
SHOW LIMIT O | CM : D JOB M JOB SHOUT USER GENERAL D INT M INT STAT |
DATE TIME | Y Y Y Y Y N N N |
080800 06290 | CO+CMEM: GENERAL SHOUT JOBS GENERAL W PIPE W JOB W |
| Y Y Y |
080800 06290 | CD+CV : SBSYS REP MIS SHOUT USER GENERAL DAILY MONIT STAT |
080800 06290 | Y Y Y Y Y Y N N N |
080800 06290 | CB : RUNTIME SHOUT DAILY GENERAL STATISTICS |
| Y Y Y Y Y |
080800 06521 | CT : GENERAL SHOUT REAL-TIME UTILITIES |
080800 06521 | Y Y Y Y |
080800 06521 | CODE |
| URGENCY: REGULAR Y URGENT Y VERY-URGENT Y |
080800 07290 | TASK TYPE CM: JOB CYC EMR STC CST EST ECJ ECS WRN TBL |
080800 07290 | Y Y Y Y Y Y Y Y Y Y |
080800 07290 | CD: REP PRT BKP/MIG RST EMR NOEMR CYC NOCYC |
| Y Y Y Y Y Y Y Y |
080800 07290 | USERID N54A |
080800 07290 | MEM/MIS MIGDASD |
080800 07290 | JOBNAME |
| CATEGORY |
080800 07493 | GROUP |
080800 07493 | ORDERID |
CMDS: SHOW, +--------------------------------------------------------------+The Control-V selection criteria are described in Table 182. For descriptions of the selection options for other INCONTROL products, see the user guides of the respective products.
The INCONTROL administrator can limit which installed INCONTROL products and options each user can access. However, because all INCONTROL products and the messages they issue are integrated, it may be important for users to see the messages of products and options to which they have no access. Therefore, the types of messages for all INCONTROL products are listed in the IOA Log Show Screen window, and by default, the messages of all installed products are listed in the IOA Log screen.
Closing the IOA Log Show Screen Window
You can activate an edited filter with or without saving changes, depending on the value you type in the SAVE field, as follows:
-
To activate and save the filter, type Y (Yes) in the SAVE field. Changes to the filter are permanently saved.
-
To activate the filter without saving it, type N (No) in the SAVE field. Changes are kept in memory only, but are not saved.
After entering a value in the SAVE field, press one of the following keys:
Table 184 IOA Log Show Screen Window - Closing Values
|
PFKey |
Description |
|---|---|
|
Enter |
Filtering begins with the first message currently displayed in the screen and continues downward. |
|
PF07 (UP) |
Filtering begins with the first message in the IOA Log file and continues downward. |
|
PF08 (DOWN) |
Filtering begins with the last message in the IOA Log file and continues upward. |
The window is closed and the filter is activated as defined or modified.
To cancel changes made in the IOA Log Show Screen window, press RESET (PF10/PF22). The changes are canceled regardless of the value specified in the SAVE field, the window is closed, and the filter that was previously in effect is restored.
By default, pressing END (PF03/PF15) in the window works like pressing Enter. However, the default can be modified so that pressing END works like pressing RESET.
IOA Calendar Facility
The IOA Calendar facility enables you to create, view, or modify calendar definitions.
Calendars simplify the scheduling of INCONTROL product jobs, missions, rules, and so on. When a particular schedule is used in many job scheduling, mission, and/or rule definitions, a calendar can be defined for that schedule, and the name of that calendar can be specified in all the job, mission, or rule definitions that use that particular schedule.
For example, calendars may be defined to handle the normal scheduling needs for workdays, holidays, weekends, beginning of month, end of month, and so on. Exception calendars may also be created.
A calendar definition consists of parameters that specify when scheduling occurs.
Calendar definitions are stored in members. A member usually contains multiple calendar definitions, as follows:
-
A member contains the calendars required for a specific type of scheduling need. For example, the calendar member WORKDAYS may contain the calendar definitions for normal workday scheduling.
-
Each calendar definition in that member defines the schedule for a given year. For example, the calendar member WORKDAYS may contain calendar definitions 2001, 2002, and 2003. Each of those definitions contains the normal workday schedule for the corresponding year.
The IOA Calendar facility also enables the definition of varied work periods throughout the year, in special calendars called periodic calendars.
A calendar definition needs to be created only once. Once defined, the definition is saved and used as necessary for scheduling. Calendar definitions can be modified or deleted as required.
Any number of calendar members can be defined. Calendar members are stored in calendar libraries (partitioned datasets). Generally one calendar library is defined at time of installation, and referenced by DD statement DACAL.
The IOA Calendar facility does not support members that have been compressed using the ISPF PACK option.
Accessing the IOA Calendar Facility
The IOA Calendar facility contains the following screens:
Table 185 IOA Calendar Facility Screens
|
Screen |
Description |
|---|---|
|
IOA Calendar Facility entry panel |
Enables specification of parameters that determine which records are displayed in subsequent screens. |
|
Calendar List screen |
Displays the list of calendar members in the specified calendar library. |
|
Year List screen |
Displays the list of years for which there is a calendar definition in the selected calendar member. |
|
Calendar Definition screen |
Displays the parameters of the selected calendar for the selected year. This is the main screen of the facility. |
To enter the IOA Calendar facility, select option 8 in the IOA Primary Option menu. The IOA Calendar facility entry panel is displayed.
Depending on the values specified in the entry panel, you can bypass the Calendar List screen and/or the Year List screen.
Entry Panel
The entry panel is displayed upon entering the IOA Calendar facility (option 8 in the IOA Primary Option menu).
Figure 195 IOA Calendar Facility Entry Panel
--------------------- IOA CALENDAR FACILITY - ENTRY PANEL ------------------(8)
COMMAND ===>
SPECIFY LIBRARY, CALENDAR, YEAR
LIBRARY ===> IOA.PROD.CAL
CALENDAR ===> (Blank for calendar selection list)
YEAR ===> (Blank for year selection list)
USE THE COMMAND "SHPF" TO SEE PFK ASSIGNMENT 10.58.42Fields of the Entry Panel
Fill in the following fields and press Enter.
Table 186 Fields of the IOA Calendar Facility Entry Panel
|
Field |
Description |
|---|---|
|
LIBRARY |
Name of the desired calendar library. Mandatory. If you make an entry in this field without filling in the CALENDAR field, the list of calendars in the selected library is displayed in the Calendar List screen. If you make an entry in this field, you can restrict the list of calendars that are displayed by entering in the CALENDAR field part of a Calendar name together with a mask character or characters (? and *). |
|
CALENDAR |
Name of the desired calendar member. Optional. If an entry is made in this field without filling in the YEAR field, the list of years in the selected calendar member is displayed in the Year List screen. |
|
YEAR |
Year of the desired calendar definition. Optional. This field can be used only if a CALENDAR value is also entered. If specified, the calendar definition is displayed in the Calendar Definition screen. |
If you use the selection list fields, their values are not erased until you exit the entry panel by pressing END (PF03/PF15).
Calendar List Screen
The Calendar List screen displays a list of calendars (members) in the specified library. This screen can be entered directly from the entry panel or upon exiting the Year List screen.
By default, only calendar names are listed in the screen. However, if the default has been modified at time of installation, statistical information is displayed for each calendar name, as shown in Figure 196.
Figure 196 Calendar List Screen
CALENDARS IN LIB IOA.PROD.CAL ------------(8.D)
COMMAND ===> SCROLL===> CRSR
OPT NAME ------------ VV.MM CREATED CHANGED SIZE INIT MOD ID
BANKDAYS 01.00 02/01/28 01/06/29 09:50 104 104 0 IOAPROD
DAYSOFF 01.00 02/01/28 01/06/29 09:50 30 30 0 IOAPROD
HOLIDAYS 01.00 02/01/28 01/06/29 09:50 15 15 0 IOAPROD
PERIOD1O 01.00 02/01/28 01/06/29 09:50 45 45 0 IOAPROD
SACAYCLN 01.01 02/01/28 01/11/29 17:43 26 26 0 L3051
SPMONCLN 01.01 02/01/29 01/11/30 15:00 117 104 0 M16A
SPWEKCLN 01.01 02/01/29 01/11/30 15:10 117 104 0 M16A
STOCKDAY 01.00 02/01/30 01/06/31 09:50 45 45 0 IOAPROD
WORKDAYS 01.01 02/01/30 01/11/31 17:43 26 26 0 L3051
======= >>>>>>>>>>>>>>>> NO MORE CALENDARS IN LIBRARY <<<<<<<<<<<<<<<< ======
OPTIONS: S SELECT B BROWSE D DELETE 13.54.14To return to the entry panel, press END (PF03/PF15).
Options of the Calendar List Screen
To request one of the following options, type the option in the OPT field to the left of the calendar names, and press Enter.
Table 187 Options of the Calendar List Screen
|
Option |
Description |
|---|---|
|
S (SELECT) |
Display the list of years for the calendar for any purpose, including editing or modification. Only one calendar can be selected at a time. |
|
B (BROWSE) |
Display the list of years for the calendar for browsing. Only one calendar can be selected at a time. |
|
D (DELETE) |
Delete the calendar (member) from the library. Multiple calendars can be selected. |
Year List Screen
The screen displays the list of years for which a specified calendar is defined. This screen can be entered directly through the entry panel or the Calendar List screen, or upon returning from the Year Definition screen.
If the S (Select) option was entered in the Calendar List screen for a calendar that is currently in use (selected) by another user, either the Year List screen is not displayed and the Calendar List screen remains displayed (the default), or the Year list screen is displayed in Browse mode (if a user profile definition overrides the default). In either case, an appropriate message is displayed.
If a calendar description was defined in the Calendar Definition screen, the definition is displayed to the right of the year.
Figure 197 Year List Screen
LIST OF YEARS IN IOA.PROD.CAL CALENDAR WORKDAYS
COMMAND ===> SCROLL===> CRSR
OPT YEAR ------------------ DESCRIPTION --------------------------------------
2001 REGULAR WORKING DAYS IN 2001
2002 REGULAR WORKING DAYS IN 2002
2003 REGULAR WORKING DAYS IN 2003
2004 REGULAR WORKING DAYS IN 2004
2005 REGULAR WORKING DAYS IN 2005
======= >>>>>>>>>>>>>>>> NO MORE YEARS IN CALENDAR <<<<<<<<<<<<<<<< =====
OPTIONS: S SELECT D DELETE I INSERT W INSERT BY WEEK DAYS C COPY 08.52.54UTo return to the Calendar List screen press END (PF03/PF15).
Format of the Year List Screen
Next to each year in the Year list, certain information can be displayed. The type and format of this information depends on whether the screen is displayed in DESC format or in STAT format:
-
In DESC format, the description of the year, taken from the DESC field of the calendar definition, is displayed. Default.
-
In STAT format, the ISPF statistical information for the calendar definition is displayed.
By default, the Year list is displayed in DESC format. To change formats, use the DESC or STAT commands, described in Table 188.
Commands of the Year List Screen
The following commands can be entered in the COMMAND field of the Year List screen.
Table 188 Commands of the Year list screen
|
Command |
Description |
|---|---|
|
DESC |
The DESC command displays the calendar description next to the year. The description is taken from the DESCRIPTION field in the calendar definition. |
|
STAT |
The STAT command displays the following ISPF-like statistical information about the calendar next to the year: version and modification numbers, creation date, last modification date, and user ID. |
Options of the Year List Screen
To request one of the following options, type the option in the OPT field to the left of the year and press Enter.
If the Year List screen is displayed in Browse mode, options D (Delete), I (Insert), and W (Insert By Week Days) are not available.
Table 189 Options of the Year List Screen
|
Option |
Description |
|---|---|
|
S (SELECT) |
Displays the calendar definition for the specific year. Parameters can be edited and updated only if the Calendar Definition screen is not displayed in Browse mode. If the Calendar Definition screen is displayed in Browse mode, the screen can only be browsed and parameters cannot be modified. |
|
D (DELETE) |
Deletes the calendar definition for the specified year. |
|
I (INSERT) |
Inserts a new year in the Year List screen and display the Calendar Definition screen with a predefined year definition for editing. The predefined calendar definition is defined with the same dates as the year next to which the I (Insert) request was specified. For more information, see "Inserting a New Year." |
|
W (INSERT BY WEEK DAYS) |
Inserts a new year in the Year List screen and display the Calendar Definition screen for editing a predefined year definition. The predefined year definition is defined with the same days of the week as the year next to which the W (Insert by Week Days) request was specified. For more information, see "Inserting a New Year." |
|
C (COPY) |
Copies sthe year to another calendar, as described in Copying Years to another Calendar. Multiple years can be selected. |
Inserting a New Year
All calendar definitions identified in the same Year List usually have the same fixed scheduling pattern. Often, this scheduling pattern is based either on dates within a month or on days of the week within the month.
-
Calendar QUARTERLY might always indicate scheduling for the last day of March, June, September, and December (that is, a scheduling pattern based on dates).
-
Calendar WEEKEND might always indicate scheduling all Saturdays and/or Sundays in each month (that is, a scheduling pattern based on days of the week).
This scheduling pattern also applies to new calendar definitions resulting from the insertion of a new year in the Year List screen.
When a year is inserted in the Year List, the IOA Calendar facility automatically generates a predefined calendar definition for the new year, based on the scheduling pattern of the calendar by which the insert request was specified. This frees the user from having to manually define the new calendar. This automatically generated calendar definition can be displayed and modified.
The Year list must be kept in ascending order without missing years (for example, 2001, 2002, 2003, 2004, 2005). Each new year must be added at the end of the list.
-
In calendar definitions, a defined scheduling date is described by both the date (month and day) and the day of the week. Because a particular date falls on a different day of the week in different years, it is necessary to indicate whether the scheduling pattern is based on the date or on the days of the week. This is indicated by the specified insert option.
-
To define the calendar with the same scheduling dates (although corresponding days of the week may vary, for example, calendar QUARTERLY described above), type option I (INSERT).
-
To define the calendar so that scheduling takes place on the same weekdays as in the previous calendar (although the corresponding dates may vary, for example, calendar WEEKEND described above), type option W (INSERT BY WEEK DAYS).
-
If the scheduling pattern is mixed (for example, calendar HOLIDAYS always indicates scheduling on both January 1 and the first Monday in September), specify the more appropriate option and correct the new calendar definition manually.
Copying Years to another Calendar
Years currently displayed in the Year List screen can be copied to another calendar. To copy the desired years, type option C (COPY) next to each desired year in the screen and press Enter. The following window is displayed:
Figure 198 Calendar List Screen Copy Window
LIST OF YEARS IN: IOA.PROD.CAL CALENDAR: CALEN1
COMMAND ===> SCROLL===> CRSR
OPT YEAR -------- DESCRIPTION ------------------------------------------------
2001 REGULAR WORKING DAYS IN 2001
C 2002 REGULAR WORKING DAYS IN 2002
2003 REGULAR WORKING DAYS IN 2003
2004 REGULAR WORKING DAYS IN 2004
+-----------------------------------------------------------+
| |
| SPECIFY DESTINATION LIBRARY,CALENDAR AND RULE NAME |
| |
| LIBRARY : IOA.PROD.CAL |
| CALENDAR: |
| YEAR : 2005 |
| |
| PRESS END/RESET TO CANCEL ENTER TO PERFORM THE COPY |
+-----------------------------------------------------------+
OPTIONS: S SELECT D DELETE I INSERT W INSERT BY WEEK DAYS C COPY 15.37.39The window contains the following fields (some fields contain default values that can be modified):
Table 190 Fields of the Calendar List Screen Copy Window
|
Field |
Description |
|---|---|
|
LIBRARY |
Library containing the calendar into which the years must be copied. Must be an existing library. Default: The current library. |
|
CALENDAR |
Name of the calendar into which the year must be copied. A year can only be copied to another calendar. It cannot be copied to its own calendar (even if the year is renamed). If the selected calendar does not exist in the Calendar List, the calendar is created when the request is performed. |
|
YEAR |
Name of the year to be copied. If multiple years are selected, the window is initially displayed with the first selected year. As each request is performed or canceled, the next requested year name appears. |
To perform a request, press Enter.
To cancel a request, press END (PF03/PF15) or RESET (PF04/PF16).
Calendar Definition Screen
This screen is used to define, display and modify dates in a calendar for a specific year. This screen can be entered directly from the entry panel or from the Year List screen.
Figure 199 Calendar Definition Screen
--------------------------- IOA CALENDAR - WEEKDAYS ----------------------(8.Y)
COMMAND ===> SCROLL===> CRSR
YEAR 2002 REGULAR WORKDAYS IN 2002
-----S-------------S-------------S-------------S-------------S-------------S---
1 2 3 4 5 6 7 8 9 + 1 2 3 4 5 6 7 8 9 + 1 2 3 4 5 6 7 8 9 + 1
01 Y Y Y Y Y Y Y Y Y Y Y Y Y Y Y Y Y Y Y Y Y Y
-----S-------------S-------------S-------------S-------------S-------------S---
1 2 3 4 5 6 7 8 9 + 1 2 3 4 5 6 7 8 9 + 1 2 3 4 5 6 7 8
02 Y Y Y Y Y Y Y Y Y Y Y Y Y Y Y Y Y Y Y Y
-----S-------------S-------------S-------------S-------------S-------------S---
1 2 3 4 5 6 7 8 9 + 1 2 3 4 5 6 7 8 9 + 1 2 3 4 5 6 7 8 9 + 1
03 Y Y Y Y Y Y Y Y Y Y Y Y Y Y Y Y Y Y Y Y Y
-----S-------------S-------------S-------------S-------------S-------------S---
1 2 3 4 5 6 7 8 9 + 1 2 3 4 5 6 7 8 9 + 1 2 3 4 5 6 7 8 9 +
04 Y Y Y Y Y Y Y Y Y Y Y Y Y Y Y Y Y Y Y Y Y Y
-----S-------------S-------------S-------------S-------------S-------------S---
1 2 3 4 5 6 7 8 9 + 1 2 3 4 5 6 7 8 9 + 1 2 3 4 5 6 7 8 9 + 1
05 Y Y Y Y Y Y Y Y Y Y Y Y Y Y Y Y Y Y Y Y Y Y Y
-----S-------------S-------------S-------------S-------------S-------------S---
1 2 3 4 5 6 7 8 9 + 1 2 3 4 5 6 7 8 9 + 1 2 3 4 5 6 7 8 9 +
06 Y Y Y Y Y Y Y Y Y Y Y Y Y Y Y Y Y Y Y Y
-----S-------------S-------------S-------------S-------------S-------------S---
TYPE Y IN ALL THE EXECUTION DAYS 14.37.10Fields of the Calendar Definition Screen
Table 191 Fields of the Calendar Definition Screen
|
Field |
Description |
|---|---|
|
YEAR |
Year of the calendar. This value can be modified. When modified, the values indicated for each date in each month (described below) are shifted to the appropriate day of the week. |
|
description |
User-supplied, free text description of the calendar. Optional. |
|
month/dates |
Each month of the year (01 – 12) of the calendar consists of the following:
|
Periodic Calendars
Some jobs must be scheduled periodically, according to schedules that are not easily expressed in terms of fixed days and dates within months. In these cases, monthly, or even yearly, scheduling definition is awkward.
-
A payroll job needs to be scheduled every other Wednesday:
-
In some months, the job may be scheduled on the first, third, and even fifth Wednesday in the month. In other months, it may be scheduled on the second and fourth Wednesday in the month.
-
In some years, the job may be scheduled beginning on the first Wednesday of the year. In other years, it may be scheduled beginning on the second Wednesday of the year.
-
-
A job must be scheduled every 25 days, regardless of date. Such a job is scheduled on different dates each month and each year.
The IOA Calendar facility provides special calendars, called periodic calendars, to allow specification of these scheduling requirements. These periodic calendars are very flexible.
To designate a calendar as periodic, you must type reserved string ==PERIODIC== in the first 12 positions of the description field. Any text can be entered in the rest of the description field. This is illustrated in the following figure.
Figure 200 Use of Reserved String "==PERIODIC=="
COMMAND ===> SCROLL===> CRSR
YEAR 2002 - ==PERIODIC== GENERAL WORKDAY CALENDAR The following are characteristics of periodic calendars:
-
In a periodic calendar, days are not marked using the letters Y (Yes) or N (No). Instead, a period identifier is used to mark working days in a period. A period identifier can be any letter from A to Z (except Y and N), any number from 0 to 9, or any other printable sign. If you need more characters, use characters falling within the hexadecimal range 4A through F9. All working days within the same period must be marked using the same period identifier character so that different identifier characters indicate different periods. Days that are not marked are nonworking days because they do not belong to any period in this calendar.
-
Identifiers from different periods can be interspersed throughout a periodic calendar.
-
A periodic calendar can consist of smaller units that do not correspond to regular months, in that they can be longer or shorter than regular months.
-
A periodic calendar can span a period, called a "logical year", which can be longer or shorter than one regular calendar year.
When a periodic calendar spans parts of two regular calendar years, special considerations are likely to arise. For more information, see Special Year-End Handling of Periodic Calendars.
-
A period can span any number of days, but no more than a preset number of days can elapse after the appearance of one identifier in a period until the appearance of the next matching identifier in the same period. After that period expires, the next matching identifier starts a new period.
By default, this period is preset to 33 days. Once the length of the gap between matching identifiers exceeds 33 days, the period automatically closes.
The length of the default period can be changed from 33 days by the INCONTROL administrator, using optional Wish WM2888.
For more information on the use of periodic calendars, see DAYS: Basic Scheduling Parameter (Decollating Mission)and WDAYS: Basic Scheduling Parameter.
Figure 201 Periodic Calendar – Example 1
-----S-------------S-------------S-------------S-------------S-------------S--
1 2 3 4 5 6 7 8 9 + 1 2 3 4 5 6 7 8 9 + 1 2 3 4 5 6 7 8 9 + 1
12 A A A B A
-----S-------------S-------------S-------------S-------------S-------------S--
1 2 3 4 5 6 7 8 9 + 1 2 3 4 5 6 7 8 9 + 1 2 3 4 5 6 7 8 9 + 1
01 B B
-----S-------------S-------------S-------------S-------------S-------------S--This example contains two periods: A and B.
-
Period A starts on December 13 and ends on December 23. During this period, the defined working days are December 13, December 18, December 20, and December 23.
-
Period B spans more than one calendar year. It starts on December 21 and ends on January 24. During this period, the defined working days are December 21, January 4, and January 24.
Figure 202 Periodic Calendar – Example 2
-----S-------------S-------------S-------------S-------------S-------------S----
1 2 3 4 5 6 7 8 9 + 1 2 3 4 5 6 7 8 9 + 1 2 3 4 5 6 7 8 9 + 1
03 B A B A
-----S-------------S-------------S----------0---S-------------S-------------S---
1 2 3 4 5 6 7 8 9 + 1 2 3 4 5 6 7 8 9 + 1 2 3 4 5 6 7 8 9 +
04 B
-----S-------------S-------------S-------------S-------------S-------------S--This example includes a period B that begins on March 9. The last marked working day of the period is March 21, which is followed by a 33-day gap. Assuming that Wish WM2888 has not been used to alter the default period of 33 days, period B automatically ends on April 23, and April 24 marks the beginning of a new period B. If no more B identifiers are added, this new B period ends on May 27.
Special Year-End Handling of Periodic Calendars
Jobs or missions may be improperly scheduled if a periodic calendar contains one or more periods that start in one year and continue into the next year, under the following circumstances:
-
If the default gap between occurrences of matching identifiers has been changed from 33 days to a longer period.
and
-
If the first occurrence of the matching identifier in one logical year falls within the default gap that began at the last occurrence of the matching identifier in a prior logical year.
In such cases, the period in the prior logical year overlaps the period in the later logical year, causing a scheduled rule not to run in the later logical year as expected.
To avoid this problem, remove logical years from periodic calendars as soon as they are no longer needed.
-
Logical year FISCAL01 extends from April 1, 2001 through March 31, 2002.
-
Logical year FISCAL01 contains a period identified as Period A that has been defined to begin on December 28, 2001 and to continue through January 15, 2002.
-
Logical year FISCAL02 extends from April 1, 2002 through March 31, 2003.
-
Logical year FISCAL02 also contains a period identified as Period A, defined to begin on April 20, 2002 and continue through May3,2002.
-
Job X is scheduled for the seventh day of Period A in each logical year, through the rule definition DAYS=D7PA.
In a case where the default gap being 33 days, Rule X runs in January 2002, and again in April 2002, as expected.
In a case where the default gap is changed from 33 to a longer period, such as 120 days, the first day of Period A in logical year FISCAL02 occurs less than 120 days after the last appearance of Period A in logical year FISCAL01. As a result, what appears to be the seventh day in Period A in April 2002 is not recognized as such, because the "old" Period A overlaps the "new" Period A. Consequently, Rule X does not run again when the user may have expected it to run.
Deleting Calendars
To delete calendars, type option D next to the calendar names in the Calendar List screen and press Enter.
The following confirmation window is displayed, in sequence, for each calendar selected for deletion.
Figure 203 Calendar List Screen Delete Confirmation Window
CALENDARS IN LIB IOA.PROD.CAL ------------(8.D)
COMMAND ===> +--------------------------+ SCROLL===> CRSR
OPT NAME --- | CONFIRM DELETE OPTION | E INIT MOD ID
D BANKDAYS <-----------| (Y/N) | 4 104 0 IOAPROD
DAYSOFF +--------------------------+ 0 30 0 IOAPROD
HOLIDAYS 01.00 02/01/28 01/06/29 09:50 15 15 0 IOAPROD
PERIOD1O 01.00 02/01/28 01/06/29 09:50 45 45 0 IOAPROD
D SACAYCLN 01.01 02/01/28 01/11/29 17:43 26 26 0 L3051
SPMONCLN 01.01 02/01/29 01/11/30 15:00 117 104 0 M16A
SPWEKCLN 01.01 02/01/29 01/11/30 15:10 117 104 0 M16A
STOCKDAY 01.00 02/01/30 01/06/31 09:50 45 45 0 IOAPROD
WORKDAYS 01.01 02/01/30 01/11/31 17:43 26 26 0 L3051
======= >>>>>>>>>>>>>>>> NO MORE CALENDARS IN LIBRARY <<<<<<<<<<<<<<<< ======
OPTIONS: S SELECT D DELETE I INSERT W INSERT BY WEEK DAYS C COPY 13.54.14Type Y (Yes) in the window to delete the calendar.
Type N (No) in the window to cancel the delete request.
If PDSMAN is operational at your site, $$$SPACE members are not deleted.
For each calendar deleted, a message is written to the IOA Log file.
Exiting the IOA Calendar Facility
When exiting the IOA Calendar facility, screens are exited in the following sequence:
-
Calendar Definition screen.
-
Year List screen.
-
Calendar List screen.
If the Calendar List screen was bypassed as you entered the IOA Calendar facility (that is, if you entered a CALENDAR value in the entry panel), the Calendar List screen is not displayed upon exiting the Year List screen; instead, the entry panel is displayed.
Calendar Facility Entry Panel
The commands and options available when exiting screens depend on the screen being exited and on whether changes have been made. If changes have been made, the selected exit options and commands determine whether the changes are saved. Exit options and commands are discussed below on a screen by screen basis.
Exiting the Calendar Definition Screen
Use any of the following commands, or press the corresponding PFKey, to exit the Calendar Definition screen:
Table 192 Commands for Exiting the Calendar Definition Screen
|
Command |
Description |
|---|---|
|
CANCEL |
Cancel the changes made to the calendar definition and return to the Year List screen. |
|
The following exit commands retain changes to the calendar definition in memory. To permanently save the changes to disk, you must also request that the changes be saved when you exit the Year List screen. |
|
|
END (PF03/PF15) Enter |
Keep changes to the calendar definition in memory and exit to the Year List screen. |
|
NEXTYEAR (PF11/PF23) |
Keep changes to the calendar definition in memory and display the next calendar definition in the Year List screen. |
|
PREVYEAR (PF10/PF22) |
Keep changes to the calendar definition in memory and display the previous calendar definition in the Year List screen. |
Exiting the Year List Screen
Press END (PF03/PF15) to exit the Year List screen. If changes made to at least one calendar definition have been kept in memory or if any changes have been made to the Year List screen, the Exit Option window is displayed. For more information, see Exiting the Calendar Definition Screen.
Figure 204 Year List Screen Exit Option Window
LIST OF YEARS IN IOA.PROD.CAL CALENDAR WORKDAYS
COMMAN +-----------------------------------------------------------+ ===> CRSR
OPT N | PLEASE SELECT EXIT OPTION |
1 | |
1 | SAVE CREATE |
1 | |
====== | LIBRARY IOA.PROD.CAL | << =====
| TABLE WORKDAYS |
| |
+-----------------------------------------------------------+
OPTIONS: S SELECT D DELETE I INSERT W INSERT BY WEEK DAYS C COPY 08.53.50Fill in the Exit Option window as follows:
The LIBRARY and TABLE (member) fields indicate the library and member in which the calendar definitions must be saved. The specified values can be modified (for example, to save the calendar definitions in a different member).
-
To save all changes currently in memory and exit the Year List screen, type Y (Yes) after the word SAVE or CREATE:
-
Type Y after the word SAVE if a member with the same calendar name already exists in the specified library.
-
Type Y after the word CREATE if a member with the same calendar name does not exist in the specified library.
-
If you create a new calendar member, the member name does not appear in the Calendar List screen upon exiting the Year List screen; it first appears when you reenter the Calendar List screen from the entry panel.
-
To cancel changes currently in memory and exit the Year List screen, type N (No) after the word SAVE or CREATE.
-
To close the Exit Option window and remain in the Year List screen (with the changes remaining in memory), press RESET (PF04/PF16).
Exiting the Calendar List Screen
Press END (PF03/PF15) to exit the Calendar List screen.
Exiting the Entry Panel
Press END (PF03/PF15) to exit the entry panel.
Utilities under ISPF
Several IOA facilities can only be activated under ISPF. To activate these facilities, select option 6 on the IOA Primary Option menu (under ISPF) or invoke the IOAUTIL CLIST from the TSO Command Processor. The IOA Online Utilities menu is displayed.
The INCONTROL administrator can remove user authority to access option 6 on the IOA Primary Option menu. In this case, the IOA Online Utilities menu is not displayed.
IOA Online Utilities Menu
Depending on the INCONTROL products that are available at your site, different online utility options are displayed in the Online Utilities menu. Figure 205 shows the IOA On-line Utilities menu that is displayed when all applicable INCONTROL products are active.
Figure 205 IOA Online Utilities Menu when all INCONTROL Products are Installed
------------------------------ ON-LINE UTILITIES ------------------------------
USERID - N06
TIME - 13:40
TERMINAL - 3278
D1 DECOLLATING - Schedule a Report Decollating Mission
D2 PRINT - Schedule a Printing Mission
D3 BACKUP/MIGRATION - Schedule a Backup/Migration Mission
D4 RESTORE - Schedule a Restore Mission
I1 PREREQ CONDITION - Add/Check/Delete a Prerequisite Condition
M1 JOB ORDER ISSUE - Issue a Job Order
M2 AUTOEDIT SIMUL - Perform an AutoEdit Simulation
M3 SIMUL/TAPE PULL - Prepare Simulation/Tape Pull List Job
M4 PARAM PROMPTING - Parameter Prompting Facilities
M5 QUICK SCHEDULE - Quick Schedule Definition
M6 USER INTERFACE - End-User Job Order Interface
R1 CTM/RESTART SIM - Control-M/Restart Simulation
R2 DATASET CLEANUP - Control-M/Restart Dataset Cleanup
R3 JOB DATASET LIST - Prepare a Job Dataset List
R4 STANDALONE - Control-M/Restart Standalone
T1 CONTROL-M/Tape SIMUL - Simulate Control-M/Tape Rules
X EXIT - Exit This Menu
OPTION ===> If DOCU/TEXT has also been installed at your site, an additional utility, option U1, is displayed in the Online Utilities menu.
To access an available utility, type the desired option number in the OPTION field and press Enter.
Options D1, D2, D3, D4, and I1, which are also available when Control-V is installed as a standalone product, are described on the following pages. For the descriptions of other utilities on the menu, see the user guides of the relevant products.
Online utility screens utilize standard ISPF profile capabilities.
Quick transfer to a utility can be performed by entering =opt from another utility screen, or =6.opt from a non-utility screen (for example, the IOA Log screen), where opt is the 2-character option identified on the IOA Online Utilities menu.
D1: Schedule a Report Decollating Mission
This utility schedules one or more categories of a report decollating mission.
The utility screen shown in Figure 206 can be displayed in the following ways:
-
Select option D1 - DECOLLATING in the Online Utilities menu.
-
Invoke the CTDMISRQ CLIST with parameter MIS(REP) from the TSO Command Processor screen.
Figure 206 Report Decollating Mission Scheduling Utility Screen
-------------- REPORT DECOLLATING MISSION SCHEDULING UTILITY -------------
COMMAND ===>
MISSION LIBRARY ===> CTDW.WORKO.REPORTS
MISSION/JOB NAME ===> SALARYRP
CATEGORY ===> * (* for all categories)
SCHEDULED RUN DATE ===> 08 08 00 (ODATE - format DD MM YY)
FORCED SCHEDULING ===> NO (YES,NO)
ENTER YES TO CONTINUE ===> YES
CALENDAR LIBRARY ===> IOAW.WORKO.CALTo activate the utility, fill in the following fields and press Enter.
Table 193 Fields of the Prerequisite Condition Utility Screen
|
Field |
Description |
|---|---|
|
MISSION LIBRARY |
Library that contains the mission you want to schedule. The default report decollating mission library is displayed. |
|
MISSION/JOB NAME |
Name of the mission you want to schedule. |
|
CATEGORY |
Name of the mission category you want to schedule. Enter an asterisk (*) to schedule all categories of the mission. |
|
SCHEDULED RUN DATE |
Original scheduling date for the mission in DD MM YY format. The default is the current working date. |
|
FORCED SCHEDULING |
Yes/No indicator that determines whether or not scheduling is "forced."
|
|
ENTER YES TO CONTINUE |
Confirmation field to prevent the unintentional scheduling of a mission. Enter YES to schedule the mission. |
|
CALENDAR LIBRARY |
Library that contains any calendars specified in the mission. The default calendar library is displayed. |
To exit the screen without activating the utility, press PF03/PF15.
D2: Schedule a Printing Mission
This utility schedules a printing mission.
The utility screen shown in Figure 207 can be displayed in the following ways:
-
Select option D2 - PRINT in the Online Utilities menu.
-
Activate CLIST CTDMISRQ with parameter MIS(PRT) from the TSO Command Processor.
Figure 207 Print Mission Scheduling Utility Screen
--------------------- PRINT MISSION SCHEDULING UTILITY --------------------
COMMAND ===>
MISSION LIBRARY ===> CTDW.WORKO.PRTMIS
MISSION/JOB NAME ===> SALARYRP
CATEGORY ===> * (* for all categories)
SCHEDULED RUN DATE ===> 08 08 00 (ODATE - format DD MM YY)
FORCED SCHEDULING ===> NO (YES,NO)
ENTER YES TO CONTINUE ===> YES
CALENDAR LIBRARY ===> IOAW.WORKO.CALTo activate the utility, fill in the following fields and press Enter.
Table 194 Print Mission Scheduling Utility Screen
|
Field |
Description |
|---|---|
|
MISSION LIBRARY |
Library that contains the mission you want to schedule. The default print mission library is displayed. |
|
MISSION/JOB NAME |
Name of the mission you want to schedule. |
|
CATEGORY |
Name of the mission category you want to schedule. Enter an asterisk (*) to schedule all categories of the mission. |
|
SCHEDULED RUN DATE |
Original scheduling date for the mission in DD MM YY format. The default is the current working date. |
|
FORCED SCHEDULING |
Yes/No indicator that determines whether or not scheduling is "forced."
Default: NO |
|
ENTER YES TO CONTINUE |
Confirmation field to prevent the unintentional scheduling of a mission. Enter YES to schedule the mission or press PF03/PF15 to return to the previous screen. |
|
CALENDAR LIBRARY |
Library that contains any calendars specified in the mission. The default calendar library is displayed. |
To exit the screen without activating the utility, press PF03/PF15.
D3: Schedule a Backup / Migration Mission
This utility schedules a backup mission or a migration mission.
The utility screen shown in Figure 208 can be displayed in the following ways:
-
Select option D3 – BACKUP / MIGRATION in the Online Utilities menu.
Figure 208 Backup Mission Scheduling Utility Screen
Activate CLIST CTDMISRQ with parameter MIS(BKP) from the TSO Command Processor.
-------------- BACKUP / MIGRATION MISSION SCHEDULING UTILITY -------------
COMMAND ===>
MISSION LIBRARY ===> CTVW.WORKO.MIGMIS
MISSION/JOB NAME ===> MIG0007D
CATEGORY ===> * (* for all categories)
SCHEDULED RUN DATE ===> 08 08 00 (ODATE - format DD MM YY)
FORCED SCHEDULING ===> NO (YES,NO)
ENTER YES TO CONTINUE ===> YES
CALENDAR LIBRARY ===> IOAW.WORKO.CAL To activate the utility, fill in the following fields and press Enter:
Table 195 Backup Mission Scheduling Utility Screen Fields
|
Field |
Description |
|---|---|
|
MISSION LIBRARY |
Library that contains the mission you want to schedule. The default backup / migration mission library is displayed. |
|
MISSION/JOB NAME |
Name of the mission you want to schedule. |
|
CATEGORY |
Name of the mission category you want to schedule. Enter an asterisk (*) to schedule all categories of the mission. |
|
SCHEDULED RUN DATE |
Original scheduling date for the mission in DD MM YY format. The default is the current working date. |
|
FORCED SCHEDULING |
Yes/No indicator that determines whether or not scheduling is "forced."
Default: NO |
|
ENTER YES TO CONTINUE |
Confirmation field to prevent the unintentional scheduling of a mission. Enter YES to schedule the mission or PF03/PF15 to return to the previous screen. |
|
CALENDAR LIBRARY |
Library that contains any calendars specified in the mission. The default calendar library is displayed. |
To exit the screen without activating the utility, press PF03/PF15.
D4: Schedule a Restore Mission
This utility schedules a restore mission.
The utility screen shown in Figure 209 can be displayed in the following ways:
-
Select option D4 - RESTORE in the Online Utilities Menu.
-
Activate CLIST CTDMISRQ with parameter MIS(RST) from the TSO Command Processor.
Figure 209 Restore Mission Scheduling Utility Screen
------------------- RESTORE MISSION SCHEDULING UTILITY ------------------
COMMAND ===>
MISSION LIBRARY ===> CTDW.WORKO.RSTMIS
MISSION/JOB NAME ===> RESTORE1
CATEGORY ===> * (* for all categories)
SCHEDULED RUN DATE ===> 08 08 00 (ODATE - format DD MM YY)
FORCED SCHEDULING ===> NO (YES,NO)
ENTER YES TO CONTINUE ===> YES
CALENDAR LIBRARY ===> IOAW.WORKO.CALTo activate the utility, fill in the following fields and press Enter.
Table 196 Restore Mission Scheduling Utility Screen Fields
|
Field |
Description |
|---|---|
|
MISSION LIBRARY |
Library that contains the mission you want to schedule. The default restore mission library is displayed. |
|
MISSION/JOB NAME |
Name of the mission you want to schedule. |
|
CATEGORY |
Name of the mission category you want to schedule. Enter an asterisk (*) to schedule all categories of the mission. |
|
SCHEDULED RUN DATE |
Original scheduling date for the mission in DD MM YY format. The default is the current working date. |
|
FORCED SCHEDULING |
Yes/No indicator that determines whether or not scheduling is "forced."
Default: NO |
|
ENTER YES TO CONTINUE |
Confirmation field to prevent the unintentional scheduling of a mission. Enter YES to schedule the mission or press PF03/PF15 to return to the previous screen. |
|
CALENDAR LIBRARY |
Library that contains any calendars specified in the mission. The default calendar library is displayed. |
To exit the screen without activating the utility, press PF03/PF15.
I1: Add, Check, or Delete a Prerequisite Condition
This utility adds prerequisite conditions to, checks the existence of prerequisite conditions in, and deletes prerequisite conditions from, the IOA Conditions file.
The Prerequisite Condition Utility screen, shown in Figure 210, can be displayed in the following ways:
-
Select option I1 in the Online Utilities menu.
-
Invoke the IOACCND CLIST from the TSO Command Processor screen.
Figure 210 Prerequisite Condition Utility Screen
----------------------- PREREQUISITE CONDITION UTILITY ---------------------
COMMAND ===>
FUNCTION ===> ADD (ADD/CHECK/DELETE)
CONDITION NAME ===> SALARY_RPT_OK
Enter either date or STAT:
CONDITION DATE ===> STAT (DDMM OR STAT)
ENTER YES TO CONTINUE ===> YES
To activate the utility, fill in the following fields and press Enter:
Table 197 Prerequisite Condition Utility Screen Fields
|
Field |
Description |
|---|---|
|
FUNCTION |
Function to be performed. Valid values are:
|
|
CONDITION NAME |
Name of the prerequisite condition (1 through 39 characters) to be added, checked, or deleted. If CONDITION NAME values contain the special characters ampersand (&) or apostrophe (‘), they must be repeated in order to appear on the screen. |
|
CONDITION DATE |
4-character date associated with the specified condition. Valid values are:
|
|
ENTER YES TO CONTINUE |
Confirmation field to prevent the unintentional addition or deletion of a condition. When blank, the operation is not performed. Type YES to add, check or delete the condition. |
To exit the screen without activating the utility, press PF03/PF15.
 Communities
 Support Center
 YouTube
 Twitter
 Facebook
 LinkedIn