Phase 2: Define Recipient Tree
Some of the questions we will be answering in this phase are:
-
What is the recipient tree?
-
Why do I need a tree?
-
What is the tree used for?
-
What information do I put in the tree?
-
Where is the tree kept?
-
How do I access the tree?
-
What is the design of the tree?
-
How do I insert information into the tree?
-
How do I maintain the tree?
Inputs
Before you start this phase you should have:
-
Selected a pilot application (Phase 1: Choose a Pilot Application).
-
Assigned resources to the project (Phase 1: Assign Resources).
Outputs
At the end of this phase you will have:
-
Set standards for recipient names.
-
Inserted basic recipient information.
General Information About the Recipient Tree
In this section, we will discuss some general information about the recipient tree. It is important that you understand how the tree is used, before you define your recipient information.
What is the Recipient Tree?
The recipient tree contains a list of all possible report recipients of Control-D managed output.
Why is it Called a Tree?
It is called the recipient tree because most users define their recipients in a hierarchical format. After inserting the information, the definition you create may have a tree-like look, as in the following example:
Figure 1 Sample Recipient Hierarchy
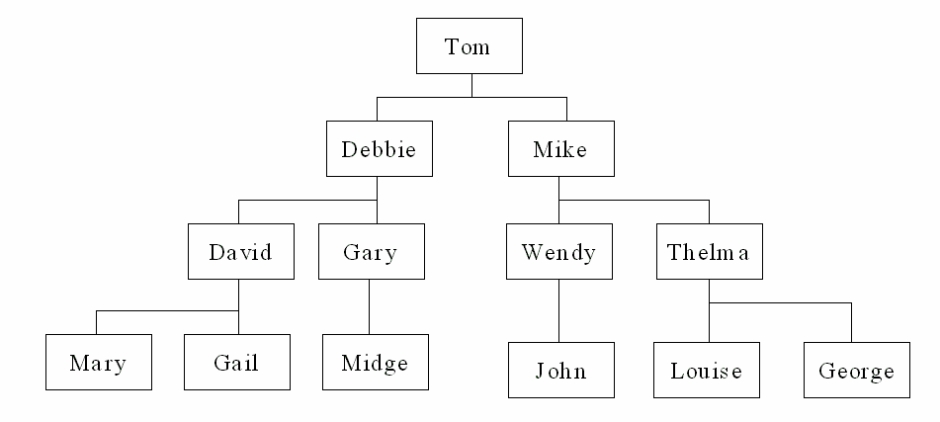
Of course, the recipient tree can have any format that suits your environment. Many sites work with a "Flat Tree" in which all users are defined on the same level.
What is the Tree Used For?
The tree acts as a repository of potential report recipients for Control-D managed output. Before output can be assigned to a user, the user must be defined as a recipient in the tree.
The tree is used extensively by Control-D for decollating purposes (described in Phase 3). In your report decollating missions, you determine the users to which Control-D should direct the report output. The recipients that you specify must exist in the tree.
The tree also provides a simplified method of grouping users’ reports together into printed bundles. You can specify delivery address information and select options that control the format of the recipient’s printed bundles. The printing missions you define (described in Phase 4) will use the tree to bundle up the report output for the users.
If you are supplying the Online Viewing facility to users, the tree is used to determine which users can see which reports. Users cannot view report output unless they are so authorized in the tree.
Where is the Tree Kept?
The recipient tree is stored as a member of a partitioned dataset (PDS). By default, the tree is stored in member CTDTREE in the Control-D PARM library.
How do I Access the Tree?
You will use the Control-D Online facility to browse, edit and change recipient information defined in the tree (Option T in the IOA Primary Option menu).
What Information Do I Put in the Tree?
The type of information you will define in the tree includes:
-
Security information specifying who is authorized to view a recipient’s reports online. (This can be controlled by an external security package such as RACF, ACF2 or TOP-SECRET.)
-
Address information specifying where the user’s printed bundle of reports should be delivered.
-
Information about the format of the bundles for each user.
-
Default destination information, if bundles are being directed to remote printers.
-
Information for Control-D/WebAccess Server specifying the PC path, size of packet, and retention information for reports being downloaded to PCs.
Fields of the Recipient Tree
During this phase, we will only review the basic tree fields. The other fields will be covered in later phases (as detailed below).
To insert information about your recipients, use the Online facility. This section discusses some of the information that you will specify. You will be inserting recipients on defined levels (supplied or user-defined) of the tree. Use the Control-D Recipient Definition screen to define your information.
Figure 2 Recipient Definition Screen
----------------------- CONTROL-D RECIPIENT DEFINITION------------------(T.S)
COMMAND ===>                                                 SCROLL===> CRSR
+--------------------------------------------------------------------------+
  RECIPIENT            RECIPIENT LEVEL      PARENT         PARENT LEVEL
  DESC
  ==========================================================================
  SYNONYM
  AUTHORIZE            $SYSDATA
  ADDRESS
  ==========================================================================
  INDEX                 USER BANNER Y                    REPORT BANNER Y
  DEF DEST
  ==========================================================================
                        P C   P A R A M E T E R S
  AUTHORIZED N
======= >>>>>>>>>>>> END OF RECIPIENT DEFINITION PARAMETERS <<<<<<<<<<<< ===


FILL IN RECIPIENT DEFINITION.                                       17.27.46
Basic Tree Fields
The fields we will review during this phase are as follows:
Table 10 Basic Tree Fields of the Recipient Tree Definition Screen
|
Field |
Description |
|---|---|
|
RECIPIENT |
Name of recipient. You can specify up to 8 characters. Each recipient name must be unique in the tree. |
|
RECIPIENT LEVEL |
Level of the recipient. This corresponds to the level codes defined for the tree. The smaller the level, the higher the level is in the tree. |
|
PARENT |
Name of the recipient’s parent. Every recipient in the tree (except the top recipient) should have a parent. We use this to form links between recipients. |
|
PARENT LEVEL |
Level code of the recipient’s parent. |
|
DESC |
Description of the recipient. |
|
ADDRESS |
Address to be printed on the recipient’s bundle of reports. You can specify up to ten lines of address information. |
Advanced Tree Fields
The more advanced tree fields are discussed in later phases, as indicated below:
Table 11 Advanced Tree Fields of the Recipient Tree Definition Screen
|
Field |
Phase in Which Discussed |
|---|---|
|
SYNONYM |
|
|
AUTHORIZE |
|
|
INDEX, USER & REPORT BANNER, DEF DEST |
|
|
PC PARAMETERS |
Parent-Child Relationship
All recipients that you define should have a parent. The only exception is the user in the top level of the tree (normally an administrative user).
Each recipient has only one parent. However, a parent may have an unlimited number of children. The parent must exist on a higher level of the tree than the recipient being defined. By using this mechanism, we can create branches within the tree. For example:
Figure 3 Sample Parent/Child Branching

Who Should Maintain the Tree?
You should restrict update access to the recipient tree and appoint staff to be responsible for its administration. You do not want unauthorized people accessing, or making changes to the tree. End users will probably have no access to the tree and might not even know of its existence. This should be a tightly-controlled function, as any incorrect changes will have an impact on your ability to deliver report access or output to your users.
Build the Recipient Tree
We will describe two methods for building the Recipient Tree: Basic and Advanced. We recommend that for the pilot application, you implement the Basic method, since this is the quicker method for initial implementation. Once you become more familiar with Control-D, you may want to build a more advanced recipient tree. At that stage, you can then review the section "Advanced Method of Building the Tree." You can, of course, select whichever method you prefer.
-
Basic Method:
This method allows you to quickly insert recipient information for your selected pilot application into a supplied recipient tree structure.
-
Advanced Method
This method details what is required to build an advanced recipient tree, giving recommendations on identifying the organizational structure and defining tree levels.
The only difference between the two methods is that with the Basic method you will be using a supplied tree structure into which you will insert your recipient information. Using the Advanced method, you will be instructed on how to build a recipient tree while taking advantage of the advanced capabilities that the Control-D recipient tree can provide. Apart from this, both methods cover the same topics.
Basic Method
Using the Basic method for building the recipient tree, you can quickly insert information about your users into a supplied recipient tree structure. In this section, we will review the supplied tree and the parameters that we suggest you define during this phase.
We will use a four-step guide to explain how to define users into the recipient tree:
-
Review the levels of the recipient tree.
-
Identify the report recipients.
-
Set standards for recipient names.
-
Insert basic recipient information.
Step 1: Review the Levels of the Recipient Tree
Use the Online facility to access the recipient tree. Select Option T in the IOA Primary Option menu.
The Recipient Tree entry panel appears (see below):
Recipient Tree Entry Panel
-------------------- IOA RECIPIENT TREE - ENTRY PANEL ----------------------(T)
COMMAND ===>
SPECIFY LIBRARY NAME AND MEMBER (TREE) NAME
   LIBRARY ===> CTDP.PROD.PARM
   MEMBER  ===> CTDTREE                      BROWSE Y (Y/N)
        LEVEL 10       OPERATIONS            ===>
              15       PRESIDENT             ===>
              20       REGNL-MGMT            ===>
              25       REG                   ===>
              30       BRANCH-DEPT           ===>
              40       BRANCH-DEPT           ===>
              50       DIVISION              ===>
              55       DEPARTMENT            ===>
              60       SECTION               ===>
              80       WORKERS               ===>
              90       CD-CONTROL            ===>
              95       OP-USER               ===>


FOR DIRECT ACCESS FILL IN RECIPIENT NAME IN APPROPRIATE LEVEL          11.03.10
Supplied Tree Structure
Displayed above is the supplied tree structure that you will use for defining information about your recipients. It is created as part of the normal installation procedures of Control-D.
On the screen, you see a two-digit level code and a description of the level. It is into these levels that you will insert your recipient details.
Normally, the higher up in the tree you insert a recipient, the greater the authority of the recipient will be, especially for online viewing purposes. Please note that an unlimited number of recipients may share a level.
There are eleven possible levels into which you can insert information about your recipients. You will probably not want to use all the defined levels. You can decide what levels are appropriate during Step 2: Identify the Report Recipients, when you identify the report recipients of your pilot application.
Administration Levels
Three of the levels have been defined specifically for administration purposes, as follows:
Table 12 Administration Levels in Recipient Tree Entry Panel
|
Level Code |
Level Title |
|---|---|
|
10 |
OPERATIONS |
|
90 |
CD-CONTROL |
|
95 |
OP-USER |
You should insert administration users into these levels (as detailed in Step 4: Insert Basic Recipient Information).
Step 2: Identify the Report Recipients
You should now identify the recipients of your pilot application. You may be able to do this from your current distribution instructions. It is important to note that each recipient you insert in the tree is not necessarily a single user. Often, a recipient name will be shared by a group of users or it may be a specific delivery location such as an area or building in which several users are located. One method you can use to identify the recipients of the application is to list the names and addresses that are currently written or printed on the reports and boxes dispatched to the users.
Take the example of a bank structure. The accounts application has been selected for the pilot implementation. This user is using the supplied (default) tree, but will not be using all the levels. Their organization splits down into two distinct structures. The head office, located in Chicago, is where all the divisions and departments of the company are located. They also have regional branches throughout the USA. The accounts application output is distributed mainly within the head office but some reports are also sent to the accounting and administration departments at the regional branches. They have created a list of the report recipients for their pilot application as follows:
-
Accounts Department, Washington
-
Administration Department, Branch12, Dallas
-
Branch Manager, Branch11, Miami
-
Accounts Supervisor, Branch12, Dallas
-
Mrs. Robinson, Miami
-
Department Manager, Accounts Receivable, Chicago
-
Special Accounts Manager, Las Vegas
-
Accounts Clerk, Accounts Receivable (Domestic), Chicago
-
Accounts Payable (Domestic), Chicago
-
Tom Farmer, Chief Accountant, Accounts Division, Chicago
Summary
Normally, each recipient name in the tree would represent one end user, but further flexibility is possible, as explained below.
In each of the dispatched boxes or envelopes there may be several reports for different users. For example, the box for the Accounts Payable (Domestic), Section 1, Miami contains reports for four different users at that location. When the box arrives, the users distribute the reports amongst themselves. This could be an example of a shared recipient name for four users.
There may be reports that are addressed differently but are for the same recipient. For example, Mrs. Robinson is the branch manager in Miami, but she currently receives two envelopes because the programs print the address differently. In this case, you would create only one recipient to eliminate the double mailing.
Match the Recipients With the Levels of the Tree
From the list of recipients that we have created, we can try to identify at which level of the recipient tree each recipient should be placed. In the following example, we have listed the levels of the tree and assigned the recipients to their appropriate levels:
Table 13 Sample Recipient Tree Level Assignments
|
Level |
Assignment |
|
|---|---|---|
|
10
|
OPERATIONS |
|
|
|
Operations (Control-D) Administration User |
|
|
15 |
PRESIDENT |
|
|
20 |
REGNL-MGMT |
|
|
25 |
BRANCH |
|
|
|
Branch Manager, Branch 11, Miami (same recipient) |
|
|
|
Mrs. Robinson, Miami (same recipient) |
|
|
30 |
BRANCH-DEPT |
|
|
|
||
|
Accounts Department, Washington |
||
|
Administration Department, Branch 12, Dallas |
||
|
Accounts Supervisor, Branch 12, Dallas |
||
|
Special Accounts Manager, Las Vegas |
||
|
50 |
DIVISION |
|
|
|
Tom Farmer, Chief Accountant, Accounts Division, Chicago |
|
|
55 |
DEPARTMENT |
|
|
|
Department Manager, Accounts Receivable, Chicago |
|
|
60 |
SECTION |
|
|
|
Accounts Payable (Domestic), Chicago |
|
|
80 |
WORKERS |
|
|
|
Accounts Clerk, Accounts Receivable (Domestic), Chicago |
|
|
90 |
CD-CONTROL |
|
|
95 |
OP-USER |
|
Summary
It may be more suitable for you to insert all your recipients on one level (for example, insert all report recipients on the WORKERS level).
In theory all recipients are "workers" of one form or another. However, when you are deciding on which level to place a recipient, there are other considerations that you should take into account. There are two basic categories of considerations: Bundling and Online Viewing.
-
Bundling Considerations
When defining the recipients in the tree, you should consider how the recipients’ reports will be printed (for example, perhaps they will be bundled together with the reports of other recipients at the same geographical location). This will be examined further when we discuss Printing Considerations in Phase 4: Design Print Bundles.
-
Online Viewing Considerations
When defining recipients in the tree, you should consider which reports each recipient may potentially need to access. It may be that there are users who do not receive reports on a regular basis, but who require access to a wide range of reports periodically. An end user’s responsibilities may affect where the recipient is placed in the tree. This will be examined further when we discuss Online Viewing in Phase 9: Online Viewing Implementation.
Step 3: Set Standards for Recipient Names
Conceivably, you can end up with thousands of recipients in the tree. It is recommended, therefore, that you set standards for recipient naming conventions. Remember that you have up to eight characters for defining the recipient name. It will benefit the implementation if you set easy-to-follow standards. It will also help in any post-implementation work that may be required (such as adding new recipients and applications to the tree).
Develop a Standard
In our example, the user has created a standard based on the organization of the company. There are two distinct structures: the head office and the branches. They have developed a standard for both:
Branch Naming Conventions
The naming standard for the branches is built in the format:
BRxxaann
where
-
BR identifies the recipient as belonging to a branch.
-
xx Identifies the Branch Number. The branches are known as the following numbers already, so we will continue with this standard.
-
10 is Washington.
-
11 is Miami.
-
12 is Dallas.
-
-
aa Identifies the department within the branch. We have defined:
-
AC is Accounts.
-
AD is Administration.
-
SP is Special Accounts.
-
-
nn is a two-digit value identifying a section number, group or individual within the branch department.
Head Office Naming Conventions
The naming standard for the head office is built in the following format:
DVaaxsnn
where
-
DV identifies the recipient as belonging to a head office division.
-
aa identifies the application at division level. We have defined AC as Accounts Application.
-
x identifies which accounts department. We have defined:
-
P as Accounts Payable.
-
R as Accounts Receivable.
-
-
s identifies which section is concerned. We have defined:
-
D as Domestic Accounts.
-
O as Overseas Accounts.
-
-
nn is a two-digit value identifying a sub-section, group or individual within the particular section.
Assign the Standard
In the following example, we will assign standards to the users of our sample application. The recipient name is built according to the location of the recipient, using our sample standards:
Table 14 Sample Assignment Standards to Users
|
Level |
Assignment |
|---|---|
|
10 |
OPERATIONS |
|
Operations (Control-D) Administration User (OPSADMIN) |
|
|
15 |
PRESIDENT |
|
20 |
REGNL-MGMT |
|
25 |
BRANCH |
|
Mrs. Robinson, Branch Manager, Branch 11, Miami (BR11) |
|
|
30 |
BRANCH-DEPT |
|
Accounts Department, Washington (BR10AC) |
|
|
Administration Department, Branch 12, Dallas (BR12AD) |
|
|
Accounts Supervisor, Branch 12, Dallas (BR12AC) |
|
|
Special Accounts Manager, Las Vegas (BR99SP) |
|
|
50 |
DIVISION |
|
Tom Farmer, Chief Accountant, Accounts Division, Chicago (DVAC) |
|
|
55 |
DEPARTMENT |
|
Department Manager, Accounts Receivable, Chicago (DVACR) |
|
|
60 |
SECTION |
|
Accounts Payable (Domestic), Chicago (DVACPD) |
|
|
80 |
WORKERS |
|
Accounts Clerk, Accounts Receivable (Domestic), Chicago (DVACRD01) |
|
|
90 |
CD-CONTROL |
|
95 |
OP-USER |
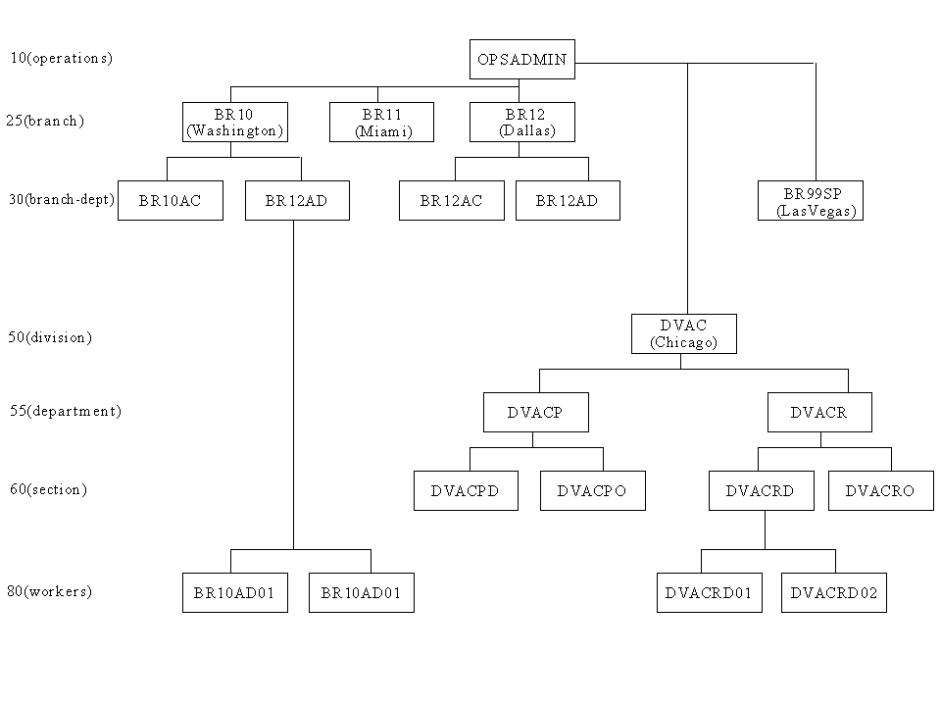
The format of the whole application in the recipient tree would look like this:
Figure 4 Sample Full Recipient Tree
Benefits of Standards
Having set these standards, a recipient’s name tells us where in our structure the recipient is placed and also provides us with other information about the recipient (for example, by looking at a recipient named BR10AD01, we can tell that this recipient is in Branch 10 (Washington) in the Administration Department).
When you come to implement future applications, you can use the same standards and assign new application ids, department codes, and so on.
Summary
Another alternative for recipient naming is the use of userids. You can use one of the supplied utilities (see Step 4: Insert Basic Recipient Information) to automatically create a recipient tree using userids as recipient names. This can be a good method if most of the recipients are on the same level (such as might be the case with the data center programmers).
Normally each recipient will be a specific user. However, Control-D allows a recipient name to be shared by a group of users, such as a branch or section.
You can, of course, assign any standards that you feel are relevant for your site. Ensure that whatever standards you do set are known and followed by all members of your implementation team.
You should by now have set standards for your recipient names.
Step 4: Insert Basic Recipient Information
We strongly recommend that you do not define every report recipient in the organization at this point. If you have chosen a pilot application according to the recommendations supplied, then you should have about thirty recipients to define in the tree. As you progress to other applications, the tree will grow naturally.
Utilities for Automatically Creating Recipient Information
There are supplied utilities that can assist you in automating the definition process. The utilities selected for use will depend on which format you prefer for the tree and the recipient names. You can use any of the supplied utilities to automatically create recipient information in the tree. The supplied utilities are found in the IOA SAMPEXIT library. They are described below:
Utility CTDBLDJB
This utility is designed to either build the user tree from scratch, or to add users to an existing tree. The input to this utility is a file containing information about the recipients you want to insert in the tree. The utility can extract details from the file and insert recipient information such as Recipient Name, Parent, Synonyms, and Address into any defined levels of the recipient tree. The input to this utility could be a security report, such as an RACF report, that contains user IDs and group information that you want to define in the recipient tree.
The DOCBLDTR member in the IOA DOC library contains a JCL sample for building a Control-D user tree.
Utility UADSTREE
This utility can be used to create a recipient tree from scratch. The input to this utility is dataset SYS1.UADS. This dataset contains the information about all TSO users. Each user ID is inserted as a recipient name into one specific level of the tree, and all recipients have the same parent.
The CTDUADST member in the IOA SAMPEXIT library contains a program and job skeleton used by ICE to create the job for building a default Control-D user tree. You can customize the CTDUAST member using ICE, the same way as you would when customizing a sample exit from the IOA SAMPEXIT library.
During this phase, you will insert the basic recipient information for each of your identified recipients. It is recommended that, if possible, you use job titles rather than specific user names when supplying the address information in the tree definition. This will minimize the maintenance required if a user changes jobs, and so on.
If users currently have their names on reports, you should continue this practice under Control-D by specifying the user name in the address information. Do not try to force changes on the users. For each identified recipient of your pilot application, you should now define the following information in the appropriate levels of the recipient tree:
-
RECIPIENT NAME
-
RECIPIENT LEVEL
-
PARENT
-
PARENT LEVEL
-
DESCRIPTION
-
ADDRESS
Below is an example of a definition in the Recipient Tree Definition screen:
Figure 5 Recipient Tree Definition Screen
 ------------------------ CONTROL-D RECIPIENT DEFINITION -------------------(T.S)
 COMMAND ===>                                                    SCROLL===> CRSR
 +-----------------------------------------------------------------------------+
  RECIPIENT BR11       RECIPIENT LEVEL 25   PARENT OPSADMIN    PARENT LEVEL 10
  DESC THIS IS THE BRANCH MANAGER IN MIAMI
  DESC
  ==========================================================================
  SYNONYM
  AUTHORIZE            $SYSDATA
  ADDRESS MRS. ROBINSON
  ADDRESS BRANCH MANAGER
  ADDRESS BRANCH 11
  ADDRESS 110 GLENDALE DRIVE
  ADDRESS MIAMI
  ADDRESS MI40 4PP
  ADDRESS
  ===========================================================================
  INDEX                USER BANNER Y                    REPORT BANNER Y
  DEF DEST
  =========================================================================
                              P C  P A R A M E T E R S
   AUTHORIZED N
 ======= >>>>>>>>>>>> END OF RECIPIENT DEFINITION PARAMETERS <<<<<<<<<<<< ==
 FILL IN RECIPIENT DEFINITION.                                          14.23.26
Insert the Administration Recipients
We recommend that you define the following administration recipients at the appropriate levels in the recipient tree:
Table 15 Recommended Administration Recipients
|
Level |
Title |
Instruction |
|---|---|---|
|
10 |
OPERATIONS |
Insert recipient OPSADMIN. You should insert only one recipient on the highest level of the tree. By default, this recipient will have authorization to see all reports handled by Control-D. (This can be limited, if required.) |
|
90 |
CD-CONTROL |
Insert recipient CDADMIN. This may be a recipient who needs access to certain distribution reports. |
|
95 |
OP-USER |
Insert recipient NULL. This recipient can be used as a destination for reports and/or pages that should be identified but never printed (such as application separator pages that are no longer required). Insert recipient PRODCNTL. This recipient can be made the recipient of all MSGCLASS output, so that it can be viewed online and archived if required. Insert recipient UNIDENT. This recipient will receive every page in a report that was not specifically identified according to the user-defined report decollating instructions. |
You can insert other administration-type recipients to suit your particular company’s operating methods. Whenever any changes are made to the tree, it should be reloaded to make the changes effective. The implementation hints chapter of the Control-D and Control-V User Guide includes a discussion about defining the levels of the organization, providing guidance to assist you when changes are made.
For information about reloading the recipient tree, see the Control-D and Control-V User Guide.
You should by now have inserted your basic recipient information in the tree. You should by now have inserted your basic recipient information in the tree.
Please go to the summary at the end of this phase.
Advanced Method
In this section, we will explain how to determine the best structure of the recipient tree for your company, and how you should define the levels of the tree, using the Advanced method. You will follow the steps listed below to build your recipient tree:
Table 16 Advanced Method Steps
|
Step |
Task |
|---|---|
|
Step 1A |
Decide levels of the organization. |
|
Step 1B |
Define level codes and descriptions. |
|
Step 2 |
Identify the report recipients (see Basic Method Step 2: Identify the Report Recipients). |
|
Step 3 |
Set standards for recipient names (see Step 3: Set Standards for Recipient Names). |
|
Step 4 |
Insert basic recipient information (see Basic Method Step 4: Insert Basic Recipient Information). |
Recommendation
We recommend that you read through the "Basic Method" section that precedes this section before you start defining a new recipient tree. If you then want to use the Advanced method to build your tree, you should read through this section before creating your new tree structure.
After digesting the information, we suggest that you hold a brain-storming session regarding the structure, standards and information to be contained in the recipient tree.
The meeting should be attended by your implementation team, and any other relevant staff. Representatives from Operations and Distribution should attend. The presence of your super users at the meeting will give you valuable insight into the workings and organization of their application, and how they process their output.
The meeting will also get all parties connected to the project involved at an early stage.
Step 1A: Decide the Levels of the Organization
The structure of the tree can take many shapes, depending on the organization of your company. In this step you will analyze how your company is structured and into what levels the company splits. Recipients are inserted into the tree at the levels that you determine. We recommend that you create the tree in a hierarchical format. This will provide many benefits that will be explained as you progress with your implementation.
It may be that a hierarchical structure does not suit your organization, and that it makes sense for you to have all recipients on one level. This type of structure may suit sites whose recipients are application programmers working individually or in groups.
Flat Tree (2 Levels)
-
ADMIN LEVEL
-
GROUP LEVEL
Hierarchical Tree (7 Levels)
-
ADMIN LEVEL
-
BOARD OF DIRECTORS
-
DIVISIONS
-
DEPT.
-
BRANCHES
-
SECTIONS
-
SUB-SECT.
-
WORKERS
Identify the Levels of the Company
You should now analyze the structure of your company and outline the levels of your organization. Perhaps there are organizational charts that can assist you. You can define up to 15 levels for the tree. On average, most companies define around 6 levels. Please use the form below (use a top down approach that is, level 1 is the top level):
Table 17 Identifying Company Levels
|
Level |
Your Entry |
|---|---|
|
Level 1 |
Reserved for Administration |
|
Level 2 |
|
|
Level 3 |
|
|
Level 4 |
|
|
Level 5 |
|
|
Level 6 |
|
|
Level 7 |
|
|
Level 8 |
|
|
Level 9 |
|
|
Level 10 |
Reserved for Administration |
|
Level 11 |
Reserved for Administration |
|
Level 12 |
Reserved for Administration |
Advantages of Hierarchical Structure
Some of the advantages associated with a hierarchical tree structure are as follows:
Table 18 Advantages of Hierarchical Structure
|
Operation |
Advantage |
|---|---|
|
Decollating Advantages |
In our report decollating missions, we can use the hierarchical structure to employ some advanced decollating techniques for distribution. These will be explained in Phase 3: Design Decollating Missions. |
|
Printing Advantages |
Using the hierarchical structure, we can simplify the specifications in our printing missions. For example, by specifying an INCLUDE for a single recipient at a high level of the tree, all reports for the recipients underneath the high-level recipient (that is, connected by the PARENT relationship) are included (by default) in one print bundle. This is useful for recipients located at the same physical delivery point. |
|
Online Viewing Advantages |
Using the hierarchical structure, if we authorize a user at a particular level in the tree, the user can then view (by default) the reports of all recipients connected by the relationship in which the recipient is the PARENT). For example, a department manager may be allowed to view all the reports of the entire department, but users lower down in the tree can only view reports directed specifically to them or their children. |
Step 1B: Define Level Codes and Descriptions
Once you have decided the levels of the organization, you need to define them to Control-D. This is done in the CTDPARM member of the IOA PARM library. You assign a level code and level description for each level. For example:
40 DEPARTMENTSwhere 40 is the level code and DEPARTMENTS is the level description.
Level codes are two-character, alphanumeric values that must be defined in ascending sequence (where 9 > 1 > Z > A). Normally the sequence is set as 10, 20, 30, 40, and so on.
The level description can be up to 20 characters long.
Define Level Information
Edit the CTDPARM member and define your level codes and descriptions under parameter TREE. Below is an example of level code and description definitions:
 BROWSE -- IOAP.PROD.PARM(CTDPARM)    - 01.12 ------- LINE 00000055 COL 001 080
 COMMAND ===>                                                  SCROLL ===> CSR
               TREE=(10,OPERATIONS,                                    *00370003
               20,DIRECTORS,                                           *00380009
               30,DIVISIONS,                                           *00390009
               40,DEPARTMENTS,                                         *00400003
               50,BRANCHES,                                            *00410003
               60,SECTIONS,                                            *00420003
               65,SUB-SECTIONS,                                        *00430003
               70,WORKERS,                                             *00440003
               90,CD-CONTROL,                                          *00450003
               95,OP-USER)                                              00460003
******************************** BOTTOM OF DATA ********************************


F1=HELP      F2=SPLIT     F3=END       F4=RETURN    F5=RFIND     F6=RCHANGE  F7=UP
F8=DOWN      F9=SWAP      F10=LEF      F11=RIGHT    F12=RETRIEVE
Make Changes to the Levels of the Tree
You can modify the definition of the tree at any time. New levels can be added without affecting the Control-D operation. However, changing a level code is a complex procedure that requires a global change to the current recipient tree and to the decollating missions. Therefore, we highly recommend that you maintain an interval between two successive levels, so that there will be a place to insert additional levels if required.
When a change is made to the level definition (for example, a new level is defined), the Control-D monitor should be shut down and brought back up again. We also recommend that users in the Online facility exit and re-enter.
Define Administration Levels
We reserved three levels for administration in the previous example. We have defined these levels as:
Table 19 Administration Levels
|
Level Code |
Level Title |
|---|---|
|
10 |
OPERATIONS |
|
90 |
CD-CONTROL |
|
95 |
OP-USER |
We use these levels to administer the tree and to receive specific output. It is on these levels that we will insert administration recipients. You should add similar administration levels to your tree.
Access the Defined Tree
Whatever you define in the TREE parameter in member CTDPARM is what will be displayed on the Recipient Tree entry panel (see below) when you enter the Online facility and select Option T.
Recipient Tree Entry Panel
 -------------------- IOA RECIPIENT TREE - ENTRY PANEL ----------------------(T)
 COMMAND ===>
 SPECIFY LIBRARY NAME AND MEMBER (TREE) NAME
    LIBRARY ===> CTDP.PROD.PARM
    MEMBER  ===> CTDTREE                      BROWSE Y (Y/N)
         LEVEL 10       OPERATIONS            ===>
               20       DIRECTORS             ===>
               30       DIVISIONS             ===>
               40       DEPARTMENTS           ===>
               50       BRANCHES              ===>
               60       SECTIONS              ===>
               70       WORKERS               ===>
               90       CD-CONTROL            ===>
               95       OP-USER               ===>


FOR DIRECT ACCESS FILL IN RECIPIENT NAME IN APPROPRIATE LEVEL          11.03.10
Summary
It is into these levels that you will insert your recipient details. Normally, the higher up in the tree you insert a recipient, the greater the recipient’s authority will be, especially for Online Viewing purposes. Please note that an unlimited number of recipients may share a level.
You should by now have defined the levels of your tree. Continue with Steps 2−4 in Basic Method.
Review
During this phase you have learned the purpose of the recipient tree; examined the structure of your organization to determine the best format of the tree for your company; reviewed the basic parameters of the tree; and reviewed standards for assigning recipient names.
Before you continue, you should have:
-
Set standards for recipient naming.
-
Defined the basic recipient information for the recipients of your pilot application and for your administration users.
 Communities
 Support Center
 YouTube
 Twitter
 Facebook
 LinkedIn