Phase 3: Design Decollating Missions
Some of the questions we will be answering in this phase are:
-
What are decollating missions?
-
What do decollating missions do?
-
How many decollating missions do I need?
-
Who should set up the decollating missions?
-
Where are decollating missions defined?
-
How do I schedule a decollating mission?
-
What makes a decollating mission start?
-
What are the parameters of the decollating missions?
-
What is the link between decollating missions and the recipient tree?
-
What is the link between decollating missions and backup missions?
-
What is the link between decollating missions and printing missions?
-
What are the results of a decollation?
-
How do I test the decollating mission?
Inputs
Before you start this phase you should have Inserted basic recipient information into the recipient tree (Step 4: Insert Basic Recipient Information).
Outputs
At the end of this phase you will have:
-
Defined decollating missions for the selected pilot application.
-
Decided your scheduling method for the decollating missions.
-
Tested the decollating missions.
-
Inserted synonyms into the recipient tree.
General Information About Decollating Missions
What Are Decollating Missions?
Decollating missions are used to tell Control-D which recipients should receive which report output. Normally you will define one report decollating mission for each batch job producing standard reports.
One batch job may create ten different reports. Using Control-D, you would define one report decollating mission for the batch job to handle all of the reports. If you have chosen a pilot application according to the recommendations supplied in Phase 1, then you will have around forty report decollating missions to set up during this phase.
As soon as report output has been processed by a report decollating mission, the output can be viewed online, printed and archived using Control-D.
What Information Can I Put in a Decollating Mission?
In your report decollating mission definitions, you define parameters that tell Control-D how to process specified reports. The information you can specify is as follows:
-
Which reports or report pages should be given to which recipients.
-
How many copies of the report should be printed (by default).
-
The destination to which the report output will be directed.
-
Which printing characteristics will be assigned to the report (if different from the original).
-
What name should be assigned to the processed reports.
-
How reports will be printed (what printing mission will print the reports).
-
How compressed datasets will be archived (what backup mission will backup the reports).
Where Are Decollating Missions Defined?
Report decollating missions are defined using the Online facility (Option R in the IOA Primary Option menu). The definitions are stored as members of a partitioned dataset (PDS) in the Control-D decollating missions library. You use the formatted Report Decollating Mission Definition screen to define your decollating parameters (see below):
Figure 6 Report Decollating Mission Definition Screen
 --------- CONTROL-D/V CATEGORY PROD               JOB  JOB6     ----------(R.S)
 COMMAND ===>                                                    SCROLL===> CRSR
 +-----------------------------------------------------------------------------+
   CATEGORY PROD                      JOBNAME JOB6     GENERIC   MONITOR
   ===========================================================================
   DEF COPIES    LVL    USER                      DEST          MAX COPIES
   ===========================================================================
   ON
   PRT COPIES    LVL    USER                      DEST          MAX COPIES
       PRINT/CDAM PARMS =
   WHEN LINE       -       COL       -       PRINT   REF NXT   CT     AND/OR
        STRING =
     DO
======= >>>>>>>>>> END OF JOB/REPORT PARAMETERS FOR THIS CATEGORY <<<<<<< =====


 FILL IN REPORT DEFINITION. CMDS: EDIT, SCHED, SHPF, PATH               10.51.22
Who Should Set Up the Decollating Missions?
You should assign members of your implementation team to define the report decollating missions for your pilot application. You should ensure that they are aware of standards that have been established, and that they have gone through the Control-D Getting Started Guide. It is also recommended that they receive some basic training in Control-D.
It is important that the assigned team members read this phase of the Implementation Guide, which provides recommendations for the definition and testing of the decollating missions. They should also have access to the Control-D User Guide that contains definitions and examples of all possible report decollating mission parameters.
When Should I Schedule a Report Decollating Mission?
Normally you would want to decollate report output as soon as it is created. To handle the output produced by the batch jobs, a report decollating mission for the job must be placed on the Active Missions file. Your decision on how to schedule a report decollating mission to the Active Missions file will depend on your current production control system (if you have one) and your preferences for scheduling.
Control-M for z/OS has full integration with Control-D and can schedule the report decollating mission as soon as the job ends.
The Basic Scheduling parameters of a report decollating mission specify on which days and/or dates you want to schedule the report decollating mission to the Active Missions file for potential execution. report decollating missions must be scheduled to the Active Missions file before they can execute and process the relevant report output. A copy of the report decollating mission is placed on the Active Missions file by a special scheduling program called by the New Day procedure (CTDNDAY). Temporary changes can be made to the report decollating mission without affecting the master definition in the report decollating missions library.
The options and methods available for scheduling the report decollating missions are detailed in Scheduling Parameters later in this phase.
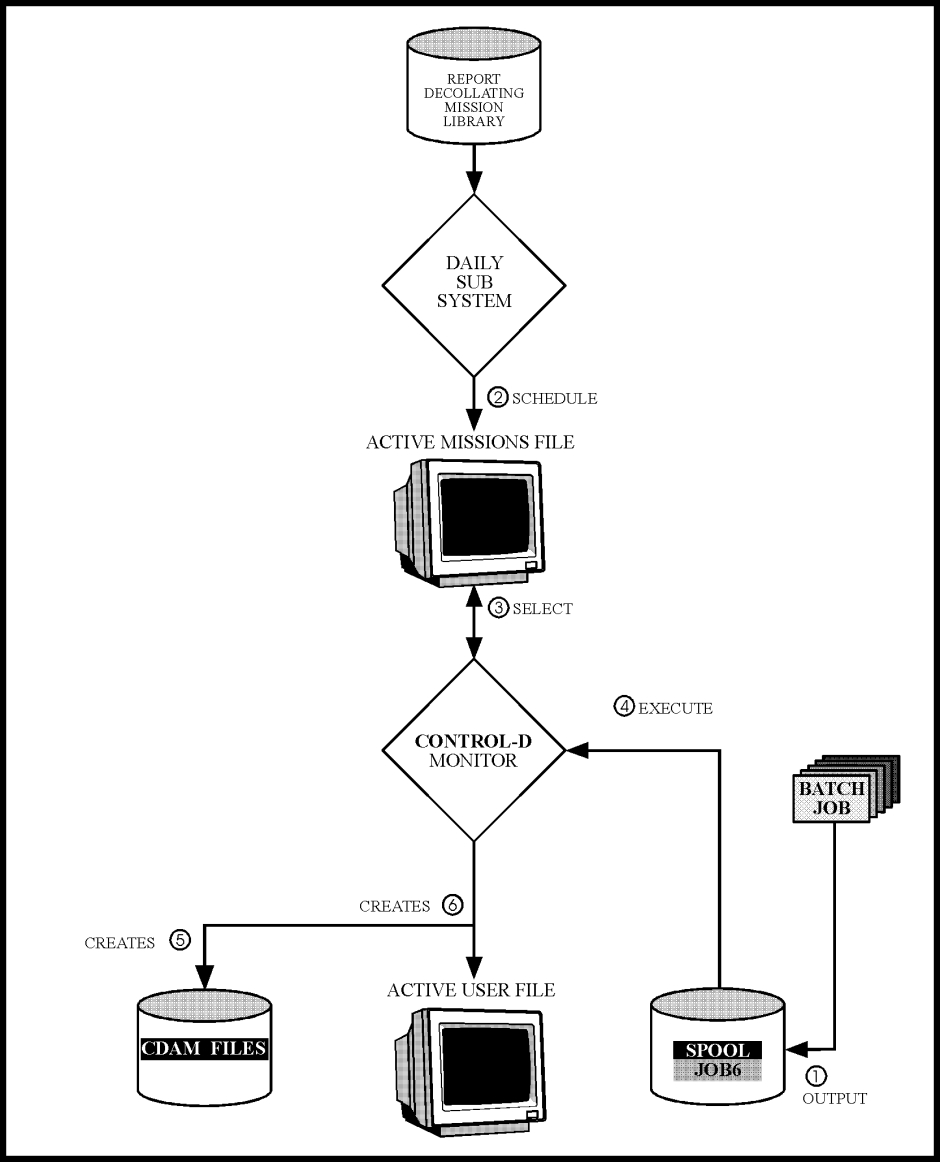
Decollating Mission Workflow
The workflow of a report decollating mission is shown in the figure that follows the table below. It details the stages involved from initial scheduling of the report decollating mission through to the decollation results. The performance of certain phases of the workflow at your site is determined by you. The phases are detailed below:
Table 20 Decollating Mission Workflow Phases
|
Phase |
Description |
|---|---|
|
Create Report Output |
You decide what the decollating source for each report decollating mission will be. During the pilot implementation you will probably use the same method as you do currently, that is, you will be creating the report output to spool. If implementing the CDAM Direct Write facility, you will be creating reports directly to CDAM datasets. |
|
Schedule Report Decollating Missions to Active Missions File |
You decide how report decollating missions will be scheduled to the Active Missions file. In this example, the New Day procedure calls a scheduling program that places a copy of the report decollating mission definition on the Active Missions file. |
|
Select Report Decollating Mission for Execution |
The Control-D monitor analyzes the Active Missions file every few seconds, and selects decollating missions for execution once all runtime dependencies have been met. |
|
Execute Report Decollating Mission Instructions |
The Control-D monitor executes the report decollating mission instructions, assigning report pages as specified in the report decollating mission definition. |
|
Create CDAM File |
The ultimate storage format for all reports processed by Control-D is as a compressed dataset (CDAM). If you have implemented the CDAM Direct Write facility, the report is already in this compressed format and this phase is bypassed. |
|
Create Entries in Active User Report List File |
The result of the decollation process is that entries are created in the Active User Report List file. These entries detail which parts of the CDAM file are assigned to each user. Each entry describes which pages of a report should be printed, or can be viewed for each specific recipient. As soon as a decollation has been performed, the entries are available for online viewing, printing and archiving. |
Figure 7 Graphic Overview of Decollating Mission Workflow
Determine Distribution Instructions for Reports
Create Test Report Output
The first thing you should do before defining the report decollating missions is to examine the format of the reports you want to decollate. Normally, the best way to do this is to produce a copy of the report to spool, preferably to a Held output class. You will then be able to view the report and determine where any identifying strings appear. You will also be able to run, test and revise your report decollating missions against the sample Held outputs, until the decollating missions are working as desired. You can produce a copy of the reports to spool by:
-
Using a test job to create the output.
-
Using the JCL OUTPUT statement to produce a duplicate copy of a report. (See the example in Test Decollating Missions in this phase.)
-
Using the JES OFFLOAD facility to create a duplicate copy.
Obtain Current Distribution Instructions
Once you have created your test output to spool, you can then gather the information you will require to define your report decollating missions. You must find out how the reports are currently distributed before you can define your report decollating missions. When you create a report decollating mission, you are actually using Control-D parameters to duplicate exactly what you would do manually (that is, you are defining how the report is distributed). At this stage, it is recommended that you do not change what the users currently receive. During Phase 8, we will perform "Report Pruning" according to user requirements.
You may have up-to-date, accurate, online distribution instructions for the reports you want to handle, or you may have old hand-written distribution instructions that are out-of-date and have pages missing. You must determine exactly how reports are currently handled. A good way to find out how reports are handled is to ask the dispatch staff how they identify who receives which reports.
The output for job PAC2030 contains two identical copies of a report. One full copy goes to the Accounts Department. The other copy is then split further according to the branch number on each page. Each branch gets its relevant pages. This is a good example of the information you will need to define in your report decollating missions. It tells you who the recipients of the reports are, and how to identify who receives which reports.
Identify Who Receives Which Reports
Reports that are to be distributed in their entirety to one or more users do not require any further information. For reports that are to be decollated into parts, you must identify a character string that is unique to the specific recipient or recipients (for example, a report header or title). Take note of the line and column ranges of the identifying strings; you will need this information for your report decollating mission definitions.
The identifying string may be a value that you can define as a recipient synonym (see "Using Synonyms" later in this phase). Synonyms can help make report decollating mission definition much easier.
Please note that you can determine the exact position of a string by viewing the report online using SDSF and the COLS command, or a similar application. This should make the task of identifying string locations simpler than doing so from a printed report page.
Figure 8 Sample Output Report
 SDSF OUTPUT DISPLAY JOB6      JOB  9381 DSID-  101 LINE       0 COLUMNS  02- 81
 COMMAND INPUT ===>                                            SCROLL ===> CSR
---+----1----+----2----+----3----+----4----+----5----+----6----+----7----+----8-
********************************* TOP OF DATA **********************************
DATE:   05.05.00
UPDATE: 05.05.00
 INVENTORY REPORT
 ----------------

WAREHOUSE NO: 1001       DEPARTMENT:  100  -  FINAL ASSEMBLY SHOP
              ----                    ---------------------------
                                   SHELF   QNTY   QNTY       QNTY       QNTY IN
ITEM NO.      DESCRIPTION          LIFE    UNIT   AVAIL      ORDER      PROCESS
-----------   ----------------     -----   ----   -------    -------    -------
1233-781-21   RIVET D. 0.1 ACR     NONE    KG      100.00     250.00
1233-781-25   RIVET D. 0.5 ACR     NONE    KG      500.00     500.00
1233-781-27   RIVET D. 0.7 ACR     NONE    KG      100.00     100.00
1234-781-21   RIVET D. 0.1 ACP     NONE    KG      100.00
1233-781-25   RIVET D. 0.5 ACR     NONE    KG      500.00     500.00
In this example of the original report (as displayed in SDSF before decollation), the dispatch staff examine every page of the Inventory Report to determine to which branches pages of the report should be sent. They do this by checking the Warehouse Number in line 6, column range 16 through 19.
Define Decollating Missions
After you have produced your sample output and have gathered the distribution information about your reports, you can define the information in Control-D.
You define one report decollating mission per batch job. If a batch job produces four reports, then you will define the instructions for handling the four reports in one report decollating mission.
You will define the required report decollating mission parameters using the screens of the Control-D Online facility. The definitions that you create will be saved in the Control-D decollating missions library. Note that because definitions are saved in a partitioned dataset, you should ensure that the PDS is backed up regularly. This protects against the loss of definitions due to some type of system error.
This section contains recommendations on specific parameters that you will define in your report decollating mission definitions. Below is a summary of the information that you will specify:
-
Report Decollating Parameters.
-
Basic Scheduling Parameters.
Each section in our overview corresponds to a relevant section of the report decollating mission parameters. Each section of parameters on the screen is separated with a double-dash line (=) as follows:
Report Decollating Mission Parameters
Parameters that are mainly used to specify decollating operations are described below. For a full explanation of all report decollating mission parameters see the Control-D and Control-V User Guide.
The General and Decollating parameters explain the basic information you need to identify and split report output. These are the parameters that are displayed when you enter the Report Decollating Mission Definition screen (Option R in the IOA Primary Option menu) with parameter SHOW SCHEDULING CRITERIA set to N (that is, do not show scheduling parameters), which is the default.
General Parameters
The first set of parameters you fill in are the General parameters. You use these parameters to define general information about the decollating mission, much of which can be used for tracking and control purposes.
Figure 9 General Mission Parameters
   CATEGORY PROD                      JOBNAME JOB6     GENERIC   MONITOR
   OWNER    M90         TASKTYPE REP  GROUP ACCOUNTS-PAYABLE     JOBID
   DESC JOB6 PRODUCES THREE ACCOUNTS PAYABLE REPORTS
   DESC
CATEGORY Recommendations
You can use the CATEGORY parameter to create multiple decollating mission definitions for the same job (name). You may want to do this if the batch job creates different reports on different days with different decollating parameters. For example:
Table 21 Using Multiple Decollating Mission Definitions - Example
|
Mission Definition |
Purpose |
|---|---|
|
JOB6 DAILY RUN |
PRODUCES 3 DAILY REPORTS |
|
JOB6 WEEKLY RUN |
PRODUCES 4 WEEKLY REPORTS |
|
JOB6 MONTHLY RUN |
PRODUCES 8 MONTHLY REPORTS |
In the above example, set up three different decollating mission definitions to handle the various reports produced by the batch job named JOB6. This can be done by using the CATEGORY parameter, and by defining an appropriate report decollating mission for each category:
Table 22 Using CATEGORY Parameter - Example
|
Jobname |
Category |
Report Handling |
|---|---|---|
|
JOB6 |
DAILY |
(Handles daily reports) |
|
WEEKLY |
(Handles weekly reports) |
|
|
MONTHLY |
(Handles monthly reports) |
Many sites have standard naming conventions for their batch jobs and do not encounter the above problem (for example, the weekly and monthly runs of the batch job have a different name than the daily run). It may be more applicable for you to define only one category per batch job, such as DAILY. Another option may be to set up two categories per batch job: one called PROD for all tested report decollating missions, and one called TEST for all report decollating missions being updated, changed or tested. This would help prevent incorrect changes to a current production definition, and would provide a safe fallback. For example:
Table 23 Using CATEGORY Parameter - TEST and PROD Example
|
Jobname |
Category |
Decollating Mission Version |
|---|---|---|
|
JOB6 |
PROD |
(Production version of report decollating mission) |
|
TEST |
(Testing version of report decollating mission) |
Using Decollating Parameters to Split Report Output
The second set of parameters you specify are the Decollating parameters. Information about how to split the report output to the relevant recipients is provided below.
Figure 10 Decollating Parameters
  ===========================================================================
  DEF COPIES    LVL    USER                      DEST          MAX COPIES
  ===========================================================================
  ON
  PRT COPIES    LVL    USER                      DEST          MAX COPIES
      PRINT/CDAM PARMS =
  WHEN LINE       -       COL       -       PRINT   REF NXT   CT     AND/OR
       STRING =
    DO
The parameters you define in this section will depend on how you currently split report output. There are many potential parameters you can use that will enable you to deal with any format of output that may be produced.
A simple definition would be one in which an entire report is assigned to one or more recipients. A more complex definition would be one in which many pages within a report are identified by different selection criteria and are distributed to recipients based on various values or strings within the report.
Overview
We will now discuss some general recommendations for decollating report output. The first step is to break down the information that we need to specify:
Table 24 General Decollation Recommendations
|
Task |
Details |
|---|---|
|
1. Assign Defaults |
Default information that specifies to Control-D who should receive unidentified pages from the job, and so on. There are two types of default information: Job Defaults (specifying global default information for all the reports produced by the batch job) and Report Defaults (specifying defaults for a specific report – these values override the specified Job Defaults). |
|
2. Identify Report Output |
Where Control-D can find report output, for example, if written to compressed datasets, which datasets should be decollated. If written to spool, which class or classes should be searched for the reports is specified. |
|
3. Assign Pages to Recipients |
Which recipients should receive which pages of a report. You specify how to identify the pages and to whom to send them. |
|
4. Assign Report Names |
What report name will be assigned to the identified report pages for a recipient. The report name can be seen online and is printed in the recipient's bundle. |
|
5. Assign Other Administration Parameters |
Other administration parameters that will tell Control-D how to back up and print identified reports. |
These steps are described in depth on the following pages.
Assign Defaults
First define the default parameters for the job. The job defaults apply to all the reports that you are handling from the batch job. If you want different default values for specific reports within the job, you can override job defaults with report defaults.
Figure 11 Default Parameter Lines
   DEF COPIES    LVL    USER                      DEST          MAX COPIES
   ===========================================================================
   ON
   PRT COPIES    LVL    USER                                    MAX COPIES
       PRINT/CDAM PARMS =
   WHEN LINE       -       COL       -       PRINT   REF NXT   CT     AND/OR
        STRING =
     DO
   ===========================================================================
   ON
   PRT COPIES    LVL    USER                                    MAX COPIES
       PRINT/CDAM PARMS =
   WHEN LINE       -       COL       -       PRINT   REF NXT   CT     AND/OR
        STRING =
     DO
If there are any unidentified pages, you can assign them to recipient UNIDENT (defined during Phase 2). The UNIDENT recipient can act as a central collection point for
all unassigned pages. If you do not specify a default recipient name for unidentified pages (here or in the report defaults), then your decollating mission will be flagged as ended NOTOK in the Active Missions file (although it may have decollated the output successfully), and any unidentified pages will be assigned to the user in the top level of
the tree.
Figure 12 Job Default Parameters
  DEF COPIES 01 LVL 95 USER UNIDENT              DEST          MAX COPIES 03
  ===========================================================================
  ON
  PRT COPIES    LVL    USER                      DEST          MAX COPIES
      PRINT/CDAM PARMS =
  WHEN LINE       -       COL       -       PRINT   REF NXT   CT     AND/OR
       STRING =
    DO
Identify Report Output
Either create reports directly to compressed datasets using the CDAM Direct Write facility, or create report output on spool as you do currently. You have to specify to Control-D exactly where to find the report output that you want to decollate.
Jobs That Write Directly to CDAM Datasets
When decollating from CDAM datasets, you use special parameters that tell Control-D which CDAM datasets you want to decollate. These parameters are called the CDAM retrieval parameters. Any retrieval parameters entered in the DSN field are merged with the parameters specified in the ON DSN field. We will examine these parameters in greater detail in Phase 6.
Figure 13 CDAM Parameter Requirements
  WHEN IN QUEUE N       TIME FROM      UNTIL      INTERVAL      PRIORITY
  DSN     LAST=YES
  ===========================================================================
  OUT
  SHOUT WHEN                                      TO                  URG
   MSG
  ===========================================================================
  DEF COPIES 01 LVL 95 USER UNIDENT              DEST          MAX COPIES
  ===========================================================================
  ON DSN        = PGMSTEP=STEP1,DDNAME=SYSUT2
  PRT COPIES    LVL    USER                      DEST          MAX COPIES
      PRINT/CDAM PARMS =
  WHEN LINE       -       COL       -       PRINT   REF NXT   CT     AND/OR
       STRING =
    DO
Jobs That Write Output to Spool
If you specify a class(es), Control-D will search the specified class(es) for the output that matches the JOBNAME defined in your report decollating mission. Any output from the job in other classes is not processed by Control-D.
Figure 14 Spool Parameter Requirements
  DEF COPIES 01 LVL 95 USER UNIDENT              DEST          MAX COPIES
 ===========================================================================
  ON CLASS      = PJ        EXTWTR               DEST          FORM
  PRT COPIES    LVL    USER                      DEST          MAX COPIES
      PRINT/CDAM PARMS =
  WHEN LINE       -       COL       -       PRINT   REF NXT   CT     AND/OR
       STRING =
    DO
Assign Pages to Recipients
Once you have identified the output to process, you must tell Control-D how you want to distribute the output. This is where distribution information you previously collected is defined in Control-D.
Example 1
If the entire report output is to be assigned to one or more recipients, you need only specify the relevant recipients, as in the example below.
Figure 15 Assigning Entire Report Output to Recipients
  DEF COPIES 01 LVL 95 USER UNIDENT              DEST          MAX COPIES
 ===========================================================================
  ON CLASS      = PJ        EXTWTR               DEST          FORM
  PRT COPIES    LVL    USER                      DEST          MAX COPIES
      PRINT/CDAM PARMS =
  WHEN LINE       -       COL       -       PRINT   REF NXT   CT     AND/OR
       STRING =
    DO USER     = DVACP                 LVL    LINE     COL     -     S   T
                                        SYNONYM =       CONCAT =
    DO USER     = BR10AD                LVL    LINE     COL     -     S   T
                                        SYNONYM =       CONCAT =
    DO
In the above example, a copy of all output for this batch job, written to classes P and J is assigned to recipients DVACP (Accounts Payable Department) and BR10AD (Washington Branch, Administration Department). No other identification is required.
Specifying String Identification
If reports are to be split according to an identifying strings appearing on the report pages, you must specify which recipients should receive which pages. You can specify AND/OR logic when identifying strings. You can also specify that Control-D should search a specified "window" on the page for a string. We recommend that you try to identify as accurately as possible the location of the string on the page. This will increase the performance and efficiency of your report decollating mission definitions.
Example 2
Figure 16 Identifying Two Strings on a Report Page
  ON CLASS      = P         EXTWTR               DEST          FORM
  PRT COPIES    LVL    USER                      DEST          MAX COPIES
      PRINT/CDAM PARMS =
  WHEN LINE 00003 - 00003 COL 00020 - 00045 PRINT   REF NXT   CT     AND/OR A
       STRING = ACCOUNTS SUMMARY REPORT
  WHEN LINE 00004 - 00005 COL 00001 - 00016 PRINT   REF NXT   CT     AND/OR
       STRING = DALLAS OFFICE
    DO USER     = BR12                  LVL    LINE     COL     -     S   T
                                        SYNONYM =       CONCAT =
    DO
  WHEN LINE       -       COL       -       PRINT   REF NXT   CT     AND/OR
  WHEN LINE       -       COL       -       PRINT   REF NXT   CT     AND/OR
       STRING =
    DO
In this example, reports produced by the specified job in Output Class P will be retrieved. Only when the string ACCOUNTS SUMMARY REPORT is found on line 3 in the Column range 20 - 45 and the string DALLAS OFFICE is found in line 4 or 5 in column range 1 - 16, will the page be assigned to recipient BR12.
Note that the second WHEN identification searches over two lines because the identifying string can be produced on line 4 or 5.
Example 3
Figure 17 Identifying Specific Pages for Recipients
  DEF COPIES 01 LVL 95 USER UNIDENT              DEST          MAX COPIES
    ===========================================================================
  ON CLASS      = T         EXTWTR               DEST          FORM
  PRT COPIES    LVL    USER                      DEST          MAX COPIES
      PRINT/CDAM PARMS =
  WHEN LINE 00006 - 00006 COL 00016 - 00019 PRINT   REF NXT   CT     AND/OR
       STRING = 1001
    DO USER     = BR11                  LVL    LINE     COL     -     S   T
                                        SYNONYM =       CONCAT =
    DO
  WHEN LINE 00006 - 00006 COL 00016 - 00019 PRINT   REF NXT   CT     AND/OR
       STRING = 1002
    DO USER     = BR12                  LVL    LINE     COL     -     S   T
                                        SYNONYM =       CONCAT =
    DO
In this example, we identify output that is directed to different recipients depending on a location code appearing on the report page.
In the above example, all pages identified with string 1001 are allocated to recipient BR11, and all pages with string 1002 are allocated to recipient BR12.
Synonyms Overview
Assume that every time these particular location codes appear on a report, the pages should be allocated to the specific recipients. If this is so, we can define these location codes as synonyms in the recipient tree.
Synonyms are nicknames or aliases for recipients. If we know that a particular string that appears in our reports is associated with a particular recipient, we can define the string as a synonym in the recipient tree.
Let's associate some aliases with our recipients in the sample recipient tree diagram:
Figure 18 Synonyms in a Recipient Tree
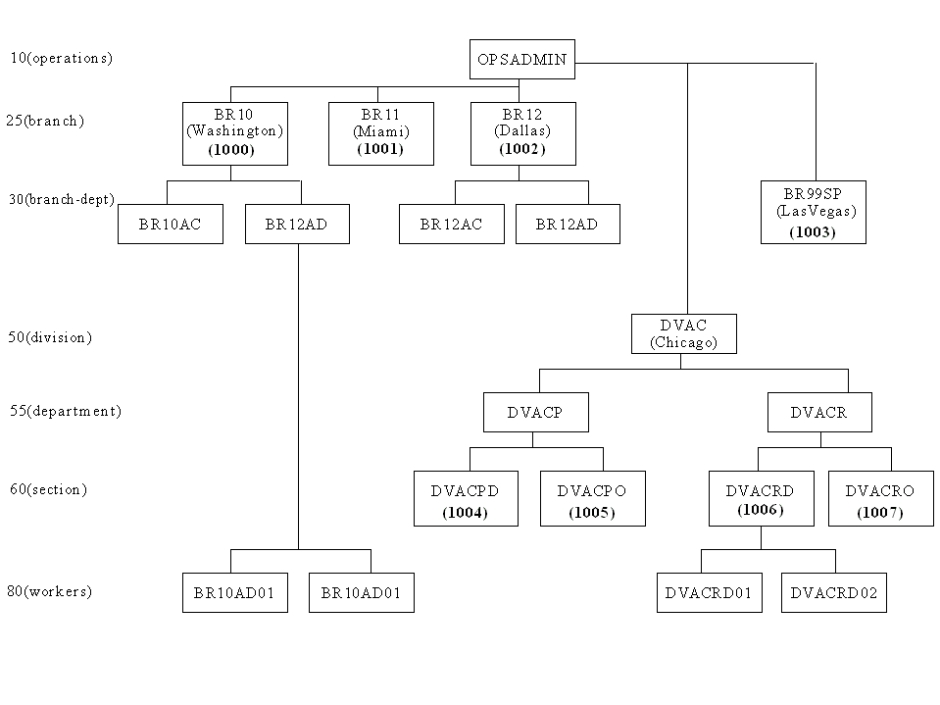
Defining Synonyms in the Recipient Tree
Once you have identified strings as being recipient synonyms, you should define them in the recipient tree. You simply select your previously-defined recipient, and insert the associated alias. You can define an unlimited number of synonyms for each recipient, since the same recipient may be identified differently in different reports and/or applications.
Figure 19 Recipient Definition Screen for Recipient BR11
 ------------------------ CONTROL-D RECIPIENT DEFINITION -------------------(T.S)
 COMMAND ===>                                                    SCROLL===> CRSR
 +-----------------------------------------------------------------------------+
  RECIPIENT BR11       RECIPIENT LEVEL 25   PARENT OPSADMIN    PARENT LEVEL 10
  DESC THIS IS THE BRANCH MANAGER IN MIAMI
  DESC
  ==========================================================================
  SYNONYM 1001
  SYNONYM BRANCH-11-MIAMI
  SYNONYM BRNCH 11
  SYNONYM BRAN11MI
  SYNONYM ACCMIAMI
  SYNONYM
  AUTHORIZE            $SYSDATA
  ADDRESS MRS. ROBINSON
  ADDRESS BRANCH MANAGER
  ADDRESS BRANCH 11
  ADDRESS 110 GLENDALE DRIVE
  ADDRESS MIAMI
  ADDRESS MI40 4PP
  ADDRESS
  ===========================================================================
  INDEX                USER BANNER Y                    REPORT BANNER Y
  DEF DEST
  ===========================================================================
                         P C   P A R A M E T E R S
   AUTHORIZED N
 ======= >>>>>>>>>>>> END OF RECIPIENT DEFINITION PARAMETERS <<<<<<<<<<<< ===
FILL IN RECIPIENT DEFINITION.                                         12.04.48
In this example, five synonyms were defined for recipient BR11. Synonyms can be up to twenty characters in length, and do not have to be unique.
Decollating Missions and Synonyms
If we defined a report decollating mission to handle the output from our report without using synonyms, then our definition would look like the next example.
Example 4
Figure 20 DO USER (Primitive Method)
  ON CLASS      = T         EXTWTR               DEST          FORM
  PRT COPIES    LVL    USER                      DEST          MAX COPIES
      PRINT/CDAM PARMS =
  WHEN LINE 00006 - 00006 COL 00016 - 00019 PRINT   REF NXT   CT     AND/OR
       STRING = 1000
    DO USER     = BR10                  LVL    LINE     COL     -     S   T
                                        SYNONYM =       CONCAT =
    DO
  WHEN LINE 00006 - 00006 COL 00016 - 00019 PRINT   REF NXT   CT     AND/OR
       STRING = 1001
    DO USER     = BR11                  LVL    LINE     COL     -     S   T
                                        SYNONYM =       CONCAT =
    DO
  WHEN LINE 00006 - 00006 COL 00016 - 00019 PRINT   REF NXT   CT     AND/OR
       STRING = 1002
    DO USER     = BR12                  LVL    LINE     COL     -     S   T
                                        SYNONYM =       CONCAT =
    DO
  WHEN LINE 00006 - 00006 COL 00016 - 00019 PRINT   REF NXT   CT     AND/OR
       STRING = 1003
    DO USER     = BR99SP                LVL    LINE     COL     -     S   T
                                        SYNONYM =       CONCAT =
    DO
Using this method, if we have hundreds of codes for hundreds of recipients, our report decollating mission definition will be very long. If we had defined synonyms in the recipient tree, we could pick the recipient identification from the page itself. Although the recipient name does not appear on the page, the recipient's synonym (alias) does.
If at any time a new branch opens, then using this method, all the report decollating mission definitions that handle reports for the new branch would have to be updated with the new branch name, and so on. Also, if a branch closes, the report decollating mission definitions would have to be updated to reflect this. This would generate a lot of work in maintaining the report decollating mission definitions.
The recommended way to handle this situation is detailed in the following example.
Example 5
Using defined synonyms, our definition would look like this:
Figure 21 DO USER=* (Recommended Method)
  ON CLASS      = T         EXTWTR               DEST          FORM
  PRT COPIES    LVL    USER                      DEST          MAX COPIES
      PRINT/CDAM PARMS =
  WHEN LINE       -       COL       -       PRINT   REF NXT   CT     AND/OR
       STRING =
    DO USER     = *                     LVL    LINE 006 COL 016 - 019 S   T
                                        SYNONYM =       CONCAT =
    DO
The use of the statement DO USER=* allows us to pick the recipient name or synonym from the actual report page, rather than defining clumsy and lengthy report decollating mission definitions.
The combined use of the DO USER=* statement along with our recipient synonyms, provides a powerful tool that greatly simplifies not only our report decollating mission definitions, but maintenance as well. Adding or changing a recipient synonym (once DO USER=* statements are specified in the decollating mission definitions) is much easier than changing all report decollating missions where a recipient name is defined, because the synonym changes can be done in one place (that is, in the recipient tree).
If a new branch opens, all that is required is that the branch be defined in the recipient tree. No modifications are required to the report decollating mission definitions; likewise, if a branch closes, all that is required is that the recipient tree entry be deleted.
You should use the DO USER=* statement and synonyms whenever possible.
You should now have inserted any relevant synonym information into the recipient tree.
Parameter SEARCH
At this stage, we would like you to set the SEARCH parameter (of the DO USER statement) to blank for all the report decollating mission definitions you create. We will discuss this parameter in detail during Phase 5 and give recommendations for its use.
  ON CLASS      = T         EXTWTR               DEST          FORM
  PRT COPIES    LVL    USER                      DEST          MAX COPIES
      PRINT/CDAM PARMS =
  WHEN LINE     -         COL     -         PRINT   REF NXE   CT     AND/OR
       STRING =
    DO USER     = *                     LVL    LINE 006 COL 016 - 019 S   T
                                        SYNONYM =       CONCAT =
    DO
Pages Without an Identifying String
In the examples we have looked at so far, an identifying string has appeared on each page. The default value for the CONTID parameter tells Control-D to check every page for an identifying string. Normally, if a report page is not identified by the report decollating mission (for example, the string is either not where we specified, or is different from what we coded), it is assigned to the default recipient. Sometimes you may have to process report output that does not have an identifying string on every page, as in the following example:
Sample Report
Table 25 Identifying Strings Found Only On Certain Report Pages
|
Page |
Page Information |
|---|---|
|
Page 1 |
Header Page – Report for Branch 10 |
|
Page 2 |
Data |
|
Page 3 |
Data |
|
Page 4 |
Data |
|
Page 6 |
Header Page – Report for Branch 12 |
|
Page 7 |
Data |
|
Page 8 |
Data |
|
Page 9 |
Header Page – Report for Branch 13 |
|
Page 10 |
Data |
|
Page 11 |
Data |
|
Page 12 |
Data |
In this example, if we used the default identification (CONTID set to N), all the data pages would be assigned to the default user because they could not be identified. To help handle this situation, we would use the following report decollating mission definition:
Figure 22 Parameter CONTID
  ON CLASS      = T         EXTWTR               DEST          FORM
  PRT COPIES    LVL    USER                      DEST          MAX COPIES
      PRINT/CDAM PARMS =
  WHEN LINE       -       COL       -       PRINT   REF NXT N CT Y   AND/OR

       STRING =
    DO USER     = *                     LVL    LINE 012 COL 010 - 020 S   T
                                        SYNONYM =       CONCAT =
    DO
In this example, we are assuming that we have defined the branch numbers as synonyms in the recipient tree. When Control-D finds an identifying string (such as Branch 10), this page and all following pages are assigned to this recipient, until Control-D identifies a new string (such as Branch 12). When it finds the new identifying string, this page and all following pages are assigned to the new recipient, and so on.
Assign Report Names
The pages of a report that you assign to recipients in your report decollating mission definitions should be assigned report names. The report name that you assign can be printed on the user's bundle, and viewed when using the Control-D Online Viewing facility. The report name can be up to twenty characters in length, and is assigned in a DO NAME statement.
When you assign report names during the initial implementation, we recommend using either the names that appear on the report output you are handling, or the names by which the reports are commonly known to the end user. Below is an example of DO NAME specifications:
Figure 23 Parameter DO NAME
  ON CLASS      = T         EXTWTR               DEST          FORM
  PRT COPIES    LVL    USER                      DEST          MAX COPIES
      PRINT/CDAM PARMS =
  WHEN LINE 006 - 006     COL 016 - 019     PRINT   REF NXT   CT     AND/OR
       STRING = 1001
    DO USER     = BR11                  LVL    LINE     COL     -     S   T
                                        SYNONYM =       CONCAT =
    DO NAME     = INVENTORY-FOR-1001           LINE     COL
    DO
  WHEN LINE 006 - 006     COL 016 - 019     PRINT   REF NXT   CT     AND/OR
       STRING = 1002
    DO USER     = BR12                  LVL    LINE     COL     -     S   T
                                        SYNONYM =       CONCAT =
    DO NAME     = INVENTORY-FOR-1002           LINE     COL
    DO
Extracting the Report Name From the Report Page
To simplify a report decollating mission definition, you can extract the report name from the report page itself. You can also build report names from different fields on the report page (and add your own text). Let's look again at our original sample report page again (as displayed in SDSF before decollation):
 SDSF OUTPUT DISPLAY JOB6      JOB  9381 DSID-  101 LINE       0 COLUMNS  02- 81
 COMMAND INPUT ===>                                            SCROLL ===> CSR
---+----1----+----2----+----3----+----4----+----5----+----6----+----7----+----8-
********************************* TOP OF DATA **********************************
DATE:   05.05.00
UPDATE: 05.05.00
                                 INVENTORY REPORT
                                 ----------------

WAREHOUSE NO: 1001       DEPARTMENT:  100  -  FINAL ASSEMBLY SHOP
              ----                    ---------------------------

                                   SHELF   QNTY   QNTY       QNTY       QNTY IN
ITEM NO.      DESCRIPTION          LIFE    UNIT   AVAIL      ORDER      PROCESS
-----------   ----------------     -----   ----   -------    -------    -------

1233-781-21   RIVET D. 0.1 ACR     NONE    KG      100.00     250.00
1233-781-25   RIVET D. 0.5 ACR     NONE    KG      500.00     500.00
1233-781-27   RIVET D. 0.7 ACR     NONE    KG      100.00     100.00
1234-781-21   RIVET D. 0.1 ACP     NONE    KG      100.00
1233-781-25   RIVET D. 0.5 ACR     NONE    KG      500.00     500.00
In this example, we want to build the report name based on values appearing in two different locations on the page, and we want to add some text of our own. The report decollating mission definition would look like this:
  ON CLASS      = T         EXTWTR               DEST          FORM
  PRT COPIES    LVL    USER                      DEST          MAX COPIES
      PRINT/CDAM PARMS =
  WHEN LINE       -       COL       -       PRINT   REF NXT   CT     AND/OR
       STRING =
    DO USER     = *                     LVL    LINE 006 COL 016 - 019 S   T
                                        SYNONYM =       CONCAT =
    DO NAME     = *-FOR-                       LINE 003 COL 035 - 043
    DO NAME     = *P+*                         LINE 006 COL 016 - 019
    DO
The first string found on the report page (that is, in the location specified in the first DO NAME statement) is INVENTORY, to which we add the string -FOR-. To this we add the next string found in the report page (that is, in the location specified in the second DO NAME statement). This is the warehouse number, which on the first page has a value of 1001. The resulting name is INVENTORY-FOR-1001, assigned to the report. Each time the text on the page changes, the report name changes.
If you do not specify a report name, the report will be assigned the name NONAME. Unidentified pages are assigned the report name of the last identified page. This can be helpful for locating in which part of the report the unidentified page was produced.
The Report Name in the Online Viewing Facility
In the previous example, the resulting report names assigned after decollation would appear as follows in the Control-D Online Viewing facility:
Active User Report List Display
 ACTIVE LIST    <D> JOB JOB6     REP                      USR MGT      CHILD (U) COMMAND ===>                                                    SCROLL===> CRSR
 O USER     REPORT               ODATE     PAGES    LINES V N STATUS
   BR11     INVENTORY-FOR-1001   07/04/00      3      137     Decollated
   BR12     INVENTORY-FOR-1002   07/04/00      3      145     Decollated
   BR13     INVENTORY-FOR-1003   07/04/00      3      145     Decollated
   BR99SP   INVENTORY-FOR-1004   07/04/00      3      145     Decollated
====== >>>>>>>>>>>>>>>   B O T T O M    O F    L I S T   <<<<<<<<<<<<<<< ======


 P PRINT     V VIEW     U UPDATE     I INSERT     A ADD INFO     E EDIT
 X INDEX     N NOTE     G GIVETO     D DELETE     Q QUICK ACCESS       17.08.30
Assign Other Administrative Parameters
Certain parameters in the report decollating mission definition determine how a recipient's reports should be printed and backed up. In the report decollating mission, you define the names of the printing and backup missions that will process the recipient's reports. This, in effect, is the way you link the decollated reports with printing missions (described in Phase 4) and backup missions (described in Phase 5).
Printing Mission Specification
The subject of printing missions is covered in detail in Phase 4, and it is during that phase that you will learn how to design your printing missions. One topic included in Phase 4, however, is important to us now. In Phase 4, we give recommendations for printing mission naming standards. For now, we recommend that you read about printing mission naming standards in Phase 4, and decide on your printing mission names, so that they can be specified in your report decollating mission definitions.
Printing mission naming standards are discussed in Phase 4.
Printing mission names are specified in the report decollating mission definition in the DO PRINT statement, as indicated in the example below:
  ON CLASS      = T         EXTWTR               DEST          FORM             PRT COPIES    LVL    USER                      DEST          MAX COPIES
      PRINT/CDAM PARMS =
  WHEN LINE       -       COL       -       PRINT   REF NXT   CT     AND/OR
       STRING =
    DO USER     = *                     LVL    LINE 006 COL 016 - 019 S   T
                                        SYNONYM =       CONCAT =
    DO NAME     = *-FOR-                       LINE 003 COL 035 - 043
    DO NAME     = *P+*                         LINE 006 COL 016 - 019
    DO PRINT    = STD                                   MUST   =
    DO
In the above example, when the printing mission STD is run (if bundling for these users), the report will be selected for printing. The report will not be printed twice. If you only want to view reports online, no DO PRINT statement is required.
Backup Mission Specification
The subject of backup missions is covered in detail in Phase 5, and during that phase that you will learn how to design your backup missions. One topic included in Phase 5, however, is important to us now. In Phase 5, we give recommendations for backup mission naming standards.
You should now read the section What Are Backup Missions? in Phase 5, and decide on your backup mission names, so that they can be specified in your report decollating mission definitions.
Backup Mission names are specified in the report decollating mission definition in the DO BACKUP statement, as indicated in the following example.
  ON CLASS      = T         EXTWTR               DEST          FORM
  PRT COPIES    LVL    USER                      DEST          MAX COPIES
      PRINT/CDAM PARMS =
  WHEN LINE       -       COL       -       PRINT   REF NXT   CT     AND/OR
       STRING =
    DO USER     = *                     LVL    LINE 006 COL 016 - 019 S   T
                                        SYNONYM =       CONCAT =
    DO NAME     = *-FOR-                       LINE 003 COL 035 - 043
    DO NAME     = *P+*                         LINE 006 COL 016 - 019
    DO PRINT    = STD                                   MUST   =
    DO BACKUP   = BKP0031D
    DO
In this example, we have specified that backup mission BKP0031D (when run) should backup the compressed dataset in which this report resides. (It is the backup mission definition that contains the information about how long to keep the report backed up.) Only after the backup mission has run, will a copy of the compressed dataset be archived.
If you do not specify a DO BACKUP statement, your report will not be backed up by Control-D, and the report will not be available for restoring.
Exception Handling
You can use report decollating mission parameters to perform powerful exception handling routines based on the appearance of specified report strings within the report. There are three main actions you can perform:
-
You can flag the mission as ended NOTOK under Control-D.
-
You can issue a message to a user or group of users.
-
You can assign a remark to the report.
These actions are discussed on the following pages.
End the Report Decollating Mission With NOTOK Status
Based on the appearance of a particular string in a report, you can force the mission to end NOTOK. This would mean that the mission would be flagged as NOTOK on the Active Missions file, and that none of the job's reports would be printed by Control-D. The mission is flagged using parameter DO NOTOK.
  ON CLASS      = T         EXTWTR               DEST          FORM
  PRT COPIES    LVL    USER                      DEST          MAX COPIES
      PRINT/CDAM PARMS =
  WHEN LINE 00002 - 00002 COL 00012 - 00038 PRINT   REF NXT   CT     AND/OR
       STRING = GENERAL LEDGER REPORT
    DO USER     = DVAC                  LVL    LINE     COL     -     S   T
                                        SYNONYM =       CONCAT =
    DO NAME     = GEN LEDGER REP               LINE     COL
    DO
  WHEN LINE 00012 - 00012 COL 00026 - 00040 PRINT   REF NXT   CT     AND/OR
       STRING = LEDGER UNBALANCED
    DO NOTOK
    DO
If any pages of the above report contain the string LEDGER UNBALANCED in the specified page location, the mission will be flagged as ended NOTOK and the reports will not be printed. This provides us with a good method of preventing the printing of reports that may contain erroneous information.
The reports can still be viewed online, which may help you determine the cause of the problem. From the User Report (Online Viewing) facility, you can issue a request to print the reports.
Issue a Message Based on Exception Data
Based on the appearance of a particular string in a report, you can issue a message to a user, a group of users, or an MVS Console. You use the DO SHOUT parameter to issue the message.
  ON CLASS      = T         EXTWTR               DEST          FORM
  PRT COPIES    LVL    USER                      DEST          MAX COPIES
      PRINT/CDAM PARMS =
  WHEN LINE 00002 - 00002 COL 00012 - 00038 PRINT   REF NXT   CT     AND/OR
       STRING = GENERAL LEDGER REPORT
    DO USER     = DVAC                  LVL    LINE     COL     -     S   T
                                        SYNONYM =       CONCAT =
    DO NAME     = GEN LEDGER REP               LINE     COL
    DO
  WHEN LINE 00018 - 00020 COL 00040 - 00060 PRINT   REF NXT   CT     AND/OR
       STRING = LEDGER CORRUPTION
    DO SHOUT    TO OPER2            URGENCY R
     = A LEDGER CORRUPTION HAS OCCURRED IN %%JOBNAME %%DATE %%TIME
    DO
In the above example, if any pages of the report contain the string LEDGER CORRUPTION in the specified page location, a Highlighted, unrollable message is displayed on the Master console (that is, the location indicated by the OPER2 specification).
Advanced Handling
In many instances, a job will produce exception messages inside a report, indicating that there are processing errors, but will not actually fail the job. Normally, these exceptions will not be noticed until the following day, when users receive reports or try to use online systems. This often means that the previous night's work must be redone, and that online systems are unavailable for users while corrective measures are being taken.
If other INCONTROL products are operational at your site, you can take advantage of their integrated architecture to perform some of the following actions, based on exception messages appearing in reports:
-
Automatically execute a Control-M/Analyzer rule (DO CTBRULE) to perform quality assurance checking procedures, for example, comparing totals, and so on.
-
Automatically set prerequisite conditions (DO COND) that impact the processing of jobs under Control-M, for example, to cause or prevent job submission.
-
Automatically execute a Control-O rule, for example, to suspend processing and ask the operators if they want to continue.
-
Automatically execute a Control-M/Links for Windows NT rule, for example, to issue a pager notification to the relevant support person indicating the nature of the problem.
Assign a Remark to a Report
You can assign a remark to a report based on the appearance of a particular string, using parameter DO REMARK. The remark can be up to sixteen characters in length, and can be displayed in the Online Viewing facility and printed on the user's report.
  ON CLASS      = T         EXTWTR               DEST          FORM
  PRT COPIES    LVL    USER                      DEST          MAX COPIES
      PRINT/CDAM PARMS =
  WHEN LINE 00003 - 00003 COL 00010 - 00032 PRINT   REF NXT   CT     AND/OR
       STRING = GENERAL LEDGER REPORT
    DO USER     = DVACP                 LVL    LINE     COL     -     S   T
                                        SYNONYM =       CONCAT =
    DO NAME     = GEN LEDGE REP                LINE     COL
    DO
  WHEN LINE 00040 - 00040 COL 00032 - 00042 PRINT   REF NXT   CT     AND/OR
       STRING = UNBALANCED
    DO USER     = DVAC                   LVL    LINE     COL     -     S   T
                                         SYNONYM =       CONCAT =
    DO NAME     = GEN LEDGE REP
    DO REMARK   = UNBAL
    DO
In the above example, recipient DVACP receives the General Ledger report on a daily basis. If the string UNBALANCED appears in any pages in the specified location, a copy of those pages is allocated as a report to recipient DVAC, for analysis. The report is also assigned the remark UNBAL, which can be displayed online, attracting the user's attention to the exception report.
Active User Report List Display (Updating REMARKs)
 ACTIVE LIST    <U> JOB M90      REP                      USR           CHILD (U)
 COMMAND ===>                                                    SCROLL===> CRSR
 O REPORT               ODATE     PAGES    LINES V COP STATUS             REMARK
   SAL-FOR-ARUE         04/04/00      1       60   000 Decollated
   SAL-FOR-OBSO         04/04/00      1       11   000 Decollated
   SAL-FOR-CHWA         04/04/00      1       10   000 Decollated
   SAL-FOR-ERED         04/04/00      1       60   000 Decollated
   SAL-FOR-URRA         04/04/00      1       60   000 Decollated
   SAL-FOR-EEDO         04/04/00      1       49   000 Decollated
   GEN LEDGE  REP       04/04/00      6      290   000 Decollated        CHECKED
   INVENTORY-FOR-1001   04/04/00      3      137   000 Decollated
   INVENTORY-FOR-1002   04/04/00      3      145   000 Decollated
   INVENTORY-FOR-1003   04/04/00      3      145   000 Decollated


======>>>>>>>>>>>>>>>>>> NO MORE REPORTS IN THE LIST  <<<<<<<<<<<<<<<<<<======
Scheduling Parameters
Recommended scheduling parameters are explained below. For a full explanation of these parameters, see the decollating mission parameters chapter of the Control-D and Control-V User Guide.
Scheduling parameters fall into two groups, each group referring to a particular section of report decollating mission parameters (sections are separated by a double dash (=) line):
-
Basic Scheduling Parameters: When to scheduling the mission.
-
Runtime Scheduling Parameters: When to execute the mission.
Each section in our overview corresponds to a relevant section of the report decollating mission parameters.
The scheduling parameters are displayed in the Report Decollating Mission Definition screen if the SHOW SCHEDULING CRITERIA field of the Report Decollating Mission entry panel was set to Y. (If the SHOW SCHEDULING CRITERIA field of the entry panel was set to N, the parameters can be displayed in the Report Decollating Mission Definition screen by specifying the SCHED command in the definition screen.) The following screen shows a Report Decollating Mission Definition screen with the scheduling parameters displayed.
Report Decollating Mission Parameter Definition Screen (SCHED=Y)
 --------- CONTROL-D/V CATEGORY PROD               JOB  JOB6     ----------(R.S)
 COMMAND ===>                                                    SCROLL===> CRSR
 +-----------------------------------------------------------------------------+
  CATEGORY PROD                      JOBNAME JOB6     GENERIC   MONITOR
  OWNER    M43         TASKTYPE REP  GROUP                      JOBID
  DESC
  ============================================================================
  DAYS                                                          DCAL
                                                                     AND/OR
  WDAYS                                                         WCAL
  MONTHS  1- Y 2- Y 3- Y 4- Y 5- Y 6- Y 7- Y 8- Y 9- Y 10- Y 11- Y 12- Y
  DATES
  CONFCAL          SHIFT   RETRO N MAXWAIT 00
  MINIMUM          PDS
  ============================================================================
  IN
  WHEN IN QUEUE         TIME FROM      UNTIL      INTERVAL      PRIORITY
  DSN
  ============================================================================
  OUT
  SHOUT WHEN                                      TO                  URG
   MSG
  ============================================================================
  DEF COPIES    LVL    USER                      DEST          MAX COPIES
  ===========================================================================
  ON
  PRT COPIES    LVL    USER                      DEST          MAX COPIES
      PRINT/CDAM PARMS =
  WHEN LINE       -       COL       -       PRINT   REF NXT   CT     AND/OR
       STRING =
    DO
 ======= >>>>>>>>>> END OF JOB/REPORT PARAMETERS FOR THIS CATEGORY <<<<<<< =====
 FILL IN REPORT DEFINITION. CMDS: EDIT, SCHED, SHPF, PATH               11.42.50
Using Basic Scheduling Parameters to Determine When to Schedule the Mission
Having already filled in the General Parameters and Decollating parameters, the third set of parameters you fill in are the Basic Scheduling parameters. With these parameters, you define when the report decollating mission should be scheduled to the Active Missions file (please note that different categories of the report decollating mission can have different scheduling criteria):
Report Decollating Mission Basic Scheduling Parameters
  DAYS                                                          DCAL                                                                               AND/OR
  WDAYS                                                         WCAL
  MONTHS  1- Y 2- Y 3- Y 4- Y 5- Y 6- Y 7- Y 8- Y 9- Y 10- Y 11- Y 12- Y
  DATES
  CONFCAL          SHIFT   RETRO N MAXWAIT 00
  MINIMUM          PDS
What Places the Report Decollating Mission into the Active Missions File?
A report decollating mission must be placed in the Active Missions file in order to execute. The mechanism used to place a copy of the report decollating mission definitions in the Active Missions file is the New Day procedure (CTDNDAY).
The New Day procedure calls a special scheduling program that runs independently of the Control-D monitor (STC). The program can run at any time, even if the Control-D monitor is not active.
The scheduling program scans and analyzes your report decollating mission library, and determines which report decollating missions should be scheduled to the Active Missions file depending on the defined Basic Scheduling Parameters. You can also specify special parameters in the list of missions to be scheduled, which can override any specified scheduling criteria. For example, the FORCE parameter ignores Basic Scheduling parameters, and always places the report decollating mission in the Active Missions file.
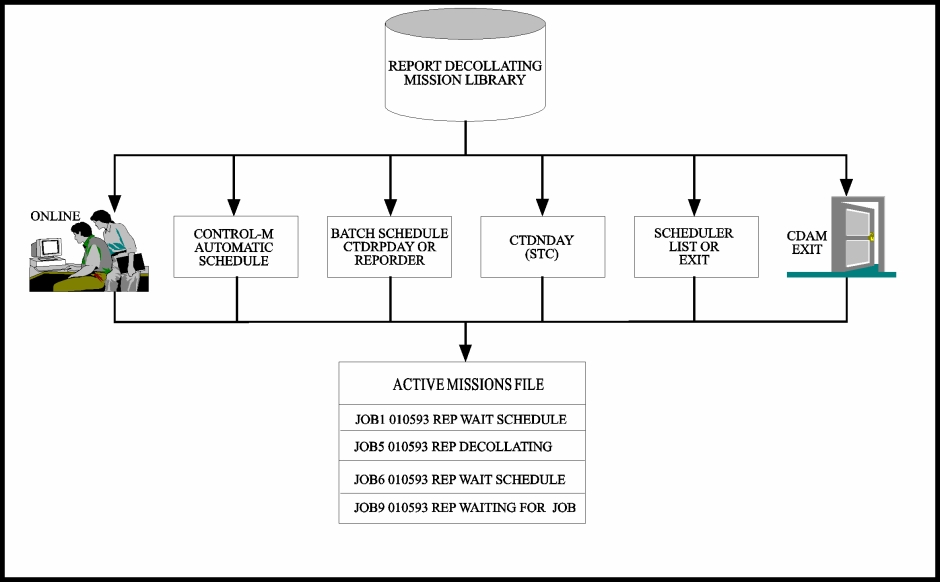
Methods of Scheduling Report Decollating Missions
You can invoke the scheduling program under a variety of environments (see Figure 6). Below is a list of the possible invocation environments and a description of how they work. Some of the methods detailed do not require that any Basic Scheduling parameters be coded.
-
Online From the Report Decollating Mission Library
All users should use this method when testing report decollating mission definitions, or for any ad hoc type scheduling. You simply use the Online options ORDER or FORCE to specify which report decollating missions you want to place on the Active Missions file.
-
Control-M Automatic Scheduling
If the Control-M Production Control System is active at your site, you can (and should) use it to automatically schedule your report decollating missions. Use the CATEGORY field of the Control-M job scheduling definition to specify which report decollating mission Category should be scheduled Then, when the relevant batch job is scheduled by Control-M, the Control-D report decollating mission will automatically be scheduled to the Active Missions file. (Using this method, you would not need to define any Basic Scheduling parameters in the report decollating mission.)
-
Batch Execution of the Scheduling Program
You can run the scheduling program as a batch job, using procedure CTDRPDAY. The batch job will analyze the Basic Scheduling parameters of the specified report decollating missions, and schedule the relevant missions to the Active Missions file. (This method normally requires definition of Basic Scheduling parameters for each report decollating mission.) Using this method, you can invoke the scheduling program from an application batch job. This would normally be defined as the last step in the job that would schedule the report decollating mission for this job into the Active Missions file. (Using this method, you can use the FORCE parameter, and you would therefore not need to define any Basic Scheduling parameters.)
-
Using CTDNDAY
During the run of New Day procedure CTDNDAY, described in the Control-D and Control-V chapter of the INCONTROL for z/OS Administrator Guide, one of its phases is the execution of the scheduling program. During this phase, it analyzes a supplied list of report decollating missions, and determines which of them should be scheduled to the Active Missions file. (Using this method, you would normally define Basic Scheduling parameters for each report decollating mission, and would keep the report decollating mission list for CTDNDAY up-to-date.)
-
Using Scheduler Information
If you have a scheduling package, you probably want to avoid duplicating scheduling information in Control-D. You can use the scheduler to control the scheduling and execution of the report decollating missions. This can be accomplished using either of two main methods:
The first method is to pass a list of scheduled jobs for a specific day from the scheduling program to the Control-D New Day procedure. This would place the relevant report decollating missions into the Active Missions file. You want the report decollating mission to execute after the relevant batch jobs have created their report output, so you need to establish a trigger from the scheduler, on completion of the batch job. You can do this by adding a condition to Control-D that would trigger the report decollating mission. You would specify in the report decollating mission (through the IN parameter) that the report decollating mission should wait for the condition before executing. The conditions can be added to the report decollating missions by utility IOACND, which can be executed under various environments.
The second method is to use a user exit in the scheduler software to invoke an execution of the Control-D scheduling program whenever an appropriate job completes in the scheduler application. Since the scheduler knows the job has ended successfully, the report decollating mission is automatically placed in the Active Missions file and can start to execute immediately.
Using these methods, you do not need to define any Basic Scheduling parameters in the report decollating mission.
For users of the CA-7 scheduling software, a Control-D Interface is supplied. Documentation concerning the implementation of the interface can be found in member CA7DOC in the IOA SAMPLE library.
-
CDAM Scheduling Exit (CTDX018O)
If you implement the CDAM Direct Write feature, you can schedule report decollating missions to the Active Missions file based on the creation of a CDAM file. Using this method, you must set EXIT to YES in the CDAM parameters of the batch job's JCL. We will discuss this technique further in Phase 6. Using this method, you do not need to define any Basic Scheduling parameters.
Figure 24 Graphic Overview of Scheduling Methods
DAILY SUBSYSTEM in the above figure refers to the New Day procedure and the programs it calls.
Scheduling Recommendations
So far, we have detailed the methods that can be used to schedule report decollating missions. Now we will list our recommendations for the use of these methods depending on the production control system that you use.
-
Sites with Control-M
We recommend that sites with Control-M utilize the integrated IOA capabilities to automatically schedule report decollating missions whenever the relevant jobs are scheduled by Control-M. You can use a condition to trigger the execution of a scheduled report decollating mission whenever a job ends in Control-M. You should run Control-M and Control-D in "Shared Data Base" mode to use this facility. For further details, see "Interfaces to Production Control Systems" in the Control-D and Control-V chapter of the INCONTROL for z/OS Administrator Guide.
-
Sites with Another Production Control System
If you have a production control system other than Control-M, you probably do not want to maintain two sets of scheduling criteria (that is, scheduling criteria for the jobs in the scheduling package, and scheduling criteria in Control-D for the report decollating mission definitions). If this is so, we recommend that you implement one of the following options:
-
Batch Execution of the scheduling program using the FORCE option (such as a last step in the JCL procedure).
-
Using Scheduler Information (for example, passing the required information to Control-D).
-
The CDAM Scheduling Exit
-
-
Sites without Any Production Control System
If you have no production control software, we recommend that you use one of the following methods of scheduling:
-
Batch Execution of the scheduling program using the FORCE option (for example, as a last step in the JCL procedure).
-
The CDAM Scheduling Exit
-
Using CTDNDAY to schedule a predefined list of report decollating missions (using basic scheduling criteria or the FORCE option; for further details see the Control-D and Control-V chapter of the INCONTROL for z/OS Administrator Guide).
-
You can, of course, use any combination of scheduling techniques that particularly suit your environment.
-
You should now decide your report decollating mission scheduling method.
Using Runtime Scheduling Parameters to Determine When to Execute the Mission
The fourth set of parameters you fill in are the Runtime Scheduling parameters. With these parameters, you define when (and under what conditions) the mission should execute after it has been placed in the Active Missions file.
Report Decollating Mission Runtime Scheduling Parameters
  IN
  WHEN IN QUEUE         TIME FROM      UNTIL       INTERVAL     PRIORITY
  DSN
Once all runtime criteria are fulfilled concurrently, the report decollating mission starts executing. The Control-D monitor checks the Active Missions file at specified intervals (defined in member CTDPARM) to see if the specified criteria have been met.
There are two environments from which decollating may proceed – from jobs that have output written directly to CDAM datasets, and from jobs that have output written to spool. We will summarize both methods.
Jobs That Write Directly to CDAM Datasets
CDAM Parameter Requirements
  IN      JOB6-CDAM-CREATED    ODAT
  WHEN IN QUEUE N       TIME FROM      UNTIL       INTERVAL     PRIORITY
  DSN     LAST=YES
If you use the CDAM Direct Write facility, your report decollating missions will decollate directly from the CDAM datasets. We therefore must tell the report decollating mission which compressed dataset you want to decollate.
You specify retrieval information in the DSN field so that Control-D can identify which CDAM dataset you want to decollate. You do not specify the JES dataset name in this field. You use the special CDAM retrieval parameters. It is unnecessary to specify the JOBNAME retrieval parameter because, by default, Control-D will look for CDAMs that match the job name of your specific report decollating mission.
BMC recommends that you use the retrieval statement LAST=YES when decollating from CDAM datasets. This means that you will decollate only the last CDAM datasets created by the job. If you do not use this parameter, you will be decollating all CDAM datasets that exist for the job, including those from previous runs, which for some implementations may be very useful.
You should also note that if you do not specify any other Runtime parameters, the report decollating mission will run as soon as it is placed in the Active Missions file. To avoid this, you should either define the report decollating mission so that it waits for a condition before it can execute (using the IN parameter), or schedule the report decollating mission after the CDAM dataset has been created.
Jobs That Write Output to Spool
Spool Parameter Requirements
  IN
  WHEN IN QUEUE Y       TIME FROM      UNTIL       INTERVAL     PRIORITY
  DSN
If you are decollating output directly from spool, your report decollating missions will automatically wait for the output to appear before they start to execute (WHEN IN QUEUE parameter defaults to Y). If two or more jobs with the same job name, as specified in the report decollating mission, are found in the queue when the report decollating mission starts to execute, it will select the job that finished executing last.
If you rerun the same batch job a few times in one day, the report decollating mission will not execute again unless you rerun it manually (option RERUN of the Active Missions screen), or unless you have defined the report decollating mission with a tasktype of CPR (which defines it as a Cyclic report decollating mission, able to execute multiple times).
Note that Non-held Output will be deleted from spool after decollation.
Report decollating missions "attach" themselves to the job name and job number of the particular job they are handling. If you reschedule a report decollating mission to reprocess a Held output, you must HOLD the previously executed report decollating mission (option H on the Active Missions screen) so that the new mission can gain access to decollate the same output.
Using Post-Processing Parameters to Determine What to Do Upon Termination of the Mission
The fifth set of parameters you fill in are the Post-processing parameters. Through these parameters, you define what to do when the mission finishes executing.
Report Decollating Mission Post-Processing Parameters
  OUT
  SHOUT WHEN NOTOK                        TO TSO-TS016   URG V
   MSG %%JOBNAME RDM FAILED ON %%DATE %%TIME - PLEASE CHECK
SHOUT Recommendations
BMC recommends that you use the Shout facility for exception handling (that is, when a mission fails or is late for execution). You should try to avoid sending "comforting" messages indicating that all your report decollating missions have worked successfully, as these may clutter your display and obscure any real exceptions that occur in Control-D.
The Shout facility allows you to reach out beyond the confines of your machine. Using Control-M/Links for Windows NT or another similar software tool, you can filter the Shout exception messages, and automatically issue pager requests (based on specific exceptions) to notify the relevant person of the problem.
You should by now have defined report decollating missions for your pilot application.
Test Decollating Missions
Initial Test
Once you have defined your report decollating missions, you should test them to ensure that they decollate the report output as you expected. The best way to initially test your report decollating missions is as follows:
-
Produce the report output into a Held Output Class.
-
Create report decollating mission parameters.
-
Schedule the report decollating mission to the Active Mission file (using the Online options).
-
Execute the mission.
-
Analyze the results of execution in the Active User Report List file (check the IOA log for any errors).
If any further modifications are necessary, you can simply repeat this process, working on the same Held report output until the mission is working as desired.
You should check that your decollating instructions are working correctly before adding administrative parameters such as DO BACKUP and DO PRINT. Once you are satisfied with the results of the mission, add these parameters.
Parallel Test
Once the initial test is working as desired, you can set up a parallel test of the report decollating mission against your production output. Report content often varies from day to day, and you need to ensure that your report decollating mission definitions can process the output consistently. When parallel testing your report decollating missions, you certainly do not want to interfere with any of the production reports. We therefore recommend that you create a duplicate copy of the report for Control-D testing purposes.
There are several methods of doing this. We recommend that you produce a duplicate copy of the targeted reports using the JCL OUTPUT statement. This will create a duplicate copy of the reports onto a different spool class.
Using the JCL OUTPUT Statement (Recommended Method)
You can automatically create a duplicate copy of the reports as they are created.
Below is the original JCL producing one copy of the report to class X:
//JOB6 JOB ,IOAP,CLASS=A,MSGCLASS=D
//*
//STEP1    EXEC PGM=IEBGENER
//SYSUT1   DD  DISP=SHR,DSN=IOAP.PROD.SAMPREPS(REPORT1)
//SYSUT2   DD  SYSOUT=X
//SYSIN    DD  DUMMY
//SYSPRINT DD  SYSOUT=*
//
Below is the amended JCL, producing one copy of the report to class X for production use, and one copy to class T for Control-D parallel testing purposes:
//JOB6 JOB ,IOAP,CLASS=A,MSGCLASS=D
//*
//OUT1     OUTPUT CLASS=X
//OUT2     OUTPUT CLASS=T
//*
//STEP1    EXEC PGM=IEBGENER
//SYSUT1   DD  DISP=SHR,DSN=IOAP.PROD.SAMPREPS(REPORT1)
//SYSUT2   DD  SYSOUT=(,),OUTPUT=(*.OUT1,*.OUT2)
//SYSIN    DD  DUMMY
//SYSPRINT DD  SYSOUT=*
//
Creating Copies of Reports From Report Files
You can create duplicate copies of report output for testing purposes from report files by reprocessing the file and creating a copy for Control-D, using utilities such as IEBGENER.
Manually Duplicating Reports
You can manually duplicate report output for testing purpose, by using JES operator commands or facilities such as SDSF.
Summary
Whatever method you choose, you should analyze the results of the decollation in the Active User Report List file to ensure that the report has been processed as required. Make sure that you check the default recipient names specified in your report decollating mission definitions (normally UNIDENT) to see if and why any report output has not been identified from your decollating instructions.
You can test the results of your report decollating missions in parallel until you get to Phase 8, when it will be time to implement them in production. At this stage, it is recommended to view all results online. When you get to Phase 4, you will start parallel testing the printed output sent to the recipients. The results of your parallel decollation will be the input for your parallel printing phase.
You should now test your report decollating missions in parallel until you reach Phase 8: Production Implementation.
Review
During this phase, you have learned the purpose of the decollating missions; examined the methods of scheduling a report decollating mission; reviewed the parameters of the decollating missions; and reviewed the procedures for creating and testing your report decollating mission definitions.
Before you continue, you should have:
-
Decided your report decollating mission scheduling method.
-
Defined report decollating missions for your selected pilot application.
-
Inserted relevant synonyms in the recipient tree.
-
Performed initial testing on your report decollating mission definitions.
-
Set up a parallel test for your report decollating mission definitions.
 Communities
 Support Center
 YouTube
 Twitter
 Facebook
 LinkedIn