Phase 4: Design Print Bundles
If you want to implement only Control-D Online Viewing services, and do not want to create printed bundles of report output on the mainframe printers, you can skip this phase. The topic of printing using the Online Viewing facility is discussed in Phase 9.
During this phase, we will summarize the printing workflow, and provide recommendations and options for the organization of your print bundles.
Some of the questions we will be answering in this phase are:
-
What are printing missions?
-
What do printing missions do?
-
How many printing missions do I need?
-
Where are printing missions defined?
-
When should I print the users' reports?
-
What are the parameters of the printing missions?
-
What is the link between printing missions and the recipient tree?
-
What is the link between printing missions and decollating missions?
-
How do I control the printing process?
-
How do I design the format of report bundles?
-
How do I test printing missions?
Inputs
Before you start this phase you should have completed testing your report decollating missions (Phase 3).
Outputs
At the end of this phase you will have:
-
Defined printing missions for the recipients of the pilot application.
-
Set printing mission naming standards.
-
Designed the basic format of the printed bundles.
-
Initially tested your printing mission definitions.
General Information About Printing Missions
Your main task in this phase is to decide how and when report output for your users should be printed. Control-D uses printing missions to create printed bundles of report output. A printing mission can bundle reports for one or more recipients.
A main objective of using Control-D to control printing is to deliver all reports for a user together in one formatted printed bundle.
What Are Printing Missions?
Printing missions are the basic mechanism used by Control-D for collating user reports into one print bundle, for example, if a user receives twenty reports (or parts of reports) from fifteen different batch jobs, all report output for the user is collated together and printed in one bundle. A printing mission can print reports for one or more recipients in a bundle. Parameter INCLUDE of the printing mission is used to specify which recipients' reports should be included in the bundle. By default, all reports of the recipient's children are included in the bundle, unless they are specifically excluded using parameter EXCLUDE. If no recipient names are specified, the entire recipient tree is included in the bundle. The recipient names specified are the names defined in the Control-D recipient tree.
What Do Printing Missions Do?
By defining parameters in your printing mission definitions, you will supply Control-D with the following information
Printing Methodologies
If you are changing from a manual printing environment to Control-D, it is important that you understand the difference between the methodologies of each system. Implementing Control-D will improve and optimize the sequence of the printing flow. New considerations are introduced for planning the printing workload.
Manual Printing Method
A manual printing system more than likely operates on a first-come-first-serve basis, that is, reports are printed in the sequence they are produced by batch jobs. Some sites use output print priorities to override this printing order but normally only a few critical reports, if any, are targeted. The report output is produced to spool where it waits until an appropriate printer becomes available. The reports are then printed. The operator splits the printed bundle at the job level (this may be done automatically depending on printer technology).
The reports are then passed to the person responsible for distribution. The distribution phase consists of splitting and assigning reports to the relevant recipients based on documented distribution instructions. Each recipient is allocated a holding area ("pigeon hole") where the manually processed reports are stacked as they are handled. At a predetermined time, the contents of the pigeon hole are prepared for dispatch. The packaged reports are then delivered by couriers or post to the recipients.
Control-D Printing Method
Using Control-D, this methodology is revolutionized. Reports are decollated automatically as they are created, eliminating the manual splitting and assignment process. The spool is no longer used as a holding area for reports that are in queue for printers. Reports for recipients are automatically bundled together by the printing missions and output is optionally "chunked" to spool for printing (avoiding spool overload). The recipient bundles are then printed and are ready for dispatch.
Comparison
The splitting and assignment of reports in a manual environment is equivalent to the Control-D decollation process. Placing reports in physical pigeon holes is equivalent to the automatic bundling process of Control-D. Below is a comparison of the two methods:
Table 26 Comparison of Manual Report Breakdown to Control-D Decollation
|
Manual Method |
Control-D Method |
|---|---|
|
Batch job produces reports to spool. |
Batch job produces reports. |
|
Reports are printed as they are created. |
Reports are automatically decollated. |
|
Reports are manually split and assigned to recipients. |
Recipient bundles are printed. |
|
Reports are stacked awaiting dispatch. |
Recipient bundles are dispatched. |
|
Reports are packaged and dispatched. |
|
This change in printing methodology means that you may now have to reexamine the timing of printing in your environment to ensure that print bundles meet required dispatch deadlines. Towards this goal, you must time the printing of user output, carefully considering the entire printing workload.
When Should I Create the Print Bundles?
This is one of the most important decisions you will have to make during this phase. The decision depends on two main factors:
-
Number of volumes of printed output you produce in relation to your printer resources.
-
Time frames involved between the creation of reports and their dispatch deadlines.
Using printing mission parameters, you can specify time and event dependency information for creating print bundles. These parameters can be used to control the exact point at which a printing mission should be executed.
Occasions may arise (due to resource constraints) where you cannot meet a dispatch deadline if you wait until all of a recipient's reports are created before you start to print them. This may be caused by large print volumes or batch jobs executing close to report dispatch times. In these cases, you may have to perform two bundling runs for the same recipient in order to meet the dispatch deadline, for example, one that prints the bulk of reports that have been created for a user so far, and one that creates a second bundle for the user's reports that are produced later.
Link the Report Decollating Mission With Printing Missions
Using report decollating mission parameters, you specify the name of the printing mission (DO PRINT = mission_name), which should print each assigned report. You can also override the original printing characteristics of each assigned report using the PRINT/CDAM parameter.
    ON CLASS      = T         EXTWTR               DEST          FORM
  PRT COPIES    LVL    USER                      DEST          MAX COPIES
      PRINT/CDAM PARMS = SYSOUT=P,CHARS=SP12
      PRINT/CDAM PARMS =
  WHEN LINE       -       COL       -       PRINT   REF NXT   CT     AND/OR
       STRING =
    DO USER     = *                     LVL    LINE 006 COL 016 - 019 S A T
    DO NAME     = ACCOUNTS SUMMARY             LINE 003 COL 035 - 043
    DO PRINT    = STD                                   COL     -
    DO
  ===========================================================================
Link the Recipient Tree With Printing Missions
The recipient tree supplies the following information to Control-D:
-
What address information should be printed for each recipient in the bundle.
-
If an index of reports should be printed for a recipient.
-
Which banner pages should be printed (at the recipient level).
-
What is the default destination for the report bundle (if not a local main printer).
-
Recipient bundle default sorting capability.
Where Are Printing Missions Defined?
You define printing missions using the Online facility (Option M in the IOA Primary Option menu). The definitions are stored as members of a partitioned dataset (PDS) in the Control-D printing missions library. Use the formatted Printing Mission Definition screen to define your parameters:
 ---- CONTROL-D CATEGORY DAILY                PRT MISSION STD      --------(M.S)
 COMMAND ===>                                                    SCROLL===> CRSR
 +-----------------------------------------------------------------------------+
   CATEGORY DAILY                             MISSION STD        MONITOR
   OWNER    M90        TASKTYPE PRT           GROUP
   BATCH               SKELETON               FREE    CLOSE      TIMEOUT
   OVERRIDE CLASS      DEST                   EXTWTR             FORM
   STARTED             ODATE                  MAXWAIT
   WRITER OPTION
   DESC
   ===========================================================================
   INCLUDE USER
   EXCLUDE USER
   SORT PARAMETERS: 1-USER  2-JOB   3-REPORT NAME 4-CATEGORY  5-LEVEL 6-TREE
                    7-FORMS 8-CHARS 9-MODIFY T-DECOL TIME E-USER DEFINED
   ENTER SORT SEQ :
   ===========================================================================
   DAYS                                                          DCAL
                                                                     AND/OR
   WDAYS                                                         WCAL
   MONTHS  1- Y 2- Y 3- Y 4- Y 5- Y 6- Y 7- Y 8- Y 9- Y 10- Y 11- Y 12- Y
   DATES
   CONFCAL          SHIFT   RETRO N MAXWAIT 00
   MINIMUM          PDS
   ===========================================================================
   IN
   TIME FROM      TO      NOT LATER THAN      PRIORITY
   ON PAGE#               ON LINE#            INTERVAL          NEXT TIME
   ===========================================================================
   OUT
   SHOUT WHEN                                      TO                   URGN
    MSG
   PRINTER                       DEST                   CHUNKSIZE
   ON FORM
    REQUEST
   ===========================================================================
   STORE        BACKUP               MIGRATE
 ======= >>>>>>>>>>>>> END OF PRINTING MISSION PARAMETERS <<<<<<<<<<<<<< =======
 PLEASE FILL IN MISSION PARAMETERS. USE "SHPF" TO SEE PFK DEFINITION    09.08.12
How Do I Activate a Printing Mission?
Printing missions must be scheduled to the Active Missions file to execute and create a print bundle. A special scheduling program called by the New Day procedure (CTDNDAY) is responsible for scheduling printing missions. Scheduling options are discussed later in this phase.
Active Missions File Display
 ---- CONTROL-D CATEGORY DAILY                PRT MISSION STD      --------(M.S)
 COMMAND ===>                                                    SCROLL===> CRSR
 +-----------------------------------------------------------------------------+
   CATEGORY DAILY                             MISSION STD        MONITOR
   OWNER    M90        TASKTYPE PRT           GROUP
   BATCH               SKELETON               FREE    CLOSE      TIMEOUT
   OVERRIDE CLASS      DEST                   EXTWTR             FORM
   STARTED             ODATE                  MAXWAIT
   WRITER OPTION
   DESC
   ===========================================================================
   INCLUDE USER
   EXCLUDE USER
   SORT PARAMETERS: 1-USER  2-JOB   3-REPORT NAME 4-CATEGORY  5-LEVEL 6-TREE
                    7-FORMS 8-CHARS 9-MODIFY T-DECOL TIME E-USER DEFINED
   ENTER SORT SEQ :
   ===========================================================================
   DAYS                                                          DCAL
                                                                     AND/OR
   WDAYS                                                         WCAL
   MONTHS  1- Y 2- Y 3- Y 4- Y 5- Y 6- Y 7- Y 8- Y 9- Y 10- Y 11- Y 12- Y
   DATES
   CONFCAL          SHIFT   RETRO N MAXWAIT 00
   MINIMUM          PDS
   ===========================================================================
   IN
   TIME FROM      TO      NOT LATER THAN      PRIORITY
   ON PAGE#               ON LINE#            INTERVAL          NEXT TIME
   ===========================================================================
   OUT
   SHOUT WHEN                                      TO                   URGN
    MSG
   PRINTER                       DEST                   CHUNKSIZE
   ON FORM
    REQUEST
   ===========================================================================
   STORE        BACKUP               MIGRATE
 ======= >>>>>>>>>>>>> END OF PRINTING MISSION PARAMETERS <<<<<<<<<<<<<< =======
 PLEASE FILL IN MISSION PARAMETERS. USE "SHPF" TO SEE PFK DEFINITION    09.08.12
-------------------- CONTROL-D/V ACTIVE MISSIONS ENVIRONMENT ---------------(A)
COMMAND ===>                                                    SCROLL===> CRSR
O NAME     ODATE  TYP OWNER    ------------------STATUS ------------------ UP
BKP0365D 040400 BKP M22      WAIT PROCESS
RST0060M 040400 CRS M22      WAIT PROCESS
RSTADHOC 040400 RST M22      WAIT PROCESS
JBR3450  040400 REP M90      J00469 ENDED "OK"
PO1000M  040400 REP M83      WAITING FOR JOB
PAC1020D 040400 REP M90      J09381 ENDED "OK"
M83GEN   040400 REP M83      J02353 ENDED "OK"
STD      040400 PRT M90      PAGES= 119 ENDED "OK"
IMP132   040400 PRT M46      WAIT PROCESS
M69BX016 040400 REP M69B     J03081 ENDED "OK"
M83X16   040400 REP M83      J03135 ENDED "OK"
======== >>>>>>>>>>>>>>>>>>> BOTTOM OF ACTIVE MISSIONS LIST <<<<<<<<<<<<<< ===
OPT ? WHY H HOLD D DELETE F FREE L LOG Z ZOOM R RERUN P PRINT CONTROL   12.20.47
Printing Mission Workflow
The printing mission workflow of Control-D is shown in the following figure, which shows the stages involved from initially scheduling the printing mission until printing the output. You must decide how certain stages of the workflow are to be performed at your site. Each stage will be examined in detail.
Figure 25 Printing Mission Workflow
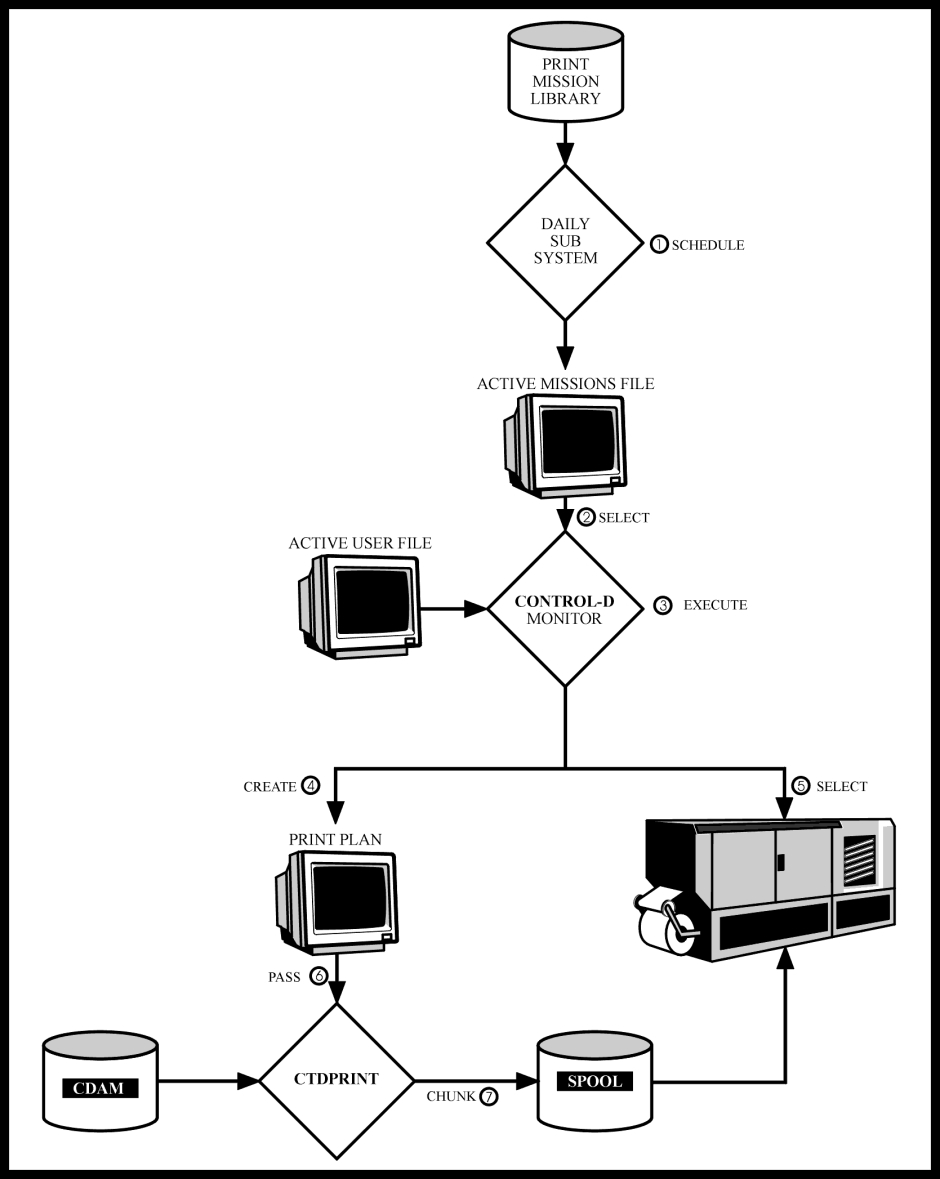
DAILY SUBSYSTEM in this figure refers to the New Day procedure and the programs it calls.
Schedule Printing Missions to the Active Missions File
A printing mission must be placed in the Active Missions file in order to execute. The mechanism used to place a copy of printing mission definitions in the Active Missions file is a special scheduling program called by the New Day procedure (CTDNDAY).
The scheduling program scans your printing mission library and determines which printing missions should be scheduled to the Active Missions file, based on the defined Basic Scheduling parameters.
Select Printing Missions for Execution
The Control-D monitor analyzes the Active Missions file at the interval specified in installation parameter INTERVALD in member CTDPARM, and selects missions for execution once all runtime dependencies have been met.
The Control-D monitor analyzes the Runtime Scheduling parameters of the printing mission to determine when the mission should be executed. You can specify dependency information and time specifications to control exactly when the printing mission should execute.
Execute Printing Mission Instructions
The Control-D monitor executes printing mission instructions. These instructions specify which recipients' reports should be included in the print bundle for this mission. Once a report has been decollated by Control-D, the report is available for printing. The decollating mission creates entries in the Active User Report List file.
Use report decollating mission parameter DO PRINT to specify which printing mission should print the user's report. The created entries in the Active User Report List file have a Wait Print status and are marked with the name of the assigned printing mission, as shown in the following screen.
 ACTIVE LIST    <A> JOB M90      REP                      USR          CHILD (U)
 COMMAND ===>                                                    SCROLL===> CRSR
 O USER     REPORT NAME          JOB      JOB-NUM  CATEGORY             FROMUSER
   BR11     ALL 100 ACCTS        M90TEST  JOB 9381 TEST1
   Ordered: 06/04/00  Run:          00:00 To: 00:00 Decollated: 06/04/00 11:10
   Status : Wait print               Remark :                   View: V
   Copies : 000 Form : STD           Class: D           P-      9 L-       427
   Dest:                             WTR:               Note:
   Record  ID        : 3AC09709           RBA:         UPDT:
   Print   Missions  : LAS132
   Restore Mission   :
   Pagedef:         Formdef:        Output:            Chars:
   Additional Users  :
 ------------------------------- end of record ---------------------------------
   BR12AD   HIGH ACCTS REP       M90TEST  JOB 9381 TEST1
   Ordered: 06/04/00  Run:          00:00 To: 00:00 Decollated: 06/04/00 11:10
   Status : Wait print               Remark : UNBAL             View:
   Copies : 000 Form : STD           Class: D           P-      3 L-      181
   Dest:                             WTR:               Note:
   Record  ID        : 3AC09707           RBA:         UPDT:
   Print   Missions  : STDRUN1  STDRUN2
   Restore Mission   :
   Pagedef:         Formdef:        Output:            Chars:
   Additional Users  :
 ------------------------------- end of record ---------------------------------
Bundle Selection Criteria
Two main checks are performed by Control-D when deciding which reports to include in a print bundle.
-
Only reports for the specified recipient or recipients will be analyzed for inclusion in the print bundle. The specifications in parameter INCLUDE/EXCLUDE of the printing mission tell Control-D which recipients to include in the bundle.
-
Only reports with a matching printing mission name will be selected. Control-D scans the Active User Report List file and analyzes the reports of the specified recipients. All reports for these recipients that have a printing mission name that matches the executing mission will be selected for this bundle (that is, all reports assigned by parameter DO PRINT in the report decollating mission definition).
Create the Print Plan
The result of the report selection phase is a print plan. The print plan is a dataset that describes which reports will be printed in this bundle (that is, as selected from the Active User Report List file). The reports are sorted according to the criteria specified in the printing mission parameters. The print plan can be viewed online (Option P in the Active Missions screen), and can be used to control the printing process of the print bundle. For example, to suppress printing of a particular report or to skip to a specific report.
Print Plan Screen
 ----- PRINT PLAN CATEGORY  DALLAS-BRANCH       MISSION  LAS132  ----------(A.P)
 COMMAND ===>                                                    SCROLL===> CRSR
 TOTAL PAGES      119  CURRENT PAGE NUMBER           REPORT PAGE NUMBER
 O USER     REPORT NAME          JOBNAME  JOBID    PAGES    LINES  PRINTED  STAT
   BR10     DISTRICT ACCTS       M46CHK   02180        4       76       76    P
   BR10AD   ACCTS SUMMARY        PAC1020  04521       26      494      494    P
   BR10AC   HI ACCTS REP         PO1000M  02186       75     1425     1425    P
   BR10AC   ACCTS LOANS REP      PAC1020  04521       14      266      266    P
 ========= >>>>>>>>>>>>>>>>>>>> BOTTOM OF PRINT PLAN <<<<<<<<<<<<<<<<< =========
 OPTIONS:  > SKIP TO REPORT  < STOP AT REPORT  D DELETE   U UNDELETE    12.22.47
The print plan can also be used if you request a rerun of a printing mission (Option R in the Active Missions screen). Two options are available when requesting a rerun:
-
Use the existing print plan
-
If the rerun is performed with the existing print plan, the same bundle is reprinted (or part of the same bundle, if you have specified print control symbols).
-
Rebuild the print plan
-
If you rebuild the print plan, the printing mission selects appropriate reports that have not yet been printed from the Active User Report List file.
Select Printer
Once the print plan has been created, Control-D searches for a "free" printer in order to print the bundle. You specify potential printers, using the PRINTER field of the printing mission parameters.
Pass Information to CTDPRINT
The selected printer and print plan information are then passed to the Control-D Printers Control monitor (CTDPRINT). The Printers Control monitor runs as a started task (STC) and actually controls the physical printing phase.
Print Output
There are two methods of printing output that can be used by Control-D:
Multi-Chunk Method
If you choose the Multi-Chunk Method, you must allocate the printer solely for Control-D use. This is achieved by specifying a unique destination id for each mainframe printer. When you want to print Control-D bundles using the chunking mechanism, assign the printer for Control-D use. You issue a JES operator command specifying the Control-D destination code.
One-Chunk Method
If you select the One-Chunk Method, do not assign the printer specifically for Control-D use. Instead, the entire print bundle will be sent to spool and will wait along with your other output to be printed as usual.
Define Printing Missions
The number of printing missions you define is dependent on the number of print bundles you want to create (as detailed in Printing Mission Naming Standards). For each printing mission, multiple categories can be defined.
You define the required printing mission parameters using the formatted screens of the Control-D Online facility. The definitions that you create are saved in the Control-D printing missions library. Note that because the definitions are saved in a partitioned dataset, you should ensure that the partitioned dataset is backed up regularly. This protects against the loss of your definitions due to some type of system error.
This section contains recommendations regarding specific parameters that you will define in your printing mission definitions. Following is a summary of the information that you will specify:
-
General Parameters
-
Information (Bundling Parameters)
-
Printing Parameters
-
Scheduling Parameters
-
Post-Processing Parameters
Printing Mission Definition Screen
 ---- CONTROL-D CATEGORY                      PRT MISSION          --------(M.S)
 COMMAND ===>                                                    SCROLL===> CRSR
 +-----------------------------------------------------------------------------+
    CATEGORY                                   MISSION            MONITOR
    OWNER               TASKTYPE               GROUP
    BATCH               SKELETON               FREE               TIMEOUT
    OVERRIDE CLASS      DEST                   EXTWTR             FORM
    WRITER OPTION
    DESC
    ===========================================================================
    INCLUDE USER
    EXCLUDE USER
    SORT PARAMETERS: 1-USER  2-JOB   3-REPORT NAME 4-CATEGORY  5-LEVEL 6-TREE
                     7-FORMS 8-CHARS 9-MODIFY T-TIME/DATE E-USER DEFINED
    ENTER SORT SEQ :
    ===========================================================================
    DAYS                                                          DCAL
                                                                       AND/OR
    WDAYS                                                         WCAL
    MONTHS  1- Y 2- Y 3- Y 4- Y 5- Y 6- Y 7- Y 8- Y 9- Y 10- Y 11- Y 12- Y
    DATES
    CONFCAL          SHIFT   RETRO   MAXWAIT
    MINIMUM          PDS
    ===========================================================================
    IN
    TIME FROM      TO      NOT LATER THAN      PRIORITY
    ON PAGE#               ON LINE#            INTERVAL
    ===========================================================================
    OUT
    SHOUT WHEN                                      TO                    URGN
     MSG
    PRINTER                       DEST                   CHUNKSIZE
    ON FORM
     REQUEST
    ===========================================================================
    STORE        BACKUP               MIGRATE
 ======= >>>>>>> END OF PRINTING MISSION PARAMETERS OF THIS CATEGORY <<<<<< ====
 PLEASE FILL IN MISSION PARAMETERS. USE "SHPF" TO SEE PFK DEFINITION    12.31.32
Printing Mission Parameters
Parameters that are mainly used to specify printing operations are described below. A detailed explanation is provided in the printing, backup and restore mission parameters chapter of the Control-D and Control-V User Guide.
General Parameters
The first set of parameters you specify are the General parameters. You use these parameters to define general information about the mission, much of which can be used for tracking and control purposes.
General Parameters
  CATEGORY                                   MISSION            MONITOR
  OWNER               TASKTYPE               GROUP
  BATCH               SKELETON               FREE               TIMEOUT
  OVERRIDE CLASS      DEST                   EXTWTR             FORM
  STARTED             ODATE                  MAXWAIT
  WRITER OPTION
  DESC
MISSION Recommendations
We recommend that you develop a standard for your printing mission names, as detailed later in "Printing Mission Naming Standards." The printing mission name usually reflects the physical attributes of the print bundle.
CATEGORY Recommendations
We recommend that you develop a standard for your category names, as detailed in Printing Mission Naming Standards. The category name usually reflects the contents of the bundle. You can use parameter CATEGORY to create multiple definitions for the same printing mission name.
Bundling Parameters
The next set of parameters you specify are the Bundling Parameters. You use these parameters to define information about which recipients' reports will be included in the bundle and how the reports should be organized.
Bundling Parameters
  INCLUDE USER                                                                  EXCLUDE USER
  SORT PARAMETERS: 1-USER  2-JOB   3-REPORT NAME 4-CATEGORY  5-LEVEL 6-TREE
                   7-FORMS 8-CHARS 9-MODIFY T-DECOL TIME E-USER DEFINED
  ENTER SORT SEQ :
Parameters INCLUDE and EXCLUDE
These parameters specify which recipients' reports should be included in the bundle. If you specify a recipient name in the INCLUDE parameter, by default all reports for this user and any of the user’s children (linked by the PARENT field in the recipient tree) will also be included in the bundle (unless you specify an EXCLUDE).
You can include or exclude as many recipients as you want. In most cases, the hierarchical format of the recipient tree reflects the physical destination and grouping of users. This assists in defining printing missions where we can specify the "top" group user and by default include all related users.
To include reports for a specific recipient (and by default all their children) the following definition could be used:
Sample Bundling Definition
  INCLUDE USER BR10                                                             INCLUDE USER
  EXCLUDE USER
  SORT PARAMETERS: 1-USER  2-JOB   3-REPORT NAME 4-CATEGORY  5-LEVEL 6-TREE
                   7-FORMS 8-CHARS 9-MODIFY T-DECOL TIME E-USER DEFINED
  ENTER SORT SEQ :
  ===========================================================================
The following users' reports (indicated as shaded) would be bundled from our sample recipient tree for the above definition:
Figure 26 Users Whose Reports Are Bundled - Example 1
If you want to exclude a specific recipient from the bundle, use parameter EXCLUDE. Any reports for the excluded user and the user's children (that is, users linked by the PARENT field) will, by default, be excluded from the bundle (unless you specify an INCLUDE).
Sample Bundling Definition
  INCLUDE USER DVAC                                                             INCLUDE USER DVACRD02
  INCLUDE USER
  EXCLUDE USER DVACRD
  EXCLUDE USER
  SORT PARAMETERS: 1-USER  2-JOB   3-REPORT NAME 4-CATEGORY  5-LEVEL 6-TREE
                   7-FORMS 8-CHARS 9-MODIFY T-DECOL TIME E-USER DEFINED
  ENTER SORT SEQ :
The following users' reports (indicated as shaded) would be bundled from our sample recipient tree for the above definition:
Figure 27 Users Whose Reports Are Bundled - Example 2
Parameter SORT
Parameter SORT instructs Control-D how the reports for the recipients in this bundle should be organized for example, sorted by user name (recipient tree order – Option 6), sorted by user name (alphabetically – Option 1), sorted by report name, and so on.
The default is to sort by tree and then by report name.
Sample Definition
  INCLUDE USER BR10                                                             INCLUDE USER
  EXCLUDE USER
  SORT PARAMETERS: 1-USER  2-JOB   3-REPORT NAME 4-CATEGORY  5-LEVEL 6-TREE
                   7-FORMS 8-CHARS 9-MODIFY T-DECOL TIME E-USER DEFINED
  ENTER SORT SEQ : 1,3
The above example will sort the bundle primarily by recipient name and then, within each recipient bundle, by report name.
Printing Parameters
The next set of parameters you specify are the Printing Parameters. You use these parameters to define information about where and how to print the bundle.
Printing Parameters
  PRINTER                       DEST                   CHUNKSIZE
  ON FORM
   REQUEST
  ===========================================================================
  STORE        BACKUP               MIGRATE
Parameter PRINTER
Once the print plan has been created, Control-D searches for a "free" printer in order to print the bundle. You specify potential printers using the PRINTER field of the printing mission parameters.
Sample Definition
  PRINTER PRT4                  DEST                   CHUNKSIZE
  PRINTER PRT5                  DEST                   CHUNKSIZE
  PRINTER                       DEST                   CHUNKSIZE
  ON FORM
  REQUEST
  ==================================================================
  STORE        BACKUP               MIGRATE
The printer names specified in this parameter must be defined in the PRINTER parameter in member CTDPARM in the IOA PARM library. For details, see the INCONTROL for z/OS Installation Guide: Installing. Using this parameter, you specify the default values for each printer, such as a destination code, relative printer speed, printer disposition (OPEN or CLOSED), and default chunk size.
Note that you should only define the mainframe printers (not remote printers) in this member.
If you do not specify any printer name in the printing mission parameters, Control-D will select (from the list of defined printers) the fastest printer (determined by the Relative Printing Speed parameter) that is OPEN (set by the default Printer Disposition parameter or overridden by an operator command) and currently available to Control-D (that is, not in use). We recommend that you define your printers as OPEN during the installation process. This will save you from specifying operator commands to Control-D to logically open and close printers when you want to print.
Parameter CHUNKSIZE
Parameter CHUNKSIZE of the printing mission can be used to override the default CHUNKSIZE specified in member CTDPARM (as detailed previously).
There are two methods of printing output that can be used by Control-D:
-
Multi-Chunk
-
One Chunk
The Multi-Chunk Method
If one of your objectives for the implementation was to reduce the size of the spool area, you will want to use the Chunking mechanism.
This means that Control-D does not send the entire print bundle to spool to await printing, but rather sends a chunk of the bundle to spool to print – when the first chunk has printed, it sends another chunk, and so on. This way we can avoid using the spool as a pre-print holding area and only send output as it is required to print.
Let's say we have a print bundle that consists of 200,000 lines of output. If we sent this output to spool for printing in its entirety, it would take up a large area of spool space. It would be preferable to send the output in chunks of 10,000 lines, as required by the printer, thus avoiding using the spool as a report repository.
You can specify a default CHUNKSIZE to be used for each printer in the member CTDPARM. You can override this default for each specific printing mission using the CHUNKSIZE parameter.
When using the Multi-Chunk Method, the printing characteristics of the reports to be printed can be mixed. Each time the printing characteristics change, Control-D automatically creates a new chunk.
One-Chunk Method
If you do not want to use the Multi-Chunk Method, you can specify a CHUNKSIZE of zero in member CTDPARM for the printer, or override the default for each printing mission using the CHUNKSIZE parameter. You do this by specifying 0 for CHUNKSIZE.
When using the One-Chunk Method, Control-D sends all the output to be printed in one chunk to the spool, regardless of its size.
If the bundle contains reports with different printing characteristics, the characteristics of the first report are used as a default for all reports in the bundle. If you want to print bundles containing mixed printing characteristics, you must use the Multi-Chunk Method.
Parameter DEST
Parameter DEST can be used to specify a remote printer destination. For further details, see the discussion about specifying report destinations in the implementation hints chapter of the Control-D and Control-V User Guide.
Printer Assignment
If you use the Multi-Chunk Method, allocate the printer solely for Control-D use. This is achieved by specifying a unique destination id for each mainframe printer. When you want to print Control-D bundles using the chunking mechanism, you must assign the printer for Control-D use. This is achieved by issuing a JES operator command specifying the Control-D destination code.
Sample JES2 Command
$TPRT2,S=N,R=U1002,Q=ABCD,SEPDS=NSample JES3 Command
*X WTR OUT=U1002,H=N,B=N,WC=Q
*S U1002
Using the One-Chunk Method, you do not have to assign the printer specifically for Control-D use. Instead, the entire print bundle will be sent to spool and will wait along with your other output to be printed as usual.
Scheduling Parameters
Recommended scheduling parameters are explained below. For a detailed explanation, see the printing, backup, and restore mission parameters chapter in the Control-D and Control-V User Guide.
Scheduling parameters fall into two groups, each group referring to a particular section of printing mission parameters (sections are separated by a double dash (=) line):
-
Basic Scheduling parameters - When to scheduling the mission.
-
Runtime Scheduling parameters - When to execute the mission.
The following topics discuss these two groups of Scheduling parameters.
Using Basic Scheduling Parameters to Determine When to Schedule the Mission
The next set of parameters you specify are the Basic Scheduling parameters. Now you define information about when to schedule the mission to the Active Missions file.
Different categories of the printing mission can be set up, and can have different scheduling criteria (for example, the printing priorities or dependencies for the mission may change for the month's end run).
Basic Scheduling Parameters
  DAYS                                                          DCAL                                                                               AND/OR
  WDAYS                                                         WCAL
  MONTHS  1- Y 2- Y 3- Y 4- Y 5- Y 6- Y 7- Y 8- Y 9- Y 10- Y 11- Y 12- Y
  DATES
  CONFCAL          SHIFT   RETRO N MAXWAIT 00
  MINIMUM          PDS
What Places the Printing Mission in the Active Missions File?
A printing mission must be placed in the Active Missions file in order to execute. The mechanism used to place a copy of the printing mission definitions in the Active Missions file is the New Day procedure (CTDNDAY).
The New Day procedure calls a special scheduling program that runs independently of the Control-D monitor (STC). The program can run at any time, even if the Control-D monitor is not active.
The scheduling program scans and analyzes your printing mission library and determines which printing missions should be scheduled to the Active Missions file depending on the defined Basic Scheduling parameters. You can also specify special parameters in the list of missions to be scheduled, which can override any specified scheduling criteria. For example, parameter FORCE ignores the Basic Scheduling parameters and always places the printing mission in the Active Missions file.
Methods of Scheduling Printing Missions
You can invoke the scheduling program under a variety of environments. Below is a list of the possible invocation environments and a description of how they work.
-
Online From the Printing Mission Library
-
All users will use this method for "ad hoc" scheduling or testing. You simply specify, using the online options, which printing missions you want placed in the Active Missions file.
-
Batch Execution of the Scheduling Program
-
You can run the scheduling program as a batch job, using procedure CTDPRDAY. The batch job will analyze the Basic Scheduling Parameters of the specified printing missions and schedule the relevant missions in the Active Missions file.
-
Using Procedure CTDNDAY (Recommended Method)
-
During the run of the New Day procedure CTDNDAY, as explained in the Control-D and Control-V chapter of the INCONTROL for z/OS Administrator Guide, one of its phases is an execution of the scheduling program. During this phase, a supplied list of printing missions is analyzed and which missions should be scheduled to the Active Missions file is determined.
We recommend that initially you schedule your printing missions on an "ad hoc" basis to compare your print bundles in parallel. You will implement your chosen scheduling method during Phase 8.
You should now decide your printing mission scheduling method.
Using Runtime Scheduling Parameters to Determine When to Execute the Mission
The next set of parameters you specify are the Runtime Scheduling parameters. You now define information about when the mission should execute after it has been placed in the Active Missions file.
Runtime Scheduling Parameters
  IN
  TIME FROM      TO      NOT LATER THAN      PRIORITY
  ON PAGE#               ON LINE#            INTERVAL          NEXT TIME
When all Runtime parameters are fulfilled concurrently, the printing mission starts executing. The Control-D monitor checks the Active Missions file at specified intervals (defined in member CTDPARM) to see if the specified criteria have been met. You can specify dependency information to the printing mission using parameter IN.
The following definition specifies that the printing mission for the Accounts recipients should not run until all of the Accounts application's decollating missions have run. This ensures that all of the account application's reports are included in the recipients' bundles.
  IN        PAC102-DEC-OK        ODAT        PAC106-DEC-OK       ODAT
  IN        PAC107-DEC-OK        ODAT        PAC108-DEC-OK       ODAT
  IN        PAC109-DEC-OK        ODAT
  TIME FROM      TO      NOT LATER THAN      PRIORITY
  ON PAGE#               ON LINE#            INTERVAL          NEXT TIME
In the next definition, we use parameter NOT LATER THAN to specify a cutoff time when the mission should no longer wait for conditions. The Account's application is only halfway through its schedule when you need to start printing reports to meet your dispatch deadlines. Therefore, you specify a NOT LATER THAN time of 0500. Even if the relevant conditions have not been added by the decollating missions, the printing mission will start executing to print the reports produced so far.
  IN        PAC102-DEC-OK        ODAT        PAC106-DEC-OK       ODAT
  IN        PAC107-DEC-OK        ODAT        PAC108-DEC-OK       ODAT
  IN        PAC109-DEC-OK        ODAT
  TIME FROM      TO      NOT LATER THAN 0500 PRIORITY
  ON PAGE#               ON LINE#            INTERVAL          NEXT TIME
Using Post-Processing Parameters to Determine What to Do Upon Termination of the Mission
The next set of parameters you specify are the Post-Processing parameters.
Post-Processing Parameters
  OUT
  SHOUT WHEN LATE     2100                        TO TSO-TS016   URGN V
   MSG LAS132 FOR DALLAS-BRANCH IS LATE FOR PRINTING - PLEASE CHECK
You now define information about what to do when the mission finishes executing.
SHOUT Recommendations
We recommend that you use the Shout facility for exception handling (that is, when a mission fails or is late for execution). You should try to avoid sending "comforting" messages indicating that all your printing missions have worked successfully as these may obscure any real exceptions that might occur in Control-D.
You can use parameter SHOUT WHEN LATE as a check pointing mechanism. You can specify times by which a printing mission should finish executing. If the mission does not finish executing by the specified time, you can alert someone to this fact. If printing does not start by a specific time, you may end up with too much printing to do to meet your dispatch deadlines. Using this facility you can start to be proactive (that is, solve a problem before it occurs using early warning indicators) rather than reactive (as when you try to solve the problem after it has occurred) in problem solving.
What Are Backup Missions?
Backup missions are the basic mechanism used by Control-D for backing up CDAM datasets to tape or cartridge. A backup mission makes a copy of the CDAM datasets onto tape. It does not delete the CDAM dataset from the disk.
Each backup mission archives the CDAM datasets for a specific period of time. You tell Control-D which backup mission should back up which reports. You do this in the report decollating mission definitions using DO BACKUP parameter. The backup mission name supplied is the mission that will back up all entries in the Active User Report List file marked with its name.
Report Decollating Mission Parameters Example
   ON CLASS      = T         EXTWTR               DEST          FORM
       PRT COPIES    LVL    USER                      DEST          MAX COPIES
       PRINT/CDAM PARMS =
   WHEN LINE       -       COL       -       PRINT   REF NXT   CT     AND/OR
        STRING =
     DO USER     = *                     LVL    LINE 006 COL 016 - 019 S A T
                                         SYNONYM =       CONCAT =
     DO NAME     = PURCHASE ORD REPORT          LINE     COL     -
     DO BACKUP   = BKP0031D
     DO
You can define multiple backup missions that will back up reports for different lengths of time. For example, back up all the Accounts reports for a year, back up the JCL MSGCLASS output for a month, and back up all the Audit reports for seven years.
Each backup mission uses a separate tape, so if you run three backup missions every day, a minimum of three tapes will be used every day.
Backup Mission Purpose - Examples
|
Backup Mission Name |
Purpose |
|---|---|
|
BKP0031D |
Backs up JCL MSGCLASS output for a month. |
|
BKP0365D |
Backs up Accounting reports for a year. |
|
BKP0007Y |
Backs up Audit reports for seven years. |
Cyclic Printing Missions
The printing missions we have discussed so far are standard printing missions that are scheduled to the Active Missions file and are executed once (unless manually rerun).
You can define a printing mission as being cyclic by defining the task type as CPR. This means that the mission can have multiple executions rather than one. The flow of a cyclic mission is that the mission is scheduled to the Active Missions file and executes at a specific point based on time and dependency parameters (specified in the Runtime Scheduling Parameters). When the mission completes, it is rescheduled for another potential execution. Using this method, a printing mission can have multiple executions.
Example 1
In the definition below we specify that the printing mission should print all reports created for the Development Department at a two-hour interval between 0900 and 18:45 (that is, between 9:00 AM and 6:45 PM). Please note that the interval specified starts from the time that the printing mission last finished, that is, if the first cyclic run ended at 0905 then the next run starts at 1105.
---- CONTROL-D CATEGORY NORTH-COURIER        PRT MISSION STD      --------(M.S)
COMMAND ===>                                                    SCROLL===> CRSR
+-----------------------------------------------------------------------------+
  CATEGORY DEVELOPMENT-DEPT                  MISSION LAS132      MONITOR
  OWNER    M90           TASKTYPE CPR        GROUP   DEV
  BATCH                  SKELETON            FREE                TIMEOUT
  OVERRIDE CLASS         DEST                EXTWTR              FORM
  STARTED                ODATE               MAXWAIT
  WRITER OPTION
  DESC     PRINTS ALL REPORTS FOR DEVELOPMENT DEPARTMENT EVERY TWO HOURS
  DESC
  ===========================================================================
  INCLUDE USER DVDV
  INCLUDE USER
  EXCLUDE USER
  SORT PARAMETERS: 1-USER  2-JOB   3-REPORT NAME 4-CATEGORY  5-LEVEL 6-TREE
                   7-FORMS 8-CHARS 9-MODIFY T-DECOL TIME E-USER EXIT
  ENTER SORT SEQ :
  ===========================================================================
  DAYS    ALL                                                   DCAL
                                                                     AND/OR
  WDAYS                                                         WCAL
  MONTHS  1- Y 2- Y 3- Y 4- Y 5- Y 6- Y 7- Y 8- Y 9- Y 10- Y 11- Y 12- Y
  DATES
  CONFCAL          SHIFT   RETRO N MAXWAIT 00
  MINIMUM          PDS
  ===========================================================================
  IN
  TIME FROM 0900 TO 1845 NOT LATER THAN      PRIORITY
  ON PAGE#               ON LINE#            INTERVAL 120          NEXT TIME
  ===========================================================================
  OUT
  SHOUT WHEN                                      TO                   URGN
   MSG
  PRINTER                       DEST                   CHUNKSIZE
  ON FORM
   REQUEST
  ===========================================================================
  STORE        BACKUP               MIGRATE
======= >>>>>>> END OF PRINTING MISSION PARAMETERS OF THIS CATEGORY <<<<<< ====
PLEASE FILL IN MISSION PARAMETERS. USE "SHPF" TO SEE PFK DEFINITION    12.31.32
Example 2
In this example, we specify that the printing mission should run every time a Director's report is created. The condition is added by the decollating missions that handle the Directors' reports. Using a condition to trigger a cyclic printing mission is a powerful way of linking "ad hoc" report creation events to printing events.
---- CONTROL-D CATEGORY DEVELOPMENT-DEPT     PRT MISSION LAS132   --------(M.S)
COMMAND ===>                                                    SCROLL===> CRSR
+-----------------------------------------------------------------------------+
  CATEGORY DEVELOPMENT-DEPT                  MISSION LAS132     MONITOR
  OWNER    M90           TASKTYPE CPR        GROUP   DEV
  BATCH                  SKELETON            FREE                TIMEOUT
  OVERRIDE CLASS         DEST                EXTWTR              FORM
  STARTED                ODATE               MAXWAIT
  WRITER OPTION
  DESC     PRINTS REPORTS FOR DIRECTORS AS SOON AS THEY ARE CREATED
  DESC
  ===========================================================================
  INCLUDE USER DIRBR
  INCLUDE USER
  EXCLUDE USER
  SORT PARAMETERS: 1-USER  2-JOB   3-REPORT NAME 4-CATEGORY  5-LEVEL 6-TREE
                   7-FORMS 8-CHARS 9-MODIFY T-DECOL TIME E-USER EXIT
  ENTER SORT SEQ :
  ===========================================================================
  DAYS    ALL                                                   DCAL
                                                                     AND/OR
  WDAYS                                                         WCAL
  MONTHS  1- Y 2- Y 3- Y 4- Y 5- Y 6- Y 7- Y 8- Y 9- Y 10- Y 11- Y 12- Y
  DATES
  CONFCAL          SHIFT   RETRO N MAXWAIT 00
  MINIMUM          PDS
  ===========================================================================
  IN        DIRECTOR-REP-DEC-OK  ODAT
  TIME FROM      TO      NOT LATER THAN      PRIORITY
  ON PAGE#               ON LINE#            INTERVAL          NEXT TIME
  ===========================================================================
  OUT       DIRECTOR-REP-DEC-OK  ODAT -
  SHOUT WHEN                                      TO                   URGN
   MSG
  PRINTER                       DEST                   CHUNKSIZE
  ON FORM
   REQUEST
  ===========================================================================
  STORE        BACKUP               MIGRATE
======= >>>>>>> END OF PRINTING MISSION PARAMETERS OF THIS CATEGORY <<<<<< ====
PLEASE FILL IN MISSION PARAMETERS. USE "SHPF" TO SEE PFK DEFINITION    12.31.32
If you use a condition to trigger a cyclic mission, make sure that you delete the condition (using parameter OUT) at the completion of the mission. Otherwise, your mission will try to execute continuously.
Special Printing Missions
You can use the printing mission specification in the report decollating mission parameters to specify multiple printing mission names. One use of this facility is to set up "special" printing missions.
Let's say that the printing workload is behind schedule. You know that by running your normal printing missions, not all the high priority or critical reports for various recipients will be printed in time.
The solution to this problem would be to define a special printing mission that will print all the critical reports. All critical reports would have the following Report Decollating Mission DO PRINT parameters defined:
Sample Report Decollating Mission
  ON CLASS      = T         EXTWTR               DEST          FORM
  PRT COPIES    LVL    USER                      DEST          MAX COPIES
      PRINT/CDAM PARMS =
  WHEN LINE   006 - 006   COL   016 - 019   PRINT   REF NXT   CT     AND/OR
       STRING = 1001
    DO USER     = BR11                  LVL    LINE     COL     -     S   T
                                        SYNONYM =       CONCAT =
    DO NAME     = INVENTORY-FOR-1001           LINE     COL
    DO PRINT    = STD      SPECIAL                      MUST   =
    DO
  WHEN LINE   006 - 006   COL   016 - 019   PRINT   REF NXT   CT     AND/OR
       STRING = 1002
    DO USER     = BR12                  LVL    LINE     COL     -     S   T
                                        SYNONYM =       CONCAT =
    DO NAME     = INVENTORY-FOR-1002           LINE     COL
    DO PRINT    = STD                                   MUST   =
    DO
Normally an STD (Started Task) printing mission will be run to print these reports. In times when the printing workload affects critical printing you can run the special printing mission to select only the critical reports. The STD mission can be run later to bundle and print the other reports that are noncritical and still waiting to be printed.
Printing Mission Naming Standards
When deciding how to organize the structure of the printing missions, we use two key parameters to help us identify and control the print bundles. They are the Printing Mission Name and Category Name parameters.
When deciding how the printing missions should be organized, the following main topics should be taken into consideration:
-
Physical printing constraints
-
Bundle contents constraints
-
Workload constraints
Establishing printing mission naming standards will assist you in dealing with these constraints. We will analyze the impact of each constraint and suggest a standard that will enable us to deal effectively with each problem.
Physical Printing Constraints
First, we will analyze the physical attributes of each bundle. The contents of each bundle may be affected by the type of printer required, the type of stationery used, or the type of physical intervention needed (for example, Insert Forms Flash) to print specific reports. You should list all physical printing restraints that exist at your site. These restraints determine at the highest level, which reports for a recipient can be realistically printed together, for example, the first split may be that some reports for a user must be printed on an impact printer and some on a laser printer. It is also impractical to mix stationery types within the same bundle because, for example, of the amount of manual intervention involved, and so on.
These physical attributes will form the basis for our first level naming standards. Let's assume that our sample site has four laser printers and two impact printers and the following stationery types:
Stationery Types
-
132 REPORTS
-
80 REPORTS
-
BLUE PAPER
-
FLASH 101 (BILLS FORM FLASH)
-
FLASH 102 (REMINDERS FORM FLASH)
-
CUSTOMER INVOICE
-
CUSTOMER CREDIT NOTE
Assign Printing Mission Names
We can use a mix between the printer requirements and stationery requirements of a printed bundle to create a naming standard that groups output at a level to meet the bundles' physical requirements.
In this example, we will use the printing mission name to identify the physical constraints of the bundle. The first identification we will use identifies the printer required for the bundle. The second identification we will use identifies the stationery required for the bundle. For our example, let's say we define the following printing mission names that identify the physical contents of each bundle:
Printing Mission Names
-
LAS132
-
IMP132
-
LAS80
-
IMP80
-
LASBLUE
-
IMPBLUE
-
IMPINV5
-
LASF101
Bundle Contents Constraints
Our next consideration concerns which users' reports should be printed together (that is, what the contents of each bundle will be). You may want to create one bundle per user, or you may want to include reports for several recipients in one bundle (the default).
This will probably be determined by how you currently dispatch your reports. For example, if you send all output to a particular branch in a box then you may want to include reports for all users at that location in one bundle.
Some sites that mail reports to recipients produce one bundle per recipient. These bundles are automatically addressed by Control-D. The printers print, split and shrink-wrap the recipient's bundle so that it can be mailed immediately.
In theory, you could print all the reports in one "Super Bundle," but one of the drawbacks of this method is that it is not as flexible as producing smaller bundles (for example, assigning printing priorities, scheduling the print workflow and specifying print dependencies). In other words, printing in the best sequence to meet business objectives by printing the most important or distant user bundles first is recommended.
Assign Category Names
These bundling attributes will form the basis for our second level naming standards in Control-D. We will use printing mission parameter CATEGORY for this purpose. Let's use our sample recipients as an example to show how they will be bundled together and assigned a category name. In this example, the category name reflects the physical delivery location of the recipients.
Table 27 Category Name Assignment Based On Bundle - Example
|
Recipients |
Category (Bundle Name) |
|---|---|
|
(BR10,BR10AC,BR10AD, BR10AD01,BR10AD02) |
WASHINGTON-BRANCH |
|
(BR11) |
MIAMI-BRANCH |
|
(BR12,BR12AC,BR12AD) |
DALLAS-BRANCH |
|
(BR99SP) |
LAS-VEGAS-BRANCH |
|
(DVAC) |
HO-BLDG1-2ND-FLOOR |
|
(DVACP,DVACPD,DVACPO) |
HO-BLDG3 |
|
(DVACR,DVACRD, DVACRD01,DVACRD02) |
HO-BLDG2 |
|
(DVACRO) |
HO-BLDG1-1ST-FLOOR |
Workload Constraints
We have discussed previously under Printing Methodologies, that Control-D prints output differently from the first-come-first-serve basis that occurs in a manual system. With Control-D, ideally we want to print all reports for a user in one printed bundle.
However, this means that you have to wait until all reports for the user have been created before you start printing. This may be impractical if you have a series of lengthy batch jobs producing high volume reports. It may be that by the time the last reports for a user are created, there is not enough time to print all the users reports to meet the dispatch deadlines.
In this case, it may be necessary to set up multiple bundling runs at different times, for example, bundle up all reports for Branch 11 at 2200 and again at 0300. This way, you can be sure you have enough time to print all the created output. The hours set for bundling runs depend on the workload and practices of your site.
We will modify the category names of our sample printing missions to cope with this situation where required:
Table 28 Splitting Bundles into Multiple Runs - Example
|
New Category Names |
Processing Description |
|---|---|
|
MIAMI-BRANCH-RUN1 |
First bundle for Miami at 2200 |
|
MIAMI-BRANCH-RUN2 |
Second bundle for Miami at 0300 |
|
DALLAS-BRANCH-RUN1 |
First bundle for Dallas at 2300 |
|
DALLAS-BRANCH-RUN2 |
Second bundle for Dallas at 0430 |
Summary
The example above results in a list that takes into consideration physical printing constraints, bundle contents constraints, and workload constraints.
The printing missions can be further controlled by specifying dependency information using parameters COND and NOT LATER THAN. For example, you can specify that a printing mission should not be run until a specific report decollating mission or a different printing mission has been run. Parameter PRIORITY can be specified to give printing missions printing priorities that are relative to the execution of other missions.
Below is a list of some of the missions and categories that could be set up for the example:
Table 29 Printing Missions and Categories - Example
|
Printing Mission Name |
Category Name |
|---|---|
|
LAS132 |
MIAMI-BRANCH-RUN1 MIAMI-BRANCH-RUN2 DALLAS-BRANCH-RUN1 DALLAS-BRANCH-RUN2 HO-BLDG2 HO-BLDG3-RUN1 HO-BLDG3-RUN2 |
|
IMP132 |
HO-BLDG2 HO-BLDG3 |
|
LAS80 |
HO-BLDG2 |
|
LASINV5 |
MIAMI-BRANCH DALLAS-BRANCH HO-BLDG3 |
Active Missions File Display (With CATEGORY Set to "On")
To control the printing process, you can view the printing mission status in the Active Missions file. Issue the CATEGORY command to display the defined category name of each mission.
 ------------------- CONTROL-D/V ACTIVE MISSIONS ENVIRONMENT ----------------(A)
 COMMAND ===>                                                    SCROLL===> CRSR
 O NAME     ODATE  TYP OWNER    ------------------STATUS ------------------ UP
   LAS132   040400 PRT M90      CAT=MIAMI-BRANCH-RUN1 PAGES= 119 ENDED "OK"
   LAS132   040400 PRT M46      CAT=MIAMI-BRANCH-RUN2 WAIT PROCESS
   LAS132   040400 PRT M90      CAT=DALLAS-BRANCH-RUN1 PAGES= 1517 ENDED "OK"
   LAS132   040400 PRT M90      CAT=DALLAS-BRANCH-RUN2 WAIT PROCESS
   LAS132   040400 PRT M46      CAT=HO-BLDG2 WAIT PROCESS
   LAS132   040400 PRT M46      CAT=HO-BLDG3-RUN1 PAGES= 12106 ENDED "OK"
   LAS132   040400 PRT M46      CAT=HO-BLDG3-RUN2 PAGES= 32 ENDED "OK"
   IMP132   040400 PRT M46      CAT=HO-BLDG2 WAIT PROCESS
   LASINV5  040400 PRT M46      CAT=DALLAS-BRANCH PRINTING ON PRT1
  ======== >>>>>>>>>>>>>>>>>>> BOTTOM OF ACTIVE MISSIONS LIST <<<<<<<<<<<<<< ===
OPT: ? WHY H HOLD D DELETE F FREE L LOG Z ZOOM R RERUN P PRINT CONTROL  12.20.47
You can set up any standard you prefer, but try to take into account the considerations discussed. The printing mission and category names you create should help you identify and control the printing workload.
By now, you should by now have defined printing mission naming standards, and defined printing missions for your pilot application.
Bundle Format Options
Once you have decided how to bundle your output, developed a standard for printing mission names, and defined your printing missions, you should start to think about the presentation and format of the print bundles you will be creating.
Control-D generates banner pages that describe the contents of the printed bundles. These banner pages are inserted in various positions in the bundle. You can define the format of these banner pages and control which banners should be produced at a global level and which banners should be produced at the recipient level.
Control-D also generates index pages that provide information about the contents of the printed bundles. You can define the format of the indexes and control which indexes are generated at a global level and which indexes are generated at the recipient level.
Default Bundle Format
The default structure of a Control-D bundle is shown below. The following banners will be automatically generated by Control-D:
Table 30 Resulting Banner and Index Pages
|
Banner or Index |
Description |
|---|---|
|
Bundle Start Banner |
Indicates the start of a Control-D bundle. This banner can contain any information you want to communicate to the users (for example, contact information for any problems). |
|
Bundle Index |
Contains a list of all reports included in the bundle for all users (for example, user names, report names, number of pages). |
|
User Start Banner |
Indicates the start of a user's report bundle. This banner contains the user's name and can also include address information (extracted from the recipient tree), general and/or specific information for users, and information such as the date and time of printing. |
|
User Index |
Contains a list of all reports for this user (such as report names or number of pages). |
|
Report Start Banner |
Indicates the start of a new report. This banner contains the report name of the following report. You can also supply information such as which job name or job ID produced the report. |
|
Report Pages |
Specifies the actual pages of the report. |
|
Report End Banner |
Indicates the end of the current report. |
|
User End Banner |
Indicates the end of reports for the current user. |
|
Bundle End Banner |
Indicates the end of the Control-D bundle. |
Banner Members
Each banner is defined as a member in the IOA BANNERS library as follows:
Table 31 Banner Members
|
Member |
Type of Banner |
|---|---|
|
$$BNDLST |
Bundle Start Banner |
|
$$UINDXH |
Bundle User Index (Header) |
|
$$UINDXV |
Bundle User Index (Variables) |
|
$$USERST |
User Start Banner |
|
$$UINDXH |
User Index (Header) |
|
$$UINDXV |
User Index (Variables) |
|
$$REPSTA |
Report Start Banner |
|
$$REPEND |
Report End Banner |
|
$$USEREN |
User End Banner |
|
$$BNDLEN |
Bundle End Banner |
Control Bundle Format
Two methods exist for controlling which banners and indexes are produced in a print bundle. The banners and indexes can either be controlled on a global level (which affects all bundles produced), or at the recipient level (affecting only a particular user).
Global Control
Banners
Each banner is defined as a member in the IOA BANNERS library. If you do not want a particular banner to be produced by Control-D, simply rename the appropriate banner member in the library (for example, rename the report end banner member so that no such banner will be produced for all recipients).
Indexes
If you want to control which indexes are produced at a global level, you should make a change to member CTDX003 in the IOA SAMPEXIT library. Parameter GINDEX of this member specifies if a bundle index for the whole bundle should be produced. Parameter INDEX of this member specifies if a user index for each recipient should be produced.
Recipient Control
Banners
The recipient tree can be used to control the format of a bundle at the user level. For each recipient, you can specify if you want user and report banners printed. If you renamed the banner member (global control), you will not be able to print the banners with these options.
Recipient Definition Screen
 ------------------------ CONTROL-D RECIPIENT DEFINITION -------------------(T.S)
 COMMAND ===>                                                    SCROLL===> CRSR
 +-----------------------------------------------------------------------------+
  RECIPIENT BR11       RECIPIENT LEVEL 25   PARENT OPSADMIN    PARENT LEVEL 10
  DESC THIS IS THE BRANCH MANAGER IN MIAMI
  DESC
  ==========================================================================
  SYNONYM
  AUTHORIZE            $SYSDATA
  ADDRESS MRS. ROBINSON
  ADDRESS BRANCH MANAGER
  ADDRESS BRANCH 11
  ADDRESS 110 GLENDALE DRIVE
  ADDRESS MIAMI
  ADDRESS MI40 4PP
  ADDRESS
  ===========================================================================
  INDEX                USER BANNER Y                    REPORT BANNER Y
  DEF DEST
  =========================================================================
                              P C  P A R A M E T E R S
   AUTHORIZED N
 ======= >>>>>>>>>>>> END OF RECIPIENT DEFINITION PARAMETERS <<<<<<<<<<<< ==
 FILL IN RECIPIENT DEFINITION.                                          14.23.26
Indexes
For each recipient, you can specify if a user index should be printed. Anything you specify here will override the value set at the global level. The default value is Y.
Banners
Format of Banner Pages
You can control the format and contents of each banner page. You can specify what information is to be printed on each page, where the information should be positioned, and the size of the information. You can also access and/or specify special Control-D variables that will be replaced with appropriate values. For a complete list of all variables and control parameters, see the Exits chapter in the INCONTROL for z/OS Administrator Guide.
This information is defined in the banner members. The example below shows the definition for the report start banner ($$REPSTA) in the IOA BANNERS library.
Example Definition (Report Start Banner)
********************************* TOP OF DATA  *********************************
C AN EXAMPLE OF A BANNER DEFINITION FOR A BANNER THAT IS
C PRINTED AT THE BEGINNING OF A REPORT.
1
M%USER%
 R  E  P  O  R  T :
+R  E  P  O  R  T :
 ------------------
+------------------
S%REPORT%
  ------------------------------------
  |   PAGES          : %PAGES%        |
  |   LINES          : %LINES%        |
  |                                   |
  |   JOBNAME        :   %JOBNAME%    |
  |   JOB ID         :   %JOBID%      |
  |   ORIGINAL DATE  :   %ODATE%      |
  |                                   |
  |   DATE           :   %DATE%       |
  |   TIME           :   %TIME%       |
  ------------------------------------
M%USER%
E
---------------------------- BOTTOM OF DATA ----------------------------
Translation of the Banner Member Contents
The contents of each banner page are determined by the text defined in the banner member. The following rules are applied when translating the banner member:
The first character of each line can be:
-
Any valid ASA code (for example, + to over type a line to create a bold line).
-
X'5A' – for AFP remains unchanged.
-
A line descriptor, where:
<blank> means Regular size letters
-
B means Big (large) letters
-
M means Medium size letters
-
S means Small size letters
-
H means Header line (of index)
-
V means Format of an index line
-
E means End of banner page
-
C means Comment line
Any variables specified are replaced with the appropriate values. The values are presented according to the definitions in the first character of each line.
Resulting Banner Page
The resulting page shows the banner page with all special variables automatically replaced by Control-D.
 DDDDDDDD     AAAAAAAAA  VV       VV DDDDDDDDD   AAAAAAAAAAA VV       VV
 DD     DDD  AA       AA VV       VV
 DD      DDD AA       AA VV       VV
 DD      DDD AAAAAAAAAAA VV       VV
 DD      DDD AAAAAAAAAAA  VV     VV
 DD     DDD  AA       AA   VV   VV
 DDDDDDDDD   AA       AA    VV VV
 DDDDDDDD    AA       AA     VVV
 R  E  P  O  R  T :
 ------------------
 ******  *****  ***** ******  ****          ***  ****   ****  *****
 *    * *      *        **   **            * ** *   ** *   **     *
 ****** *      *        **    ***  ------ *  ** *  * * *  * *   ***
 *    * *      *        **      **           ** * *  * * *  *     *
 *    *  *****  *****   **   ****            **  ****   ****  *****

  *************************************
  *   PAGES          :          8     *
  *   LINES          :        328     *
  *                                   *
  *   JOBNAME        :   PAC1020      *
  *   JOB ID         :   16956        *
  *   ORIGINAL DATE  :   04/04/00     *
  *                                   *
  *   DATE           :   04/04/00     *
  *   TIME           :   16:22:54     *
  *************************************
 DDDDDDDD     AAAAAAAAA  VV       VV
 DDDDDDDDD   AAAAAAAAAAA VV       VV
 DD     DDD  AA       AA VV       VV
 DD      DDD AA       AA VV       VV
 DD      DDD AAAAAAAAAAA VV       VV
 DD      DDD AAAAAAAAAAA  VV     VV
 DD     DDD  AA       AA   VV   VV
 DDDDDDDDD   AA       AA    VV VV
 DDDDDDDD    AA       AA     VVV
Address Print Bundles
Some print bundles may contain reports for several recipients at a specific location. In such cases, it is desirable to have a specific delivery address for the bundle printed on the bundle start banner. To achieve this you should do the following:
-
In parameter GROUP of the printing mission definition, specify the recipient name of the user whose address you want printed on the bundle start banner.
-
In the bundle start banner member ($$BNDLST), specify variable %ADDRn% to retrieve the address information of the specified recipient from the recipient tree.
The specified user's address will then be printed as required in the bundle start banner. Using this method, you can set up "dummy" recipients in the tree whose sole purpose is to provide address information for specific groups of users (for example, the address of a building).
Customize Print Bundles
You can customize Control-D banners to produce various company or user-specific information to be printed on the banner pages, such as:
-
Company logos
-
Company mission statements
-
Company and/or computer department news
-
Company messages
-
Contact information about report problems
You can use the banner members and special variables %GLOBALn% and %DATAn% to produce the required information on the banner pages.
Summary
The supplied format of banners should meet most of your requirements for initial testing purposes. We suggest that you try a few variations and produce a few samples. You want to achieve a banner that is acceptable to the operators, dispatchers, and most importantly, the end users. When we get to Phase 8, we will ask the users how they would like their banners formatted. Then you can present the banner samples to them to see what their preferences are. You should not spend too much time at this stage trying to perfect the "ultimate" banner.
Printer Support
Control-D supports various printing technologies. For information on specific printing methods and recommendations, see the following documentation:
-
Advanced Function Printing (AFP)
-
The Control-D guide, AFP in the Control-D Environment Implementation Guide, provides thorough instructions, including various recommendations, examples, and options, for implementing Control-D in an AFP environment.
-
XEROX (Using DJDE Parameters)
-
See "Printing Using XEROX LCDS (DJDE) Parameters" in the Control-D and Control-V chapter of the INCONTROL for z/OS Administrator Guide.
Parallel Test Print Bundles
We recommend that you periodically produce a few print bundles to compare to the normal report output being distributed to end users. The input for your print bundles will be the output generated by your parallel test decollating missions.
You should ensure that only the appropriate night's reports are picked up by the printing mission. You can achieve this by moving all entries more than a day old to the History file. This will be explained in Phase 5 when we set up utility CTDDELRP.
You should now test your report decollating missions in parallel until you reach Phase 8.
Review
During this phase, you have learned what the purposes of the printing missions are, examined the methods of scheduling a printing mission, examined the naming standards for printing missions, reviewed the parameters of the printing missions, and reviewed the options for bundle formatting.
Before you continue, you should have:
-
Set standards for printing mission naming.
-
Defined printing missions for the recipients of your selected pilot application.
-
Set basic formatting options for bundles and produced sample banner pages.
-
Performed initial testing on your printing mission definitions.
-
Set up periodic parallel tests for your printing missions.
 Communities
 Support Center
 YouTube
 Twitter
 Facebook
 LinkedIn