Part 1 Upgrade Procedures
Overview
This guide contains instructions for upgrading to the current release from any of the following INCONTROL versions:
-
8.0.xx
-
9.0.xx
-
9.0.18.xxx
-
9.0.19.xxx
-
9.0.20.xxx
-
9.0.21.xxx
Upgrade in Place is the recommended approach for upgrading Version 9.0.xx or later of INCONTROL products to the most recent version. This process does NOT require copying all the database and operations libraries during upgrade process downtime. It reduces downtime to minutes, and provides for Fallback to the previous level of software, provided that the compatibility mode has not been changed. This process is described in Upgrade in Place process.
The Express Upgrade is the recommended approach for upgrading versions 8.0.xx and earlier of INCONTROL products to the most recent major version. This process does NOT require copying all the database and operations libraries during upgrade process downtime. It reduces downtime to minutes. This process is described in Express Upgrade.
The Full Upgrade approach was the original approach for upgrading INCONTROL products. The Express Upgrade approach was introduced with the INCONTROL version 8.0.00. This process is described in Full Upgrade.
For more information, see also
Before proceeding, review Technical considerations and the What’s New section of the INCONTROL for z/OS Release Notes to determine if upgrading is appropriate for your site.
Throughout the entire upgrade process, as long as the INCONTROL for z/OS products are running in compatibility mode for previous versions (see Basic concepts), the configuration of the Control-M/Enterprise Manager must be kept at the same version as it was before the upgrade process was started.
After the transition period is completed, and the user has decided to change the compatibility mode to the new upgrade level, the user is required to configure Control-M/Enterprise Manager for managing the Control-M at the newly upgraded level.
To configure Control-M/Enterprise Manager for the upgraded Control-M for z/OS
-
From the z/OS machine, shut down the following INCONTROL components:
-
IOAGATE
-
Control-M
-
Any IOA Online monitors
-
-
From the Control-M Configuration Manager, shut down the Gateway for this Control-M.
-
From the z/OS machine, set the CMODE to the new upgrade level in the MODEASM and MODECTM parameters, and in the parameters for any other INCONTROL products that are installed.
For a list of INCONTROL products and their product codes, see the table below.
-
BMC recommends setting the CMODE to the same upgrade level for all INCONTROL products.
-
In the following types of upgrade, this step is performed automatically, and NO CHANGE is needed after successful completion:
-
In the Express Upgrade, during the "Complete the upgrade" step
-
In the Upgrade in Place, during the "ACCEPT Upgrade" step
-
-
-
From the z/OS machine, restart the following INCONTROL components:
-
IOAGATE
-
Control-M
-
Any IOA Online monitors
-
-
From the Control-M Configuration Manager, restart the Gateway for this Control-M.
WARNING: When the system is running with all capabilities at the new upgrade level, there is no simple, efficient way to fallback to any of the previous versions.
The following product names and codes are used throughout this guide:
|
Product Name |
Product Code |
|---|---|
|
Control-M for z/OS |
CTM |
|
Control-M/Analyzer |
CTB |
|
Control-M/Restart |
CTR |
|
Control-M/Tape |
CTT |
|
Control-M JCL Verify |
CTJ |
|
Control-O |
CTO |
|
Control-D |
CTD |
|
Control-V |
CTV |
Upgrade in Place
Upgrade in Place upgrades a 9.0.vv.mmm environment to a later version and/or maintenance level. By maintaining the same software library names and database files, the upgrade can be accomplished with close to zero downtime and minimal risk. This upgrade process also provides a fallback to the previous software level, provided that the compatibility mode has not yet been changed to work with the new features.
The Upgrade in Place approach is described in Upgrade in Place process
Express Upgrade
The Express Upgrade is aimed at simplifying the upgrade procedure, providing the advantages of the Full Upgrade with more flexibility.
The Express Upgrade allows you to prepare the new production environment with the new release, while the old production environment is still running, and then perform a fast and easy switch to the new release. In addition, this option allows an immediate fallback to the old production environment, in case it is required.
The Express Upgrade approach is described in Express Upgrade.
Full Upgrade
During the time you are performing a Full Upgrade, because the IOA core and the INCONTROL products are upgraded as an integrated procedure, none of the individual Control-x products are available for day-to-day operations.
The Full Upgrade approach is described in Full Upgrade.
Terms used in this guide
-
The terms CR and the current release are used interchangeably. These terms are intended to mean the version number shown on the front cover of this guide.
-
The term Control-x is used as a generic identifier for any one or more INCONTROL products.
Basic concepts
Each of the INCONTROL products, and the common IOA infrastructure as well, has a compatibility mode set to them in the IOAPARM member of the IOA PARM library.
These modes are also managed from ICE, through the Customization panels.
The names of these compatibility mode parameters are in the form MODEnnn, where
nnn denotes the product line (CTM, CTD, IOA, and so on), and the values of these modes correspond to feature sets that were introduced in different versions of the products:
-
MODEnnn=800 refers to the basic feature set available for version 8.0.xx
-
MODEnnn=900 refers to the basic feature set available for version 9.0.xx
-
MODEnnn=918 refers to the basic feature set available for version 9.0.18.xxx
-
MODEnnn=919 refers to the basic feature set available for version 9.0.19.xxx
In general, products of a given version can work in their native full feature mode (the mode corresponding to that version according to the list above), but also in a mode that is a version lower than the native mode. This ability to work in a mode lower than the native mode is also called C-1 compatibility.
Upgrade in Place process
This chapter describes the Upgrade in Place, which upgrades an environment to a later version and/or maintenance level with close to zero downtime and minimal risk. This is accomplished by maintaining the same software library names and database files. The upgrade also provides a process for falling back to the previous software level, provided that the compatibility mode has not yet been changed.
-
Uprade to version 9.0.21 using the Upgrade in Place process is supported in product versions 9.0.18 and later. To enable Upgrade in Place, you must first APPLY the pre-requisite PTF PG06480 (WI10163) (and pre-requisites) to the environment.
-
After a successful Upgrade in Place, if you have multiple IOA environments at the same INCONTROL software level that are non-SMP/E- managed and have no ICE, you can perform a Multisystem Upgrade to upgrade those IOA environments.
-
IMPORTANT: The following considerations MUST be taken into account before the upgrade process begins:
-
Step 3.2 - Set Compatibility Modee enables changing the compatibility mode to the upgraded level. No INCONTROL address spaces may be active during this step in order to avoid working in mixed compatibility modes.
-
If Control-M/Enterprise Manager is installed at your site and connected to this environment, consider upgrading it to the new level prior to performing Step 3.2 - Set Compatibility Mode. Otherwise, its compatibility mode must not be changed, and the latest features will not be available.
-
Preparing for the Upgrade in Place installation
The best practice is to decide carefully from the beginning what is the appropriate upgrade and maintenance level for your system.
Before the upgrade process begins, customers must verify that there is enough space in the basepref.MAINTLIB and ilprefa.MAINTLIB libraries in order to accommodate 50 additional blocks and 4 additional directory blocks.
In preparation for the upgrade, choose a method for obtaining the PTFs and HOLDDATA required for the upgrade process. You can choose between the following two methods:
Using RECEIVE ORDER
In this method, you RECEIVE the required PTFs and HOLDDATA through a direct internet connection with BMC's Automated Delivery Server.
Required PTF files are obtained along with any PTFs in the PRE/REQ chain that are missing from your environment.
The latest Enhanced HOLDDATA is included, as well. Enhanced HOLDDATA is an SMP/E mechanism that assists in identifying PTFs in error and corrective PTFs, if available.
When using the RECEIVE ORDER method for the first time, you must perform an initial configuration. This involves setting local values for parameters regarding the required certificates and the connection with the client environment. For more information, see Parameters for RECEIVE ORDER.
Manually loading the upgrade files
If you choose not to use the RECEIVE ORDER method for obtaining upgrade files, you must manually load the upgrade files to the mainframe. The following table describes the required files.
All files must be renamed to the names indicated in step 1.2 (Verify Upgrade Files) of the upgrade process.
|
File type |
Description |
|---|---|
|
Upgrade package files |
Each upgrade level consists of a single binary file in IBM tersed format. All package files required for the upgrade must be loaded to the mainframe with the following dataset attributes: RECFM=FB, LRECL=1024. For each upgrade and maintenance level to be installed, transfer the upgrade package file to the mainframe as a binary file. You can download the package file from the EPD site (http://www.bmc.com/available/epd.html) or copy it from the product CD. |
|
EHD file |
Enhanced Hold Data (EHD) is an SMP/E mechanism for identifying PTFs that are flagged in error, and their resolving PTFs (if available). This file is in IBM tersed format and must be loaded to the mainframe with the following dataset attributes: RECFM=FB, LRECL=1024. |
|
PTF files |
Uncompressed PTF files that are not included in the maintenance levels being installed, but are to be installed together with the maintenance. The PTF files must be downloaded from eFix and uploaded to the mainframe using binary transfer and without CR/LF translation. These files require the following dataset attributes: RECFM=FB, LRECL=80. |
For additional details and instructions see the appropriate upgrade release notes.
Running Upgrade in Place from ICE
To run Upgrade in Place from ICE:
-
Invoke the INCONTROL Installation and Customization Engine (ICE). For details refer to the Installation and Customization Engine section in the INCONTROL for z/OS Installation Guide: Installing.
-
From the list on the INCONTROL Installation Options screen, select Maintain your Environment.
-
On the IOA Maintenance and ICE refresh screen, select Upgrade in Place.
Common to both Major and Minor Step panels
To select a step or an option:
Enter S in the Sel column in the row next to the step or option.
To mark a step as completed:
Enter C in the Sel column in the row next to the step.
Under normal circumstances, the step will be marked COMPLETE automatically.
To access the on-line help:
Enter "?" in the Sel column in the row next to the step or option.
Common to most Minor Step panels
To submit a job:
-
Enter S in the S column in the row next to the job description.
The Job Status message box opens, indicating that the job is running. Pressing Enter refreshes the status and, when the job has completed, opens the job log.
If the job ran already, a confirmation window is displayed to allow you to confirm whether you want to rerun the job (default is N=no).
-
Press PF3 (END) to close the log.
An OK status next to the job description indicates that the job completed successfully.
A FAIL status next to the job description indicates that the job failed. Examine the log for the cause of the failure. To understand the information contained in the log, see Maintenance job logs.
To browse a job log:
Enter B in the S column in the row next to the job description of a job that ran already.
The WARN status is set when a submitted job terminates with RC4. Usually rerun is possible and it is required.
The JobFailure status is set when it is impossible to determine the job termination results. It might be caused by a JCL error or a job cancellation. Analyze the situation and rerun the job.
Upgrade process
In the table of contents below, the primary headings correspond to major steps of the maintenance procedure in the ICE environment. The secondary headings (that start with the word "Step") correspond to minor steps in the maintenance procedure.
1. Upgrade - Preparations
Headings (that start with the word "Step") correspond to minor steps in the upgrade procedure.
Step 1.1 – Start new Upgrade Cycle
This step starts a new upgrade cycle for upgrading the system to the specified version and maintenance level.
The current upgrade level (VV.MMM) [VV (Version) and MMM (Maintenance)] of the system is displayed. You can specify any available valid level of maintenance. This process supports upgrading multiple upgrade levels in one cycle.
-
Select Minor Step 1, Start new upgrade cycle.
If the previous upgrade cycle has not yet been completed (it was APPLYed (Step 2.5), but not ACCEPTed (Step 3.4)) a message is displayed. You must first complete the previous cycle before you can start a new upgrade cycle.
-
In the VV.MMM (Ver . Maint) fields type the target upgrade version and maintenance levels.
-
Press PF3 (END) to save these changes and return to the Minor Steps Selection panel. To exit without saving, enter CANCEL in the command line.
Saving a new level of upgrade initiates the new upgrade cycle. All log and status information from the previous cycle is deleted.
Step 1.2 – Verify Upgrade Files
This step verifies that the upgrade level is valid and available. If you choose to manually download the upgrade packages, this step verifies that all required files are available and ready for the upgrade.
-
Select Minor Step 2, Verify Upgrade Files.
-
Select the method to load upgrade files:
Use RECEIVE ORDER to RECEIVE files directly from a BMC server over the internet.
Manually download the upgrade packages from the EPD site and make them available in datasets on the mainframe.
-
If you chose to use RECEIVE ORDER, use the S option to submit the Verify job.
If the specified upgrade level is valid and available, the job will complete OK. Otherwise, the job will fail with an appropriate message.
After the job completes successfully, press PF3 (END) to return to the Minor Steps Selection panel.
If you have not yet completed the initial configuration for RECEIVE ORDER, first enter C to view and edit the details of certificates/client environment for RECEIVE ORDER. On the Parameter Data Entry screen, set local values for the required/relevant parameters, as discussed in Parameters for RECEIVE ORDER, and then press PF3 (END).
-
If you chose to download the upgrade packages manually, a list of upgrade package files is displayed in the Verify Upgrade Files panel, one file for each required upgrade level, up to the specified target level. There is also an additional line for the EHD file, as explained below.
Each upgrade level (VV – Version and MMM – maintenance), is represented by a single binary file. In order to minimize the number of files that need to be uploaded, each file that contains an upgrade to a new VV (Version) (that is, maintenance 000), also contains all maintenance levels above the previous VV level (for example, 19.000 would contain version 19.000 and all maintenances above 18.000 up to 19.000).
Perform the following steps:
-
Ensure that all upgrade package files are in Ready status.
-
The following table lists the possible statuses and the action to take in each case. After taking action, press Enter to refresh the panel and display the updated status.
Status
Action
Ready
No action necessary. This is the desired status.
Compressed
Uncompress all Compressed upgrade package files:
-
To submit an Uncompress job for each file, enter the U line command next to the file name.
-
To submit one Uncompress job for all compressed files, enter the UU command next to any file with a Compressed status.
Missing
No file with the specified name was detected on DASD. Check DASD and perform the appropriate action:
-
Make the file available on DASD, as described in Manually loading the upgrade files.
-
Rename the file to the displayed name (outside of ICE).
Invalid
The file has incorrect DCB attributes or is an incomplete uncompressed file.
Type ? next to the file name to view possible reasons why the file has an Invalid status and how to proceed.
-
-
-
BMC strongly recommends using EHD (Enhanced Hold Data file), which is an SMP/E mechanism that assists in identifying PTFs that are in error, and identifying corrective PTFs, if available. To retrieve the current EHD file, go to ftp://ftp.bmc.com/bmc/holddata and download the yrs3.bin file.
The yrs3.bin file is refreshed frequently. To ensure that you are using the latest version, download the file immediately before you upload it to the mainframe.
Upload the file to the mainframe using binary transfer and the following dataset attributes:
-
Dataset Name: mlprefa.Evv#mTRS (where vv#m represents the target version and maintenance level)
-
RECFM: FB
-
LRECL: 1024
After uploading the EHD dataset file, ensure that it is in Ready status.
If you prefer to proceed without EHD support (not recommended), see Proceeding without EHD support.
After all files are Ready, press PF3 (END) to return to the Minor Steps Selection panel.
-
Parameters for RECEIVE ORDER
Before the first time that you use the RECEIVE ORDER option for obtaining PTFs and Enhanced HOLDDATA directly from BMC's Automated Delivery Server, you must perform an initial configuration, in which you set local values for the following parameters.
Table 25a RECEIVE ORDER parameters
|
Parameter |
Description |
|---|---|
|
BMC RECEIVE ORDER URL |
The URL of the BMC RECEIVE ORDER server, https://ws-prod.bmc.com/smpe This value cannot be changed. |
|
x.509 keyring |
The keyring in the security product database (RACF, CA-ACF2, or CA-TOP SECRET) that contains the x.509 user certificate and the root CA certificate used to sign the BMC Automated Delivery Request server certificate. Valid values are in the following format: The x.509 user certificate identifies you as a BMC customer that is using RECEIVE ORDER for BMC products. To obtain the BMC x.509 user certificate, go to https://www.bmc.com/available/zso.html. |
|
x.509 user certificate label |
The label under which the x.509 Certificate, obtained from https://www.bmc.com/available/zso.html, was installed in the security product database (RACF, CA-ACF2 or CA-TOP SECRET). This certificate should be connected to the keyring specified in the previous parameter. |
|
Path to Java run time directory |
A valid USS path to a directory that contains JAVA (javahome) on the client. |
|
Search Path for Java SMP/E classes |
A valid USS path to a directory that contains SMP/E classes on the client. Default: /usr/lpp/smp/classes |
|
Path to be used as SMPNTS |
A valid USS path to be used as your SMPNTS (SMP Network Temporary Store directory). |
|
Max. wait time in minutes for SMP/E RECEIVE ORDER |
Maximum wait time, in minutes, for SMP/E RECEIVE ORDER Valid values are between 0 and 1440 or NOLIMIT Default: 120 minutes |
|
Download Method |
Communication protocol to use for the download of PTFs on the client. Valid values: ftp, http, or https Default: ftp |
|
Download Keyring |
For https downloads: The keyring or keyword 'javatruststore' that contains the root CA certificate used to sign the BMC HTTPS download server certificate on the client. Valid values:
If left blank, the x.509 keyring is used. |
|
ftp.data file |
For ftp downloads: A valid USS file or dataset name that contains ftp data definitions for the client. If it is a dataset name, specify it in the following format: Copy
To use ftps (secure ftp), you must also obtain the required EV SSL certificate. |
You can define additional client parameters (for inclusion between the <CLIENT>....</CLIENT> tags used by the RECEIVE ORDER command) by defining them in member SMPROCLT in ilprefa.PARM. For example, you can define FTP firewall parameters or HTTP proxy parameters for the client. For information about the available client parameters, their valid values, and the syntax of parameter definitions, see the description of the CLIENT data set in the IBM z/OS SMP/E Commands documentation.
For additional details about SMP/E settings, see the following IBM publications:
-
IBM z/OS SMP/E User's Guide
-
IBM z/OS SMP/E Reference
-
IBM's z/OS Communications Server: IP Configuration Reference manual
Step 1.3 – Backup your INCONTROL system
You must back-up your INCONTROL system before continuing with the upgrade.
The backup generated by this step only contains the INCONTROL system files. User data libraries are not included.
-
Select Minor Step 3, Backup your INCONTROL system.
-
Submit the appropriate job using one of the following options:
-
Run a DFDSS job that creates a logical backup of the INCONTROL system files to a dataset on DASD. The name of the backup dataset is written to the job log in ICE. After the job has completed, the DFDSS input deck used for the backup, can be found in ilprefa.INSTWORK(IOACDBKP).
In addition to the backup, a Fallback job named MNTJREST is also created in the INSTWORK library.
-
Run a job that creates a list of all the datasets that need to be backed up. After running this job, the list of datasets requiring backups is located in: ilprefa.INSTWORK(IOACDBKL). The actual backup of these datasets must be performed using local site procedures.
No Fallback job is created for this option.
-
-
Press PF3 (END) to return to the Minor Steps Selection panel.
Step 1.4 – ACCEPT APPLYed PTFs
This step will ACCEPT any PTFs that have been APPLYed in your environment above the current maintenance level, and have not yet been ACCEPTed.
-
Select Minor Step 4, ACCEPT APPLYed PTFs.
-
Submit the job.
-
When the job has completed, examine the status. If the job did not complete OK, use B to browse the log for more details.
-
Press PF3 (END) to return to the Minor Steps Selection panel.
Step 1.5 – RECEIVE and Analyze Target Environment
This step will RECEIVE the PTFs, analyze the environment for any Pre APPLY HOLD conditions that need to be handled, then run an APPLY CHECK to analyze the target environment and prepare subsequent steps of the upgrade.
If you chose to download the upgrade packages manually in Step 1.2 and also chose to bypass EHD processing, the PE PTF report will not be current and, as a result, known error conditions might not be identified in the log.
If any ad hoc PTFs are installed in the target environment after step 1.5 has been run, rerun step 1.5.
Do not run step 1.5 after step 2.5 (APPLY the Upgrade) has been run.
-
Select Minor Step 5, RECEIVE and Analyze Target Environment.
-
Submit the job.
A log is displayed. For general information about understanding the log, see Maintenance job logs
-
Examine the log for error and warning messages. Resolve any errors and rerun the job.
-
If the log and status indicate that there are unhandled pre APPLY HOLD conditions to be handled (status is PreHold, colored red), use the "P" option to display the "Handle Pre Apply HOLDs" panel, use 'S' to select and view the 'Pre Installation Holds', handle them as described, and then type CONFIRM in the space provided to confirm that they have been handled. Type PF3 to Save and Exit.
When the status PreHold is displayed in Green it indicates that handling of all Pre Holds has been confirmed (as above). Use 'S' to re-run the RECEIVE and ANALYZE job.
-
Examine the information about PTFs in error, in the PE PTF report, if one is included in the log.
Do the following, as necessary:
-
For PE PTFs without resolving PTF(s), perform the procedure described in PTFs in error without resolving PTF(s)
-
For PE PTFs with resolving PTF(s), perform one of the following procedures:
-
If you chose to use RECEIVE ORDER, use the A line command to specify IDs of additional PTFs that you want to install, as described below.
-
If you chose to obtain the files manually, perform the procedure described in PTFs in error with resolving PTF(s).
-
-
If you chose to continue without the resolving PTFs, manually mark this step COMPLETE.
-
If the job completes with status PE-PTF, and you intend to install the resolving PTFs together with this upgrade (recommended), use the A line command. The response to the A command depends on the method that you chose in Step 1.2 – Verify Upgrade Files for obtaining the required files:
-
If you chose to use RECEIVE ORDER, specify the IDs of the additional PTFs that you want to install.
You do not need to specify requisite PTFs, as they will be automatically RECEIVEd together with the specified PTF(s).
-
If you chose to obtain the files manually, the name and attributes of the dataset where the additional PTFs must be placed are displayed.
When the dataset is present, it is moved to the bottom of the panel with a Ready status (or with an *Empty* status if the dataset is empty - in which case the PTFs must copied into the dataset), and the name of the next dataset to be used is displayed at the top.
-
-
-
-
Press PF3 (END) to return to the Minor Steps Selection panel.
Step 1.6 – View APAR Descriptions
Use this step to review the APARs that will be installed during the upgrade.
-
Select Minor Step 6, View APAR Descriptions.
A list of APARs, each with a brief description, is displayed.
-
Enter S in the OP column to see the full description of an APAR. The details for each APAR are displayed in individual panels. Pressing PF3 (END) closes the panel of an APAR, allowing you to view the panel of the next selected APAR, or to return to the list.
The S option is not active after the PTFs for the upgrade have been ACCEPTed.
-
Press PF3 (END) to return to the Minor Steps Selection panel.
Step 1.7 – Pre-Upgrade Exception Handling
During this step you must review the exception situations relevant to this upgrade.
These are divided into two groups:
-
items that must be handled before step 2.5 – APPLY the Upgrade
-
items that require reviewing and planning, but must be handled after step 2.5 – APPLY the Upgrade
-
Select Minor Step 7, Pre-Upgrade Exception Handling.
The following groups of items are displayed:
-
Pre-Installation Holds
-
Review the list of Pre-APPLY exceptions relevant to your environment. These actions must be taken before running the SMP/E APPLY step in the Implementation major step. These actions should have been previously handled during the RECEIVE and Analyze step, and are included here again for review and additional confirmation.
-
-
HOLD ERRORs
-
This item lists the unresolved PTF in ERROR conditions that were identified and brought to your attention during the 'RECEIVE and Analyze Target Environment' step of this upgrade.
The PTF(s) listed are HELD for the ERROR Reason indicated, and the HOLD condition is NOT resolved in this upgrade. Refer to the description in Handling PE PTFs or to the log of the 'RECEIVE and Analyze Target Environment' step for instructions on how to proceed.
If you mark this step Complete, and proceed with the APPLY step, these conditions will remain unresolved.
-
-
Post Installation Holds
-
Review the list of Post APPLY exceptions relevant to your environment. You are being alerted to these now so that you will be aware of them and can plan for them. These activities must be done after the SMP/E APPLY during the Post APPLY Exception Handling step in the Post Implementation major step.
-
-
User Exits
-
The 'Analyze Target Environment' step identified that new version(s) of exit samples, which are already implemented in your system, will be introduced by this upgrade.
-
This will not affect your system, but you should consider reinstalling these exit(s) in order to take advantage of the updates. At this point you are only alerted to this situation. The actions required to handle this will be described later in the documentation of step 2.6.
-
This item lists these user-exits.
-
-
Regressed Usermods
-
The elements listed were previously installed or modified in this environment by a SMP/E USERMOD, and are being replaced in this upgrade, and so the modification made by the USERMOD is being regressed.
-
Before the upgrade implementation, back up the locally modified version.
-
Following the upgrade, review your modified version of the affected elements together with the new version introduced by this upgrade, and consider re-adapting and re-installing some of these USERMODS.
There is a step in the 'Post APPLY Exception Handling' step of the Post Implementation section of the upgrade that reminds you regarding this activity.
-
-
Post APPLY Activities
-
Review and plan for the Post-upgrade activities listed in this item.
-
-
-
Each item, in both categories, must be selected and reviewed in order to continue with the upgrade process.
-
Once you have reviewed these, type 'CONFIRM' to acknowledge your awareness of all required preinstallation and postinstallation activities and to assume responsibility for the SMP/E APPLY BYPASS options required to continue.
When there are items in HOLD ERRORs, if you confirm and proceed with the APPLY step, the listed errors will remain unresolved.
2. Upgrade - Implementation
In the table of contents below, headings (that start with the word "Step") correspond to minor steps in the upgrade procedure.
Step 2.1 – Create Mirror Libraries
This step creates a set of mirror libraries from the primary libraries. These mirror libraries are used by the products during the upgrade process when the primary libraries are updated.
-
Select Minor Step 1, Create Mirror Libraries.
-
If necessary, use the 'A' command to adjust additional settings:
-
On the Long Parameter Data Entry screen, you can set or change the mirror libraries prefixes.
-
On the Allocation Attributes Entry screen, you can set or change the DASD/SMS allocation attributes from those used during the previous time that this step was run.
-
All parameters in the Long Parameter Data Entry screen are mandatory. Specify values for all parameters and fix any errors in the prefix definitions before you use PF11 to proceed to the Allocation Attributes Entry screen or before you exit and save parameters.
-
For the values of the various fields, you can use the Primary library value as reference. To do so, enter '=' in the Mirror field. For prefixes, adjust the value to match the Mirror naming convention.
-
-
-
Submit the job to create the mirror libraries.
-
Press PF3 (END) to return to the Minor Steps Selection panel.
Step 2.2 - Switch to Mirror Libraries
This step switches internal references and prefixes from the primary to the mirror set of libraries. After the switch, address spaces and jobs of this IOA environment start using the mirror libraries instead of the primary libraries.
-
Select Minor Step 2, Switch to Mirror Libraries.
-
Use the 'S' command to perform the switch.
After a successful switch, the status changes from yellow 'PRIMARY' to green 'MIRROR'.
-
Press PF3 (END) to return to the Minor Steps Selection panel.
Step 2.3 - Restart Address Spaces
This step instructs you to move the active products from the primary libraries to the mirror libraries. This frees the primary libraries and makes them available for the upgrade process. If required, the primary libraries can be enlarged and updated without interfering with the running address spaces.
To proceed with the upgrade, all active address spaces must be restarted. This causes them to start using the mirror libraries instead of the primary libraries.
After all INCONTROL components are switched to the mirror libraries, you can proceed to the next step.
-
Select Minor Step 3, Restart Address Spaces.
-
Use the 'S' command to show a list of address spaces that are still allocated to primary libraries.
-
Press PF3 (END) to return to the Minor Steps Selection panel.
Step 2.4 - Enlarge Primary Libraries
This step enlarges primary libraries, to satisfy the upgrade free space requirements. This step processes only those libraries that do not have enough free space to proceed with the upgrade. Depending on the primary data sets and free space availability, you might need to submit the job several times until a successful termination. Running products are not impacted during the process, since at this phase they use the corresponding mirror libraries.
-
Select Minor Step 4, Enlarge Primary Libraries.
-
If necessary, use the 'A' command to set or change DASD/SMS allocation attributes from those used during installation of the primary libraries or the previous time that this step was run.
-
Submit the job to enlarge relevant primary libraries.
-
Press PF3 (END) to return to the Minor Steps Selection panel..
Step 2.5 – APPLY the Upgrade
This step APPLYs the upgrade to the primary libraries.
The SMP/E BYPASS options required for this upgrade, and implicitly confirmed in the Pre Upgrade Exception Handling step, are used for the APPLY process.
-
Select Minor Step 5, APPLY the Upgrade.
-
Submit the job.
-
When the job has completed, examine the status. If the job did not complete successfully, use B to browse the log for more details, correct the problem(s), and rerun the job until it completes successfully.
-
Press PF3 (END) to return to the Minor Steps Selection panel.
Step 2.6 – Handle User Exit Updates
This step lists the new versions of user-exit samples introduced by the upgrade. These exits were identified as already being implemented in your system. The updates have not yet affected your system.
Select Minor Step 6, Handle User Exit Updates, to display the list.
If no installed user exits were replaced by the upgrade, the following message is displayed:
Step will be marked COMPLETE. No Installed User Exits were replaced in this upgrade.
For each member in this list, consider whether you want to use the new version of the exit and, if so, do the following:
-
Back up the source of the installed exit member and its usermod job. They are both located in the ilprefa.CUSTEXIT library. The usermod job has the same name as the sample exit name, except that the first two characters are replaced by "UM." For example, the usermod job for installing CTDX008B is UMDX008B.
-
Enter the ICE Exit Installation Tool (Main Menu=>Customization=>Environment selection=>Product Customization (set to IOA)=>User EXITs Installation=>EXITs Customization).
-
Enter the name of the exit member and specify N on the pop-up question (Do you want to use the existing copy?).
-
Edit the exit member source to reflect the local modifications (according to the backup) and press PF03.
-
Specify N on the pop-up question (Do you want to use the existing Job?).
-
Edit the job to reflect any local modifications.
-
Submit the job and verify successful completion.
-
Return to Major Step 2, 2. Upgrade - Implementation.
Step 2.7 – Propagate Members to Environment Libs
INCONTROL BASE libraries are shipped with members that contain symbolic variables that must be resolved according to local values that are determined during installation. During the installation of INCONTROL products, members related to the products are copied from IOA libraries to the appropriate product libraries and the variables are resolved. (This process of copying elements from a BASE library to a working product library and resolving the symbolic variables is termed propagation.)
If product members that require propagation are replaced in the BASE libraries by the maintenance, they need to be propagated to the working product libraries, for the changes to take effect. Propagation is not performed automatically - to avoid overwriting the product members (in the working libraries) that may have local modifications.
Propagation during Upgrade in Place is performed against the primary BASE and working libraries. The changes come into effect after the 'Switch to Primary Set to Activate Upgrade' step. If you made local modifications to the members in your working library, back up the members and, after the propagation step has completed, reapply the modifications to the new versions of the members (based on the backups).
-
Select Step 2.7 – Propagate Members to Environment Libs.
If there are no members requiring propagation in the upgrade, the step is marked COMPLETE. Continue with the next step.
-
Enter L in the S column in the row with the Propagate selected elements description, to display a list of elements that were introduced by this maintenance and require propagation.
A panel opens with a table listing the elements and propagation data. Statuses are displayed for the elements according to the following propagation considerations:
-
Elements that can be propagated without further analysis. There is no chance of overwriting local modifications, since they did not exist previously in the working library. These elements have a 'New' status and are pre-selected with an S (this selection cannot be removed).
-
Elements that must be propagated. There is a chance of overwriting local modifications, since they previously existed in the working library. These elements have a 'MustReplace' status and are pre-selected with an S (this selection cannot be removed). Make sure to back up the appropriate members as described above.
-
Elements that require further analysis before they are propagated. There may be a chance of overwriting local modifications, since they did exist previously in the working library. These elements have a 'Replacement' status.
-
For assistance in deciding which elements to propagate or to obtain more information about any of the elements in the list, use the following line commands for each element:
-
B - view the new version of the element
-
V - read the PTF description
The V option is not active after the PTFs for the upgrade have been ACCEPTed.
For the elements that are being propagated, check if there are local modifications that were made previously and must be reapplied. Back up the appropriate elements to preserve the modifications for reference.
-
-
-
Select the elements from the list that you want to propagate, by entering S in the O column next to the elements. Press PF3 (END) to close the panel.
-
Submit the job.
If you enter L after the job has completed, elements that have been propagated have a Propagated! status.
-
When the job has completed, examine the status. If the job did not complete successfully, use B to browse the log for more details.
-
After propagation, apply the local modifications as they existed previously using local site procedures. Use the backups that you created in step 2 as references.
-
Press PF3 (END) to return to the Minor Steps Selection panel.
Step 2.8 – Post APPLY Exception Handling
During this step you must review and handle the post APPLY exception situations relevant to this upgrade and environment.
-
Select Minor Step 8, Post APPLY Exception Handling.
-
A panel opens with following list:
-
Post APPLY Holds
-
Regressed USERMODs
-
Post APPLY Activities
-
APF Authorizations
-
-
-
Enter S next to the Post APPLY Holds option, review the HOLD exceptions listed (if any), and take the actions described within.
-
Enter S next to the Regressed USERMODs option and review the list of elements that were replaced by this upgrade. These elements are identified as having been locally modified using SMP/E USERMOD. To avoid losing the local modifications, perform steps 4 to 7.
-
The locally modified version of these elements were backed up during the Pre-Upgrade Exception Handling step (Step 1.7).
-
Now, compare the modified versions of each element with its new version (introduced by this upgrade).
-
Review each element in the list and adapt it, if necessary.
-
Re-install each adapted element using an SMP/E USERMOD. The adapted elements will be APPLYed to the primary libraries.
-
Enter S next to the Post APPLY Activities option and review the list of Post APPLY activities relevant to your environment, and take the actions described.
-
Enter S next to the APF Authorizations option and review the list of datasets that might require new APF authorization, and follow the instructions described within.
-
Select each of the above items to review the post APPLY exception situations relevant to this upgrade and environment.
-
Take the necessary post APPLY actions.
-
To continue, type CONFIRM to affirm that you have taken all the required actions.
-
Press PF3 (END) to return to the Minor Steps Selection panel.
Step 2.9 - Perform Pre-activate Actions
This step may contain sub-steps that should be performed before the updated software can be used.
Step 2.10 - Switch to Primary Set to Activate Upgrade
This step switches internal references and prefixes from the mirror to the primary set of libraries. After the switch, address spaces and jobs of this IOA environment will start using the updated primary libraries instead of the mirror libraries.
-
Select Minor Step 10, Switch to Primary Set to Activate Upgrade.
-
Use the 'S' command to perform the switch.
After a successful switch, the status changes from yellow 'MIRROR' to green 'PRIMARY'.
-
Press PF3 (END) to return to the Minor Steps Selection panel.
Step 2.11 – Copy Elements into Site Libraries
During the original installation, certain libraries may have been copied to libraries outside the IOA libraries and afterwards modified locally. In this step, the locally modified libraries are identified, so they can be backed up first. (Otherwise, the new members in these libraries will overwrite the modified members.) In this step, the selected elements are copied to the site libraries. After the job has completed successfully, the local modifications must be reapplied to these members.
PROCJCL elements may be brought in an upgrade. Previously, members of the PROCJCL library may have been copied by the installation jobs to a library specified by the PROCLIB installation parameter.
If any PROCJCL members for the installed products are replaced by the upgrade, they can be listed using the L option, and selected to be recopied using the S option. If any of the selected members had local modifications in the site library, back them up first, before copying the elements, and re-work the changes after this step is completed.
-
Select Minor Step 11, Copy Elements into Site Libraries.
If either the PROCLIB parameter is set to the default value (DONTCOPY, do not copy to a site library), or if no PROCJCL elements are replaced in this upgrade, for the products installed, an appropriate message is issued, and the step is marked COMPLETE. Continue with Step 2.8 – Post APPLY Exception Handling.
-
If there are candidate elements to be copied, a panel opens with a table listing the elements and copy data.
-
For assistance in deciding which elements to copy, use the following line commands:
-
B - view the new version of the element
-
V - read the PTF description
The V option is not active after the PTFs for the upgrade have been ACCEPTed.
-
-
-
Enter S in the O column next to the elements that you decide to copy and press PF3 (END) to return to the Minor Steps Selection panel.
If any of these elements have local modifications, back them up now, and reapply the modifications to the new copies after successfully copying the elements to the site libraries.
Step 2.12 – Restart Address Spaces
This step instructs you to move the active products from the mirror libraries to the primary libraries. This is required in order to activate the upgrade by starting to use the updated primary libraries.
To proceed with the upgrade, all INCONTROL address spaces must be restarted. This causes them to start using the primary libraries where the upgrade was installed.
After all INCONTROL components are switched to the primary libraries, you can proceed to the next step.
-
Select Minor Step 12, Restart Address Spaces.
-
Use the 'S' command to show address spaces still allocated to mirror libraries.
-
Press PF3 (END) to return to the Minor Steps Selection panel.
3. Upgrade - Post Implementation
In the table of contents below, headings (that start with the word "Step") correspond to minor steps in the upgrade procedure.
Step 3.1 - Pre-ACCEPT Requirements
This step prepares you for setting the compatibility mode in the next minor step, when you choose whether to set the compatibility mode to the new level (that is, the product version to which you are upgrading) or to retain the current level (that is, the product version from which you are upgrading).
It is normally recommended to set the compatibility mode to the new level. This enables you to work with all the latest functions and features after the upgrade. However, ensure that you have done sufficient testing and are satisfied with the stability of the upgraded system.
In the following situations, you should NOT set the compatibility mode to the new level:
-
Any IOA datasets (for example, the Condition file) are shared with another environment at a lower level.
-
Control-M is installed and Control-M/Enterprise Manager is still on a lower level.
For such cases, you can change the compatibility mode at a later time (after the upgrade) using the MODE parameters in ICE.
Perform the following:
-
Select Minor Step 1, Pre-ACCEPT Requirements.
Information about setting the compatibility mode is displayed.
-
If you decide to set the compatibility mode to the new level, shut down all INCONTROL address spaces at this time, before performing Step 3.2, to prevent working in mixed compatibility modes.
To help you with this action, Step 3.2 identifies the key datasets that are in use and prompts you to stop them before you continue with setting the new compatibility mode.
-
Press PF3 (END) to return to the Minor Steps Selection panel.
Step 3.2 - Set Compatibility Mode
This step enables you to set the compatibility mode to a new level or keep it at the current level.
Caution:
This step is irreversible.
Ensure that all INCONTROL address spaces are down.
-
Select Minor Step 2, Set Compatibility Mode.
-
In the pop-up question (Do you wish to set Compatibility Mode to newVersion?), enter either Y (Yes) or N (No), and then press PF3.
-
Depending on your choice:
-
If you entered N, Minor Step 2 is marked COMPLETE.
-
If you entered Y, customize the compatibility mode level for each INCONTROL product.
For example, you might want to set the compatibility mode of most INCONTROL products to the new level while keeping one product, Control-M for z/OS, at the old level. In such a case, leave the MODECTM value as is, and set all other MODExxx parameters to the new version.
-
-
Press PF3 (END) to return to the Minor Steps Selection panel.
Step 3.3 - Start Address Spaces
This step reminds you to restart the INCONTROL address spaces that you shut down before setting the new compatibility mode in the previous step.
If you set the compatibility mode for Control-M (parameter MODECTM) to the new level, remember to promote the level in Control-M/Enterprise Manager, as well.
-
Select Minor Step 3, Start Address Spaces.
Information is displayed regarding restarting the address spaces.
-
Press PF3 (END) to return to the Minor Steps Selection panel.
Step 3.4 – ACCEPT Upgrade
Caution:
This step is irreversible.
All the mirror data sets are deleted during this step.
This step will ACCEPT all the PTFs APPLYed by this upgrade.
-
Select Minor Step 4, ACCEPT Upgrade.
-
Submit the job.
When the job has completed, examine the status. If the job did not complete successfully, use B to browse the log for more details.
-
Press PF3 (END) to return to the Minor Steps Selection panel.
Step 3.5 – Housekeeping
The maintenance files that were used for the upgrade are no longer required and are deleted in this step.
-
Select Minor Step 5, Housekeeping.
-
Press Enter to delete the upgrade packages.
-
Press PF3 (END) to close the panel.
4. Upgrade - Fallback (Optional)
In the table of contents below, headings (that start with the word "Step") correspond to minor steps in the upgrade procedure.
Step 4.1 – Perform Fallback
This step switches internal references and prefixes from the Primary set of libraries to the Mirror set of libraries. After the switch, address spaces and jobs of this IOA environment start using the Mirror libraries instead of the Primary libraries.
As an alternative or in addition to this step, the IOA environment can be restored back to the pre-upgrade level of the system, provided that the compatibility mode has not been changed and the backup file has been created in Step 1.3 – Backup your INCONTROL system. To restore from the backup, use a copy of the MNTJREST job from the INSTWORK library of your IOA environment.
Step 4.2 – Start Address Spaces
In this step you must re-Start all INCONTROL address spaces that were shut down, to complete the Fallback process.
Express Upgrade
This chapter explains the Express Upgrade process, which is an alternative to the Full process, described in Full Upgrade. The Express Upgrade provides an upgrade process with very short downtime. The main idea behind the Express Upgrade is using the original database data sets and operational libraries of the old IOA environment instead of the long and complicated process of copying data from the old environment to the new one (cloned environments are also supported).
For more information, see
Overview
The Express Upgrade supports an upgrade to the new IOA version with a minimum of resources required for checking the readiness of the new IOA environment. An automatic process scans both the old and the new IOA environments, providing a detailed report of the differences between the two environments. This process ensures that the new IOA is identical to the old one.
Since the Express Upgrade process does NOT require copying all the database and operations libraries during the upgrade process downtime, it reduces the downtime to seconds.
WARNING: Since the New Environment will be connected to the repository data sets and the operational libraries of the Old Production environment during the Express Upgrade process, it is strongly recommended that you back up the Production Environment data sets and the Site Libraries before starting the upgrade process.
The Express Upgrade process is recommended when you want to complete an upgrade in the quickest and simplest manner. The Express Upgrade is performed using the ICE that is installed in the new IOA environment. However, it is important to note that for the Express Upgrade process to work, ICE must also exist in the old IOA environment as well. For detailed information about ICE, see Part 1, "Installation and Customization Engine (ICE)" in INCONTROL for z/OS Installation Guide: Installing.
When working in compatibility mode (see Basic concepts), if MODEnnn=800, the Control-M Server must be defined as version 800; if MODEnnn=700, Control-M Server must be defined as version 700. When switching from MODEnnn=800 or from MODEnnn=700 to MODEnnn=900, you must migrate the Control-M/Server definitions in the Control‑M/Enterprise Manager database from the earlier version to the current release by running the migrate_dc utility in the Control-M/Enterprise Manager environment. For more information about the migrate_dc utility, see the Control-M Migration Guide. See also Step 55. Final adjustments.
To invoke the Express Upgrade facility, select the Express Upgrade option on the ICE Main screen.
The IOA Express Upgrade panel is displayed, enabling you to select the following steps:
Compare two environments
This step compares the original ("old") IOA environment, which is being upgraded, with the new IOA environment and creates a report that indicates the differences between these two environments. These differences result from customizations performed on these environments. Analyze this report to ensure that all the customizations implemented in the original environment are also implemented in the New Environment, before you confirm it and continue to the next upgrade step.
Adapt new environment
You must deactivate all address spaces from the new IOA environment before performing this step.
This step adapts the new IOA environment by
-
updating relevant settings in the new IOA environment according to the settings in the original IOA environment (includes QNAME and SSNAME)
-
connecting the new IOA environment to the operation and data base files of the original production environment
-
switching the new IOA environment to Compatibility Mode
Switch to new environment
In this step all new IOA environment procedures become ready for processing. You must deactivate all address spaces from the original IOA environment and activate all address spaces from the new IOA environment upon a successful termination of this step. All INCONTROL products in the new IOA environment then work in Compatibility Mode.
Complete the upgrade
In this step all products in the new IOA environment are automatically switched to Incompatibility Mode. After completion of this step, the fallback to the original IOA environment is no longer possible, and all Express Upgrade steps, including the FALLBACK step are locked.
FALLBACK
This optional step recovers all procedures from the original IOA environment. Address spaces from the original IOA environment can again be activated after this step is completed.
Limitations
To perform an Express Upgrade, ensure that all INCONTROL products that are installed in the old version production environment are also installed in the new version environment. The opposite is not required; the new version environment can contain products that are not installed in the old version production environment.
Control-M JCL Verify cannot be upgraded from version 8.0.03 or higher to version 9.0.00.
Terminology
The following key terms are used to describe the Express Upgrade process:
-
Old Environment - This is the old version IOA environment that serves the production systems.
-
New Environment - This is an environment that will become the new version IOA production environment upon a successful completion of the upgrade process.
-
Compatibility Mode - In this mode, the newly installed new version environment uses the repository data sets and operation libraries from the original production environment. This is possible because it does not use new features that are not compatible with the older version production environment. Fallback is only possible in this mode.
-
Adaptation - The process during which the repository data sets and operation libraries that were installed together with the New Environment are disconnected from the New Environment, and the repository data sets and operational libraries of the Old Production Environment are connected to the New Environment. From this point, the merger of the newer version runtime environment with the existing production repository data sets is called the Adapted Environment.
-
Adapted Environment - When the New Environment and older version production environment are configured to share the same production data sets and operation libraries, the New Environment is also called the Adapted Environment.
-
Incompatibility Mode - In this mode the newly installed environment uses new features that are not compatible with the older version. Once the products are switched from Compatibility Mode to Incompatibility Mode, and activated, then switching them back to the Compatibility Mode using the FALLBACK process is no longer possible.
-
Site Libraries - This term refers to two libraries outside of the IOA environment, which are pointed to by the SITEPROC and PROCLIB ICE parameters. The libraries contain, respectively, the Procedures and Started Tasks (STC JCLs) of the INCONTROL products, which are copied to the libraries during the Installation and Upgrade processes.
-
First Three Characters - This term refers to first three characters of Procedures and Started Tasks names which the user defines during the Installation and Adaptation processes.
Use Cases
Case 1
The original installation consists of a production environment.
When installing the New Environment, the LPAR-wide installation parameters, such as the QNAMEs, SSNAMEs, port numbers, prefixes and first three characters of started tasks and procedures names of the New Environment must be different from those of the old one.
The Express Upgrade procedure consists of the following two phases:
-
Install and test the new production environment.
Figure 1 Phase 1: Install and test the New Production Environment
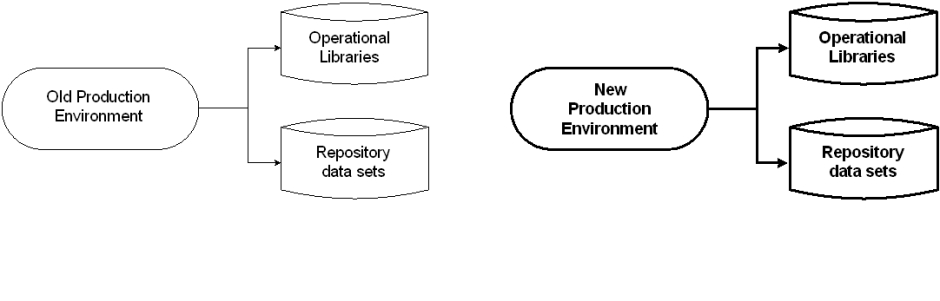
-
Upgrade from the old to the new production environment using the Express Upgrade facility.
Figure 2 Phase 2: Upgrade from Old to New Production Environment using the Express Upgrade facility

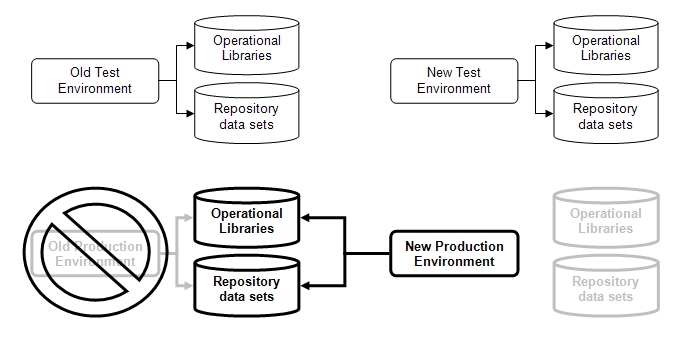
Case 2 - ("Best Practice")
The original installation consists of both a test environment and a production environment.
When installing the New Environment, the LPAR-wide installation parameters, such as the QNAMEs, SSNAMEs, port numbers, prefixes and first three characters of started tasks and procedures names of the New Environments must be different from those of the old environments.
The Express Upgrade procedure consists of the following five main phases:
-
Install and test the new test environment.
-
Compare settings of the existing production environment against the new test environment.
-
Create a new production environment (by cloning from the new test environment). This environment will be a primary production environment after the upgrade process will be completed.
-
Upgrade from the old to the new test environment using the Express Upgrade facility.
-
Upgrade from the old to the new production environment using the Express Upgrade facility.
Figure 3 Phase 1: Install and test the New Test Environment
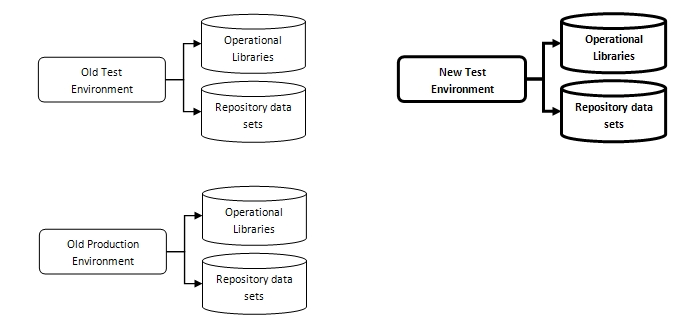
Figure 4 Phase 2: Compare Old and New Environments
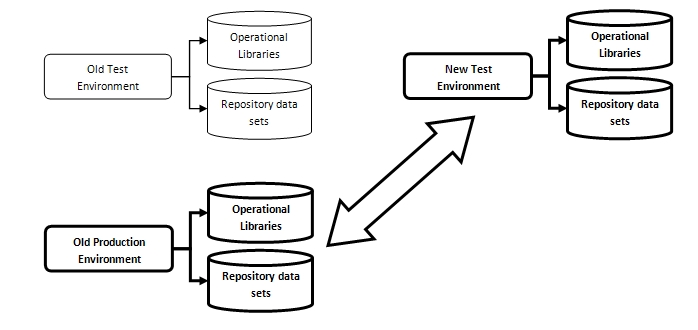
Figure 5 Phase 3: Create New Production Environment
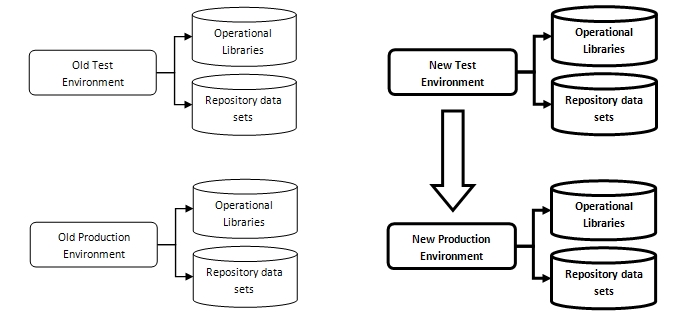
Figure 6 Phases 4 and 5: Upgrade from Old to New Production and Test Environments using the Express Upgrade facility
Detailed description of the Express Upgrade process
The Express Upgrade enables upgrading the IOA environment using the original data base data sets and operational libraries of the old environment (cloned environments are also supported). It reduces the upgrade downtime to seconds and makes the upgrade process much more stable.
Since the New Environment will be connected to the repository data sets and operational libraries of the old production environment during the Express Upgrade process, it is strongly recommended to back up the production environment data sets and site libraries before starting the upgrade process.
Step 1 - Compare two environments
This step compares the original IOA environment that is being upgraded with the new IOA environment and creates a report that indicates the differences between these environments. These differences result from customizations performed on these environments. Analyze this report to ensure that all customizations performed in the original environment are implemented in the new environment, before you continue to the next step.
The step can be invoked as many times as required as long as the second step ("Adapt new environment") has not been invoked yet. If the "Compare two environments" step is invoked more than one time, you are asked whether you want to rerun the step or to continue with the results of the previous step invocation. If you choose to rerun the step or the step is invoked for the first time, you are asked to provide the Installation Libraries prefix of the old version production environment, which are pointed to by the ILPREFA ICE parameter. The prefix value must be the same as the IOA PARM data set name of the old environment with the low level qualifier PARM omitted. For example, if the name is IOA.PROD.PARM, you have to specify IOA.PROD. Once the prefix is provided, the reference values are retrieved from the old production to the new environment and the comparison process starts.
The step consists of the following sub-steps:
-
Compare installed environments
-
Compare user exits
-
Compare optional wishes
-
Compare IOADSN* members
-
Check modified members of OLD Environment
-
Compare parameters of two environments
-
Compare ALC* members in IOA PARM libraries
-
Compare IOA Profile Variables
-
Compare Control-D skeletons
-
Check CTO rules of OLD Environment
-
Application Servers considerations
-
Check Mail Destination Table
-
Review Control-M JCL library
-
Check definitions of Control-M scheduled libraries
-
Check security interface
-
Compare NLS definitions
-
Compare samples from operation libraries
Each sub-step performs a specific comparison or analysis operation. The list of the sub-steps varies according to the products installed.
To complete the "Compare two environments" step each sub-step must be completed (the status of each sub-step must be set to COMPLETE). The sub-steps achieve the COMPLETE status when the comparison between old and new environments or an analysis operation satisfies the Express Upgrade process requirements. Otherwise, a sub-step status is set to '*'. Sub-steps having the '*' status must be reviewed by selecting them.
There are two options to change a sub-step status from '*' to COMPLETE:
-
Implement the relevant customizations in the new environment to align them with the old version production environment customizations, and then rerun the "Compare two environments" step. If the customizations are identical to those of the old version production environment, then the sub-step status will be automatically changed to COMPLETE.
-
Complete a sub-step by typing the word "CONFIRM" when exiting from a sub-step review screen. In this case you confirm that you understand the meaning of the differences and that the differences are irrelevant or non-critical for your environment.
The REP command can be used to review the entire report produced by all sub-steps of the "Compare two environments" step. The name of the member containing the report is UPGREP1. The member is located in the IOA INSTWORK library.
WARNING: After the comparison step is completed, the OLD and NEW environments must remain "frozen" - do not make any modifications to either of the environments until after the successful completion of the "Complete the upgrade" step.
Step 2 - Adapt new environment
This step performs the following:
-
Locks the first step from being invoked by a user.
-
Checks that all components of the new environment are down. If some address spaces of the new environment are active a dialog panel with corresponding information will be displayed. To continue the Adaptation step all active address spaces of the new environment must be stopped. Otherwise it will be impossible to continue the Adaptation step.
-
Retrieves parameters from the old environment.
-
Switches the new environment to Compatibility Mode according to the version of the old environment.
-
Copies the following parameter members (if they exist) from the IOA PARM library of the old version production environment to the new environment:
-
CMMPLEX
-
CTMPLEX
-
IOAPLEX
-
ECAPARMx
-
ECAMAPx
-
ECAIPLx
-
IOACPRM
-
IOAKPRM
-
IOASPRM
-
IOAXPRM
-
REMCONF
-
REMTMPLx
-
SECPARM
-
$PROFMOD
-
AUDTPARM
-
MAILDEST
-
IOACMEML
-
TIMEZONE
-
-
Copies members from the IOA PROF library of the old environment to the IOA PROF library of the new environment.
-
Adds new members from the Operational Libraries of the New Environment to the Operational Libraries of the old one.
-
Checks and corrects IOAGATE Parameters to make sure that the monitor names in the IOA Online Monitor parameter member ilprefa.PARM(IOAXPRM) are the correct names for the New Environment.
-
Displays two screens to enable the user to change the following parameters:
Table 1 INCONTROL parameters
|
Component |
Parameter |
Description |
|---|---|---|
|
IOA |
||
|
|
PROCLIB |
MVS started tasks library |
|
SITEPROC |
Site's procedure library |
|
|
SYSPROCA |
SYSPROC site library |
|
|
PROCPRFA |
First 3 characters of IOA JCL procedures |
|
|
Control-M/Analyzer |
||
|
PROCPRFB |
First 3 characters of Control-M/Analyzer JCL procedures |
|
|
Control-D |
||
|
|
PROCPRFD |
First 3 characters of Control-D JCL procedures |
|
Control-M JCL Verify |
||
|
|
PROCPRFJ |
First 3 characters of Control-M JCL Verify JCL procedures |
|
CLISTNMJ |
New CTJXVER CLIST name |
|
|
Control-M |
||
|
|
PROCPRFM |
First 3 characters of Control-M JCL procedures |
|
Control-O |
||
|
|
PROCPRFO |
First 3 characters of Control-O JCL procedures |
|
Control-M/Restart |
||
|
|
PROCPRFR |
First 3 characters of Control-M/Restart JCL procedures |
|
Control-M/Tape |
||
|
|
PROCPRFT |
First 3 characters of Control-M/Tape JCL procedures |
|
Control-V |
||
|
|
PROCPRFV |
First 3 characters of Control-V JCL procedures |
Upon the step termination, the new environment is disconnected from its repository data sets and operation libraries. Instead, the new environment will be connected to the repository data sets and operation libraries of the old version production environment. The new environment cannot be activated until the "Switch to new environment" step is completed.
Take the following considerations into account when defining the values of the parameters in the "Adapt the environment" step:
-
If the corresponding values of the Three Letter Prefixes and the Site Libraries names are the same for the old and new environments, it is not possible to simultaneously activate the address spaces for the INCONTROL products from both the new and old environments.
-
If the corresponding values of the Three Letter Prefixes are the same for the old and new environments, but the Site Libraries names are different, the order of the Site Libraries names, defined by the PROCLIBs JES2 initialization statements, determines which address spaces of which environment is activated upon request.
The "Adapt the environment" step can be invoked in the following cases:
-
After a successful completion of the "Compare two environments" step.
-
After a successful completion of the "FALLBACK" step.
-
After a failure of the "Adapt the environment" step.
Step 3 - Switch to new environment
The step backs up the procedures and STC jobs of the old version production environment and places the new environment procedures and STC jobs into the Site Libraries defined at the "Adapt new environment" step. The procedures and STC jobs of the old environment are replaced by those of the new one when it is required. Upon completion of this step the summary containing the values of prefixes and backup locations are displayed, and all new IOA environment procedures and STC jobs become ready for processing. You must deactivate all address spaces from the original IOA environment and activate all address spaces from the new IOA environment (including CDAM and Control-M/Tape). All products in the new IOA environment will work in Compatibility Mode. The step can be invoked after the "Adapt new environment" step only.
Step 4 - Complete the upgrade
WARNING: After IOA is set to the current release mode, changing the value of the compatibility variables back to 630/700 (C-1 compatible) might cause unpredictable results.
In this step all products in the new IOA environment are automatically switched to Incompatibility Mode (see Terminology). After completion of this step the fallback to the old version production environment will no longer be possible, and all the Express Upgrade steps will be locked. To prevent the activation of the OLD address spaces by mistake, the OLD environment will be locked by renaming the IOAPARM and DEFPARM members in the OLD IOA.PARM library to IOAPARM@ and DEFPARM@ respectively. This step can be performed after you are confident that the new environment is working as expected.
After selecting the "Complete the upgrade" step all INCONTROL started tasks must be re-cycled to avoid the situation where online users work in a different compatibility mode to the started tasks. ISPF users must exit and then re-enter the IOA on-line environment.
Optional Step - FALLBACK
The step allows performing a quick fallback to the old version production environment, as long as the "Complete the upgrade" step has not been completed. The "FALLBACK" step recovers all procedures and STC jobs of the old version production environment from the backup prepared in the "Switch to new environment" step. Address spaces from the original IOA environment can be activated after the "FALLBACK" step is completed. The "Adapt new environment" and the "Switch to new environment" steps will be unlocked and their status will be reset to allow an additional attempt to perform the steps.
Before performing the "FALLBACK" step, do the following:
-
check that all components of the new environment are down
-
perform a full backup of all the Control-M files, including the journal file
If the following message is issued by the monitor, reply with option I
*CTML11W AJF/CONDITION JOURNALING DISABLED
*xx CTML12W REPLY 'C' CONTINUE WITHOUT JOURNALING, 'I' INITIALIZE, OR 'E' END
Express Upgrade planning sheet
|
IOA |
|
|---|---|
|
PROCLIB MVS started tasks library
_________ Use the supplied library directly _________ Copy procedures to site library
PROCLIB DSNAME:________________________ |
The library contains all the started tasks. All the members in this library are jobs. Therefore, DDNAME IEFJOBS, which is in the MSTJCLxx member of SYS1.PARMLIB, must point to the library in which these members reside. You can define the library in your system as a started task library, or copy started tasks from the IOA library into an existing started tasks library. To specify the DSNAME of an existing started tasks library, use the PROCLIB installation parameter. Started tasks are customized during the installation process for each environment. |
|
SITEPROC Site's procedure library
_________ Use the supplied library directly _________ Copy procedures to site library
SITEPROC DSNAME:_______________________ |
The library contains all the procedures to be used in jobs. Each job supplied already contains a JCLLIB statement to enable the job to use this library. You can also copy a small number of selected procedures into an existing procedure library. The SITEPROC installation parameter specifies the DSNAME of an existing procedure library. If you do this, make sure that the names of new JCL procedures are different from existing ones. |
|
SYSPROCA site's CLIST library
_________ Use the supplied library directly _________ Copy CLIST to site library
SYSPROCA DSNAME:______________________ |
The library contains REXX "CTJXVER" from the IOA CLIST library. You have to allocate the SYSPROC library to the TSO users. The SITEPROC installation parameter specifies the DSNAME of an existing SYSPROC library. |
|
PROCPRFA First 3 characters of IOA JCL procedures First 3 characters of IOA JCL procedures_______________________________________ |
First three characters of the IOA JCL started tasks and procedures, after they are copied to the MVS procedure library. The value specified for this parameter must not be the same as that specified for the PROCPRFx parameter in other INCONTROL products. |
|
Control-M/Analyzer |
|
|
PROCPRFB First 3 characters of Control-M/Analyzer JCL procedures First 3 characters of Control-M/Analyzer JCL procedures__________________________ |
First three characters of the |
|
Control-D |
|
|
PROCPRFD First 3 characters of Control-D JCL procedures First 3 characters of Control-D JCL procedures_______________________________ |
First three characters of the Control-D JCL started tasks and procedures, after they are copied to the MVS procedure library. The value specified for this parameter must not be the same as that specified for the PROCPRFx parameter in other INCONTROL products.\ |
|
Control-M JCL Verify |
|
|
PROCPRFM First 3 characters of Control-M JCL Verify JCL procedures First 3 characters of Control-M JCL Verify JCL procedures____________________________ |
First three characters of the Control-M JCL Verify JCL started tasks and procedures, after they are copied to the MVS procedure library. The value specified for this parameter must not be the same as that specified for the PROCPRFx parameter in other INCONTROL products. |
|
Control-M |
|
|
PROCPRFM First 3 characters of Control-M JCL procedures First 3 characters of Control-M JCL procedures_______________________________ |
First three characters of the Control-M JCL started tasks and procedures, after they are copied to the MVS procedure library. The value specified for this parameter must not be the same as that specified for the PROCPRFx parameter in other INCONTROL products. |
|
Control-O |
|
|
PROCPRFO First 3 characters of Control-O JCL procedures First 3 characters of Control-O JCL procedures_______________________________ |
First three characters of the Control-O JCL started tasks and procedures, after they are copied to the MVS procedure library. The value specified for this parameter must not be the same as that specified for the PROCPRFx parameter in other INCONTROL products. |
|
Control-M/Restart |
|
|
PROCPRFR First 3 characters of Control-M/Restart JCL procedures First 3 characters of Control-M/Restart JCL procedures_______________________________ |
First three characters of the Control-M/Restart JCL started tasks and procedures, after they are copied to the MVS procedure library. The value specified for this parameter must not be the same as that specified for the PROCPRFx parameter in other INCONTROL products. |
|
Control-M/Tape |
|
|
PROCPRFT First 3 characters of Control-M/Tape JCL procedures First 3 characters of Control-M/Tape JCL procedures_______________________________ |
First three characters of the Control-M/Tape JCL started tasks and procedures, after they are copied to the MVS procedure library. The value specified for this parameter must not be the same as that specified for the PROCPRFx parameter in other INCONTROL products. |
|
Control-V |
|
|
PROCPRFV First 3 characters of Control-V JCL procedures First 3 characters of Control-V JCL procedures_______________________________ |
First three characters of the Control-V JCL started tasks and procedures, after they are copied to the MVS procedure library. The value specified for this parameter must not be the same as that specified for the PROCPRFx parameter in other INCONTROL products. |
Full Upgrade
The following topics explain how to perform a full upgrade to the current release:
This chapter assumes that you are installing INCONTROL products according to the customized installation option. If you are using the Express installation option, modify the instructions in the current chapter accordingly.
This process requires a full system shutdown in order to implement, and concludes with your entire system reaching the functionality of the current release as a single entity.
Overview
All INCONTROL products must be at the same version number in order to use the full upgrade process. Otherwise, the INCONTROL products will not be able to work together, interact, and share resources.
The following changes have been made in the IOA structure to simplify installation and upgrading:
-
All jobs and working members are now in the INSTWORK library. The INSTCTx libraries are now base libraries.
-
All PARM members are in the IOA.PARM library.
-
The DEFPARM member is in the IOA.PARM library.
-
IOASPARM is now IOASPRM.
-
IOAXPARM is now IOAXPRM.
Full upgrade steps
The full upgrade process involves the following steps:
-
Follow the instructions in the INCONTROL for z/OS Installation Guide: Installing to install the current release to use as a test system.
-
Create a second, separate CR system exactly like the first, to use as a production system.
-
Apply the customizations from your previous version to the current release system.
-
Prepare to migrate production from your previous version to the current release system.
-
Migrate production to the current release system.
When you complete the upgrade, you will have three systems:
-
the old version
-
the current release test version
-
the current release new production version
Installing the current release as a test system
The following table describes the steps you must follow in order to begin the installation of the full upgrade to the current release as a test system. Mark the Check column of the following table as you complete each step. You may exclude those steps that are optional or not applicable to your site. All steps must be completed in sequence.
Table 2 Installation checklist
|
Check |
Step and Description |
|---|---|
Step 1. Prepare a plan
-
Prepare batch jobs and CLISTs
-
Prepare batch jobs and CLISTs to automate as much of the upgrade as possible. Edit, copy, and delete files manually only when you have no choice. This enables you to review and test your jobs and CLISTs before the upgrade, and run them automatically during the upgrade.
-
Place your batch jobs and CLISTs in a dedicated library.
-
Examples:
-
For Step 21. Adjust Control-M/Tape:
-
Instead of copying files manually, prepare a CLIST that copies definitions from your previous version to the current release ControlM/Tape PARM library.
-
-
For Step 38. Copy definition libraries:
-
Instead of copying libraries manually, make a batch job that copies libraries from your previous version to the current release.
-
-
-
-
Plan and schedule the migration
Build your plan around the batch jobs, CLISTs, and sitespecific parameter members that make up the bulk of the work.
Keep a record of the customizations that you have made, both during the upgrade and after you have migrated production to the current release.
Step 2. Install the current release as a test system
-
Review Technical considerations and the What’s New section of the INCONTROL for z/OS Release Notes
-
Follow the instructions in the INCONTROL for z/OS Installation Guide: Installing to install the current release.
-
Clone the installation and create a test system. The IOA and Control-x product repositories should be created to be at least the size of the current production repositories. If not, migration of the data from the old repositories to the new repositories will fail.
When you finish the upgrade, the clone becomes your production system, and the test system is then available for testing maintenance fixes.
Step 3. Install the IOA component
Install the IOA component, following the instructions in the IOA installation chapter of the INCONTROL for z/OS Installation Guide: Installing. Observe the following rules:
-
Assign parameter values
Use the INCONTROL Installation and Customization Engine (ICE) to assign values to the current release parameters in the following table that are different than the values of the corresponding parameters in the system you are now using. For details, see the DEFPARM member in the IOA.PARM library.
Table 3 IOA parameters
Parameter
Description
%ILPREFA%
Prefix of the Environment INSTALL library and IOA Installation libraries
%OLPREFA%
Prefix of the IOA Operations libraries
%STEPLIB%
IOA LOAD library
%DBPREFA%
Prefix of the IOA Core
-
While you are testing the current release, the names of IOA started tasks such as IOAOMON1 and IOAVMON must differ from the names of the same started tasks in the earlier version.
-
Assign a value to the PROCPRFA parameter
Assign a value to be used as the prefix of IOA procedure names. Then adjust the JCL of your production jobs accordingly:
-
If you assign a value different than the value in the version you are upgrading from, you must modify the JCL of the production jobs that invoke IOA JCL procedures during the migration.
-
If you assign the same value as in the version you are upgrading from, you must have a separate PROCLIB for the testing period, and you must include a JCLLIB statement or /*JOBPARM statement in all the jobs.
WARNING: If you assign the same value to the PROCPRFA parameter as in your previous version installation, ensure that all IOA started tasks that were specified in the SYS1.PARMLIB (COMMNDxx) will continue to be invoked from the correct procedure library.
-
-
Assign parameter values in the IOAPARM member
For the QNAME and SSNAME parameters, assign values that are different than the values in your earlier version system. To find the values in the system you are now using, see the IOAPARM member in the IOA.PARM library.
WARNING: Using an earlier version production IOA QNAME during testing can damage production files.
-
Assign parameter values in the IOAXPRM member
If you are installing the IOA Online monitor, assign values to the SUBSYSTEM and VTAM APPLICATION parameters. The values that you assign must be different than the values in your current production system.
-
IOA security interface
If the IOA Security interface was installed in the version you are now using, install the new IOA Security interface.
If you are using the IOA Online monitor, grant the IOAOMON user permission to access all data sets used by online users.
-
Install maintenance
Install any maintenance that you applied to the test system that you created in substep 2 in Step 2. Install the current release as a test system.
Step 4. Install Control-M
If you do not intend to run Control‑M at your site, skip this step.
Install Control‑M following the instructions in the Control‑M installation chapter of the INCONTROL for z/OS Installation Guide: Installing. Observe the following rules:
-
Assign parameter values
Use ICE to assign values to the current release parameters in the following table that are different than the values of the corresponding parameters in the system you are now using. For details, see the DEFPARM member in the IOA.PARM library.
Table 4 Control‑M parameters
Parameter
Description
%ILPREFM%
Prefix of the Control‑M Installation library
%OLPREFM%
Prefix of the Control‑M Operations libraries
%DBPREFM%
Prefix of the Control‑M Repository
%STATFILE%
DSName of the Control‑M Statistics file
-
While you are testing the current release, the names of ControlM started tasks such as CONTROLM must differ from the names of the same started tasks in the version you are now using.
-
Assign a value to the PROCPRFM parameter.
Assign a value to be used as the prefix of ControlM procedure names. Then adjust the JCL of your production jobs accordingly. For details, see the explanation of PROCPRFA in substep 3 of Step 3. Install the IOA component.
-
Assign values in the CTMPARM member
The mapping of certain parameters in earlier versions of Control-M has been changed to Control-M version CR parameters, as shown in the following table. For the PROCNAMM parameter, assign a value that is different than the value in the version you are now using. To find the value in the version you are now using, see the CTMPARM member in the IOA.PARM library.
Table 5 CTMPARM parameters
Earlier version parameters
Equivalent current release parameters
INTERVL
INTERVLM
NONSWAP
NONSWAPM
PROCNAM
PROCNAMM
DAYTIME
DAYTIMEM
CKPSIZE
AJFSIZE
Step 5. Install Control-M/Restart
If you do not intend to run Control‑M/Restart at your site, skip this step.
Install Control‑M/Restart following the instructions in the Control‑M/Restart installation chapter of the INCONTROL for z/OS Installation Guide: Installing. Observe the following rules:
-
Assign parameter values
Use ICE to assign values to the current release parameters in the following table that are different than the values of the corresponding parameters in the version you are now using. For details, see the DEFPARM member in the IOA.PARM library.
Table 6 Control‑M/Restart parameters
Parameter
Description
%ILPREFR%
Prefix of the Control‑M/Restart Installation library
%OLPREFR%
Prefix of the Control‑M/Restart Operations libraries
-
Assign values in the CTRPARM member
For the following parameters, assign values that are different than the values in the version you are now using. To find the values in your current system, see the CTRPARM member in the IOA.PARM library.
-
CTRPROC
-
AMPREFR
The mapping of certain parameters in earlier versions of Control-M/Restart has been changed to Control-M/Restart version CR parameters, as shown in the following table.
Table 7 CTRPARM parameters
Earlier version parameters
Equivalent current release parameters
AMBLK#
AMBLK#R
AMBLKSZ
AMBLKSZR
AMUNIT
AMUNITR
AMVOL
AMVOLR
-
Step 6. Install Control-D
If you do not intend to run Control‑D at your site, skip this step.
Install Control‑D following the instructions in the Control‑D installation chapter of the INCONTROL for z/OS Installation Guide: Installing. Observe the following rules:
-
Assign parameter values
Use ICE to assign values to the current release parameters in the following table that are different than the values of the corresponding parameters in the version you are now using. For details, see the DEFPARM member in the IOA.PARM library.
Table 8 Control‑D parameters
Parameter
Description
%ILPREFD%
Prefix of the Control‑D Installation library
%OLPREFD%
Prefix of the Control‑D Operations libraries
%DBPREFD%
Prefix of the Control‑D Repository
-
While you are testing the current release, the names of ControlD started tasks, such as CONTROLD, must differ from the names of the same started tasks in the version you are now using.
-
Assign a value to the PROCPRFD parameter.
Assign a value to be used as the prefix of ControlD procedure names. Then adjust the JCL of your production jobs accordingly. For details, see the explanation of PROCPRFA in substep 3 of Step 2. Install the current release as a test system
-
Assign values in the CTDPARM member.
For the following parameters, assign values that are different than the values in the system you are upgrading from. To find the values you are now using, see the CTDPARM member in the IOA.PARM library.
-
PROCNAMD
-
PRTSTC
-
AMNAME (You should leave this parameter blank, so that it defaults to the value of the SSNAME parameter of IOA)
-
WRKPREF
-
WRKUNIT or WRKVOL
-
AMPREF, AMPREFD and JB1PREF
-
-
Verify the Recipient Tree
Verify that the Recipient Tree is loaded and has no errors. The analysis phase contains new checks, and can reject recipients that were valid in previous versions. Error checking in the online environment is different than error checking in the ControlD monitor, so verify error-free loading for each case separately. BMC recommends that you correct all Recipient Tree records that are rejected.
-
Install the ControlD security interface
If the ControlD security interface was installed in the version you are now using, install the new ControlD security interface.
Step 7. Install Control-V
If you do not intend to run Control‑V at your site, skip this step.
Install Control‑V following the instructions in the Control‑V installation chapter of the INCONTROL for z/OS Installation Guide: Installing. Observe the following rules:
-
Assign parameter values
Use ICE to assign values to the current release parameter in the following table that is different than the value of the corresponding parameter in the version you are now using. For details, see the DEFPARM member in the IOA.PARM library.
Table 9 Control‑V parameters
Parameter
Description
%OLPREFV%
Prefix of the Control‑V Operations libraries
-
While you are testing the current release, the name of the IOA Archive server started task (IOASMON) must differ from the name of the same started task in the version you are now using.
-
Assign PROCPRFV value
Assign a value to be used as the prefix of ControlV procedure names. Then adjust the JCL of your production jobs accordingly. For details, see the explanation of PROCPRFA in substep 3 of Step 3. Install the IOA component.
-
Assign values in the CTVPARM member
For the following parameters, BMC recommends that you assign values that are different than the values in the version you are now using. Assigning different values makes cleanup after testing easier. To find the values in the version you are now using, see the CTVPARM member in the IOA.PARM library.
-
IXHPREF and IXPREF
-
IXUNIT and IXVOL
-
-
Assign values in the IOASPRM member
For the following parameters, BMC recommends that you assign values that are different than the values in the version you are now using. Assigning different values makes cleanup after testing easier. To find the values in your current system, see the IOASPRM member in the IOA.PARM library.
-
DSNPREF (In the "Media Specific Parameters" ICE step)
-
SECPREF (During the definition of all media types)
To edit the IOASPRM member, do the following:
-
Enter the main ICE screen.
-
Select Customization.
-
Enter CTV in the Product field.
-
Select Product Customization.
-
Select major step 2, "Archive Server Post-Installation."
-
Select minor step 2, "Edit Media Parameters and Build IOASPRM."
-
-
Step 8. Install Control-O
If you do not intend to run Control‑O at your site, skip this step.
Control-M/Links for z/OS is a separately licensed product that enables customers to use Control‑O functions to assist with Control‑M operations. To install Control‑M/Links follow the instructions for installing Control-O.
Install Control‑O following the instructions in the Control‑O installation chapter of the INCONTROL for z/OS Installation Guide: Installing. Observe the following rules:
-
Assign parameter values
Use ICE to assign values to the current release parameters in the following table that are different than the values of the corresponding parameters in the version you are now using. For details, see the DEFPARM member in the IOA.PARM library.
Table 10 Control‑O parameters
Parameter
Description
%ILPREFO%
Prefix of the Control‑O Installation library
%OLPREFO%
Prefix of the Control‑O Operations libraries
-
While you are testing the current release, names of ControlO started tasks such as CONTROLO must differ from the names of the same started tasks in the version you are now using.
-
Assign PROCPRFO value
Assign a value to the PROCPRFO parameter. This value is the prefix of ControlO procedure names. Then adjust the JCL of your production jobs accordingly. For details, see the explanation of PROCPRFA in substep 3 of Step 3. Install the IOA component.
-
Assign values in the CTOPARM member
-
For the following parameters, assign values that are different than the values in the version you are now using. To find the values in the version you are now using, see the CTOPARM member in the IOA.PARM library.
-
CTOQNAM
-
JCMDSSN (only if JCMDSSN = subsystem name is used)
-
-
-
Reallocate Automation Log file
-
If you cannot reallocate the Automation Log because ControlO is running, skip this step; you will be instructed to reallocate in Step 48. Migrate Control-O.
-
To reallocate the Automation Log file at this time, do the following:
-
Use the IDCAMS utility to delete or rename both the CLUSTER and the DATA elements of the existing Automation Log files in each computer that is running ControlO.
-
Enter the main ICE screen.
-
Select Customization.
-
Select an environment to customize.
-
Enter CTO in the Product field.
-
Select Product Customization.
-
Select major step 2, "Customize Control-O Dataset Parameters."
-
Select minor step 6, "Allocate the Automation Log File."
-
Submit and execute the job on every system that should run Control-O.
-
-
-
If the ControlO security interface was installed in the version you are now using, install the new ControlO security interface.
If you are using CMEM, you should have already installed the ControlO security interface as part of CMEM security interface installation. In this case, you only need to customize security definitions, as described in the INCONTROL for z/OS Security Guide.
Save security parameters. When upgrading from an earlier ControlO version when ControlO security is implemented at your site, do the following:
-
Enter the main ICE screen.
-
Select Customization.
-
Select an environment to customize.
-
Enter CTO in the Product field.
-
Select Security Customization.
-
Select major step 1, "Implement ControlO Security."
-
Select minor step 3, "Save Security Parameters into Product."
-
Select Control-O SECURITY.
-
Perform minor steps 2, 3, and 4.
-
Step 9. Install Control-M/Analyzer
If you do not intend to run Control‑M/Analyzer at your site, skip this step.
Install Control‑M/Analyzer following the instructions in the Control‑M/Analyzer installation chapter of the INCONTROL for z/OS Installation Guide: Installing. Observe the following rules:
In the following steps, do not use ICE to allocate the Control‑M/Analyzer repository. Instead, migrate the repository in the version you are now using to the current release, as explained in Step 49. Migrate Control-M/Analyzer.
-
During testing, the ControlM/Analyzer current release procedure names such as CTBNDAY must differ from the corresponding earlier version procedure names.
-
Assign PROCPRFB value
Assign a value to the PROCPRFB parameter. This value is used as the prefix of ControlM/Analyzer procedure names. Then adjust the JCL of your production jobs accordingly. For details, see the explanation of PROCPRFA in substep 3 of Step 3. Install the IOA component.
-
Install security interface
If the ControlM/Analyzer security interface was installed in the version you are now using, install the new ControlM/Analyzer security interface.
Step 10. Install Control-M/Tape
If you do not intend to run Control‑M/Tape at your site, skip this step.
If you intend to run the Control‑M/Tape current release in parallel with a previous version of Control‑M/Tape, see Running two Control-M/Tapes in parallel.
Install Control‑M/Tape following the instructions in the Control‑M/Tape installation chapter of the INCONTROL for z/OS Installation Guide: Installing.
Observe the following rules:
-
Assign parameter values
Use ICE to assign values to the current release parameters in the following table that are different than the values of the corresponding parameters in your current system. For details, see the DEFPARM member in the IOA.PARM library.
Table 11 Control‑M/Tape parameters
Parameter
Description
%ILPREFT%
Prefix of the Control‑M/Tape Installation library
%OLPREFT%
Prefix of the Control‑M/Tape Operations libraries
%DBPREFT%
Prefix of the Control‑M/Tape Repository
-
While you are testing the current release, the names of ControlM/Tape started tasks, such as CTTINIT, must differ from the names of the same started tasks in previous ControlM/Tape versions.
-
Assign PROCPRFT value
Assign a value to the PROCPRFT parameter. This value is used as the prefix of ControlM/Tape procedure names. Then adjust the JCL of your production jobs accordingly. For details, see the explanation of PROCPRFA in substep 3 of Step 3. Install the IOA component.
-
Assign values in the CTTPARM member
For the DBPREF and SVCNUM parameters, assign values that are different than the values in the version you are now using. To find the values in the version you are now using, see the CTTPARM member.
The DBPREFT IOA variable and the DBPREF CTTPARM parameter must contain the same value.
Step 11. Install IOAGATE
Install IOAGATE following the instructions in the IOAGATE installation section of the IOA installation chapter of the INCONTROL for z/OS Installation Guide: Installing. Observe the following rules:
-
While you are testing the current release, the names of IOAGATE started tasks must differ from the names of the same started tasks in the version you are now using.
-
Assign parameter values
For the following parameters, use ICE to assign values that are different than the values of the corresponding parameters in the version you are now using. For details, see the ECAPARMs members (ECAPARMC, ECAPARMD, or ECAPARMM) in the IOA.PARM library.
-
APPLIDS
-
PORT
-
Step 12. Install Control-M Application Server (CTMAS)
If you do not intend to run CTMAS at your site, skip this step.
Before you install CTMAS, the Control‑M/Enterprise Manager software must be upgraded.
Install Control‑M Application Server (CTMAS) following the instructions in the Control‑M Application Server installation section of the IOA installation of the INCONTROL for z/OS Installation Guide: Installing.
Step 13. Install Control-M JCL Verify
If you do not intend to run Control‑M/JCL Verify at your site, skip this step.
Install Control‑M/JCL Verify following the instructions in the Control‑M/JCL Verify installation chapter of the INCONTROL for z/OS Installation Guide: Installing.
Observe the following rules:
-
Assign parameter values.
Use ICE to assign values to the current release parameters in the following table.For details, see the DEFPARM member in the IOA.PARM library.
Parameter
Description
%ILPREFJ%
Prefix of the Control‑M/JCL Verify Installation library
%OLPREFJ%
Prefix of the Control‑M/JCL Verify Operations libraries
The parameters listed in the above table do not exist in Control-M JCL Verify version 7.
-
While you are testing the current release, the names of ControlM/JCL Verify started tasks, such as CTJAREF, must differ from the names of the same started tasks in the version you are now using.
-
Assign a value to the PROCPRFJ parameter. Assign a value to be used as the three-letter prefix for the Control-M JCL Verify procedure names. Then adjust the JCL of your production jobs accordingly. For details, see the explanation of PROCPRFA in substep 3 of Step 3. Install the IOA component.
-
For Edit Macro users, assign a value of the CLISTNMJ parameter. Assign a value to be used as REXX CTJXVER copied from IOA CLIST library to SYSPROC Site library. You can use any valid name for the CLIST that is different from the name of the REXX in the version you are now using.
-
Assign values in the CTJPARM member.
-
IOA Security interface must be installed in the version you are currently using. If is not, install the IOA security interface, and enable it.
Adjusting installed products
In this section you apply the adjustments you made to the version you are now using, to the current release IOA component and the installed INCONTROL products.
The IOACMPP utility can be used to compare the parameter members of two environments. For details, see the INCONTROL for z/OS Utilities Guide.
New features in the current release may eliminate the need for customizations that you made to your current system. Before you make any adjustments, review the enhancements to your products in:
-
What’s New section of the INCONTROL for z/OS Release Notes
This section deals with the adjusting your current INCONTROL products to get ready to migrate them to the new version. It includes the following information:
The following table describes the steps you must follow in order to adjust the products and components of the full upgrade to the new version. Mark the Check column of the following table as you complete each step. Excluding those steps that are optional or not applicable to your site, you should complete these steps in sequence.
Table 12 Adjusting checklist
|
Check |
Step and Description |
|---|---|
|
|
|
|
|
|
|
Step 20. Adjust Control-M/AnalyzerStep 21. Adjust Control-M/Tape |
|
|
|
Step 14. Adjust the IOA component
The topics described in this step refer to IOA and the INCONTROL products installed at your site. Specific adjustments appear in the step for each product.
Apply the adjustments to the version you are now using, to the current release IOA component as follows:
-
Adjust exits and security modules
For information about the exits, see "IOA Exits" in the Exits chapter in the INCONTROL for z/OS Administrator Guide. For information about security modules, see the INCONTROL for z/OS Security Guide.
-
Adjust security definitions
-
Grant permission to production users to access their data sets.
-
If the new IOA QNAME differs from that in the previous IOA production environment, modify the security definitions accordingly. For more information about the security entity structure that IOA and INCONTROL products use to validate authorization for each particular function, see the INCONTROL for z/OS Security Guide.
-
Adjust CLISTs, ISPF panels, ROSCOE RPFs, and procedures.
-
-
Adjust messages and screens
-
Adjust Dynamic Destination table
-
The IOADEST member in the IOA.PARM library now contains the Dynamic Destination table, replacing the CTMDEST load module. The IOAGDST utility can be used to convert a CTMDEST load module to a IOADEST member. For more information see the Dynamic Destination Table section in the IOA Shout facility section in Setting rules - Jobtrac Mainframe editor.
-
-
Adjust KSL report programs and utilities
Because of changes to screen layouts in the current release, you may need to adjust locally developed KSL scripts.
-
Adjust profiles
Specify values for profile variables following the Customization procedure in ICE, using profile variable values in your current IOA production system as a reference. Values entered in ICE are stored in the $PROFMOD member in the IOA.PARM library.
To use the old profile values for a specific user, in the new environment, copy the user profile from the previous environment’s IOA.PROF library to the new IOA.PROF library.
BMC recommends that you specify profile variables for all relevant INCONTROL products at the same time.
-
Modify libraries
Make modifications to the IOA BANNERS library and to the following ControlD libraries:
-
ACIFPARM
-
APAPARM
-
DJDEPARM
-
FTOPARM
-
OUTPARMS
-
SKL
-
TRANSTO
All definitions and libraries created in the version you are now using can be used without change in the current release.
If reports with names between 20 and 50 characters long will be used, the corresponding members in these libraries should be created in accordance with the format described in the INCONTROL for z/OS Administrator Guide.
-
-
Special options
-
If you are using the IOA Online monitor CICS interface and a CICS version earlier than 3.3, apply Optional Wish WI0787.
-
If you are using the IOA Online monitor or the IOA VTAM monitor interface, note the following:
-
The built-in capabilities of a terminal that can be queried determine its color and size attributes. (A terminal that can be queried is one that has a LOGMODE that supports either EXTENDED DATA STREAM or GENERIC in the PSERVIC definition.) For example, a terminal that is able to display color does so even if the terminal is defined as monochrome in the LOGMODE.
-
If you want the terminal to use color and screen size attributes that are not based on its actual capabilities, do one of the following:
-
Activate optional Wish WI0310. This forces the IOA VTAM monitor to use the color attributes of the ICOLOR parameter in the terminal's IOA PROFILE for all the terminals that log into the IOA VTAM monitor. Screen size is determined by the terminal's LOGMODE PSERVIC definitions.
-
Define a LOGMODE that does not specify EXTENDED DATA STREAM or GENERIC. The terminal’s attributes are taken from its LOGMODE PSERVIC definitions.
-
-
-
-
Adjust IOADSNL member
Adjust the IOADSNL member of the current release to reflect any necessary modifications that were specified in the IOADSNL member of the previously installed version. Take special note of DATASET statements with DSN values that refer to the previously installed version, and correct them accordingly.
-
Adjust IOADFLTL member
Adjust the IOADFLTL member of the current release to reflect any WISH options that were specified in the IOADFLTL member of the previously installed version. Identify WISH statements that are now configured via standard parameters, and if you find any, remove them and set the corresponding parameters in the relevant product or component configuration.
Step 15. Adjust Control-M
The CTMPARM member contains most Control‑M defaults. Customize these defaults using ICE Customization for Control‑M.
If you are using the CMEM function, the defaults are found in the IOACPRM member and are customized in the "Specify IOA computers" ICE step.
CTMCPU parameters and the CTM2SBS parameter are now defined in the IOACPRM member.
Step 16. Adjust Control-M/Restart
The CTRPARM member contains all Control‑M/Restart defaults. Customize these defaults using ICE Customization for Control‑M/Restart.
Step 17. Adjust Control-D
Apply the modifications to the CTDX001 through CTDX028 exits created in the version you are upgrading from.
Increase the AMFSIZE parameter by approximately 15% or use ICE to reformat the Active Mission file during the upgrade processing.
Step 18. Adjust Control-V
-
Create primary and secondary migration skeletons based on the corresponding MIGLIM and MICLIM members. The names of the new primary skeletons should be identical to the name of the migration missions. The names of the secondary skeletons should be identical to the names specified in the SECONDARY SKELETON parameter of the migration missions.
-
Apply the modifications to the CTVX001 and CTDX002 exits created in the version you are upgrading from.
Step 19. Adjust Control-O
Apply the adjustments to the version of Control-O you are now using, to the current release of Control‑O as follows:
-
If you rename the ControlO monitor during the testing, ensure that the server-started task has the same 3-character prefix.
-
If ControlO/COSMOS is installed or you used the ControlO GLOBAL variable database, review and adjust the parameters of the GLOBAL variable database. In the current release this database is installed during IOA installation.
-
If you are using a customized version of the COSMOS table, it can be used as is in the current ControlO version. However, to take advantage of the new Sysplex facilities of COSMOS you may need to review your customized rules and adapt them to manage a Sysplex.
-
If you are using the CMEM function, the defaults are found in the IOACPRM member and are customized in the "Specify IOA computers" ICE step.
Step 20. Adjust Control-M/Analyzer
Apply the adjustments you made to the version of Control-M/Analyzer you are now using, to the current release, as follows:
-
Adjust exits and security modules
Move locally developed ControlM/Analyzer exits (for example, ControlM/Analyzer DO EXTRACT user processes) in the CTBX010 member to the corresponding ControlM/Analyzer current release IOA LOAD library. Alternatively you can recompile the CTBX010 module in the current release environment.
For information about ControlM/Analyzer exits, see the discussion of ControlM/Analyzer exits in the Exits chapter in the INCONTROL for z/OS Administrator Guide. For information about security modules, see the INCONTROL for z/OS Security Guide.
-
Modify locally developed rules
You may need to modify rules from the version you are upgrading from so that they can work in the ControlM/Analyzer current release.
Step 21. Adjust Control-M/Tape
-
ControlM/Tape security definitions
-
If the new IOA or ControlM/Tape QNAME differs from that in the current ControlM/Tape production environment, modify the security definitions accordingly.
-
For information about the security entity structure that INCONTROL products use to validate authorization for each particular function, see the INCONTROL for z/OS Security Guide.
-
-
Copy rule definitions
-
Copy the rule definitions from the old ControlM/Tape RULES library to the ControlM/Tape current release RULES library.
-
-
Copy pool definitions
-
Copy the pool definitions (default member: $$POOL) from the old ControlM/Tape PARM library to the ControlM/Tape current release PARM library.
-
-
Copy vault definitions
-
Copy the vault definitions (default member: $$VAULT) from the old ControlM/Tape PARM library to the ControlM/Tape current release PARM library.
-
-
Copy Rule List
-
Copy the rule list member (default member: RULLIST) from the old ControlM/Tape PARM library to the ControlM/Tape current release PARM library. Change the RULES library name in the new RULLIST member to match the current release RULES library name.
-
-
Adjust Media Database and Stacking Database
-
In "CTT Customization" in ICE, select the "Upgrade ControlM/Tape Repository" major step, and perform its minor steps.
-
Select the "Adjustments" major step, and perform the "Building Vault Information in MDB" minor step.
-
-
Adjust interfaces
-
Adjust locally developed ControlM/Tape interfaces to automated tape libraries interfaces and other products, such as the External Data Manager interface.
-
For information about ControlM/Tape interfaces to other products, see the ControlM/Tape chapter in the INCONTROL for z/OS Administrator Guide.
-
-
Operate in parallel
-
For information about running the ControlM/Tape current release in parallel with a previous version of ControlM/Tape, see Running two Control-M/Tapes in parallel.
-
Step 22. Adjust IOAGATE
Apply the IOAGATE adjustments from the version you are now using to the current release IOAGATE by modifying messages. For information about modifying messages, see the IOA Administration chapter in the INCONTROL for z/OS Administrator Guide.
Step 23. Adjust CTMAS
If you defined applications to CTMAS using DD statement DAGROUP in the version you are upgrading from, add the same DAGROUP DD statement to the CTMAS the current release procedure.
For information about modifying messages, see the IOA Administration chapter in the INCONTROL for z/OS Administrator Guide.
Step 24. Adjust Control-M JCL Verify
-
The CTJPARM member contains most Control-M JCL Verify defaults. Customize these defaults using ICE Customization for Control-M JCL Verify.
-
Adjust the Control-M JCL Verify CTJRULE.
Ensure that the CTJRULE member, in the Parameters library of the current version of Control-M JCL Verify, %%OLPREFJ.PARM, references the correct rule definitions.
Control-M JCL Verify makes use of one RULES library.
-
Adjust the Control-M JCL Verify CTJRENF.
Ensure that the CTJRENF member, in the Parameters library of the current version of Control-M JCL Verify, %%OLPREFJ.PARM, references the correct rule definitions.
Control-M JCL Verify makes use of one ENFRULE library.
-
Adjust the Control-M JCL Verify CTJRREF.
Ensure that the CTJRREF member, in the Parameters library of the current version of Control-M JCL Verify, %%OLPREFJ.PARM, references the correct rule definitions.
Control-M JCL Verify makes use of one REFRULE library.
-
Adjust the JCLs in the Control-M JCL Verify JCL library, %%ILPREFJ.JCL
Step 25. Test the installed environment
Test IOA functionality and all your INCONTROL products. Pay special attention to adjustments that you copied from your earlier version.
Preparing for migrating adjusted products
This section explains how to prepare to migrate your adjusted INCONTROL products to the new version.
Use Customization in the INCONTROL Installation and Customization Engine (ICE) to modify parameters. Customization facilitates data entry, saves the parameters, and rebuilds the formatting jobs.
To find out in which ICE step a variable is used, you may use the VREF command from any customization panel. For more information about using the VREF command, see the INCONTROL for z/OS Installation Guide: Installing.
The following table describes the steps you must follow in order to prepare your data and software for full upgrade to the new version. Mark the Check column of the following table as you complete each step. Excluding those steps that are optional or not applicable to your site, you should complete these steps in sequence.
Table 13 Migration preparation checklist
|
Check |
Step and Description |
|---|---|
Step 26. Prepare IOA
-
Change data set parameters
To increase or decrease the size of data sets, change the current release IOA data set parameters. Changing data set parameters affects the allocation and formatting of IOA data sets.
You can change the values of most parameters and customize all formatting jobs in the "Customize IOA Dataset Parameters" major step, under Product Customization for IOA, in ICE Customization. This step lets you
-
redo the space calculation for the IOA Log file and the Global Variables files
-
specify new parameter values for the Conditions and the Manual Conditions files
-
save the parameters in IOAPARM and DEFPARM members—mandatory if values were changed
-
rebuild formatting jobs reflecting the new values
If you migrate the conditions from the old repository to the new one, you must specify new parameter values for the Condition and Manual Condition files that are at least the size of the current production repositories. If not, migration of the data from the old repositories to the new repositories will fail.
For each data set whose size you changed, delete or rename the older version of the data set outside of ICE.
-
-
Modify new installation parameters
Verify that the values of the following IOA parameters in the new installation are suitable for production.
Table 14 IOA installation parameters
Parameter
Additional considerations
QNAME
Using the same QNAME as the existing production environment may eliminate some changes to the security definitions.
SSNAME
You can use the same subsystem for different releases but you may need to perform IOASDISC in order to disconnect and then initialize the subsystem in the correct format.
-
Save parameters
Save the parameters by performing the "Save Parameters into Installation Libs." minor step.
-
Reformat repository data sets
If you modified the QNAME, reformat all repository data sets.
Step 27. Prepare Control-M
-
Prepare New Day procedure
-
To prevent the New Day procedure from running twice on the same day (once on the old ControlM version and again on ControlM current release), do one of the following:
-
After the New Day Procedure ends, copy the Active Jobs file and the History Jobs file from the previous version to the current release. The method for performing this procedure is described in items A and B of Step 44. Migrate Control-M For example, if the New Day procedure runs at 11:00A.M. for about 3 minutes, copy the Active Jobs file at 11:15 when you are sure that the New Day procedure has ended.
-
Migrate to the current release well before the New Day procedure is scheduled to run so that you complete the migration before the New Day procedure begins.
-
-
-
Modify data set parameters
-
If you want to increase or decrease the size of data sets, or change your mirroring option, modify the new ControlM data set parameters. Changes to these parameters affect the allocation and formatting of ControlM data sets.
-
You can change values by using the "Customize Control-M Dataset Parameters" major step, under Product Customization for Control-M, when in Customization in ICE. This step lets you
-
specify new parameter values for ControlM repository
-
save the parameters in the CTMPARM and DEFPARM members—mandatory if values were changed
-
rebuild formatting jobs reflecting the new values
-
For each data set whose size you changed, delete or rename the older version of the data set outside of ICE before running the formatting job.
-
-
Modify installation parameters
Verify that the values assigned to the following installation parameters in the current release system are suitable for production. You can change values by using the "CTMPARM PostInstallation" major step, under Product Customization for Control-M, in ICE Customization.
Table 15 Control‑M installation parameters
Parameter
Additional considerations
PROCNAMM
Set this parameter to the New Day procedure name.
DAYTIMEM
-
Save parameters
Save parameters by performing the "Save Parameters into Product Libraries" minor step.
-
Modify CMEM parameters
You can increase or decrease the size of the CMEM communication data sets by modifying the new CMEM data set parameters in IOACPRM. Changes to these parameters affect the allocation and formatting of the communication files. Change the values of the parameters using the "Install Event Manager (CMEM)" major step, under Product Customization for Control-M, in ICE Customization.
Step 28. Prepare Control-M/Restart
-
Modify installation parameters
-
Verify that the values assigned to the following installation parameters in the current release system are suitable for production.
-
AMPREFR
-
AMUNITR or AMVOLR
-
AMBLK#R
-
AMBLKSZR
-
-
You can change the values by using the "CTRPARM PostInstallation" major step, under Product Customization for Control-M/Restart, in ICE Customization.
-
-
Save parameters
Save parameters by performing the "Save Parameters into Product Libraries" minor step.
-
Adjust Restart Control Parameters
Adjust the Restart Control Parameters PARM library to use the new ControlM/Restart current release PARM library. Use ISPF option 3.3 to copy the contents of the PARM library from the version you are upgrading from.
Step 29. Prepare Control-D
-
Prepare New Day procedure
To prevent the New Day procedure from running twice on the same day (once on the old ControlD version and again on ControlD the current release), do one of the following:
-
Copy the Active Missions file (AMF or AMB) from the version you are now using to the current release after the New Day Procedure has completed. For example, if the New Day procedure runs at 10:00 A.M for 5 minutes, copy the Active Missions file at 10:15, after enough time has passed to ensure that the 10:00 A.M. run of the New Day procedure has completed.
-
Migrate to the current release well before the New Day procedure is scheduled to run so that you complete the migration before the New Day procedure begins.
Print missions that ran on previous Control-D versions before upgrading cannot be rerun after upgrading. Such missions should be reordered manually in the new version of Control-D.
-
-
Modify data set parameters
Change data set parameter values and customize all formatting jobs in the "Customize ControlD User Files" and "Customize ControlD Dataset Parameters" major steps, under Product Customization for Control-D, in ICE Customization.
These steps let you
-
Redo the space calculation for the ControlD user files
-
Specify new parameter values for the ControlD repository
-
Save the parameters in CTDPARM and DEFPARM members—mandatory if values were changed
-
Rebuild formatting jobs reflecting the new values
-
-
Change user report file parameters
Recalculate the space of the following IOA Access Method files:
-
Active User Report files
-
History User Report files
-
Permanent User Report files
-
-
Change repository parameters
The following parameters affect the allocation and formatting of the ControlD Repository:
Table 16 Control‑D repository parameters
Parameter
Additional considerations
AMFSIZE
Number of records in the Control‑D Active Missions file.
ATFBLK
Number of blocks in the Control‑D/WebAccess Server Active Transmission file.
COMSIZE
The number of entries in the Control‑D internal communication file.
AMPREF,
AMPREFD,
JB1PREFIf you change the values of any of these parameters and you defined a User Catalog, redefine the ALIAS name of the User Catalog.
-
Modify installation parameters
Review all the parameters in the CTDPARM member of the new installation. Verify that the values assigned to the parameters are suitable for production. Change the values by using the "CTDPARM PostInstallation" major step, under Product Customization for Control-D, in ICE Customization.
Check the following parameters:
Table 17 Control‑D installation parameters
Parameter
Additional considerations
AMBLKSZD
Block size to be used when allocating Control‑D CDAM sysout data sets.
AMUNITD
Unit for CDAM sysout data sets.
AMVOLD
Volume serial numbers for Control‑D CDAM sysout data sets.
AMNAME
If you have production jobs that write directly to CDAM, it is very important to use the CDAM subsystem name of the current production installation. If this parameter has a different value, change it to the production system value. Be sure to place an initialization command in COMMANDxx of SYS1.PARMLIB for the new Control‑D subsystem. For more information about this procedure, see the INCONTROL for z/OS Installation Guide: Installing.
DAYTIMED
Start time of the Control‑D work day. The DAYTIMED parameter specifies to Control‑D when a new work day begins.
SMF
Determines whether, and how many, SMF records are to be generated for accounting purposes.
PROCNAMD and PRTSTC
Set these parameters to the procedure names of the current release Control‑D production environment.
-
Delete files
Delete the following files:
-
Active User Report files (.ACT*)
-
History User Report files (.HST*)
-
Permanent User Report files (.PRM*)
Use the CTDUFDEL sample job in the ControlD JCL library or ISPF option 3.4. For example, for the Active User file, use the CTDUFDEL sample job with the %DBPREFD%.ACT prefix to delete all related files.
Alternatively, you can use ISPF option 3.4 to list all files with the %DBPREFD%.ACT* prefix. The list includes the DATA file and its extents, the INDEX file and its extents, and the DUAL files. Delete all listed files.
-
-
Reformat files
Reformat the files using the jobs in ICE Customization.
Step 30. Prepare Control-V
-
Change user file parameters
Change ControlV User files parameters by using the "Customize ControlV User Files" major step, under Product Customization for Control-V, in ICE Customization.
-
Recalculate file space
Recalculate the space of the IOA Access Method Migrated Users file and reformat by using the jobs in ICE Customization.
-
Modify installation parameters
Verify that the values assigned to the following installation parameters in the current version installation are suitable for production. Change the values using the "CTVPARM PostInstallation" ICE major step, under Product Customization for Control-V, in ICE Customization.
Table 18 Control‑V installation parameters
Parameter
Additional considerations
IXHPREF, IXPREF
The value of IXHPREF must be different than the values of parameters DSNPREF and SECPREF. For details, see step 28.4.
IXUNIT or IXVOL
IXUNIT is the default unit for index files.
IXVOL sets default volume serial numbers for index files.
-
Save parameters
Save parameters by performing the "Save Parameters into Product Libraries" minor step.
-
Modify definition parameters
Modify the new IOA Archive Server Media Definition parameters. Check the following parameters by using the "Edit Media Parameters and Build IOASPRM" minor step of the "Archive Server Post-Installation" major step, under Product Customization for Control-V, in ICE Customization.
Table 19 IOA archive server media definition parameters
Parameter
Additional considerations
DSNPREF
This parameter can optionally have the same value that it has in the version you are upgrading from.
SECPREF
The value of SECPREF must be different than IXHPREF and DSNPREF.
Step 31. Prepare Control-O
-
Modify installation parameters
If necessary, modify the ControlO current release installation parameters. Verify that the values assigned to the following parameters in the current release installation are suitable for production. You can change the values by using the "CTOPARM PostInstallation" major step, under Product Customization for Control-O, in ICE Customization.
Table 20 Control‑O installation parameters
Parameter
Additional considerations
DAYTIMEO
This definition must kept in the active Control-O
EMCSCONS
The definitions of the Extended MCS must not conflict with those of the other active Control‑O system. For example you should
-
ensure that test and production installations on the same MVS image do not use SMFID as the prefix of the consoles’ names.
-
ensure that in a Sysplex environment no two installations use the IOA subsystem name as the prefix of the consoles’ names.
JCMDSSN
This definition must not conflict with that of the other active Control‑O system.
NUMCONS
If EMCSCONS is assigned, this is unnecessary.
-
-
Save parameters
Save parameters by performing the "Save Parameters into Product Libraries" minor step.
-
Check blocks
Check the KOATERM blocks in the IOAKPRM member in the IOA.PARM library. Verify that all CPUs defined in the IOACPRM member (in the IOA.PARM library) are also defined for KOA.
Step 32. Prepare Control-M/Analyzer
-
Modify installation parameters
If necessary, modify the ControlM/Analyzer current release installation parameters. Verify that the values assigned to the parameters in the new installation are suitable for production. You can change the values of the parameters by using the "CTBPARM PostInstallation" major step, under Product Customization for Control-M/Analyzer, in ICE Customization.
-
Save parameters
Save parameters by performing the "Save Parameters into Product Libraries" minor step.
-
Adjust defaults
Adjust the ControlM/Analyzer defaults for production.
Step 33. Prepare Control-M/Tape
-
Change environment
To ensure that local changes to the production ControlM/Tape environment are applied to the ControlM/Tape current release, review Step 21. Adjust Control-M/Tape and the discussion of Upgrade dependencies.
If necessary, make final changes to the ControlM/Tape current release environment.
Verify that the following are identical to the corresponding definitions in the production ControlM/Tape system.
-
Rule definitions
-
Pool definitions
-
Vault definitions
-
Rule list member definitions
After making any changes in the vault definitions, you must run the CTTVTM utility in SLOTBLD and BOXBLD mode. Execute the utility using the "Building Vault Information in MDB" minor step under the "Adjustments" major step.
-
-
Modify installation parameters
You can change the values of Control-M/Tape installation parameters by using the "CTTPARM Post-Installation" major step 1, "Initialization Parameters" minor step 1, under Product Customization for Control-M/Tape, in ICE Customization. Set the value of the MODET installation parameter to PROD, and the value of the PARALLEL parameter to N.
-
Save parameters
Save parameters by performing the "Save Parameters into Product Libraries" minor step.
Step 34. Prepare IOAGATE
If necessary, modify the IOAGATE installation parameters.
Verify that the values assigned to the parameters in the current release installation are suitable for production. You can change values by using the "Configure IOAGATE Parameters" minor step of the "Install IOAGATE" major step, under Product Customization for IOA, in ICE Customization.
Step 35. Prepare CTMAS
If necessary, modify the CTMAS installation parameters.
Verify that the values assigned to the parameters in the current release installation are suitable for production. You can change values by using the "Install Control‑M Application Server" major step, under Product Customization for IOA, in ICE Customization.
Step 36. Prepare security definitions
For IOA and all installed INCONTROL products, do the following:
-
Verify that you have granted your production users permissions for their data sets.
-
If the IOA current release QNAME is different than that of the version you are now using, modify security definitions accordingly. For more information about the security entity structure used by INCONTROL products to validate authorization for each particular function, see the INCONTROL for z/OS Security Guide.
Step 37. Prepare Control-M JCL Verify
-
Modify installation parameters.
Verify that the values assigned to the parameters in the new installation are suitable for production.
-
Save parameters.
Save parameters by performing the "Save Parameters into Product Libraries" minor step.
The three-letter prefix for the Control-M JCL Verify started tasks are defined in the Control-M/JCL parameter.
The Control-M JCL Verify JCLs reside in the CTJ.JCL library.
Migrating adjusted products
This section explains how to complete the migration of your adjusted INCONTROL products to the new version.
When you complete the migration of your INCONTROL products to the new version, you will be ready to run those products with all the features of the new version. Included below are the steps you must follow to complete the migration process. This section deals with the actual migration of your current INCONTROL products to the new version. It includes the following information:
The following table describes the steps you must follow in migrating the products and components of the full upgrade to the new version. Mark the Check column of the following table as you complete each step. Excluding those steps that are optional or not applicable to your site, you should complete these steps in sequence.
Table 21 Migrating checklist
|
Check |
Step and Description |
|---|---|
|
|
|
Step 38. Copy definition libraries
-
Compatibility considerations
Current release library members, such as tables, missions, and rule definitions, have different internal formats than those found in earlier versions.
Current release products are backward compatible, meaning they can read definition members written in earlier versions. However, products from earlier versions may not be able to read members that were written in the current release.
When the current release reads a definition member that is in the format of an earlier version, its in-memory representation of the member is converted to the new format. When you exit the screen, you may be prompted to decide whether you want to save the definition member in the current release format, even if you did not modify the member. If you answer "Yes," the member is saved in the current release format.
WARNING: The member may then be unusable by your earlier version system.
Because using libraries saved in the current release may make them unusable by earlier versions, copy the old libraries to the current release libraries instead of using earlier version libraries in the current release.
For Control-M table definition members and libraries (CTM.OPR.SCHEDULE and user-defined tables), BMC recommends that you use the existing table members and libraries from the previous version without copying or renaming them. In all cases, you must create a backup of these table members and libraries before you use them in the new version.
For additional considerations related to copying definition members and libraries, see the instructions for migrating individual INCONTROL products.
-
Prohibit changes
Prohibit changes to all IOA and INCONTROL product definition libraries, including those owned by users.
-
Back up definition libraries
Back up the following current release definition libraries:
Table 22 Current release definition libraries
Product
Definition
Suffix
Comments
IOA
Calendars
CAL
Usually referenced using DD statement DACAL
Control‑M
Parameter Prompting
PROMP
JCLPROMPTables
SCHEDULE
Also user‑defined tables
Master Plan
PLANMSTR
Control‑D
Print Missions
PRTMIS
Restore Missions
RSTMIS
Backup Missions
BKPMIS
Report Decollating Missions
REPORTS
Also user‑defined report decollating missions
Banners
BANNERS
An IOA operational library
Printing Parameters
APAPARM
ACIFPARM
CCIFPARM
DJDEPARM
OUTPARMS
TRANSTO
File Transfer Option Parameters
FTOPARM
Control‑V
Migration Missions
MIGMIS
Control‑O
Rules
RULES
Control‑O GLOBAL variable pool list
PARM
DAGLBLST member
Control‑O rule table list
PARM
RULELIST member
COSMOS parameters
PARM
COSMOLST member
SolveWare
SOLV*
SolveWare was updated. Be sure to reapply local modifications to SolveWare members.
Control‑M/Analyzer
Balance Missions
BALMIS
Rules
RULES
Control‑M/Tape
Rules Definitions
RULES
Pool Definitions
PARM
Default member – $$POOL
Vault Definitions
PARM
Default member – $$VAULT
Rule Table List
PARM
Default member – RULLIST
-
Back up user owned definition libraries
Back up the current release definition libraries that are owned by users.
-
Copy definition libraries
Copy the previous version libraries to the current release libraries by using IEBCOPY or ISPF option 3.3. Use the previous table.
-
Edit all rule table list members to change, within the member, the library names to the current release rules library name.
-
Control-M table definition members and libraries are not copied, so you do not need to edit them.
-
-
Copy user-owned definition libraries
Copy definition libraries that are owned by users in the version you are now using, to the current release.
Control-M table definition members and libraries are not copied, so you do not need to edit them.
Step 39. Back up libraries and repositories
Because libraries saved in the current release are unusable by earlier versions, you must back up the libraries in the version you are now using before you migrate to the current release. If you later decide to fall back to the earlier version, you will need this backup.
Back up all
-
libraries, repositories and SMP/E data sets in the version you are now using, including user libraries that contain missions, rules, and schedules.
-
current release libraries, repositories, and SMP/E data sets.
Step 40. Stop all IOA activities
Read all documentation about stopping IOA activities and prepare your migration plan. Depending on your site configuration, you may have to perform an IPL.
WARNING: If several INCONTROL products are installed, stop all IOA activities for all products before starting the migrating phase. This is essential because all products share the same database. (For example, all products share the same IOA Conditions file and IOA Log file.)
To stop all IOA activities, do the following:
-
Terminate online sessions
Terminate all IOA Online sessions, such as TSO, ROSCOE, IOA Online monitor, and the IOA VTAM monitor.
-
Stop initiators
If the JCL of production jobs runs an IOA utility or report, stop the JES initiators that handle such jobs during the migrating phase. Similarly, ensure that longrunning address spaces and online services do not invoke IOA services.
-
Stop functions
Ensure that functions of CMEM, CDAM, and ControlO are not used during the migrating phase.
-
Stop JES initiators that handle production jobs that use CDAM files.
-
Ensure that occasional production jobs whose arrival may be acknowledged by either CMEM or Control‑O are not submitted on any CPU on which CMEM or Control‑O is active.
-
Stop JES initiators that handle production jobs that may trigger events in CMEM or Control‑O.
-
Stop started tasks or log off all TSO users that may trigger events in CMEM or Control‑O.
-
-
Stop tasks
Stop all tasks that allocate IOA files either by DD statements or by dynamic allocation.
-
Stop all Control‑O activity
-
For each Control-O or CMEM monitor that is part of your environment, stop the monitor by executing one of the following operator commands, and wait until the monitor address space and its dependent address spaces (Control‑O servers) terminate
-
STOP controlo
-
P controlo
In the commands listed above, controlo is the name of the Control-O or CMEM monitor.
-
-
Stop the Control‑O Application Server by executing the P CTOAS operator command and wait for shutdown.
-
-
Stop all ControlM activity
For each Control-M monitor that is part of your environment, stop the monitor by executing the P controlm operator command, and wait until the monitor address space terminates.
In this command, controlm is the name of the Control-M monitor. In a CTMPLEX configuration, BMC recommends first stopping the Local Sysplex Monitors (LSM) and then stopping the Global Sysplex Monitor (GSM).
-
Stop all ControlD activity
Stop the Control-D monitor that is part of your environment, stop the monitor by executing the P controld operator command, and wait until the monitor address space and all of its dependent address spaces (Print Monitors) terminate.
In this command, controld is the name of the Control-D monitor.
-
Stop all ControlV activity
Stop IOA Archive Server activities by executing the FIOASMON,STOP operator command and wait for shutdown of the server.
-
Stop all ControlM/Analyzer activity
-
Do not invoke ControlM/Analyzer batch rules.
-
Do not enter ControlM/Analyzer online screens.
-
Do not run user application programs that invoke ControlM/Analyzer rules.
If ControlM/Analyzer is running with a ControlM or ControlD monitor, stop the monitor.
-
-
Stop all ControlM/Tape activity
-
Stop all tape activity.
-
Take ControlM/Tape down by using the SCTTINIT,PARM=TERM operator command and wait for termination of ControlM/Tape.
If you run a previous version of ControlM/Tape parallel to the ControlM/Tape current version, you must shut down both versions.
-
If you are using the optional IOA Functional Monitor, stop the IOA Functional Monitor, IOAFMON.
-
-
Inhibit automatic startup of INCONTROL products during IPL (optional).
Edit the COMMNDxx member in the SYS1.PARMLIB operating system library and remove all commands that start IOA activities.
Any activities that you stop during this step must not be restarted until you have done the following:
-
completed Step 41. Disconnect the IOA subsystem through Step 43. Migrate the IOA component.
-
performed additional migration steps for the components that are linked to the activities that you stopped (beginning with Step 44. Migrate Control-M)
-
started Control-O or CMEM again, if they are part of your environment.
Step 41. Disconnect the IOA subsystem
If Control‑O or CMEM is installed and the subsystem name (the value of the SSNAME parameter) is the same as in your current environment, disconnect the subsystem by executing the S IOASDISC,SSNAME=ioa_subsystem command.
WARNING: Issue this command only after every activity specified in Step 40. Stop all IOA activities.
The IOA subsystem will automatically connect to the applicable subsystem routines belonging to the new version when the Control-O, CMEM, or Control-D monitors are started with the new environment.
Step 42. Back up libraries and repositories (again)
Make another backup of the libraries and repositories listed in Step 39. Back up libraries and repositories.
This backup, made when all INCONTROL products are shut down, is a critical safety measure.
Step 43. Migrate the IOA component
-
If the IOA LOAD library of the version you are migrating from is in the MVS Linklist, remove it. To remove it permanently, edit the LNKLSTxx member in the SYS1.PARMLIB library and delete the reference to the library.
-
You may need an IPL to make the change effective. However, if you use a product that can dynamically modify the MVS Linklist, such as CALOOK, you can skip the IPL.
-
You can decide to add the new IOA LOAD library to the Linklist. If so, refresh the LLA and update the facilities that access the LOAD libraries.
-
-
If the IOA LOAD library of the version you are migrating from is not in the MVS LINKLIST, verify that it is not being used by any address space in the GRS complex by reviewing the output of the following operator command:
D GRS,RES=(SYSDSN,ioa.prev.load)
In this command, ioa.prev.load is the name of the previous version of the IOA LOAD library. The name will usually have the form of ilprefa.LOAD, where ilprefa is the IOA Installation prefix of the version you are upgrading from.
The following is a sample output for this command indicating that no address spaces are using that environment:
ISG343I 15.40.50 GRS STATUS 678
NO REQUESTORS FOR RESOURCE SYSDSN IOAP.V900.INST.LOAD
As an alternative to the D GRS operator command, you can rename the IOA LOAD library of the version you are migrating from, and then rename it back. A successful rename indicates that no one is allocating that library. Note that renaming the library back is necessary, as it may still be used by some of the migration steps described in this chapter.
If any address spaces in the GRS complex are identified as allocating the library, resolve the situation by stopping them.
-
Replace IOA procedures
If you used IOA procedures in your jobs, you can use JCLLIB statement or you can copy these procedures to the procedure library at your site.
If IOA JCL procedure prefixes are not the same as prefixes of the previous version, modify the JCL of production jobs to refer to the new IOA JCL procedure names.
Rename the started tasks to those of the version you are migrating from.
-
Migrate the IOA Core
Rename or delete the current release LOG, LOGI, CND, NRS, NSN, and (optionally) ALTCND files that were used while testing the current release.
To migrate the IOA Core, do the following:
-
Edit the FORMIOA member in the IOA INSTWORK library. Check that the JCL is correct and submit the job. Thejob allocates and formats the IOA Core.
-
If you changed some parameters, you can tailor the FORMIOA job again by using the "Tailor Job" option in the INCONTROL Installation and Customization Engine (ICE), available by selecting Maintain your Environment => ICE refresh.
-
Copy the conditions from the IOA Conditions file and Synchronization file in the version you are upgrading from by using the IOACCND sample job in the IOA JCL library. For more information, see the INCONTROL for z/OS Utilities Guide.
-
IOA Log file
If you want to copy the previous IOA Log file to the current release IOA Log file, use the IOACPLOG utility from the new version. Before you copy the file, apply optional Wish WI0357.
Copy// JCLLIB ORDER=IOA.PROCLIB
// INCLUDE MEMBER=IOASETnn
//COPYLOG EXEC IOACPLOG
//DALOGCUR DD DISP=SHR,DSN=previous log file
//DALOG DD DISP=SHR,DSN=new log file
//SYSIN DD *
COPYTOLOG -
Update the IOA Manual Conditions file.
It is not necessary to update the IOA Manual Conditions file (NRS) during the migration of the IOA Core files. The IOA Manual Conditions file can be updated with data from your current release system by executing the IOALDNRS utility, after the migration of the Control-M Repository and the Control-D Repository (described in Step 44. Migrate Control-M and in Step 46. Migrate Control-D) have been completed.
See the INCONTROL for z/OS Utilities Guide for details on executing the IOALDNRS utility.
-
-
Migrate the AutoEdit Variable databases
If you used the AutoEdit Variable database facility in the version you are migrating from, you must copy your databases to the current release, as described below:
-
Back up the AutoEdit Variable databases from the version you are migrating from.
-
Unload the databases to flat files in the version you are migrating from by submitting the IOADBSUL, IOACOLUL, and IOAVARUL jobs from the IOAprefix.JCL library of the earlier version.
This creates three sequential files named IOAprefix.FLAT.DBSD, IOAprefix.FLAT.COLD, and IOAprefix.FLAT.VARD respectively.
-
Rename the IOAprefix.FLAT.* files from the version you are migrating from to IOAprefix.FLAT.* using the IOA prefix of your current release installation.
-
Format the current version databases using the IOADBSBF, IOACOLBF, and IOAVARBF jobs from the IOAprefix.JCL library of the current version installation.
-
Load the current version databases using the IOADBSLD, IOACOLLD, and IOAVARLD jobs from the IOAprefix.JCL library of the current version installation.
-
Build the indexes for the current version databases with the IOADBSBI, IOACOLBI, and IOAVARBI jobs from the IOAprefix.JCL library of the current version installation.
-
Start either Control-O or Control-M/Event Manager (CMEM).
-
Enter Screen IV from the current version IOA Main Menu, and verify that the databases contain the same data as the version you are migrating from.
-
Stop the application that you started in Step g.
-
-
Copy the destination definitions from the IOADEST, MAILDEST, or SNMPDEST members of the IOA...PARM library from the old to the new environment.
-
Migrate INCONTROL security definitions
For IOA and each INCONTROL product, if necessary, activate the security definitions that you prepared in Step 36. Prepare security definitions.
-
Put the new IOA Online interface, CLISTs, and panels into effect for all IOA users.
-
Migrate CMEM
-
Adjust the CMEM IOACMEML.
-
Ensure that the IOACMEML member in the current release Parameters library references the correct rule definitions in the correct Rules libraries.
-
Verify that the CMEM monitor procedure uses the correct names of the IOA GLOBAL database files.
For environments that use CMEM and do not use Control-O, the CTMCMEM monitor can be restarted at this point. After CMEM has been initialized and all relevant rules have been loaded, restart all batch jobs, started tasks, and TSO users monitored by DSNEVENT. You can then restart any other INCONTROL products as soon as you complete their migration steps.
For environments that do not use either CMEM or Control-O, any other INCONTROL products can be started as soon as you complete their migration steps.
-
-
Step 44. Migrate Control-M
-
Replace ControlM procedures
If you used ControlM procedures in your jobs, you can use the JCLLIB statement or you can copy these procedures to the procedure library at your site.
In cases where the name of a Control-M procedure does not follow the standard of PROCPREFM (3 characters) and then a suffix such as TROLM or TDAY, the name of the currently used procedure should be changed to another name, and the procedures for the new version should be renamed to the customer's selected name.
If ControlM JCL procedure prefixes are not the same as prefixes of the previous version, modify the JCL of the production jobs to refer to the new ControlM JCL procedure names.
-
Migrate the ControlM Repository
Rename or delete the current release CKP, BKP, journaling files (JNL, RESJNL, CKPJNL, CNDJNL), STATFILE, and optionally, the ALT files that were used while testing.
To reallocate the new ControlM Repository, enter ControlM Customization and select the "Customize ControlM Dataset Parameters" step.
If you have already copied the AJF as part of Step 27. Prepare Control-M, then skip A and B below.
-
Allocate and format the ControlM Active Jobs file (AJF) and the Control-M History Jobs file (HST).
-
If the IOA QNAME was changed (as recommended in Step 3. Install the IOA component, Item 4), copy the Active Jobs file using the CTMCAJF utility and copy the History Jobs file using the CTMHCOP utility.
-
Copy the resources from the Control-M Resources file of the version you are migrating from into the new ControlM Resources file using the CTMCRES utility. A sample job is found in the ControlM JCL library. For more information on using the CTMCRES utility, see the INCONTROL for z/OS Utilities Guide.
-
Copy the statistics from the Control-M STATFILE of the version you are migrating from into the new Control-M STATFILE file, using the IDCAMS IBM utility with the REPRO command.
-
The group name in jobs belonging to a SMART table are inherited, but can be modified. Since the job statistics file uses a key structure that includes both the job name and the group name, be aware that changing the inherited group name will affect the job statistics for this job.
For example, assume that there are two jobs on panel 3 with the same name and the same group. If you look at the statistics for one of these jobs, you will see both jobs on the statistics panel. The average elapsed time and the median elapsed time, for example, will be calculated based on both these jobs. However, if there are two jobs on panel 3 with the same name, but different groups, there will be separate statistics for each of these jobs.
-
Allocate and format the Control-M journaling files.
-
-
Compress the AJF file
Run the CTMCAJF utility with the "COMPRESS" option to update the pointers on the migrated AJF file. Perform this action only after items 2a. and 2c. above have both been performed since CTMCAJF also updates pointers to the Control-M Resource file.
-
Verify New Day procedure
-
Ensure that the current release ControlM New Day procedure, CTMTDAY, and any User daily jobs, all reference the same table names that were referenced in the version you are now using, in the appropriate scheduling library.
-
Check whether the UDLINDEX member exists in the old version (in IOA...CTM.OPR.PARM) for the storage of User Daily data.
-
If the UDLINDEX member exists in the old version, copy this member from the old version to the current version.
-
If the UDLINDEX member is not present in the old version, this indicates that User Daily data is stored in the IOA Global Variables library, which is the old storage location. In this case, you are advised to activate the creation of the UDLINDEX member in the new version. For more information, see Managing User Daily Jobs from Control-M/EM in the INCONTROL for z/OS Administrator Guide.
-
-
-
Adjust Date Control Records
Copy all date control records (all members that start with the DATEREC prefix) from the previous ControlM Parameters library to the current release ControlM PARM library.
-
Complete the IOA Core file migration
Execute the IOALDNRS utility to populate the IOA Manual Conditions file (NRS). See the INCONTROL for z/OS Utilities Guide for details on executing the IOALDNRS utility.
-
Migrate Workload Policies
Copy members CTMWKLDT and CTMWKLDS from the previous IOA PARM library to the IOA PARM library of the current release. These members contain the Local Workload Policies and Global Workload Policies.
-
Modify CTM.OPR.PARM Members
Edit members in the CTM.OPR.PARM library of the new version, or copy them from the CTM.OPR.PARM library of the old version, to reflect the custom changes applied to the old version of Control-M.
Step 45. Migrate Control-M/Restart
Replace the Control‑M/Restart procedure.
-
Copy the new ControlM/Restart current release procedure to the MVS procedure library, using the production ControlM/Restart procedure name prefix. The new procedure replaces the procedure of the previous version.
If Control‑M/Restart JCL procedure prefixes are not the same as prefixes of the previous Control-R version, modify the JCL of the production jobs to refer to the new Control‑M/Restart JCL procedure names.
Step 46. Migrate Control-D
-
Replace ControlD procedures
-
If you used ControlD procedures in your jobs you can use the JCLLIB statement or you can copy these procedures to the procedure library at your site.
-
Ensure that the ControlD procedures include all required output DD statements.
If ControlD JCL procedure prefixes are not the same as prefixes of the previous version, modify the JCL of the production jobs to refer to the new ControlD JCL procedure names.
-
Rename the current release started tasks to the names of the started task procedures in the version you are now using.
-
Prior to starting the new Control-D procedure, the previous CDAM subsystem must be shutdown. Run the IOASTERM task, matching its current release environment, and then run the IOASINIT task for the environment you want to load.
If you are not performing an IPL to the upgrade, the CDAM subsystem must be shutdown and started manually.
-
-
Migrate the ControlD Repository, as follows:
-
Delete the ControlD current release AMF, AMB, ATF, and ATB files that you used while testing.
-
To reallocate the new ControlD Repository, enter the ControlD Customization option and select the "Customize ControlD dataset Parameters" step.
-
Allocate the ControlD current release Active Missions file.
Use the CTDCAMF utility to copy the contents of the old Active Mission file to the current release Active Mission file. Sample JCL for running the utility is in the CTDCAMF member in the ControlD JCL library. Edit the sample, and add the OLDAMF=<previous AMF dsname> parameter and change NEWAMF=&DBPREFD..NEWAMF to NEWAMF=&DBPREFD..AMF.
-
Migrate the previous ControlD Active Transfer file.
-
Format the Active Transfer file by using the "Format the A.T.F. File" step.
-
Use the CTDCATF utility to copy the contents of the old Active Transfer file to the current release Active Transfer file. Add the following parameters:
Copy//CATF EXEC CTDCATF,P=COPY,
// INATF='previous ATF dsname',
// OUTATF='current ATF dsname 'For details, see the sample job in the INCONTROL for z/OS Utilities Guide.
-
-
-
Migrate ControlD User files.
Run the CTDUFDUL job from the ControlD JCL library in the version you are upgrading from, to back up the Active, Permanent, and History files.
Use the CTDUFRST sample job from the ControlD current release JCL library to restore the files. For each file modify the necessary lines in the job.
-
Adjust the ControlD New Day procedure
The STARTCD member in the ControlD PARM library contains the MVSSTART command to start the ControlD procedure.
-
Adjust Date Control Records
Copy the date control records, DDATEREC and DDATRECU, from the previous ControlD PARM library to the current release ControlD PARM library.
-
Copy the following members, (which contain lists of missions that are ordered by the CTDNDAY procedure) from the previous ControlD PARM library to the current release ControlD PARM library:
-
PRTLIST
-
BKPLIST
-
RSTLIST
-
REPLIST
-
GENLIST
-
-
Copy Recipient Tree members from the previous ControlD PARM library to the current release ControlD PARM library. By default, the Recipient Tree member is named CTDTREE.
-
Copy Generic User lists from the previous ControlD PARM library to the current release ControlD PARM library.
-
Ensure that the current release procedure CTDNDAY and any User daily jobs reference
-
the same table names that were referenced in the version you are now using
-
the current release mission definition libraries
For details, see the discussion of member format changes in Step 38. Copy definition libraries.
-
If you modified the BKPSKL skeleton library in the previous ControlD version, make the same modifications to the ControlD current release SKL skeleton library.
-
-
Use ISPF option 3.3 or the IEBCOPY utility to copy the following production libraries to the current release:
-
ACIFPARM
-
APAPARM
-
BANNERS
-
DJDEPARM
-
FTOPARM
-
OUTPARMS
-
TRANSTO
-
-
If necessary, adjust the parameters of the following ControlD exits in the SAMPEXIT library:
-
CTDX003
-
CTDX005
-
CTDX014
-
-
To enable use of the Control-D reports transformation option, use the relevant option of the following:
-
If you used the transformation option in a previous Control-D release use one of the following:
-
Copy old_PREFD.RESLIB (all members) to new_PREFD.RESLIB library and then apply optional wish WDN083.
This option is available if you used only one old_PREFD.RESLIB in old environment
-
Add the following definition to the member IOADSNL in the IOA PARM library, which allows you to continue using the CTD RESLIB library from the previous environment:
CopyDATASET DARESLIB,
SEQ=1,
DD=DARESLIB,
DSN=old_PREFD.RESLIB
-
-
If you did not previously work with transformers, create a new CTD RESLIB file for resource management, as follows:
-
Delete the CTD RESLIB allocated during installation.
-
Run CTDFRESL, which allocates the CTD RESLIB.
-
-
-
Complete the IOA Core file migration
Execute the IOALDNRS utility to populate the IOA Manual Conditions file (NRS). See the INCONTROL for z/OS Utilities Guide for details on executing the IOALDNRS utility.
Step 47. Migrate Control-V
-
Modify the new ControlV data set parameters
-
If you want to change the parameters of the ControlV Migrated User file, choose "Customize ControlV User Files" in ICE Customization.
-
Delete or rename the file.
-
List all files with the %DBPREFD%.MIG* prefix. The list includes the DATA file and its extents, the INDEX file and its extents, and the DUAL files. Delete or rename all files in the list.
-
Choose the "Format Migrate Users File" ICE minor step to recreate the Migrated user file using the new space parameters.
-
-
Migrate the ControlV Migrated User file
-
Run the CTDUFDUL job from the JCL library of the ControlD version you are upgrading from, to back up the Migrated User files.
-
Use the CTDUFRST sample job from the ControlD current release JCL library to restore the files. For each file modify the necessary lines in the job.
-
-
Replace ControlV procedures
If you used ControlV procedures in your jobs you can use JCLLIB statement or you can copy these procedures to the procedure library at your site.
If ControlV JCL procedure prefixes are not the same as prefixes in the previous version, modify the JCL of the production jobs to refer to the new ControlV JCL procedure names.
If you modified any current release procedures during testing, modify the procedures in the MVS PROCLIB as well.
-
Adjust DB2 Global Index interface
-
Run the CTDGBBPL job to create the DB2 Application plan and authorize it. This job is described in the discussion of the Control-D and Control-V Global Index Facility in the INCONTROL for z/OS Administrator Guide.
-
Copy the CTDGIDB2 member from the previous Control-D PARM library to the current release Control-D PARM library. Ensure that the DB2 Application plan name specified in CTDGIDB2 is the same as created in step A.
-
Step 48. Migrate Control-O
If you rename the Control‑O monitor during testing or switch over to production, rename the CTOSERV server procedure in a corresponding manner. For example, if you named the Control‑O monitor CONTROLO, name the server procedure CTOSERV. Otherwise, the Control‑O monitor and the server procedure will have the same 3‑character prefix.
-
If you used ControlO procedures in your jobs you can use JCLLIB statement or you can copy these procedures to the procedure library at your site.
-
If ControlO is started under the master scheduler rather than under JES, copy the procedures for the ControlO monitor and server into SYS1.PROCLIB or to any library pointed to from MSTJCLxx in use in the SYS1.PARMLIB.
-
If ControlO JCL procedure prefixes are not the same as prefixes of the previous version, modify the JCL of the production jobs to refer to the new ControlO JCL procedure names.
-
-
If you renamed the new ControlO monitor and server procedures during testing, give them their production names.
-
If ControlO/COSMOS is installed, or the Global Variables database is used, verify that the IOA Global Variables files (DD statements DAGRPD/I DAVAMD/I and DAVAAD/I) are allocated.
-
For each system where Control-O is installed, copy the members from the Control-O Global Variables Library (&OLPREFO..GLB.CPUsmfid) from the earlier version to the Control-O Global Variables Library (&OLPREFO..GLB.CPUsmfid) of the new version.
If necessary, use ISPF option 3.3 or the IEBCOPY utility to copy the members.
-
Adjust the ControlO RULELIST.
-
Ensure that the RULELIST member in the ControlO current version Parameters library references the correct rule definitions in the correct Rules libraries.
-
If you are using ControlO/COSMOS, add the COSMOS table to the RULELIST member. The COSMOS table is shipped in the ControlO Rules library.
-
If the ControlO Communications facility is installed, add the CTOGATEI table to the RULELIST member. The CTOGATEI table is shipped in the ControlO Rules library.
-
If you are using CMEM functions, ensure that the IOACMEML member in the current version Parameters library references the correct rule definitions in the correct Rules libraries.
-
-
Adjust ControlO DAGLBLST.
-
Verify that the DAGLBLST member in the ControlO current release Parameters library references the correct GLOBAL variable pools in the ControlO GLOBAL variable libraries and databases.
-
If you are using ControlO/COSMOS, add the COSMOS databases to the DAGLBLST member.
-
-
Verify that an Automation Log exists.
-
If the file has not been allocated because the Automation Log was allocated to an active Control-O monitor during installation, perform the below steps
-
Use the IDCAMS utility to delete or rename both the CLUSTER and the DATA elements of the existing Automation Log files in each computer that is running Control-O.
-
Enter the main ICE screen.
-
Select Customization.
-
Select an environment to customize.
-
Enter CTO in the Product field.
-
Select Product Customization.
-
Select major step 2, "Customize Control-O Dataset Parameters."
-
Select minor step 6, "Allocate the Automation Log File."
-
Submit and execute the job on every system that should run Control-O.
-
-
-
If you have installed ControlO/COSMOS or you intend to use the ControlO GLOBAL variable database, verify that the ControlO monitor procedure uses the correct names of the database files.
The Control-O monitor can be restarted at this point. After Control-O has been initialized and all relevant rules have been loaded, restart all batch jobs, started tasks, and TSO users monitored by DSNEVENT. You can then restart any other INCONTROL products for which all migration steps have been completed.
Step 49. Migrate Control-M/Analyzer
This step uses examples and procedures that apply when you are upgrading from an earlier supported version to the most recent version. In many of the examples, and elsewhere through the explanation of this step, Vxxx is used to identify the supported version you are upgrading from, and the current release is used to identify the new version.
Throughout this explanation, the .GRPD file is used for illustration purposes. The procedures illustrated using the .GRPD file must also be applied to all the files in Using existing production files in the new Control-M/Analyzer environment.
There are two ways to migrate from an earlier version of Control‑M/Analyzer:
-
You can use existing version production files in the new ControlM/Analyzer environment.
-
You can back up your existing version production files and use those backups as the basis of the new ControlM/Analyzer environment, while retaining the original production files in place.
Using existing production files in the new Control-M/Analyzer environment
The following procedure explains how to use existing production files in the new Control‑M/Analyzer environment:
-
Prepare all relevant ControlM/Analyzer data sets from supported earlier versions (Vxxx), for use in the current release. The following table identifies the data sets that must be prepared.
Table 23 Control‑M/Analyzer data sets
Data set name
Data file name
Index file name
Group
GRPD
GRPI
Model Variables Definition
MODD
MODI
Database Variables Generations
VARD
VARI
Rule Activity
JAFD
JAFI
Report
REPD
REPI
Active Balancing
ABF, ABFBKP
The files shown in the previous table can receive different migration treatment, as follows:
-
Data files GRPD, MODD, and VARD must be migrated to ensure that the current release database contains the same database records that existed in Vxxx.
-
The GRPI, MODI, VARI, JAFI, and REPI index files can be re-indexed locally after the current release has been created, so these files can be omitted from the migration process.
-
It is not necessary to IEBGENER the index files, nor to back up or follow parts C, D, E, F, G, and H in step 3. Instead, you can use the new Vyyy index files created by the standard current release installation, and then submit the following members from the CTB.V6301.JCL installation library to rebuild those indexes (AFTER the corresponding data components have been adjusted):
-
JOBBDBM
-
JOBBDBV
-
JOBBGRP
-
JOBBJAF
-
JOBBREP
This will cause the new index files to have all the necessary data that corresponds to your Vxxx data.
-
-
Log and report files hold history data and ordered missions and rules. If you are not required to migrate these files from Vxxx to the current release, you can omit the JAFD, JAFI, REPD, REPI, ABF, and ABFBKP files from the migration process. If you omit these files from the migration process, the current release will only contain history and ordered missions and rules beginning with the point of migration point.
If any of the files you want to migrate already exist in current release format, delete them before continuing the migration process.
-
-
For each file shown in the previous table that you want to migrate, use the following procedure:
-
Ensure that you can allocate the file exclusively during the upgrade process. If ControlM or other jobs currently access and use the file you are to upgrade, delay the upgrade process until the file becomes exclusively available to ControlM/Analyzer, such as the time during Initial Program Load (IPL).
-
Use the IEBGENER utility to create a backup of the current Vxxx.GRPD file by copying the file to a new name.
The current Vxxx.GRPD file will become the file used by the current release environment. At the end of the upgrade process, the backup file you are now creating will become the .GRPD file of the Vxxx environment.
-
After you have finished creating the backup copy with a new name, run the IOADBF utility on the Vxxx.GRPD file, using the FUNC=CHANGE and (BYPASS) parameters. Ensure that the rcis00.
Sample JCLs for substeps C and E (where Vxxx represents the version you are upgrading from) are:
Copy//CTB#CE JOB
//*
// JCLLIB ORDER=IOA.Vxxx.PROCLIB
// INCLUDE MEMBER=IOASET
//*****************************************************
//* ADJUST QNAME FOR CTB DB FILE
//*****************************************************
//*
//CRE0001 EXEC IOADBF,FUNC=CHANGE,D=INSTWORK,M=DEFGRPD
//DAFILE DD DISP=SHR,DSN=CTB.Vxxx.GRPD.E000(BYPASS)
//*
//CRE0002 EXEC IOADBF,FUNC=CHANGE,D=INSTWORK,M=DEFGRPI
//DAFILE DD DISP=SHR,DSN=CTB.Vxxx.GRPI.E000(BYPASS)
//For more information, see the description of the IOADBF utility in the INCONTROL for z/OS Utilities Guide.
This is a verification step to confirm that the file is accessible to name and qname changes. Because the current release parameters have not yet been supplied, at this point no changes will appear in the file.
-
Change the DSN parameter in the IOA.Vxxx.INSTWORK (DEFGRPD) library member to reflect the new version CRname of the GRPD file. Do not include the .000 suffix when you change the parameter.
-
Rerun the IOADBF utility. The internal name is modified, and rcbecomes02or00.
-
Use ISPF option 3.2 to change the name of the original Vxxx.GRPD file to the new version Vyyy.GRPD filename.
Rename CTB.Vxxx.GRPD.E000 to CTB.Vyyy.GRPD.E000
-
Change the JCL to run from the current release environment (steplib, procname), and the DAFILE to point to the new Vyyy.GRPD file.
Sample JCLs for step g (where Vyyy represents the version you are upgrading to) are:
Copy//CTB#G JOB
//*
// JCLLIB ORDER=IOA.V6301.PROCLIB
// INCLUDE MEMBER=IOASET
//*****************************************************
//* ADJUST QNAME FOR CTB DB FILE
//*****************************************************
//*
//CRE0001 EXEC IOADBF,FUNC=CHANGE,D=INSTWORK,M=DEFGRPD
//DAFILE DD DISP=SHR,DSN=CTB.Vyyy.GRPD.E000(BYPASS)
//*
//CRE0002 EXEC IOADBF,FUNC=CHANGE,D=INSTWORK,M=DEFGRPI
//DAFILE DD DISP=SHR,DSN=CTB.Vyyy.GRPI.E000(BYPASS)
// -
Rerun the IOADBF utility. The internal qname has been modified to adjust to the current release environment qname.
-
Rename the backup file created in step 3.B to the original Vxxx.GRPD file name.
-
Change the DSN parameter in the IOA.Vxxx.INSTWORK (DEFGRPD) library member to reflect the old Vxxx name of the GRPD file. Do not include the .000 suffix when you change the parameter.
-
-
If you used ControlM/Analyzer procedures in your jobs you can use JCLLIB statement or you can copy these procedures to the procedure library at your site.
If ControlM/Analyzer JCL procedure prefixes are not the same as prefixes of the previous version, modify the JCL of the production jobs to refer to the new ControlM/Analyzer JCL procedure names.
-
Enable users of Control-M/Analyzer to access the Vyyy ControlM/Analyzer online interface, CLISTs, and panels.
-
Copy the date control record from the Vxxx ControlM/Analyzer PARM library to the CTBDATE member in the current release ControlM/Analyzer PARM library.
-
Copy the list of programs that are run by the New Day procedure.
-
Copy the list of programs from the Vxxx ControlM/Analyzer PARM library to the CTBPROGD member in the current release ControlM/Analyzer PARM library.
-
Copy the CTBMNDAY member from the Vxxx ControlM/Analyzer BALMIS library to the current release BALMIS library.
-
Copy the CTBX010 member in the Vxxx IOA LOAD library to CTBX010 in the current release IOA LOAD library. Alternatively, you can recompile the CTBX010 module in the current release environment.
Using backups of existing production files in the new Control-M/Analyzer environment
The following procedure explains how to use backups of existing production files in the new Control‑M/Analyzer environment:
-
Prepare all relevant ControlM/Analyzer data sets from supported earlier versions (Vxxx) for use in the current release. The following table identifies the data sets to prepare.
Table 24 Control‑M/Analyzer data sets
Data set name
Data file name
Index file name
Group
GRPD
GRPI
Model Variables Definition
MODD
MODI
Database Variables Generations
VARD
VARI
Rule Activity
JAFD
JAFI
Report
REPD
REPI
Active Balancing
ABF
ABFBKP
If you are using the dual database option, files with D000 and E000 suffixes (one for each of the dual files you have), must be handled together in order to keep them synchronized. In the following procedure, information regarding the D000 parts of dual files is shown in bold. For example, if the current naming for Vxxx is as shown below for the GRP file (and this file is used in this procedure as a continuing example), dual files are identified as follows:
CopyCTB.Vxxx.GRPD.D000
CTB.Vxxx.GRPD.E000 -
The files shown in the previous table can be migrated in one of the following ways:
-
Create backups (not simple copies) of your current Vxxx environment, to be used in the current release environment.
-
If you only copy the current file you still need the current release (rather than Vxxx) qnames and file names.
If you do copy the files, you should set the internal qname and file name using a zap utility, and not a standard editor.
-
Use the IOADBF utility in the current release environment to create file names, which enables you to use current release (rather than Vxxx) qnames and file names, instead of manually allocating those names. This procedure, which BMC recommends that you use, will also create, in a single operation, both D000 and E000 files, provided that you specified DUAL=Y in the new IOAP.version 8000.INSTWORK(DEF*) members.
Use the following syntax to create backup copies. The names of the files are set in the DEF* members and according that IOADBF can create new files for you.
Copy//EXEC IOADBF,FUNC=INIT,D=INSTCTB,M=DEFGRPD
-
-
Use the following procedure to copy the Vxxx GRP file you just created, to the target Vyyy data sets.
-
Adjust the qname and file name in the files.
Since these are not the original files, you cannot use IOADBF to make the adjustments. Instead of using the CREGRP1 migration step, you should use the AMASZAP or ABSDUMPT utility combination, and so on, to zap the data in both new data sets (CTB.V9000.GRPD.E000 and (CTB.V9000.GRPD.D000 in dual mode)) to the qname and file name of your Vyyy environment, as shown in the following table.
There is no need to adjust the DISK or VOLSER fields.
Table 25 QNAME and file name changes
Field
Offset
Length
QNAME
1C
8
FILENAME
2C
44
-
Repeat steps 1 - 4 for the rest of your files.
/STEP1    EXEC  PGM=IEBGENER
//SYSPRINT DD  SYSOUT=*
//SYSIN    DD  DUMMY
//SYSUT1   DD  DISP=SHR,DSN=CTB.Vxxx.GRPD.D000
//SYSUT2   DD  DISP=SHR,DSN=CTB.V9000.GRPD.D000

//STEP1    EXEC  PGM=IEBGENER/
//SYSPRINT DD  SYSOUT=*
//SYSIN    DD  DUMMY
//SYSUT1   DD  DISP=SHR,DSN=CTB.Vxxx.GRPD.E000
//SYSUT2 DD DISP=SHR,DSN=CTB.V9000.GRPD.E000Step 50. Migrate Control-M/Tape
-
Replace ControlM/Tape procedures.
-
If you used ControlM/Tape procedures in your jobs you can use JCLLIB statement or you can copy these procedures to the procedure library at your site.
If ControlM/Tape JCL procedure prefixes are not the same as prefixes of the previous version, modify the JCL of the production jobs to refer to the new ControlM/Tape JCL procedure names.
-
-
If the ControlM/Tape Repository file attributes used for the testing phase need to be changed, modify the new ControlM/Tape data set parameters. Changes in these parameters affect the allocation and formatting of ControlM/Tape data sets. You can modify values and customize formatting jobs by using the "Customize ControlM/Tape Datasets" major step in ICE Customization.
Complete the remaining minor steps in ICE. These steps update the file definition statements and the DEFPARM member so that the formatting jobs are customized and ready for submission in later steps.
-
If you are going to use the Media database of your previous ControlM/Tape version, and that database is shared by other systems, ensure that the DBPREFT ICE variable and DBPREF parameter in CTTPARM have the same value as in the previous version.
-
Upgrade Media Database and Stacking Database
In "CTT Customization" in ICE, select the "Upgrade ControlM/Tape Repository" major step, and perform its minor steps.
Select the "Adjustments" major step, and perform the "Building Vault Information in MDB" minor step.
-
Using static installation
While running in TEST mode, you cannot statically install the Control-M/Tape SVC and MVS Tape Label Processing Exits. For more information, and to help you determine whether you want to proceed with a static installation, review the description of ICE minor steps "Control-M/Tape SVC Installation." and "MVS Tape Label Processing Exits Installation" in the INCONTROL for z/OS Installation Guide: Installing.
-
Initialize ControlM/Tape.
Step 51. Migrate IOAGATE
-
Replace IOAGATE procedures.
BMC recommends that you give the IOAGATE current release procedures the same names as the IOAGATE JCL procedures in the version you are upgrading from. This may save modifications to JCL of production jobs that invoke IOAGATE JCL procedures.
Back up the current procedures. Then copy the new IOAGATE current release JCL procedures to the MVS procedures library, using the production IOAGATE JCL procedure name prefix. The new procedures replace the procedures of the previous version. Instead of copying the procedures, you can use JCLLIB or /*JOBPARM.
If IOAGATE JCL procedure prefixes are not the same as prefixes of the previous version, modify the JCL of the production jobs to refer to the new IOAGATE JCL procedure names.
-
Rename the application server started task procedures to those of the version you are upgrading from. Then change the corresponding procedure names accordingly. To do so, use the "Configure IOAGATE Parameters" ICE minor step of the "Install IOAGATE" major step, under "The INSTALL activity."
-
Recycle IOAGATE.
Step 52. Migrate CTMAS
The CTMAS and Control‑M versions must be the same.
Migrate to the Control‑M current release before you migrate to the CTMAS current release.
Step 53. Migrate Control-M JCL Verify
-
If you used ControlM/JCL Verify procedures in your jobs you can use JCLLIB statement or you can copy these procedures to the procedure library at your site.
-
The three-letter prefix for the Control-M JCL Verify started tasks are defined in the Control-M/JCL parameter.
-
Adjust the ControlM/JCL Verify CTJRULE.
Ensure that in the current version of Control-M JCL Verify, the CTJRULE member in the Parameters library references the correct rule definitions.
-
For Edit Macro users, copy the REXX CTJXVER created by installation from the SYSPROC test library to the SYSPROC Site production library.
You can rename the CLIST to any valid name different from the name of the REXX in the version you are currently using.
If you want to use the same name used in the previous release, backup a copy of the previous release, and then rename it.
Step 54. Restart IOA activities
Restart any IOA activities that have not yet been restarted, and were stopped in Step 40. Stop all IOA activities. If Control-O or CMEM are part of your environment, they must be restarted before you restart other activities.
Step 55. Final adjustments
-
(optional) Add the new release IOA LOAD library to the MVS Linklist.
If the IOA LOAD library of the version you are now using was in the MVS Linklist and you want to permanently add the current release library to the list, edit the LNKLSTxx member in the SYS1.PARMLIB library, and add the reference to the new release IOA LOAD library.
You may have to IPL to make the change effective. However, if you use a product that can dynamically modify the MVS Linklist, such as CALOOK, you can skip the IPL.
If you commented out or removed STEPLIB DD statements from the IOA JCL procedures in the version you are now using, comment out the corresponding statements of the current release IOA JCL procedures. The STEPLIB DD statement is in the SIOAENV member in IOA PROCLIB. However, do not comment out STEPLIB DD statements from the ControlO monitor procedure or the CMEM monitor procedure.
BMC recommends that you comment out statements instead of removing them.
-
Modify COMMNDxx members to automatically start the installed products.
-
If subsystem names for the INCONTROL products have changed, modify IEFSSNxx members.
-
If you have products that enhance LLA performance, such as QuickFetch or PMO, and you have disabled them during the upgrade, restart them.
-
Migrate Control-M/Server definitions in the Control-M/Enterprise Manager database from the earlier version to the new version by running the migrate_dc utility in the Control-M/Enterprise Manager environment. For more information on the migrate_dc utility, see the Control-M Migration Guide.
-
Re-implement previous customizations that were made to screens, exits, and so forth into the new environment.
-
Back up the entire IOA environment, including all new IOA and INCONTROL product libraries repositories, and definition libraries (for example, schedule, mission) owned by users.
 Communities
 Support Center
 YouTube
 Twitter
 Facebook
 LinkedIn