Automated Tape Library Interface and Virtual Tape Server
This chapter includes the following topics:
Overview
Sites with a large number of tape volumes typically use an automated tape library to help manage their tapes.
Most automated tape libraries consist of the following components:
Table 18 Automated Tape Library Components
|
Component |
Description |
|---|---|
|
Automated tape library hardware |
Machine that stores and automatically mounts volumes (tapes). |
|
Automated tape library database |
Database containing the status of each volume (that is, SCRATCH or ACTIVE), its location in the automated tape library, and the pool name assigned to it (in automated tape libraries where pools are supported). For IBM devices, this database is call the Library Manager Database (LM DB). |
|
Automated tape library software |
Software that controls the automated tape library hardware. Some tasks performed by automated tape library software components are:
|
Control-M/Tape automated tape library interfaces are bidirectional (meaning, communication can be initiated either by Control-M/Tape or by the automated tape library software).
Control-M/Tape usually initiates the communication using the automated tape library API. For example, when a volume is scratched by Control-M/Tape, Control-M/Tape uses the API of the automated tape library to request to mark it as scratch in the automated tape library database.
The automated tape library usually initiates the communication using one of its exits. For example, when a volume is ejected by the automated tape library, an exit is invoked to announce this event.
Interface Types
Functions of the automated tape library interface may be implemented in either of the following ways:
-
Through an interface supplied with Control-M/Tape
-
This type of interface usually consists of a automated tape library interface module that accesses the automated tape library database through an automated tape library API.
-
Automated tape library exits are also supplied with Control-M/Tape. These exits enable Control-M/Tape to obtain control of tape processing at certain key points (for example, volume ejection).
The interface module and sample exits can be customized to reflect the needs of your site.
-
-
Through an interface supplied with the automated tape library
This type of interface usually consists of a batch utility that is added to the Control-M/Tape New Day procedure. This utility reads the Media Database through a Control-M/Tape API and updates volume status in the automated tape library database accordingly.
Many vendor-provided interfaces automatically recognize Control-M/Tape mount and keep messages (for example, CTT101A and CT102A).
This chapter describes the automated tape library interfaces provided with Control-M/Tape. For information about the interfaces provided by an automated tape library vendor, see the relevant documentation.
Interface Functions
Table 19 lists various automated tape libraries and the functions supported for each library. Each function is identified by a number and one or more function indicators. For detailed descriptions of the functions, see Function Descriptions.
Certain functions can be implemented by both the Control-M/Tape interface and the vendor-provided automated tape library interface. However, to prevent unnecessary waste of system resources, BMC recommends that you do not implement any functions through both interfaces at the same time.
Table 19 Automated Tape Library Functions
|
Automated Tape Library Hardware |
Automated Tape Library Software |
Functionsa |
|||||||||||
|---|---|---|---|---|---|---|---|---|---|---|---|---|---|
|
1 |
2 |
3 |
4 |
5 |
6 |
7 |
8 |
9 |
10 |
11 |
12 |
||
|
StorageTek silo, including VSM |
HSC |
Tb |
T |
T |
T |
T |
T |
T |
T |
Nc |
N |
T |
N |
|
StorageTek silo, including VSM |
CSC |
Tb |
Nc |
N |
N |
N |
T |
N |
N |
N |
N |
Ad |
N |
|
IBM ATL and VTS, or other library compatible with DFSMS |
DFSMS |
Tb |
T |
T |
T |
T |
Ad |
T |
T |
T |
T |
T |
T |
|
IBM ATL |
BTLS |
Tb |
T |
T |
T |
T |
Ad |
Nc |
N |
N |
N |
A |
N |
|
SUTMYN (formerly Memorex Telex) |
LMS |
Tb, |
T |
T |
T |
T |
V |
Nc |
T |
N |
N |
Ad |
N |
|
ADIC (formerly EMASS/GRAU) |
HACC |
Tb, |
T |
T |
T |
T |
V |
T |
Nc |
N |
N |
Ad |
V |
|
FUJITSU MTL |
LIBSP |
Tb |
T |
T |
T |
Nc |
V |
N |
T |
N |
N |
Ad |
N |
|
Comparex |
HAS |
Ve |
Nc |
N |
V |
N |
V |
N |
N |
N |
N |
Ad |
N |
-
Not all the functions are available for every automated tape library.
-
T indicates that the function is supported by the Control-M/Tape interface.
-
N indicates that the function is not supported or not relevant.
-
A indicates that the function is supported automatically; no interface is necessary.
-
V indicates that the function is supported by the vendor-provided automated tape library interface.
Function Descriptions
The numbers of the following function descriptions correspond to the function numbers in Table 19 in Interface Functions.
-
Set volume status to SCRATCH during batch processing. When a utility (for example,CTTRTM, the Control-M/Tape retention management utility) scratches volumes, the status of the volume is set to SCRATCH in the automated tape library database.
-
Set volume status to Scratch according to real-time and online tape processing. When a volume is scratched during real-time processing (for example, due to immediate release by an EDM) or through commandE in the Control-M/Tape Inquire/Update screen (Screen TI), the status of the volume is set to SCRATCH in the automated tape library database.
-
Set volume status to ACTIVE during online processing. When a volume is unscratched through commandX in the Control-M/Tape Inquire/Update screen (Screen TI), the status of the volume is set to ACTIVE in the automated tape library database.
-
Eject volumes during batch processing. When CTTVTM (the Control-M/Tape vault management utility) indicates that volumes in the automated tape library should be moved to a new location, the volumes are ejected from the automated tape library.
-
Eject volumes during online processing. When a volume is manually vaulted through commandV in the Control-M/Tape Inquire/Update screen (Screen TI), the volume is ejected from the automated tape library.
-
Interpret Mount and Keep messages issued by Control-M/Tape (such as CTT100A, and CTT101A) to the automated tape library so that they are handled in the same way as Mount and Keep messages issued by MVS (for example, IEF233A or IEC501A). This function also includes interpretation of the POOL name in message CTT101A (or CTT104A for JES3) to ensure that a volume from the appropriate pool is mounted.
-
Monitor volumes ejected from or inserted in the automated tape library and update the IN-ATL indication for these volumes in the Media Database. This function usually also includes recording (in the Media Database) information about the internal location of a volume in the automated tape library.
-
Batch synchronize volume status (that is, SCRATCH, or ACTIVE) and location information (that is, whether or not the volume is in the automated tape library) in the Media Database and the automated tape library database. This function is performed through the CTTSYNC utility. For more information about the CTTSYNC utility, see the Control-M/Tape utilities chapter of the INCONTROL for z/OS Utilities Guide.
This function usually also includes recording (in the Media Database) information about the internal location of a volume in the automated tape library.
-
Monitor changes to volume status (for example, from ACTIVE to SCRATCH) in the automated tape library database that are made directly using the automated tape library software. In order to avoid synchronization problems, the change to a volume’s status is allowed by Control-M/Tape only if it complies with the status of that volume in the Media Database.
-
Handle requests for volumes not in the automated tape library.
-
When a volume not in the automated tape library is needed, Control-M/Tape indicates the volume’s location outside the library (for example, the vault name) and prompts the operator to insert the volume into the automated tape library before the mount request is issued. The operator can decide to insert the volume to the automated tape library or to ignore the prompt.
-
If the prompt is ignored, the mount request for the volume specifies a tape drive that is outside the automated tape library and the tape has to be mounted manually.
This function should only be implemented at sites where all mount requests are normally handled by the automated tape library.
-
Implementing this function at a site that often requires mounts outside the automated tape library results in unnecessary messages.
-
-
Allow Control-M/Tape utility CTTTPI to initialize tapes in the automated tape library. For more information about this utility, see the Control-M/Tape utilities chapter in the INCONTROL for z/OS Utilities Guide.
-
Set a volume’s status in the automated tape library database (that is, SCRATCH or ACTIVE) according to its status in the Media Database when it is inserted in the automated tape library.
How Control-M/Tape Interacts With the Automated Tape Library
As mentioned above, interaction between Control-M/Tape and the automated tape library can be initiated by either Control-M/Tape or the automated tape library software. Interaction initiated by Control-M/Tape is discussed below. Interaction initiated by the automated tape library is discussed in the reference manual for your automated tape library software.
The Control-M/Tape automated tape library interface is managed by a central interface module. This module receives requests for actions related to the automated tape library. Figure 41 illustrates how these requests are processed for a site with two IBM libraries and one StorageTek library.
Figure 41 Control-M/Tape Interaction With Automated Tape Library
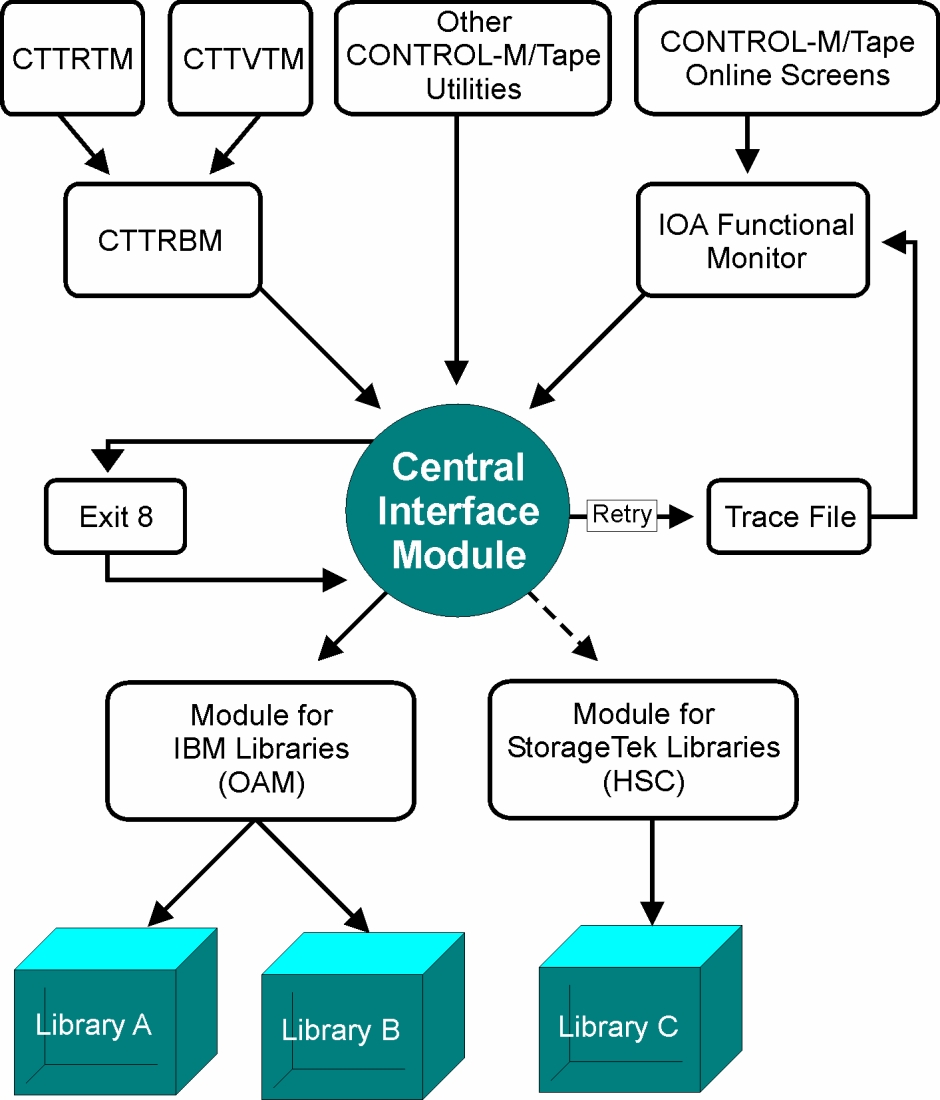
The central interface module receives requests from the following Control-M/Tape components (discussed below):
-
Module CTTRBM
-
Control-M/Tape Utilities
-
IOA Functional Monitor
Before performing each request, the central interface module consults Control-M/Tape Exit 8. If the requested action is allowed by Exit 8, the central interface module sends the request to the interface module for the specific automated tape library.
If a request to the automated tape library cannot be processed immediately, the request is written to the Control-M/Tape Trace file. The request is then retrieved from the Trace file by the IOA Functional monitor that redirects the request to the Central Interface module.
The CTTRBM Module
This module receives command files generated by the CTTRTM and CTTVTM utilities and issues requests to the central automated tape library interface module according to the information in these files.
Information from the CTTRTM command file is used to generate requests to change volume status to SCRATCH.
Information from the CTTVTM command file is used to generate requests to EJECT a volume.
For more information about the CTTRTM and CTTVTM utilities, see the Control-M utilities chapter of the INCONTROL for z/OS Utilities Guide.
Control-M/Tape Utilities
Certain Control-M/Tape utilities require access to the automated tape library interface so that they can update information in the automated tape library database. All relevant Control-M/Tape utilities are APF-authorized and therefore can access the automated tape libraries directly through the interface modules.
The following utilities may pass requests to the central interface module:
Table 20 Control-M/Tape Utilities
|
Utility |
Description |
|---|---|
|
CTTTPI |
Tape initialization, mapping and erasure. |
|
CTTSYNC |
Synchronize the Media database with other software databases. |
|
CTTMUP |
Manual update of tape information (for example, change of tape status). |
For more information about these utilities, see the Control-M utilities chapter of the INCONTROL for z/OS Utilities Guide.
IOA Functional Monitor
The IOA Functional monitor is used to direct certain types of requests to the central interface module. These requests include:
-
Requests from Control-M/Tape online screens.
-
Retry requests.
If the IOA Functional monitor is not installed and active, automated tape library requests from the online screens and retry requests are not processed. For more information, see the INCONTROL for z/OS Installation Guide, and "Sites With No IOA Functional Monitor Installed" in Sample Uses For Exit 8.
Requests From Control-M/Tape Online Screens
Most automated tape libraries require APF authorization for action requests. However, the Control-M/Tape online screens do not have APF authorization. For this reason, requests for automated tape library access from an online screen must be routed to the IOA Functional monitor, which invokes an APF-authorized environment and sends the necessary requests to the central interface module.
Requests from an online screen may indicate that a tape should be scratched, activated or ejected, due to an option in the Control-M/Tape Inquire/Update screen.
Retry Requests
If an automated tape library interface module fails to access the automated tape library, the failure is detected by Control-M/Tape and a retry request for this operation is sent to the IOA Functional monitor through the Trace file. The IOA Functional monitor then starts a retry mechanism that attempts to pass the request to the automated tape library through the central interface module. Retry requests are submitted for an action until either a successful attempt or a retry limit is reached.
A retry is not attempted if the failure is "volume not found". Exit 8, described below, can be used to limit the number of times a specific action can be retried.
Exit 8: Automated Tape Library Request/Retry Confirmation
Control-M/Tape Exit 8 can be used to accept or reject each action requested through the automated tape library interface.
Exit 8 (CTTX008) is invoked when:
-
A command is about to be sent from Control-M/Tape to an automated tape library.
-
A retry is about to be initiated for an automated tape library request.
Information Passed to the Exit
The following information is passed to the exit each time it is invoked:
-
The type of automated tape library from which the action is requested.
-
The action to be performed. The following basic commands may be requested:
-
Mark a tape as SCRATCH
-
Mark a tape as ACTIVE
-
EJECT a tape
-
QUERY tape information
-
The location of a record containing additional information (for example, volser of the relevant volume, from and to locations in case of an eject command used to move a volume).
If the current invocation of the exit is to confirm whether a request should be retried, the last return code and reason code of the failed command from the automated tape library and the retry count for the request are also passed to Exit 8. If more than one type of automated tape library is used at your site, Exit 8 is invoked separately for each type before the automated tape library is accessed. For more information, see Sample Uses For Exit 8.
For more information about Exit 8, see the CTTX008 member in the IOA SAMPEXIT library.
Sample Uses For Exit 8
Sample uses for Exit 8 are:
-
To limit the number of times a specific request can be retried.
-
To reject EJECT requests from vaults that reside in (or are part of) an automated tape library.
-
To confirm (allow) EJECT requests only if they are from the Control-M/Tape Active library (MAINLIB). (For a sample exit that performs this function, see the CTTX008W member in the IOA SAMPEXIT library.)
-
To reject retry requests when the previous action failed with a specific return code and/or reason code. For example, Exit 8 may confirm retry requests only if the previous failure was not a permanent one.
Sites With More Than One Type of Automated Tape Library
-
Control-M/Tape can interface with a maximum of four different types of automated tape libraries.
-
At a site with more than one library, automated tape library action requests are sent to each automated tape library until the request is satisfied.
-
Exit 8 is called separately before each automated tape library is accessed. The exit can be used to reject commands for volser ranges that are not relevant to the automated tape library, thereby saving valuable processing time. For example, if all the volumes with a given volser prefix are stored in an IBM automated tape library, Exit 8 can be used to suppress actions for volsers with this prefix when requested from a StorageTek library.
SMS-managed automated tape library from different vendors are considered as one library (meaning, Exit 8 is called only once for all SMS-managed automated tape libraries.
Sites With No IOA Functional Monitor Installed
-
As mentioned earlier in this chapter, the IOA Functional monitor is used both to pass requests for automated tape library actions from Control-M/Tape online screens, and to retry previously failed requests.
-
If the IOA Functional monitor is not installed at your site, and you do not intend to implement it, Exit 8 can be used to reject requests from the Online environment and retry requests from all the environments, thereby saving valuable space in the Trace file (that is used to store these requests until the monitor processes them).
-
It is recommended that you disallow retry requests at sites that do not use an IOA Functional monitor. To do this, edit sample Exit 8 in the CTTX008R member in the IOA SAMPEXIT library, and specify that 0 retries should be allowed.
This sample exit can also be used at sites using an IOA Functional monitor to limit the number of retries to any desired number.
Interface Modules for Specific Vendors
When a request for an automated tape library function has been allowed by Exit 8 (described above), the central interface module passes the request to a module that is used to interface with a specific automated tape library.
If more than one automated tape library type is in use at your site, a different interface module is used for each automated tape library. Each request is sent to one automated tape library interface module at a time, until either executed or rejected for all the automated tape library modules.
Control-M/Tape automated tape library interface modules use basic commands supported by the automated tape library API to perform certain tasks. For example, to scratch a volume, Control-M/Tape first uses the query command to verify that the volume is in the automated tape library and then uses the scratch command to scratch it.
The following basic commands are used by Control-M/Tape:
Table 21 Control-M/Tape Basic Commands
|
Command |
Description |
|---|---|
|
SCRATCH |
Sets a volume’s status to SCRATCH |
|
ACTIVE |
Sets a volume’s status to ACTIVE |
|
EJECT |
Ejects a volume |
|
QUERY |
Queries a volume’s status |
Since only a base level API is used, the Control-M/Tape interface to the automated tape library should not be affected if the automated tape library software is upgraded.
To perform the above commands, Control-M/Tape uses a different interface module for each type of automated tape library.
The following table lists the interface modules that are provided with Control-M/Tape:
Table 22 Control-M/Tape Interface Modules
|
Module |
Hardware Supported |
Software Supported |
|---|---|---|
|
CTTRSTK |
StorageTek silo and VSM |
HSC |
|
CTTRCSC |
StorageTek silo and VSM |
CSC |
|
CTTOAM |
IBM ATL or IBM VTS or any OAM compatible tape library. |
OAM |
|
CTTBTLS |
IBM ATL |
BTLS |
|
CTTMMRX |
SUTMYN libraries (formerly called MEMOREX/Telex) |
LMS |
|
CTTHACC |
ADIC |
HACC |
|
CTTFUJI |
FUJITSU MTL |
LIBSP |
The interface modules listed above are provided as samples. If necessary, they can be customized to comply with your site’s operating procedures. No functions supported for Comparex libraries are initiated by Control-M/Tape. Therefore, no interface module is necessary for the Control-M/Tape/Comparex interface.
Specific Implementations
The remainder of this chapter contains descriptions of the Control-M/Tape interfaces for each of the supported automated tape library types. The description of each automated tape library-specific interface is followed by the detailed steps necessary for implementation of the interface.
StorageTek Silo and Virtual Storage Manager (VSM)
Control-M/Tape can interface with either StorageTek’s Host Software Component (HSC) or the Client Server Component (CSC). Follow the procedure appropriate for your site.
A retry is not attempted if the failure is "volume not found". If Expert Library Manager (ExLM) software is used at your site, additional steps have to be performed to ensure that it is compatible with Control-M/Tape. For more information see ExLM Support.
StorageTek Silos Managed by HSC
-
Specify HSC as one of the values for the RBTTYPE parameter in the CTTPARM member (through Control-M/Tape step 2.10 in ICE).
-
Use the ICE Automatic Exit Installation Tool to compile the CTTRSTK member. For details about this tool, see the exits chapter in the INCONTROL for z/OS Administrator Guide.
-
Save the CTTRTM procedure under the name CTTRTM2. Rename the CTTRTMB procedure in the procedure library to CTTRTM. The new CTTRTM procedure contains an additional step (CTTRBM) that interfaces with the automated tape libraries.
-
Save the CTTVTM procedure under the name CTTVTM2. Rename the CTTVTMB procedure in the procedure library to CTTVTM. The new CTTVTM procedure contains an additional step (CTTRBM) that interfaces with the automated tape libraries.
-
Control-M/Tape uses the HSC API to communicate with the automated tape library and to update the HSC Control Datasets. If the HSC load library (SLS.SLSLINK) is not in the LINKLIST, it should be added to the STEPLIB DDstatement of all procedures that access the automated tape library. These procedures include:
-
the CTTRBM step in the CTTRTM and CTTVTM utilities
-
the CTTSYNC utility
-
the IOA Functional Monitor procedure (IOAFMON)
-
In order to add the required library to the STEPLIB, edit the procedure of the utility at IOA.PROCLIB library, remove the line 'INCLUDE MEMBER=&IOAENV' and instead add the following lines:
//STEPLIB DD DISP=SHR,DSN=&STEPLIB
//        DD DISP=SHR,DSN=robotic-tape-library-load-library
//DAPARM  DD DISP=SHR,DSN=&ILPREFA..PARM
//        DD DISP=SHR,DSN=&ILPREFA..IOAENV
If you have implemented EDM support (for example, using Exit ARCTVEXT for DFSMShsm or Exit TMSCTLEX for CA-Disk), the HSC load library should be added to the DFSMShsm, or CA-Disk procedure STEPLIB.
-
User Exit SLSUX06 (Volume Insert/Delete) can, optionally, be installed to manage the update the IN-ATL status for volume records in the Control-M/Tape Media Database. This exit also stores information about the location of each volume in the silo (the LSM address) in the appropriate volume record in the Media Database.
Sample code for this user exit is located in the SLSUX06 member in the IOA SAMPEXIT library.
-
Use the following steps to implement this exit:
-
Use the Control-M/Tape utility CTTSYNC to set the IN-ATL indication and LSM address for all volume records in the Media Database. This utility is described in detail in the Control-M/Tape utilities chapter of the INCONTROL for z/OS Utilities Guide.
-
Use the ICE Automatic Exit Installation Tool to compile the SLSUX06 member. For details about this tool, see the exits chapter in the INCONTROL for z/OS Administrator Guide.
-
Verify that Exit SLSUX06 is enabled in the HSC environment.
-
HSC and Control-M/Tape Mount Messages
Use the following step to implement scratch pooling in your StorageTek Silo:
-
Specify M or Y for the DYNWTO parameter in the CTTPARM member (through Control-M/Tape step 2.2 in ICE). This causes Control-M/Tape to include the name of a scratch pool in the mount messages.
-
Ensure that HSC scratch pool definitions (defined through the HSC’s SCRPOOL initialization statements) are compatible with Control-M/Tape pool definitions.
-
HSC SCRPOOL statements are less flexible than Control-M/Tape pool definitions. Therefore, only Control-M/Tapepools that can also be defined to HSC should be defined (for example, do not use masking characters in pool definitions).
-
HSC does not allow scratch pool names that are more than 13 characters in length. Therefore, pool names of 13 characters or less should be used in Control-M/Tape.
-
Use the SLSUX01 HSC job processing user exit to interpret Control-M/Tape mount messages.
-
Use the ICE Automatic Exit Installation Tool to compile the SLSUX01 member. For details about this tool, see the exits chapter in the INCONTROL for z/OS Administrator Guide.
-
Ensure that Exit SLSUX01 is enabled in HSC.
-
CTTTPI Interface to HSC
The initialization program of the StorageTek Host Software Component invokes a site-specific media initialization program. To indicate that you want to use the CTTTPI utility for volume initialization, follow the instructions for the cartridge initialization utility in the StorageTek reference manual. For more information, see the description of the CTTTPI utility in the Control-M utilities chapter of the INCONTROL for z/OS Utilities Guide.
StorageTek Silo Managed by CSC
-
Specify CSC as one of the values for the RBTTYPE parameter in the CTTPARM member (through Control-M/Tape step 2.10 in ICE).
-
Use the ICE Automatic Exit Installation Tool to compile the CTTRCSC member. For details about this tool, see the exits chapter in the INCONTROL for z/OS Administrator Guide).
-
Save the CTTRTM procedure under the name CTTRTM2. Rename the CTTRTMC procedure in the procedure library to CTTRTM. The new CTTRTM procedure contains an additional step (CTTRBM) that interfaces with the StorageTek Silo.
-
Allocate a sequential file as a fixed block with a record length of 80 bytes. Use the value specified for the %OLPREFT% parameter in the DEFPARM member to name this file as follows:
olpreft.DASCRCMD
This sequential file should be large enough to hold the maximum number of volumes that might be expired by the CTTRTM utility in one day (one record per volume).
StorageTek CSC cannot perform automatic ejects. After running the CTTVTM utility, all necessary ejects must be performed manually.
No application Program Interface (API) is supplied with StorageTek CSC. For this reason Control-M/Tape uses the SCUADMIN CSC utility to notify CSC about expired tapes. As a result of this method of operation, note the following:
CSC is not notified when a volume status is modified manually from the Control-M/Tape Online environment or through the CTTMUP utility.
When an External Data Manager (EDM) is set to scratch volumes immediately, CSC is not notified of the scratched tapes. It is therefore recommended that the EDM exit (for example, ARCTVEXT for DFSMShsm) scratch volumes in deferred mode. When deferred mode is used, EDM volumes are given the status PENDING SCRATCH by the EDM exit, and are scratched by the CTTRTM utility the next time it is run, at which time CSC is notified.
CSC and Control-M/Tape Mount Messages
Use the following step to implement scratch pooling in your StorageTek Silo:
-
SpecifyM orY for the DYNWTO parameter in the CTTPARM member (through Control-M/Tape step2.2 in ICE). This causes Control-M/Tape to include the name of a scratch pool in the mount messages.
If you are not using scratch pools under Control-M/Tape, specify N for the DYNWTO parameter in the CTTPARM member so that the mount message is not changed by Control-M/Tape.
-
Use the SCSUX01 CSC job processing user exit to interpret the pool name in the Control-M/Tape mount messages.
-
Edit the SCSUX01 member in the IOA SAMPLE library. Locate the POOLTAB table at the bottom of the exit. List each Control-M/Tape pool name with the associated CSC pool index number and save the member.
-
In the following example, the POOL-1 Control-M/Tape pool is associated with CSC pool index number 1 and the POOL-2 Control-M/Tape pool is associated with CSC pool index number 2:
CopyPOOLTAB CSCPOOL TYPE=START
CSCPOOL NAME=POOL-1,INDEX=1
CSCPOOL NAME=POOL-2,INDEX=2
CSCPOOL TYPE=END -
Use the ICE Automatic Exit Installation Tool to compile the SCSUX01 member. For details about this tool, see the exits chapter in the INCONTROL for z/OS Administrator Guide.
-
Copy the SCSUX01 exit (compiled in the previous step) to the CSC LOAD library.
-
ExLM Support
Expert Library Manager (ExLM) software from StorageTek is a utility that enhances control over a number of aspects of your tape management library (for example, the availability of scratch volumes). When this utility is run, it internally executes a Control-M/Tape module (CTTXLM) that provides information necessary for ExLM’s functioning.
If you are not using the ExLM software, ignore this topic.
The interface between Control-M/Tape and ExLM is performed by utilizing the TMX CTT control statement of ExLM. For more information about how to use this ExLM control statement, please refer to the ExLM System Administrator's Guide.
For ExLM 6.0.0, you must apply ExLM PTF L1L00DO, and for ExLM 6.1.0 you must apply ExLM PTF L1l00DB.
As described in the ExLM System Administrator’s Guide, you need to perform the following steps to let ExLM access the Control-M/Tape Media Database:
-
Add the IOA LOAD library to the STEPLIB DD statement of the ExLM JCL. This is not required if you have already added the IOA LOAD library to the MVS LNKLST.
-
Add the following DDstatement to the ExLM JCL:
Copy//DAPARM DD DISP=SHR,DSN=&ILPREFA.PARM
// DD DISP=SHR,DSN=&ILPREFA.IOAENVChange &ILPREFA to the IOA installation library prefix.
-
Add a DDstatement for the Media Database data component to the ExLM JCL, as follows:
Copy//DAPARM DD DISP=SHR,DSN=&ILPREFA.PARM//
DD DISP=SHR,DSN=&ILPREFA.IOAENVChange &DBPREFT to the Control-M/Tape database prefix that was set during installation.
IBM Automatic Tape Library (ATL) and Virtual Tape Server (VTS)
Control-M/Tape can interface with either IBM libraries managed by OAM, or IBM Basic Tape Library Support (BTLS). Follow the procedure appropriate for your site.
IBM Libraries managed by DFSMS
The instructions provided below should be used for implementation of an interface with any OAM-managed automated tape library (regardless of the vendor).
-
Specify OAM as one of the values for the RBTTYPE parameter in CTTPARM (through Control-M/Tape step 2.10 in ICE).
-
Save the CTTRTM procedure under the name CTTRTM2, and rename the CTTRTMB procedure in the procedure library to CTTRTM.
-
The new CTTRTM procedure contains a step (CTTRBM) that activates the interface to the IBM automated tape libraries.
-
Save the CTTVTM procedure under the name CTTVTM2, and rename the CTTVTMB procedure in the procedure library to CTTVTM.
-
The new CTTVTM procedure contains a step (CTTRBM) that activates the interface to the IBM automated tape libraries.
-
Use the ICE Automatic Exit Installation Tool (described in the exits chapter of the INCONTROL for z/OS Administrator Guide) to compile the CTTOAM member. CTTOAM contains the code necessary for interfacing with the IBM OAM-managed automated tape libraries software.
User Exits
The sample user exits in Table 23 (located in the IOA SAMPEXIT library) can optionally be installed as part of the Control-M/Tape to OAM interface.
After compiling and linking the following sample exits, put the output modules in the LNKLST, as stated in the relevant IBM DFSMS Object Access Method documentation.
Table 23 Sample user exits
|
Exit |
Description |
|---|---|
|
CBRUXCUA |
Change Use Attribute Allows a change in the use attribute of a volume (SCRATCH to ACTIVE and vice versa) only if this change has already been recorded in the Media Database. Implementation of this exit helps maintain Media Database integrity. |
|
CBRUXEJC |
Tape Eject Turns off the IN-ATL status bit in the volume record of ejected volumes. |
|
CBRUXENT |
Tape Entry This exit does the following:
If the volume is not defined in the Media Database the status is set to ACTIVE (default). However, if the automated tape library is shared with another environment (for example, another Control-M/Tape environment with a separate Media Database), it may be necessary to allow the other environment to set the volume’s status. If it is necessary to allow the other environment to set the volume’s status, do not compile and link the exit before changing the &NOTINCTT parameter setting from P (PRIVATE) to I (IGNORE), as follows: In the sample Exit CBRUXENT, in the IOA SAMPLE library, change. Copy
This sample sets the RECORDING-TECHNIQUE field (UXEREC) to UNKNOWN (that is, to UXENOREC) if no information is available. BMC recommends that you set your own default value by modifying the line marked @TRT. Valid values are listed after the UXENOREC label in the SYS1.MODGEN (CBRUXEPL) member. |
|
CBRUXVNL |
|
|
Volume Not In Library Issues a message to the operator with the volume location (as recorded in the Media Database). On receipt of this message, the operator can insert the volume into the automated tape library and reply R (retry) to continue. This exit should only be implemented at sites where all mount requests are normally handled by the automated tape library. Implementing this exit at site that often requires mounts outside the automated tape library, results in unnecessary messages. |
IBM Libraries With Basic Tape Library Support (BTLS)
-
Specify BTLS as one of the values for the RBTTYPE parameter in CTTPARM (through Control-M/Tape step 2.10 in ICE).
-
Edit the CTTBTLS member in the IOA SAMPEXIT library and make the following changes:
-
Assign one of the BTLS library units to the BTLSUNIT parameter:
CopyBTLSUNIT EQU C’123’ <=== DEFINE AUTOMATED TAPE LIBRARY UNIT ADDRESS -
If you are using 4-digit device addresses, change the value specified for the BTLSDIGS parameter from 3 to 4 using the following statement:
CopyBTLSDIGS EQU 4 <=== NUM OF DIGITS IN UNIT ADDR (3/4)If 1AB2 is the address of one of your automated tape library units, the parameters section should include the following statements:
CopyBTLSUNIT EQU C'1AB2' <=== DEFINE AUTOMATED TAPE LIBRARY UNIT ADDRESS
BTLSDIGS EQU 4 <=== NUM OF DIGITS IN UNIT ADDRESS (3/4)
-
-
Use the ICE Automatic Exit Installation Tool (described in the exits chapter of the INCONTROL for z/OS Administrator Guide) to compile the CTTBTLS member. The CTTBTLS member contains the code necessary for interfacing with the IBM automated tape library.
-
Add BTLSIN and BTLSOUT DDstatements to the CTTRBM step in the procedures for the CTTVTM and CTTRTM utilities.
-
The BTLSIN DDstatement must point to a temporary file.
-
The BTLSOUT DDstatement must point to a SYSOUT file.
If SYSDA is used as a temporary DASD unit, and BTLS messages should be printed to the default MSGCLASS SYSOUT class, the above mentioned DDstatements should be as follows:
Copy//BTLSIN DD UNIT=SYSDA,SPACE=(TRK,1)
//BTLSOUT DD SYSOUT=*
-
-
Add the BTLSIN and BTLSOUT DDstatements (described above) to the IOA functional Monitor procedure.
-
Add the BTLSIN and BTLSOUT DDstatements (described above) to your CTTMUP procedure to ensure support for functions VOLSCR and GRPSCR of the CTTMUP utility.
SUTMYN Library Managed by LMS
Use the following steps to implement the Control-M/Tape interface to a SUTMYN automated tape library (formerly called MEMOREX/Telex) at your site.
A batch interface between Control-M/Tape and a SUTMYN automated tape library that synchronizes the CDS (that is, the automated tape library database) with the Control-M/Tape Media Database can also be implemented at your site through an exit supplied with the SUTMYN automated tape library software (LMS). For more information, see your SUTMYN documentation.
-
Specify SUTMYN as one of the values for the RBTTYPE parameter in the CTTPARM member (through Control-M/Tape step 2.10 in ICE).
-
Use the ICE Automatic Exit Installation Tool (described in the exits chapter of the INCONTROL for z/OS Administrator Guide) to compile the CTTMMRX member. The CTTMMRX member contains the code necessary for interfacing with the SUTMYN ATL software (LMS).
-
Save the CTTRTM procedure under the name CTTRTM2. Rename the CTTRTMB procedure in the procedure library to CTTRTM. The new CTTRTM procedure contains an additional step (CTTRBM) that interfaces with LMS.
-
Save the CTTVTM procedure under the name CTTVTM2. Rename the CTTVTMB procedure in the procedure library to CTTVTM. The new CTTVTM procedure contains an additional step (CTTRBM) that interfaces with LMS.
-
Adjust procedures that access the automated tape library.
-
the CTTRBM step in the CTTRTM and CTTVTM utilities
-
the CTTSYNC utility
-
the IOA Functional Monitor procedure (IOAFMON)
In order to add the required library to the STEPLIB, edit the procedure of the utility at IOA.PROCLIB library, remove the line 'INCLUDE MEMBER=&IOAENV' and instead add the following lines:
Copy//STEPLIB DD DISP=SHR,DSN=&STEPLIB
// DD DISP=SHR,DSN=robotic-tape-library-load-library
//DAPARM DD DISP=SHR,DSN=&ILPREFA..PARM
// DD DISP=SHR,DSN=&ILPREFA..IOAENV -
If you have implemented EDM support (for example, using the ARCTVEXT exit for HSM or the TMSCTLEX exit for SAMS:Disk), the LMS load library should be added to the HSM, or SAMS:Disk STEPLIB procedure.
Control-M/Tape uses the LMS API to access the automated library and to update the LMS Control Dataset (CDS). If the LMS load library is not in the MVS linklist, it should be added to the STEPLIB DDstatement of all procedures that access the automated tape library.
The list of procedures that may access the automated library includes:
ADIC Automated Tape Libraries Managed by HACC
Use the following steps to implement the Control-M/Tape interface to an ADIC (formerly EMASS/GRAU) automated tape library at your site:
A batch interface between Control-M/Tape and the HACC software that synchronizes the CDS (that is, the automated tape library database) with the Control-M/Tape Media Database can also be implemented at your site through an exit supplied with the HACC software. For more information, see the HACC Installation and Customization Reference.
-
Specify HACC as one of the values for the RBTTYPE parameter in the CTTPARM member (through Control-M/Tape step 2.10 in ICE).
-
Use the ICE Automatic Exit Installation Tool (described in the exits chapter of the INCONTROL for z/OS Administrator Guide) to compile the CTTHACC member. The CTTHACC member contains the code necessary for interfacing with the HACC software.
-
Save the CTTRTM procedure under the name CTTRTM2. Rename the CTTRTMB procedure in the procedure library to CTTRTM. The new CTTRTM procedure contains an additional step (CTTRBM) that interfaces with HACC.
-
Save the CTTVTM procedure under the name CTTVTM2. Rename the CTTVTMB procedure in the procedure library to CTTVTM. The new CTTVTM procedure contains an additional step (CTTRBM) that interfaces with HACC.
-
Adjust procedures that access the automated tape library.
Control-M/Tape uses the HACC API to access the automated tape library and to update the HACC Control Dataset (CDS).
-
If the HACC load library is not in the LINKLIST, it should be added to the STEPLIB DDstatement of all procedures that access the automated tape library.
-
If the HACC parameters are defined in another library other than SYS1.PROCLIB, then the following DD card should be added:
CopyHACCPARM DD DSN=dsname,DISP=SHRwhere dsname is the library where the HACPARM1 member is searched, or
CopyHACCPARM DD DSN=dsname(memname),DISP=SHR
where dsname is the library and memname is the member that contain HACC parameters.
-
The following DD card should also be added to all the environments that may access the library:
CopyHACCOUT DD SYSOUT=*The list of procedures that may access the automated tape library includes:
-
the CTTRBM step in the CTTRTM and CTTVTM utilities
-
the CTTSYNC utility
-
the IOA Functional Monitor procedure (IOAFMON)
In order to add the required library to the STEPLIB, edit the procedure of the utility at IOA.PROCLIB library, remove the line 'INCLUDE MEMBER=&IOAENV' and instead add the following lines:
Copy//STEPLIB DD DISP=SHR,DSN=&STEPLIB
// DD DISP=SHR,DSN=robotic-tape-library-load-library
//DAPARM DD DISP=SHR,DSN=&ILPREFA..PARM
// DD DISP=SHR,DSN=&ILPREFA..IOAENVIf you have implemented EDM support (for example, using the ARCTVEXT exit for DFSMShsm or the TMSCTLEX exit for CA-Disk), the HACC load library should be added to the DFSMShsm, or CA-Disk procedure STEPLIB.
-
-
-
Implement HACC exits.
Control-M/Tape uses HACC Insert and Eject exits to update the IN-ATL status in volume records of the Media Database. Implement these exits through the following steps:
-
Use the ICE Automatic Exit Installation Tool (described in the exits chapter of the INCONTROL for z/OS Administrator Guide) to compile the CTTHACVI (the Insert exit) and CTTHACEJ (the Eject exit) members.
-
Include the expressions VIEXIT=CTTHACVI and EJEXIT=CTTHACEJ in the HACPARM statements in the HACPARM installation library.
-
Add the IOA LOAD library to the STEPLIB DDstatement of the HACC procedure.
-
FUJITSU MTLs Managed by LIBSP
Use the following steps to implement the Control-M/Tape interface to a FUJITSU automated tape library at your site:
The Control-M/Tape interface to LIBSP can be installed only after the LIBSP support for the Control-M/Tape mount messages is installed. Contact your LIBSP vendor for more information.
-
Specify FUJITSU as one of the values for the RBTTYPE parameter in the CTTPARM member (through Control-M/Tape step 2.10 in ICE).
-
Edit the CTTFUJI member in the IOA SAMPLE library. Locate the following lines:
Copy**********************************************************************
* PLEASE SET THE LIBVER PARM BELOW: *
* 1 - FOR LIBSP V1 *
* 2 - FOR LIBSP V2 *
**********************************************************************
&LIBVER SETC '1' <=== CHANGE - LIBSP RELEASE (1/2)Set the &LIBVER parameter to ‘1’ if you are using LIBSP V1. Set this parameter to ‘2’ for LIBSP V2 or higher.
-
Use the ICE Automatic Exit Installation Tool (described in the exits chapter of the INCONTROL for z/OS Administrator Guide) to compile the CTTFUJI member. The CTTFUJI member contains the code necessary for interfacing with the LIBSP software.
-
Save the CTTRTM procedure under the name CTTRTM2. Rename the CTTRTMB procedure in the procedure library to CTTRTM. The new CTTRTM procedure contains an additional step (CTTRBM) that interfaces with LIBSP.
-
Edit the CTTVTMF member in the IOA PROCLIB library. Locate the following lines:
Copy//*
//* FUJITSU LIBSP LIBRARY UTILITY
//*
//VTMFUJI EXEC PGM=KBLLIBU,COND=(4,LE,EJCTCHK) <== CHANGE (LIBSP V1)
//*TMFUJI EXEC PGM=KJJLIBU,COND=(4,LE,EJCTCHK) <== CHANGE (LIBSP V2)
//KBLCDS1 DD DISP=SHR,DSN=SYS1.LIBSP.CDS1 <== CHANGE/REMOVE
//KBLCDS2 DD DISP=SHR,DSN=SYS1.LIBSP.CDS2 <== CHANGE/REMOVE -
Set the PGM name according to the LIBSP level you are using
-
PGM=KBLLIBU for LIBSP V1
-
PGM=KJJLIBU for LIBSP V2 or above
-
If you are using LIBSP V1, modify the CDS name in the KBLCDS1 and KBLCDS2 DDstatements to the name of your CDS. A KBLCDS2 DDstatement is needed only if you are using DUAL CDS OPERATION. If this is not the case, the KBLCDS2 DDstatement should be removed from the procedure.
-
If you are using LIBSP V2 or above, remove both KBLCDS1 and KBLCDS2 DDstatements from the CTTVTMF member.
-
-
Save the CTTVTMF member.
-
Save the CTTVTM procedure under the name CTTVTM2. Rename the CTTVTMF procedure (edited in the previous step) in the procedure library to CTTVTM. The new CTTVTM procedure contains a step (CTTRBM) that interfaces with LIBSP.
-
Adjust procedures that access the automated tape library.
The following procedures may access the automated tape library:
Control-M/Tape uses the LIBSP API to access the automated tape library and to update the LIBSP Control Dataset (CDS). If the LIBSP load library is not in the MVS linklist, it should be added to the STEPLIB step of all procedures that access the automated tape library.
-
the CTTRBM step in the CTTRTM and CTTVTM utilities
-
the CTTSYNC utility
-
the IOA Functional Monitor procedure (IOAFMON)
-
if you have implemented EDM support (for example, using the ARCTVEXT exit for DFSMShsm, or the TMSCTLEX exit for CA-Disk), the LIBSP load library should be added to the DFSMShsm or CA-Disk procedure STEPLIB, as appropriate.
In order to add the required library to the STEPLIB, edit the procedure of the utility at IOA.PROCLIB library, remove the line 'INCLUDE MEMBER=&IOAENV' and instead add the following lines:
Copy//STEPLIB DD DISP=SHR,DSN=&STEPLIB//
DD DISP=SHR,DSN=robotic-tape-library-load-library//DAPARM
DD DISP=SHR,DSN=&ILPREFA..PARM//
DD DISP=SHR,DSN=&ILPREFA..IOAENVIf you are using LIBSP V1, add the following DDstatements to the above procedures:
Copy//KBLCDS1 DD DISP=SHR,DSN=SYS1.LIBSP.CDS1//KBLCDS2
DD DISP=SHR,DSN=SYS1.LIBSP.CDS2KBLCDS2 is needed only if DUAL CDS OPERATION is used. If this is not the case, the KBLCDS2 DDstatement should be removed.
-
-
Add the following DDstatement (if it does not already exist) to the above procedures:
Copy//DAPOOLS DD DISP=SHR,DSN=ilpreft.PARM($$POOL)where ilpreft is the value specified for the %ILPREFT% parameter in the DEFPARM member. (Note that this DDstatement can be copied from the CTTINIT procedure.)
-
Ensure that Control-M/Tape and LIBSP use identical pool definitions. Note that LIBSP limits pool names to a maximum length of six characters. Therefore, pool names specified to Control-M/Tape should not be longer than six characters.
Comparex Library Managed by HAS
The interface between Control-M/Tape and HAS is implemented by the Comparex library vendor and is available for HAS version 2.2.1 and later.
Contact your automated tape library vendor for more information.
When an External Data Manager (EDM) is set to scratch volumes immediately, HAS is not notified of the scratched tapes. It is therefore recommended that the EDM exit (such as ARCTVEXT for DFSMShsm) scratch volumes in deferred mode. When deferred mode is used, EDM volumes are given the status PENDING SCRATCH by the EDM exit, and are scratched by utility CTTRTM the next time it is run, at which time HAS is notified.
Export/Import Interface in a VTS Environment
VTS Export/Import Interface
VTS (Virtual Tape Server) logical volumes cannot be vaulted unless they are exported onto physical tapes. Control-M/Tape automatically initiates the VTS Export/Import interface to export VTS logical volumes out of the VTS environment and to stack and vault those volumes onto physical tapes.
When exporting logical volumes, Control-M/Tape groups together volumes with similar vaulting patterns. Each group is then written to separate physical tapes to be sent to different vaults, as necessary.
Logical volumes are grouped together for export using one of the following criteria:
-
if their first DO VAULT value and associated retention specification (UNTIL subparameter) are the same
-
only if the entire vaulting pattern for each logical volume is the same
The criteria used for grouping logical volumes are set with the TYPERUN MODE parameter in the VTSVLTIN member in the CTT PARM library. For more information, see below
Implementing the VTS Export/Import Interface
To implement the VTS Export/Import interface, modify the CTTVTM procedure as follows:
-
Rename the CTTVTM procedure as CTTVTM2.
-
Rename the CTTVTMV procedure as CTTVTM. The new CTTVTM contains steps CTTVVM and CTTVEXP, that you need to modify (as described later in this procedure).
-
The VTSVLTIN member in the CTT PARM library contains control statements with the following syntax:
Table 24 The VTSVLTIN Member Control Statements
-
Specify which TYPERUN MODE is used for exporting logical volumes (FIRSTVLT or ALLVLT). For example:
CopyTYPERUN MODE=FIRSTVLTWhen grouping logical volumes by their entire vaulting patterns with the TYPERUN MODE=ALLVLT statement, only volumes currently located within the first 10 vaults in the vaulting pattern are compared. Logical volumes located in a vault beyond the 10th vault are not exported. Grouping logical volumes by their first VAULT parameter and retention specification (TYPERUNMODE=FIRSTVLT) may prevent exclusion of logical volumes that are vaulted beyond the 10th vault.
For both TYPERUN MODEs, logical volumes that have non-specific retention specifications (such as MVS CATALOG or LAST ACCESS) are not grouped for export through VTS. Instead, each of these logical volumes are exported to their own separate tapes. This is to avoid the case where logical volumes would be grouped together on the same physical tape, but would possibly be required to be sent to different locations or on different dates due to the different values of their non-specific retention specifications.
Because logical volumes with non-specific retention specifications are exported to their own physical tapes, physical tapes within the VTS machine would be consumed faster than desirable. It is therefore recommended that you only export tapes with the VTS Export/Import Interface that have specific retention specifications (such as DATE or DAYS), by modifying the appropriate DO VAULT statements.
-
Specify the RANGE of volsers that reside in the Virtual Tape Server (VTS). Add additional RANGE statements as necessary. When Control-M/Tape exports logical volumes, only tapes inside these ranges are compared for export. For example:
CopyRANGE FROM=VOL001,TO=VOL005
RANGE FROM=VOL011,TO=VOL015
RANGE FROM=VOL021,TO=VOL025Do the following in the CTTVVM step of the new CTTVTM procedure:
-
Make the required changes in the EXPLIST DD statement.
The EXPLIST DD statement should refer to a scratch logical volser inside the VTS. This volser is the Export List Volume used by the VTS Export command.
-
Make the required changes in the RESFILE and EXPSTAT DD statements.
These DD statements should refer to the same volser as in EXPLIST.
-
Make the required changes in the IMPLIST DD statement.
The IMPLIST DD statement should refer to a scratch logical volser inside the VTS that is not the same scratch logical volser as referred to in step 5A. This volser is the Import List Volume produced during the VTS Export process.
-
Make the required changes in the IMPSTAT DD statement.
The IMPSTAT DD statement should refer to the same volser as was referred to in the IMPLIST DD statement, in step 5C.
-
-
In step CTTVEXP of the new CTTVTM procedure, make the required changes to DD statement EXPSTAT. This DD statement refers to the same Export List Volume as referred to in DD statement EXPLIST in step CTTVVM.
|
Statement |
Description |
|---|---|
|
TYPERUN MODE=[FIRSTVLT/ALLVLT] |
TYPRUN MODE indicates how logical volumes are to be checked and grouped for export. Valid values are: FIRSTVLT indicates that logical volumes with the same first DO VAULT value and retention specification are grouped together for export. Default. ALLVLT indicates that only logical volumes with the same entire vaulting pattern are grouped together for export. |
|
RANGE FROM=beg_volser,TO=end_volser |
FROM specifies the beginning of the volume serial number (volser) range. TO specifies the end of the volser range. |
VTS Export/Import Process
Based on the implementation of the VTS Export/Import interface, the VTS Export/Import process occurs as follows:
Daily Run of the Control-M/Tape Vault Management Facility
Once the changes to the VTSVLTIN member and the changes to the CTTVVM and CTTVEXP steps of the CTTVTM procedure have been implemented, the procedures are executed as part of the normal daily run of the Control-M/Tape vault management facility. This includes the entire CTTVTM utility (the Control-M/Tape vault management utility) and the CTTRBM module. Steps CTTVVM and CTTVEXP run after the CTTRBM module runs.
If you run only one CTTVTM session within the CTTVTM utility, the distribution reports that are produced by this CTTVTM session contain both regular tapes and VTS logical tapes. When reading through these distribution reports, it is difficult for the operator to identify the VTS logical tapes that require vaulting. To avoid this problem, it is recommended that you run two different CTTVTM sessions, where the first session excludes all VTS tapes (using the EXCLUDE statement) while the second session includes only the VTS tapes (using the INCLUDE statement). Using this strategy, steps CTTVVM and CTTVEXP would only be run as a part of the second session. As a result, CTTVTM produces separate distribution reports that exclude and include VTS logical tapes, respectively.
For more information about the CTTVTM utility, see the Control-M/Tape chapter of the INCONTROL for z/OS Utilities Guide. For more information about the CTTRBM module, see The CTTRBM Module.
The CTTVVM Step
From the list of tapes that were vaulted by the CTTVTM utility, CTTVVM selects logical volumes to be exported to physical tapes based on the value of TYPERUN MODE (either FIRSTVLT or ALLVLT) and the RANGE of volsers within the VTS, as defined in the VTSVLTIN member. Logical volumes that are not inside this RANGE or that were not moved from location ‘mainlib’ by CTTVTM are not compared for export.
CTTVVM uses the selected set of logical volumes to create the Export List Volume and the Import List Volume. The Export List Volume is used by step CTTVEXP to initiate the VTS Export command. The Import List Volume report contains a list of the physical volumes and the logical volumes that reside on them. The volumes on the Import List Volume are imported when the user later initiates the Import command, which is described in "Import Procedure" below.
After the Import List Volume is produced, a message similar to the following is displayed at the console:
CTT347I IMPORT LIST VOLUME CREATED ON VOLSER VOL0011The CTTVEXP Step
After the CTTVVM step finishes running, the CTTVEXP step initiates the Export command and the selected logical volumes are then written to physical tapes. This procedure may take some time, depending on the number of tapes to be written.
When all the tapes have been written, a message is issued by the OAM at the console indicating that the procedure has finished. Based on the information from the Export Status File that had been written by the VTS to the Export List Volume, the CTTVEXP step produces a report that lists the following:
-
All the exported logical volumes, their corresponding physical tapes, and the destination (vaults) of these tapes.
-
Any logical volumes that failed to be exported along with the reason for the failure.
Import Procedure
To import logical volumes back to the VTS environment, perform the following steps:
-
Select and then load the physical tapes onto the VTS based on the information in the Import List Volume.
-
Issue the Import command at the MVS console, referring to the volser as displayed in the CTT347I message during the CTTVVM step (see "The CTTVVM Step" above).
-
For more information on loading tapes and issuing the Import command, refer to the organization and administration chapter of the Control-M/Tape User Guide.
 Communities
 Support Center
 YouTube
 Twitter
 Facebook
 LinkedIn