Phase 5: Implementation of System Administration Tasks
We will detail the options for setting up the backup and restore missions of Control-D, which are responsible for report archive and retrieval. The Control-D utilities, which are responsible for managing the User Report files, are also described.
Some of the questions we will be answering in this phase are:
-
What are User Report List files?
-
What is stored in the User Report List files?
-
How long am I allowed access to reports for viewing?
-
What utilities manage the User Report List files?
-
What are backup missions?
-
How many backup missions do I need?
-
Where are backup missions defined?
-
For how long should I back up reports?
-
What are the parameters of the backup missions?
-
What are restore missions?
-
Where are restore missions defined?
-
How often should I restore reports?
-
What are the parameters of the restore missions?
Inputs
Before you start this phase you should have tested your report decollating missions (Phase 3).
Outputs
At the end of this phase you will have:
-
Implemented the Control-D "housekeeping" utilities.
-
Set the SEARCH default using optional Control-D Wish WD0933.
-
Defined, tested and implemented backup procedures.
-
Defined, tested and implemented restore procedures.
File Management Overview
The first step of this phase is to describe which components are involved in the file management of Control-D. If you understand the structure and purpose of the Control-D files, you will be better able to control the files.
There are three files that constitute the Control-D User Report List files. We will give recommendations and options on the control and usage of the files, examine what information they hold, and how the information is used by Control-D.
We will also examine the links between the User Report List files and the compressed datasets (CDAMs) that Control-D creates. The four topics in this section are:
-
CDAM files
-
Active User Report List file
-
History User Report List file
-
Permanent User Report List file
Figure 28 Control-D User Report List Files
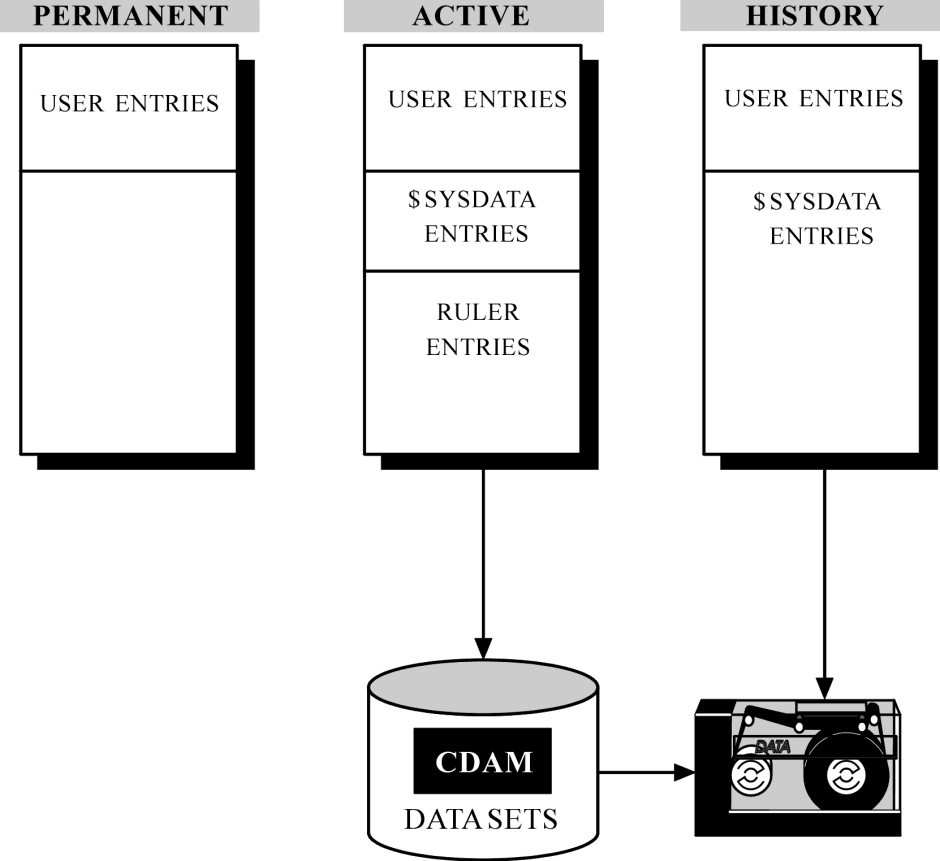
CDAM Files
CDAM files are the main storage mechanism for all reports handled by Control-D.
Control-D automatically creates compressed versions of reports into CDAM files as Control-D decollates the output from the spool (you can of course use the CDAM direct-write option to bypass the spool altogether). These compressed datasets allow for a reduction of between 30% to 70% of the space allocated for the report.
Normally, a CDAM file is created for every JES dataset that Control-D handles. This can be overridden using the CDAM allocation options that we will discuss in Phase 7. At this stage, let us assume that one CDAM dataset is created per JES dataset.
We recommend that CDAM files be kept on DASD for a minimal amount of time. This is normally determined by the length of time that the report output needs to be viewed online by the users. Control-D archives CDAM datasets to tape using backup missions. However, the backup missions only copy the CDAM files to tape, they do not delete them from disk. This method provides the great advantage of having a backup of reports while they are still on DASD for online viewing purposes (in case of a DASD crash).
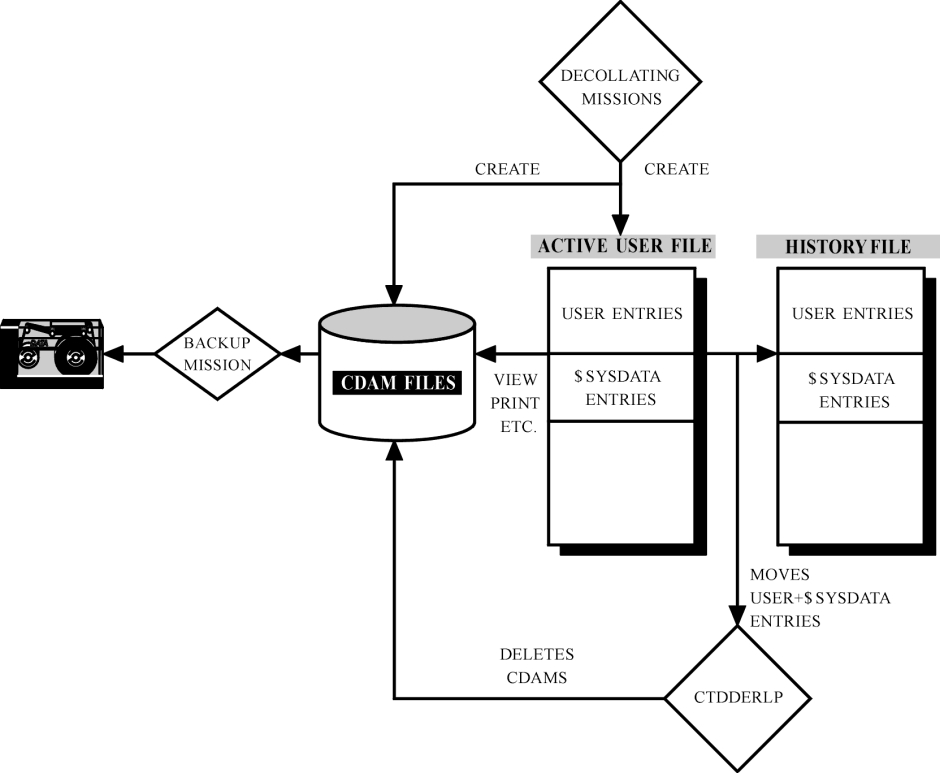
A special utility called CTDDELRP is available to delete CDAM datasets from disk.
Active User Report List File
The Active User Report List file is where entries are created and stored based on your report decollating missions. These entries enable users to access their assigned report output. It is from this file that a user can view report output and request selective print functions. There are three types of entries that exist in this file:
-
User Entries
-
$SYSDATA Entries
-
Ruler Entries
These entries contain no physical report output. They are only "pointers" that describe locations in the CDAM files.
Figure 29 Active User Report List File
User Entries
A user entry describes which specific parts of a CDAM file a user can view or print. The user entry is created by the report decollating missions using the separation criteria you define. In the following example, we have specified that three users should receive pages marked with specific strings:
Sample Definition
  ON CLASS      = T         EXTWTR               DEST          FORM
  PRT COPIES    LVL    USER                      DEST          MAX COPIES
      PRINT/CDAM PARMS =
  WHEN LINE   006 - 006   COL   016 - 019   PRINT   REF NXT   CT     AND/OR
       STRING = 1001
    DO USER     = BR11                  LVL    LINE     COL     -     S   T
                                        SYNONYM =       CONCAT =
    DO NAME     = INVENTORY-FOR-1001           LINE     COL
    DO
  WHEN LINE   006 - 006   COL   016 - 019   PRINT   REF NXT   CT     AND/OR
       STRING = 1002
    DO USER     = BR12                  LVL    LINE     COL     -     S   T
                                        SYNONYM =       CONCAT =
    DO NAME     = INVENTORY-FOR-1002           LINE     COL
    DO
  WHEN LINE   006 - 006   COL   016 - 019   PRINT   REF NXT   CT     AND/OR
       STRING = 1003
    DO USER     = BR13                  LVL    LINE     COL     -     S   T
                                        SYNONYM =       CONCAT =
    DO NAME     = INVENTORY-FOR-1003           LINE     COL
    DO
From this definition, the following user entries are created in the Active User Report List file:
ACTIVE LIST    <D> JOB JOB6     REP                      USR          CHILD (U)
COMMAND ===>                                                    SCROLL===> CRSR
O USER     REPORT               ODATE     PAGES    LINES V N STATUS
  BR11     INVENTORY-FOR-1001   07/04/00      3      137     Decollated
  BR12     INVENTORY-FOR-1002   07/04/00      4      185     Decollated
  BR13     INVENTORY-FOR-1003   07/04/00      3      145     Decollated
====== >>>>>>>>>>>>>>>>>> NO MORE REPORTS IN THE LIST <<<<<<<<<<<<<<<<<< ======
P PRINT     V VIEW     U UPDATE     I INSERT     A ADD INFO     E EDIT
X INDEX     N NOTE     G GIVETO     D DELETE     Q QUICK ACCESS       13.16.13
These entries contain pointers to the various pages that were allocated to each user. Even though all the pages were from the same report and reside together in the same CDAM dataset, user-specific pages can be accessed and viewed and, if required, selectively printed, only by the designated user.
$SYSDATA Entries
Special entries are created in the Active User Report List file that describe every CDAM file created. These are called the $SYSDATA entries and provide the ability to access the entire contents of a CDAM file.
The $SYSDATA entries allow us to see all the output contained in a CDAM file (that is, the whole report before decollation), rather than sections of the report allocated to a user entry. This is important from an administration point of view to allow you to access the entire report as it was originally created.
Defining $SYSDATA Authorization
To view reports online you must authorize the user in the recipient tree. You can use the AUTHORIZE parameter to specify which user IDs can access report output (user entries). We also use the AUTHORIZE parameter to specify which user IDs can access $SYSDATA entries.
The following definition shows that three userids are authorized to access the user entries (reports) allocated to the recipient name BR11 (and, by default, the children of BR11). However, they are not authorized to access the $SYSDATA entries.
Recipient Definition Screen for Recipient BR11
------------------------ CONTROL-D RECIPIENT DEFINITION -------------------(T.S)
COMMAND ===>                                                    SCROLL===> CRSR
+-----------------------------------------------------------------------------+
  RECIPIENT BR11       RECIPIENT LEVEL 25   PARENT OPSADMIN    PARENT LEVEL 10
  DESC THIS IS THE MIAMI BRANCH
  DESC
=============================================================================
  SYNONYM 1001
  SYNONYM
  AUTHORIZE TS0032     $SYSDATA N
  AUTHORIZE TS0004     $SYSDATA N
  AUTHORIZE TS0015     $SYSDATA N
  AUTHORIZE            $SYSDATA
  ADDRESS BRANCH 11
  ADDRESS 110 GLENDALE DRIVE
  ADDRESS MIAMI
  ADDRESS MI40 4PP
  ADDRESS
=============================================================================
  INDEX                USER BANNER Y                    REPORT BANNER Y
  DEF DEST
=============================================================================
                        P C   P A R A M E T E R S
   AUTHORIZED N
======= >>>>>>>>>>>> END OF RECIPIENT DEFINITION PARAMETERS <<<<<<<<<<<< ====
FILL IN RECIPIENT DEFINITION.                                         12.04.48
We will provide further recommendations about the AUTHORIZE field in Phase 9, when you will determine which users will view which Recipient output. For the moment, you should ensure that all user IDs of the Control-D implementation team are authorized as required.
The $SYSDATA entries are not designed for use by end users but are intended as an administration tool. We strongly recommend that only Control-D administration users be authorized to view the $SYSDATA records.
Accessing $SYSDATA Entries
To view the $SYSDATA entries, specify $SYSDATA in the USER field of the Control-D User Reports Entry Panel (Option U in the IOA Primary Option menu). You will then be presented with a list of all the $SYSDATA entries. For example:
$SYSDATA Display of the Active User Report List File
 ACTIVE LIST    <D> JOB          REP                      USR $SYSDATA CHILD (U)
 COMMAND ===>                                                    SCROLL===> CRSR
 O JOB       JNUM PROCSTEP PGMSTEP  DDNAME    PAGES    LINES DECOLLATION-TIME
   MZRPYMBC  9439 S1                SYSUT2        4      240 09/01/00 - 11:32
   JPO1020D  9446 S1                REPORTS       4      240 09/01/00 - 11:49
   MZRPYMBC  9447 S1                STEP1         4      240 09/01/00 - 11:57
   JAC1040M  9482 S1                SYSUT2        4      240 09/01/00 - 12:07
   M0004T05   358 STEP1             SYSUT2        1       37 09/12/00 - 15:47
   M02INSR1  3279 STEP1             SYSUT2        9      427 07/04/00 - 18:54
   M02INSR1  3279 STEP2             SYSUT2        8      328 07/04/00 - 18:54
   M16COMP    657 JES2              $JES2LOG      1       26 02/01/00 - 19:51
   M16COMP    657 JES2              $JCLIMG       1       31 02/01/00 - 19:51
   M16COMP    657 JES2              $SYSMSGS      1       94 02/01/00 - 19:51
   M16COMP    657 CS                SYSTSPRT      1        5 02/01/00 - 19:51
   M16COMP    657 COMP              SYSPRINT     14      705 02/01/00 - 19:51
   M16COMP    657 COMP              PRTDBG        1        6 02/01/00 - 19:51
   M20BGEN1  6128 D2PTROLD          OUT01         1       15 06/02/00 - 19:17
 ====== >>>>>>>>>>>>>>>   B O T T O M    O F    L I S T   <<<<<<<<<<<<<<< ======
P PRINT     V VIEW     U UPDATE     I INSERT     A ADD INFO     E EDIT
X INDEX     N NOTE     G GIVETO     D DELETE     Q QUICK ACCESS       12.09.25
This list identifies output at the CDAM dataset level, that is, when you view an entry, you see the whole report as it was originally created.
In some countries a different character may represent the SYSDATA prefix, such as in the United Kingdom where the pound sign is used.
Ruler Entries
Users can define different views of the reports allocated to them in the user entries. The different views that they create are called Rulers. This is a very powerful end user tool for manipulating data for productive online viewing and selective printing. We will discuss the ruler entries in further detail in Phase 9.
Utility CTDDELRP
The main reason we keep user entries in the Active User Report List file is to enable users to view report output. When a user views a report online, what is actually being viewed are assigned locations in a CDAM dataset. The longer you keep user entries in the Active User Report List file the longer the CDAM files exist on DASD.
To avoid consuming too much of the DASD resource, we use utility CTDDELRP to delete CDAM datasets from DASD. CTDDELRP also moves entries in the Active User Report List file to the History User Report List file. This provides the user with a list of archived reports that can be selected for restoration if required.
CTDDELRP Actions
Using utility CTDDELRP, you can specify how long user entries should remain in the Active User Report List file (this also determines the length of time a report can be viewed online). When a report has been online for its specified duration, it is deleted. The utility is composed of three steps, as listed below:
-
Deletes selected user and $SYSDATA records from the Active User Report List file.
-
Adds the deleted records from the Active file to the History User Report List file.
-
Deletes the associated CDAM datasets (connected to the deleted user and $SYSDATA entries) from disk.
-
The selection criteria for deleting entries from the Active User Report List file (input for STEP1) can be different for each user, report name, job name, class, and so on. For a full list of selection criteria parameters, see the CTDDELRP utility in the Control-D and Control-V chapter of the INCONTROL for z/OS Utilities Guide.
-
At this stage of the implementation, we recommend that you set up utility CTDDELRP with the following selection parameters:
DAYS 1
-
This means that all entries in the Active User Report List file older than one day will be deleted. Entries that have not been backed up will not be deleted. We recommend that you run this utility on a daily basis. There is a sample job in member CTDDELRP in the Control-D JCL library. We will define the CTDDELRP parameters further when we reach Phase 9.
Table 32 Entry Deletion Rules
|
Entry Type |
How Deletions Are Handled |
|---|---|
|
User entries |
Are optionally moved to the History User Report List file if archive was requested in the Report decollating mission (depending on the supplied selection parameters in CTDDELRP) and deleted. |
|
$SYSDATA entries |
Are deleted, and then moved to the History User Report List file (if archived) when all related user entries (that is, all user entries pointing to the $SYSDATA) have been deleted and moved to the History User Report List file. |
|
CDAM datasets |
Are deleted from DASD when the associated $SYSDATA entry describing them has been deleted and moved to the History User Report List file. |
History User Report List File
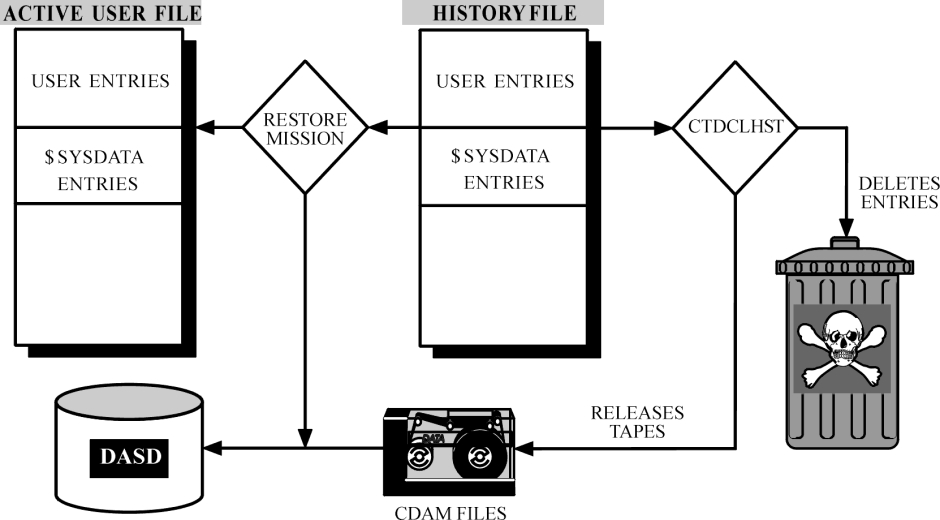
The History User Report List file is the location to which all user and $SYSDATA entries are moved, if archived. The CTDDELRP utility moves the entries to this file. The entries in this file contain information about where their reports reside, that is, the name of the CDAM file and to which volume it has been archived, depending on the backup utility used.
Entries remain in this file for the amount of time specified in the backup mission. When that time has passed, the entries are deleted by the CTDCLHST utility, which also releases the tapes or cartridges back into the system (that is, it makes the tapes and cartridges available again).
Users can request that a particular report be restored from the History User Report List file. The users can either specify the name of the restore mission that will perform this process, or use the default. The restore mission restores CDAM files to disk and moves a copy of the user and $SYSDATA entries.
There are two types of entries that exist in this file:
-
User entries
-
$SYSDATA entries
Figure 30 History User Report List File
History User Report List Display
 HISTORY LIST   <D> JOB          REP                      USR          CHILD (U)
 COMMAND ===>                                                    SCROLL===> CRSR
 O USER     REPORT               ODATE     PAGES    LINES   STATUS
   BR11     HI ACCTS REPORT      04/01/00      4       97   Backed up
   BR11     HI ACCTS REPORT      04/02/00      3       46   Wait restore
   BR11     INVENTORY-FOR-1001   04/01/00      4       97   Backed up
   BR12     INVENTORY-FOR-1002   04/01/00      1        3   Backed up
   BR12     INVENTORY-FOR-1002   04/02/00      1        3   Wait restore
   BR12     INVENTORY-FOR-1002   04/03/00     28      903   Restored
   BR12     SUMMARY ACCTS        04/02/00    398     1194   Backed up
   BR13     INVENTORY-FOR-1003   04/01/00      4       90   Restored
   BR13     INVENTORY-FOR-1003   04/01/00    123     6394   Backed up
   BR13     INVENTORY-FOR-1003   04/01/00    398     1194   Backed up
 ====== >>>>>>>>>>>>>>>>>> NO MORE REPORTS IN THE LIST <<<<<<<<<<<<<<<<<< ======
OPTIONS: R RESTORE  C NO-RESTORE U UPDATE  D DELETE  A ADD INFO        11.02.43
No output can be viewed from this file; its sole purpose is to track and retain information about archived reports and allow restore requests to be issued.
CTDCLHST Utility
CTDCLHST, the "Clear History" utility, is responsible for deleting from the History User Report List file those user and $SYSDATA entries that have passed their retention period. The utility also deletes the catalog entries for the associated CDAM files and produces a list of tapes and/or cartridges that have been released.
The utility has two steps:
-
Deletes expired user and $SYSDATA entries and produces a list of released tapes and/or cartridges.
-
Releases tapes and/or cartridges back into the system. The method used varies according to the backup utility used.
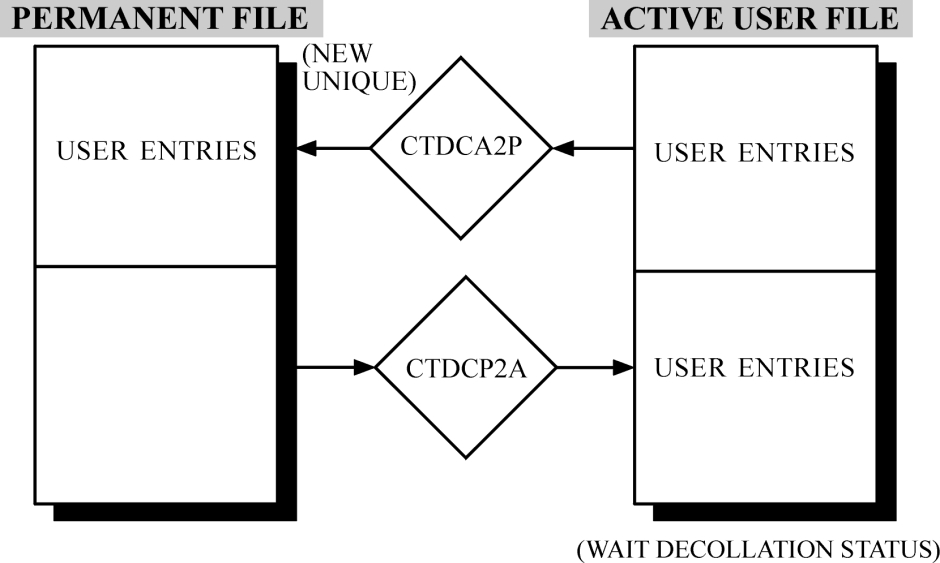
Permanent User Report List File
The Permanent User file contains a list of all reports that each user has received. The list includes details of report attributes, such as copy count, destination information, and so on. The list can be used by end users to make permanent modifications to the attributes of the reports they receive.
The file is built and updated by copying user entries from the Active file to the Permanent User Report List file using utility CTDCA2P (Copy Active To Permanent). One unique entry per user and/or report name and/or job name and/or category is stored in the Permanent User Report List file. For example, if the same report for the same user of the same job name and category is created on a daily basis, only one entry will exist for that user and/or report and/or jobname in the Permanent User Report List file.
The file contains a user entry for each unique report name a user receives.
Figure 31 The Permanent User Report List File
Using the Permanent User Report List File as a Reference Index
For many sites it is important to keep an index of all the unique reports a user has received. For example, an end user calls the computer department to advise that a report that is normally sent was not received. You may have suspicions that they have never received this report before. By checking the Permanent User Report List file, you can check if this report has ever been allocated to this recipient.
In effect, the Permanent User Report List file becomes a catalogue of all unique reports a recipient has received. To create and maintain the information in this file we use the CTDCA2P utility (Copy Active To Permanent).
Permanent User Report List File Display
 PERMANENT LIST <D> JOB          REP                      USR          CHILD (U)
 COMMAND ===>                                                    SCROLL===> CRSR
 O USER     REPORT NAME          JOB      COP FORM C DEST    UDEST     WTR
   BR11     ACCTS-1001-REP       JAC1020  DFT STD  D
   BR11     BASIC VALUE REP      PO1000D  003 GP10 P
   BR11     DELIVERY TIMES REP   AR5500   DFT STD  D
   BR11     FINANCIAL-ACC-SUMM   JGL1020P DFT STD  D
   BR11     INVESTMENT ANALYSIS  PRDPAY1  002 STD  T
   BR11     KEY ACCTS REPORT     PBL1040  DFT STD  D
   BR11     LOW-THRESH-REP       JAR3000  DFT STD  D
   BR11     UNBALANCED ACCTS     JAP4067  003 STD  D
   BR12     ACCTS-1002-REP       JAC1020  002 STD  T
   BR12     BASIC VALUE REP      PO1000D  DFT STD  D
 ====== >>>>>>>>>>>>>>>   B O T T O M    O F    L I S T   <<<<<<<<<<<<<<< ======
 OPTIONS: U UPDATE  I INSERT  D DELETE  A ADD INFO                      12.09.25
These entries cannot be used to access reports. They can be used to override attribute information associated with a report.
Making Changes to Report Attributes
Once a list of report names is built in the Permanent User Report List file, using the CTDCA2P utility, you can modify attribute information of the reports listed. The attributes that can be set are as follows:
-
Copy count (number of copies of the report to be printed).
-
Form type to use for printing.
-
Class to use for printing.
-
Destination at which the report will be printed (for example, remote or mainframe).
-
External writer to use.
-
List of additional users for the report (allocate other users a report).
-
Print mission name that should print the report.
There are two types of changes that can be made to the attributes of the reports, Permanent changes or Temporary changes.
Permanent Changes
You can use the Permanent User Report List file to make permanent changes to the attributes of specific reports.
Temporary Changes
You can copy the permanent entries on a daily basis to the Active User Report List file. To do this we use utility CTDCP2A (Copy Permanent To Active). The status of the copied entries in the Active User Report list will be Wait Decollation (that is, the physical reports have not been produced yet). You can access these Wait Decollation entries in the Active User Report List file and make a temporary change to the attributes of the report for the coming night's decollation. When the decollating mission runs, rather than creating a new entry in the Active User Report List file, it will use the Wait Decollation entry. Thus, the created report uses the attributes set in the Active User Report List file.
The CTDCP2A utility has selection criteria that can be used to avoid unnecessary overhead (for example, only copy specified entries from the Permanent User Report List file to the Active User Report List file, not all entries).
The modification of the entry in the Active User Report List file does not affect the entry in the Permanent User Report List file. We instruct Control-D where to look for its attribute information using parameter SEARCH of the report decollating mission.
This is potentially a very powerful end user facility for those end users who need to modify the attributes of their reports.
SEARCH Parameter
There is a parameter that we can use in the report decollating mission definition that instructs Control-D where to check for the attributes of a report for a specific user, that is, either in the Active User Report List file, the Permanent User Report List file, or not at all.
SEARCH Parameter
    ON CLASS      = T         EXTWTR               DEST          FORM
       PRT COPIES    LVL    USER                      DEST          MAX COPIES
       PRINT/CDAM PARMS =
   WHEN LINE   006 - 006   COL   016 - 019   PRINT   REF NXT   CT     AND/OR
        STRING = 1001
     DO USER     = BR11                  LVL    LINE     COL     -     S A T
     DO NAME     = INVENTORY-FOR-1001           LINE     COL
     DO
   WHEN LINE   006 - 006   COL   016 - 019   PRINT   REF NXT   CT     AND/OR
        STRING = 1002
     DO USER     = BR12                  LVL    LINE     COL     -     S P T
     DO NAME     = INVENTORY-FOR-1002           LINE     COL
     DO
   WHEN LINE   006 - 006   COL   016 - 019   PRINT   REF NXT   CT     AND/OR
        STRING = 1003
     DO USER     = BR13                  LVL    LINE     COL     -     S N T
     DO NAME     = INVENTORY-FOR-1003           LINE     COL
     DO
There are three values that can be set for this parameter in the report decollating mission definitions. The value you set will depend on the way you want the parameter to function. The values are assigned at the DO USER statement level. The permitted values for parameter SEARCH are:
Table 33 Valid SEARCH Parameter Values
|
Value |
Description |
|---|---|
|
N |
The decollating mission will not search for any attribute information for this user's report (it will use the report decollating mission specifications). This option enhances the decollating speed of Control-D and should be used by sites that do not require users to set attribute information of reports. |
|
P |
The decollating mission will search the Permanent User Report List file for attribute information of the matching user and report name. It will use the attribute information defined in the Permanent User Report List file to create the entry in the Active User Report List file. We recommend that sites using this option run utility CTDCA2P once a day at the end of production processing. |
|
A |
The Decollating Mission will search the Active file for an entry matching this user and report name in Wait Decollation status. It will then take the attribute information of that entry. This option should be used by sites whose users need to be able to make temporary changes to entries copied to the Active User Report List file. We recommend that sites using this option run utility CTDCP2A once a day at the beginning of the production process. |
Setting the Search Default
The default value to be used for parameter SEARCH can be set using optional Control-D Wish WD0933. This default value will then be assigned to all new Decollating Missions created, and to all existing decollating missions whose SEARCH parameter is currently blank.
You should now decide what default option you will use for parameter SEARCH and set it using Wish WD0933.
General Information About Backup Missions
In this section, we will discuss in detail all of the automatic phases and processes which occur during the backup workflow. We will analyze what a Backup Mission does and how, as well as how backup missions are defined.
Overview
Control-D uses backup missions to create copies of compressed datasets onto tape or cartridge for report archiving purposes.
Control-D uses your current backup product to perform the backup of the CDAM datasets. For example, if you use backup product DF/HSM, Control-D will build and submit a DF/HSM batch job to perform the backup process.
Supported backup products are:
-
FDR
-
DF/DSS
-
DF/HSM
-
DMS/OS
-
ASM2
-
ARCS
In-House Application
You determine which reports should be backed up by which backup mission, using report decollating mission definitions. The backup mission defines for how long a report will be archived. We recommend that all reports be backed up by Control-D backup missions so that they can be easily restored if required.
Backup Mission Methodology
In this section, we will explain the logic behind Control-D backup methodology. We recommend that when using Control-D, you back up all reports (CDAM datasets) of the same retention period together, and that datasets with different retention periods are not mixed. To explain why we make this recommendation, we will review the following subjects:
-
Archiving Datasets – Mixed Retention Periods
-
Archiving Datasets – Unmixed Retention Periods
Archiving Datasets – Mixed Retention Periods
Let us examine an example of a site that requires four backup durations to archive their reports for 7 days, 1 month, 3 months and 1 year.
If we back up all datasets created with various durations on the same tapes, as time passes "holes" start to appear in our tapes as certain archived datasets pass their expiration dates. Some of the backup products that Control-D supports, such as DMS/OS, have a Merge option. However, merge processing is both time and resource consuming, tying up multiple tape and cartridge devices as it processes, and has to be run frequently to avoid the forming of "holes."
So the mixing of various retention periods during archiving prevents us from releasing tapes into the system, and continual merge processing incurs too much overhead.
Archiving Datasets – Unmixed Retention Periods (Recommended Option)
If we examine the previous example but do not mix reports of different retention periods, all reports stored on a tape expire at the same time. At that time, the tape will automatically be released back into the system.
Identify Backup Durations
The first decision you should make is how many different backup durations you require for your reports. To determine for how long a report should be backed up you need to know for how long it is currently backed up. You may have audit requirements that detail for how long reports should be archived. Specific users may have different backup requirements. You should consider that the fewer categories of durations, the less tape or cartridge consumption will be.
In the backup mission parameters you can specify time and event dependency information for the execution of the backup mission. Normally, for a backup that runs on a daily basis, you will want it to execute after all the CDAM files for that day have been created. You can use these parameters to control the precise point at which a backup mission should execute.
Where Are Backup Missions Defined?
You define backup missions online using the Control-D Mission Definition facility (Option M in the IOA Primary Option menu). The definitions are stored as members of a partitioned dataset (PDS) in the Control-D backup missions library. You use the Backup Mission Definition screen to define your parameters (see below):
Backup Mission Definition Screen
  ---- CONTROL-D CATEGORY                      BKP MISSION BKP0031D --------(M.S)
  COMMAND ===>                                                    SCROLL===> CRSR
   -----------------------------------------------------------------------------
   CATEGORY PROD                              MISSION BKP0031D
   OWNER    M90           TASKTYPE BKP        GROUP
   DESC
   ===========================================================================
   DAYS                                                          DCAL
                                                                      AND/OR
   WDAYS                                                         WCAL
   MONTHS  1- Y 2- Y 3- Y 4- Y 5- Y 6- Y 7- Y 8- Y 9- Y 10- Y 11- Y 12- Y
   DATES
   CONFCAL          SHIFT   RETRO N MAXWAIT 00
   MINIMUM          PDS
   ===========================================================================
   IN
   TIME FROM      TO      NOT LATER THAN      PRIORITY
   ===========================================================================
   # OF DAYS TO KEEP 0031                     # OF GENERATIONS TO KEEP 0000
   ===========================================================================
   OUT
   SHOUT WHEN                                      TO                   URGN
 ======= >>>>>>> END OF BACKUP MISSION PARAMETERS OF THIS CATEGORY <<<<<< ======
PLEASE FILL IN MISSION PARAMETERS. USE "SHPF" TO SEE PFK DEFINITION     15.15.36
You define parameters in your backup mission definitions that supply Control-D with the following information:
-
When the backup mission should be scheduled.
-
When the backup mission should be executed.
-
For how long the reports should be archived.
How Do I Activate a Backup Mission?
Backup missions must be scheduled to the Active Missions file to execute and archive the appropriate reports. A special scheduling program called by the New Day procedure CTDNDAY is responsible for performing the scheduling of backup missions. Scheduling options are discussed later in this phase.
Active Missions File Display
 ------------------- CONTROL-D/V ACTIVE MISSIONS ENVIRONMENT ----------------(A)
 COMMAND ===>                                                    SCROLL===> CRSR
 O NAME     ODATE  TYP OWNER    ------------------STATUS ------------------ UP
   RST0060M 060400 CRS M22      WAIT PROCESS
   RSTADHOC 060400 RST M22      WAIT PROCESS
   JBR3450  060400 REP M90      J00469 ENDED "OK"
   BKP0007D 060400 BKP M22      WAIT PROCESS
   BKP0031D 060400 BKP M22      WAIT PROCESS
   BKP0365D 060400 BKP M22      WAIT PROCESS
   PO1000M  060400 REP M83      WAITING FOR JOB
   PAC1020D 060400 REP M90      J09381 ENDED "OK"
   M83GEN   060400 REP M83      J02353 ENDED "OK"
   LAS132   060400 PRT M90      PAGES= 119 ENDED "OK"
   IMP132   060400 PRT M46      WAIT PROCESS
  ======== >>>>>>>>>>>>>>>>>>> BOTTOM OF ACTIVE MISSIONS LIST <<<<<<<<<<<<<< ===
OPT: ? WHY H HOLD D DELETE F FREE L LOG Z ZOOM R RERUN P PRINT CONTROL 12.20.47
Backup Mission Workflow
The backup mission workflow of Control-D is shown in Figure 9. It shows the stages involved from initially scheduling the backup mission through to backing up the CDAM datasets. There are certain phases of the workflow that you have to decide how to perform at your site. We will examine each phase in detail, as follows:
-
Schedule backup mission to Active Missions file.
-
Select backup mission for execution.
-
Execute backup mission instructions.
-
Create backup job.
-
Submit backup job.
-
Execute backup job and analyze results.
Figure 32 Graphic Overview of Backup Mission Workflow

DAILY SUBSYSTEM in the above figure refers to the New Day procedure and the programs it calls.
Schedule Backup Mission to the Active Missions File
A backup mission must be placed in the Active Missions file to execute. The mechanism used to place a copy of the backup mission definitions in the Active Missions file is the New Day procedure (CTDNDAY).
The New Day procedure calls a special scheduling program that runs independently of the Control-D monitor, which is a started task – STC. The program can run at any time, even if the Control-D monitor is not active.
The scheduling program scans your backup mission library and analyzes which backup missions should be scheduled to the Active Missions file, depending on the Basic Scheduling parameters you have defined. You can also specify special parameters to the list of missions to be scheduled that can override any specified scheduling criteria. For example, parameter FORCE ignores Basic Scheduling parameters and always places the backup mission in the Active Missions file.
Methods of Scheduling Backup Missions
You can invoke the scheduling program under a variety of environments. Below is a list of the possible invocation environments and a description of how they work.
-
Online From the Backup Mission Library
-
All users will use this method for ad hoc scheduling or testing. You simply specify, using online options ORDER or FORCE, which Backup Missions you want to place in the Active Missions file.
-
Batch Execution of the Scheduling Program
-
You can run the scheduling program as a batch job, using procedure CTDBKDAY. The batch job will analyze the Basic Scheduling parameters of the specified backup missions, and schedule the relevant missions to the Active Missions file.
-
Using Procedure CTDNDAY (Recommended Method)
-
During the run of the New Day procedure CTDNDAY, as explained in the Control-D and Control-V chapter of the INCONTROL for z/OS Administrator Guide, one of its phases is an execution of the scheduling program. During this phase the procedure will analyze a supplied list of backup missions to determine which ones should be scheduled to the Active Missions file.
Select Backup Mission for Execution
The Control-D monitor analyzes the Active Missions file at the interval specified in installation parameter INTERVALD in member CTDPARM, and selects missions for execution once all runtime dependencies have been met.
The Control-D monitor analyzes the Runtime Scheduling parameters of the backup mission to determine when to execute it. You can specify dependency information and time specifications to control exactly when the backup mission should be executed.
Execute Backup Mission Instructions
The Control-D monitor executes the backup mission. The mission selects which CDAM files will be backed up by the backup mission.
Once a report has been decollated by Control-D, it is available for backup. The decollating mission creates entries in the Active User Report List file.
With the report decollating mission parameters, you can use parameter DO BACKUP to specify which backup mission should back up the user's report. The $SYSDATA entries created in the Active User Report List file are marked with the name of the assigned backup mission.
Assigned Backup Mission in the Active User Report List File (SYSDATA Display)
 ACTIVE LIST    <A> JOB M90      REP                      USR $SYSDATA CHILD (U)
 COMMAND ===>                                                    SCROLL===> CRSR
 O JOB       JNUM PROCSTEP PGMSTEP  DDNAME    PAGES    LINES DECOLLATION-TIME
   JAC1020  17852          STEP1    SYSUT2        9      427 08/04/00 - 14:52
   CDAM: CTDP.R3.JAC1020.J17852.D1181452.S91.N006400    Extents: 00
   Record  ID         : 3B39FF3D 54529000 RBA: 000004E0 UPDT: AC2D25AE 54529000
   Backup  Missions   : BKP0031D
   Backup  Volumes    :
   Restore Mission    :
   Creation Date      : D93118 - T145204       Status: Decollated
   Printing Parameters: CLASS: X  FORMS: STD   RECFM: UA     ALOPT :
                        APA  : N  FCB  : ****  LRECL: 00133  WTR   :
                        ACIF : N  UCS  : ****  BLKSZ: 00133  OUTPUT:
                        TRC  : N  FLASH:       OPTCD:        MODIF :
                                  LINCT: 0100  PGDEF:        FMDEF :
                        CHARS:      ,      ,      ,      OUTPUT:
   Job Parameters     : SYSID:      JTYPE:              ACCOUNT:
                        ENTRY:          -
 ------------------------------- end of record ---------------------------------
   JAC1020  17852          STEP2    SYSUT2        8      328 08/04/00 - 14:52
   CDAM: CTDP.R3.JAC1020.J17852.D1181452.S91.N006800    Extents: 00
   Record  ID         : 3B39FF40 54539000 RBA: 000004E0 UPDT: AC2D25AE 54539000
   Backup  Missions   : BKP0007D
   Backup  Volumes    :
   Restore Mission    :
   Creation Date      : D93118 - T145206       Status: Decollated
   Printing Parameters: CLASS: X  FORMS: STD   RECFM: UA     ALOPT :
                        APA  : N  FCB  : ****  LRECL: 00133  WTR   :
                        ACIF : N  UCS  : ****  BLKSZ: 00133  OUTPUT:
                        TRC  : N  FLASH:       OPTCD:        MODIF :
                                  LINCT: 0100  PGDEF:        FMDEF :
                        CHARS:      ,      ,      ,
                        ENTRY:          -
 Resource set key   :
 ------------------------------- end of record ---------------------------------
 ====== >>>>>>>>>>>>>>>   B O T T O M    O F    L I S T   <<<<<<<<<<<<<<< ======
  P PRINT     V VIEW     U UPDATE     I INSERT     A ADD INFO     E EDIT
  X INDEX     N NOTE     G GIVETO     D DELETE     Q QUICK ACCESS       13.16.13
Backup Mission Selection Rules
If you do not specify parameter DO BACKUP for a report in the report decollating mission definition, it will not be archived by Control-D. Any CDAM datasets that are to be backed up are only backed up once. Control-D backs up at the CDAM dataset level.
A report will only be backed up once by Control-D. However, it is possible to specify multiple backup mission names in the report decollating mission definition. This provides us with a special handling ability. Whichever of the defined backup missions runs first will archive the report. In the following example, two backup mission names are specified.
Sample Report Decollating Mission Definition
   ON CLASS      = T         EXTWTR               DEST          FORM              PRT COPIES    LVL    USER                      DEST          MAX COPIES
       PRINT/CDAM PARMS =
   WHEN LINE   006 - 006   COL   016 - 019   PRINT   REF NXT   CT     AND/OR
        STRING = 1001
     DO USER     = BR11                  LVL    LINE     COL     -     S A T
                                         SYNONYM =       CONCAT =
     DO NAME     = INVENTORY-FOR-1001           LINE     COL
     DO BACKUP   = BKP0007D BKP0031D
     DO
On a daily basis, the site normally schedules mission BKP007D to process the daily reports and archive them for a week. However, at month-end, they schedule mission BKP0031D to run before the normal BKP007D. This way, the reports produced by this job at month-end are archived for thirty-one days.
Create Backup Job
During execution, the backup mission scans the Active User Report List file to see which reports should be backed up by this mission. The result of the execution is a backup job that will make a copy of the selected CDAM files to tape or cartridge.
This job is defined in the format of the backup product you want to use to perform the archive. Which backup product to use at your site is specified at time of installation in member CTDPARM in the IOA PARM library.
Access Backup Job Skeleton
There must be a skeleton member in the Control-D SKL library (the Control-D skeleton library) that matches the name of the backup mission. This member is used as a basis for building the backup job. Sample members exist for all supported backup products in the Control-D SKL library.
Backup Job Skeleton JCL
 BROWSE -- CTDP.PROD.SKL(BKP0031D)     - 01.03 -------- LINE 00000000 COL 001 080
 COMMAND ===>                                                  SCROLL ===> CSR
********************************* TOP OF DATA  *********************************
//M90BKP JOB ,IOA,CLASS=A,MSGCLASS=X
//*
//*******************************************************************
//*               CONTROL-D BACKUP STEP                             *
//*******************************************************************
//BACKUP   EXEC PGM=FDRDSF,REGION=OM
//SYSPRINT DD DSN=CTDP.PROD.%MISSNAME%.BKPLIST,
//            DISP=(MOD,PASS),SPACE=(CYL,(1,1)),UNIT=SYSALLDA
//DISK1    DD UNIT=SYSALLDA,DISP=SHR,VOL=SER=FDSYM3
//TAPE1    DD DSN=CTDP.BKP.%ODATE%.%TIME%.LABEL1,
//            LABEL=(1,SL,RETPD=%RETPD%),UNIT=TAPE,DISP=(,PASS)
//SYSIN    DD *
   DUMP TYPE=DSF,MAXCARDS=9999
   %DSNS%
//*******************************************************************
//*               CONTROL-D ANALYZE STEP                            *
//*******************************************************************
//ANALYZE  EXEC PGM=CTDBKC,COND=EVEN,REGION=OM,
//         PARM='%TIMESTMP%,%MISSNAME%'
//STEPLIB  DD DSN=IOAP.PROD.LOAD,DISP=SHR
//TAPE1    DD DSN=*.BACKUP.TAPE1,DISP=(OLD,CATLG),UNIT=(,,DEFER)
//SYSIN    DD DSN=CTDP.PROD.%MISSNAME%.BKPLIST,
//          DISP=(OLD,DELETE)
//DAAMF    DD DISP=SHR,DSN=CTDP.PROD.Active Missions File
//DAAMF1   DD DISP=SHR,DSN=CTDP.PROD.Active Missions File
//DALOG    DD DISP=SHR,DSN=IOAP.PROD.LOG
//DAVACT   DD DSN=CTDP.PROD.ACTUSR,DISP=SHR,
//          AMP=('BUFSP=500000')
//SYSPRINT DD SYSOUT=*,HOLD=YES
//SYSABEND DD SYSOUT=*,HOLD=YES
//PRTDBG   DD SYSOUT=*,HOLD=YES
//
******************************** BOTTOM OF DATA ********************************
Create Backup Job JCL
The Backup Mission uses the skeleton member to create a backup job in the Control-D JOB library (the backup job library). All variable values from the skeleton member are substituted. This job contains a list of all the CDAM datasets that will be backed up.
Backup Job JCL
 BROWSE -- CTDP.PROD.JOB(BKP0031D)     - 01.00 -------- LINE 00000000 COL 001 080
 COMMAND ===>                                                  SCROLL ===> CSR
********************************* TOP OF DATA  *********************************
//M90BKP JOB ,IOA,CLASS=A,MSGCLASS=X
//*
//*******************************************************************
//*               CONTROL-D BACKUP STEP                             *
//*******************************************************************
//BACKUP   EXEC PGM=FDRDSF,REGION=OM
//SYSPRINT DD DSN=CTDP.PROD.BKPM90.BKPLIST,
//            DISP=(MOD,PASS),SPACE=(CYL,(1,1)),UNIT=SYSALLDA
//DISK1    DD UNIT=SYSALLDA,DISP=SHR,VOL=SER=FDSYM3
//TAPE1    DD DSN=CTDP.BKP.D000428.T175218.LABEL1,
//            LABEL=(1,SL,RETPD=0031),UNIT=TAPE,DISP=(,PASS)
//SYSIN    DD *
   DUMP TYPE=DSF,MAXCARDS=9999
          SELECT  DSN=CTDP.R3.PO1000D.J17840.D1181409.S91.N002300
          SELECT  DSN=CTDP.R3.JAC3056.J17841.D1181419.S91.N004400
          SELECT  DSN=CTDP.R3.BL1140F.J17852.D1181452.S91.N006400
//*******************************************************************
//*               CONTROL-D ANALYZE STEP                            *
//*******************************************************************
//ANALYZE  EXEC PGM=CTDBKC,COND=EVEN,REGION=OM,
//         PARM='17521805,BKPM90  '
//STEPLIB  DD DSN=IOAP.PROD.LOAD,DISP=SHR
//TAPE1    DD DSN=*.BACKUP.TAPE1,DISP=(OLD,CATLG),UNIT=(,,DEFER)
//SYSIN    DD DSN=CTDP.PROD.BKPM90.BKPLIST,
//          DISP=(OLD,DELETE)
//DAAMF    DD DISP=SHR,DSN=CTDP.PROD.Active Missions File
//DAAMF1   DD DISP=SHR,DSN=CTDP.PROD.Active Missions File
//DALOG    DD DISP=SHR,DSN=IOAP.PROD.LOG
//DAVACT   DD DSN=CTDP.PROD.ACTUSR,DISP=SHR,
//          AMP=('BUFSP=500000')
//SYSPRINT DD SYSOUT=*,HOLD=YES
//SYSABEND DD SYSOUT=*,HOLD=YES
//PRTDBG   DD SYSOUT=*,HOLD=YES
******************************** BOTTOM OF DATA ********************************
Once the JCL for the backup job has been written to the JOB library it is then ready for submission. Note that because this library is used to create a new member (or replace an existing one), the library should be compressed on a regular basis to avoid any space problems.
Submit Backup Job
Once the JCL created for the backup job has been written to the JOB library, Control-D provides two methods for submitting the job to the system:
-
The Control-D monitor will submit the job (default).
-
Control-M or another automated scheduling package will submit the job.
These methods are described below.
-
Submit using Control-D monitor
-
Control-D will automatically submit the job to the system.
-
Submit using Control-M
-
If you have Control-M installed in Shared Database mode, you can add a condition to trigger the submission of the JCL by Control-M. This is the preferred method for Control-M users, because the execution of the backup job can be monitored by Control-M.
-
Submit using Production Control System
-
You can pass control to another production control system to submit the job. Using this method, the execution of the job can be monitored by the production control system. This method is implemented using Control-D Exit CTDX010.
Execute Backup Job
Once the backup job has started executing, two JCL steps are performed. The first JCL step backs up the selected CDAM datasets to tape or cartridge. The second JCL step analyzes the results of the execution and updates the status of the entries in the Active User Report List file to indicate that the datasets have been backed up successfully.
If a backup mission fails while executing, you may have to run a BKPRESET job from the Control-D JCL library.
Define Backup Missions
The number of backup missions you define will depend on the various categories of durations for which you need to keep archived reports.
A number of supplied backup mission definitions exist which may meet most of your requirements. We recommend that when you are creating new backup mission definitions, you always use the CLIST CTDCRMIS. This CLIST will automatically create a backup mission definition and a backup skeleton job for you according to the parameters you supply. If specific changes are then required, you can access the backup mission definition using the Online facility.
You can also define the backup mission parameters using the screens of the Control-D Online facility. The definitions that you create are saved in the Control-D backup missions library. Note that because the definitions are saved in a partitioned dataset (PDS), you should ensure that the PDS is backed up regularly in case you lose your definitions due to a DASD error.
In this section, we will offer recommendations on specific parameters that you will define in your backup mission definitions. Shown below is a summary of the information that you will specify. We have split the information into five distinct steps. For a detailed explanation, see the printing, backup, and restore mission parameters chapter of the Control-D and Control-V User Guide.
We will use the following five-step guide to explain how to define backup missions. Each step corresponds to a particular category of the backup mission parameters:
-
General mission information (General Parameters).
-
When to schedule the mission (Basic Scheduling parameters).
-
When to execute the mission (Runtime Scheduling parameters).
-
Archive information (Archive parameters).
-
What to do upon termination of the mission (Post-Processing parameters).
Backup Mission Parameters Definition Screen
  ---- CONTROL-D CATEGORY                      BKP MISSION BKP0031D --------(M.S)
  COMMAND ===>                                                    SCROLL===> CRSR
   -----------------------------------------------------------------------------
   CATEGORY PROD                              MISSION BKP0031D
   OWNER    M90           TASKTYPE BKP        GROUP
   DESC
   ===========================================================================
   DAYS                                                          DCAL
                                                                      AND/OR
   WDAYS                                                         WCAL
   MONTHS  1- Y 2- Y 3- Y 4- Y 5- Y 6- Y 7- Y 8- Y 9- Y 10- Y 11- Y 12- Y
   DATES
   CONFCAL          SHIFT   RETRO N MAXWAIT 00
   MINIMUM          PDS
   ===========================================================================
   IN
   TIME FROM      TO      NOT LATER THAN      PRIORITY
   ===========================================================================
   # OF DAYS TO KEEP 0031                     # OF GENERATIONS TO KEEP 0000
   ===========================================================================
   OUT
   SHOUT WHEN                                      TO                   URGN
    MSG
 ======= >>>>>>> END OF BACKUP MISSION PARAMETERS OF THIS CATEGORY <<<<<< ======
PLEASE FILL IN MISSION PARAMETERS. USE "SHPF" TO SEE PFK DEFINITION     15.15.36
Step 1: General Mission Information
The first set of parameters you can fill in are the General Mission parameters. In this section, you define general information about the mission, much of which can be used for tracking and control purposes:
   CATEGORY                                   MISSION                             OWNER                  TASKTYPE BKP        GROUP
   DESC
We recommend that the mission names reflect the backup duration. This should make it easy to identify report archive durations when working with the user files.
Step 2: When to Schedule the Mission
The second set of parameters you can fill in are the Basic Scheduling parameters. In this section, you define information about when to schedule the mission to the Active Missions file:
Backup Mission Basic Scheduling Parameters
   DAYS                                                          DCAL                                                                                 AND/OR
   WDAYS                                                         WCAL
   MONTHS  1- Y 2- Y 3- Y 4- Y 5- Y 6- Y 7- Y 8- Y 9- Y 10- Y 11- Y 12- Y
   DATES
   CONFCAL          SHIFT   RETRO N MAXWAIT 00
   MINIMUM          PDS
A scheduling program called by the New Day procedure analyzes these parameters to determine if the mission should be placed in the Active Missions file. The various options for scheduling were detailed in Schedule Backup Mission to the Active Missions File.
We recommend that you select a method for scheduling of the backup missions and implement it at this stage. This will mean that backup procedures will be in place before the implementation of Control-D into production (which will occur in Phase 8).
Step 3: When to Execute the Mission
The third set of parameters you can fill in are the Runtime Scheduling parameters. In this section, you define information about when the mission should execute after it has been placed in the Active Missions file.
Backup Mission Runtime Scheduling Parameters
   IN
  TIME FROM      TO      NOT LATER THAN      PRIORITY
When all runtime parameters are fulfilled concurrently, the backup mission will start executing. The Control-D monitor checks the Active Missions file at specified intervals (defined in CTDPARM) to see if the specified criteria have been met. You can specify dependency information to the backup mission using parameter IN.
If you have to manually load tapes or cartridges, you should ensure that backup missions are run when there is someone there to respond to the mount requests. You can achieve this by scheduling only on working days, and by specifying time windows for the execution of backup missions.
Step 4: Archive Information
The fourth set of parameters you can fill in are the Archive parameters. In this section you define information about the period for which a report should be backed up.
Backup Mission Archive Parameters
# OF DAYS TO KEEP 0031 # OF GENERATIONS TO KEEP 0000 You can specify the duration time as either number of days or number of generations. When using number of generations, each run of the backup mission is a generation. Once the number of days or generations has passed, the entries are deleted from the History User Report List file by utility CTDCLHST.
Step 5: What to Do Upon Termination of the Mission
The fifth set of parameters you can fill in are the Post-Processing parameters. In this section, you define information about what to do when the mission finishes executing.
Backup Mission Post Processing Parameters
OUT                                                 SHOUT WHEN NOTOK
TO TSO-TS016   URG V
MSG BKP0007D HAS ENDED NOTOK - PLEASE INVESTIGATE
We recommend that you use the Shout facility for exception handling (such as when a mission fails). You should try to avoid sending "comforting" messages indicating that all your backup missions have worked successfully, as these may obscure any real exceptions that occur in Control-D.
You should by now have defined and implemented the backup procedures.
General Information About Restore Missions
In this section we will be describing in detail all of the automatic phases and processes that occur during the restore workflow. We will analyze what a Restore Mission does and how, as well as how they are defined.
Overview
Control-D uses restore missions to bring back copies of archived datasets from tape or cartridge to disk for online viewing or printing purposes.
Control-D uses your current backup product to perform the restore of the CDAM datasets. For example, if you use the DF/HSM backup product, Control-D will build and submit an DF/HSM batch job to perform the restore process.
When you restore a report, you are actually restoring the CDAM dataset in which the report is stored. Restore operations are performed in response to user requests issued from the History User Report List file. Restore missions analyze these requests when they are executed. In this phase, you will decide how and when the restore requests should be processed.
What Is A Restore Mission?
A restore mission is the basic mechanism used by Control-D for restoring archived datasets back to disk.
The restore mission searches the History User Report List file for entries that have been requested for restoring. Any entries that have a restore mission name matching the mission will be restored. A copy of the archived CDAM dataset is restored to disk and a copy of the requested entry is placed in the Active User Report List file, allowing the user access to the restored report.
You can define different restore missions that can restore reports at different times. For example, restore critical reports immediately and non-critical reports on an hourly basis:
-
Restore Mission RSTADHOC - Restores reports immediately.
-
Restore Mission RST0060M - Restores reports on an hourly basis.
If you have to manually load tapes or cartridges, you should ensure that restore requests do not continually flood the operator's console. It is better to create a specific interval to carry out these requests.
When Should I Restore Reports?
You can limit the authority of who is allowed to restore reports under Control-D. It may be that you allow all end users to control their reports, or that only the computer service people are allowed to restore reports. If you are not giving online access to users, they will not have the ability to restore their reports.
When deciding the frequency of restoring reports, you should consider the needs of all parties involved (both operators and end users). If certain reports are constantly being restored, it may be that the report should remain online for a longer duration. You should weigh carefully the costs involved in keeping reports online and archiving reports if they are heavily accessed (that is, constantly being restored).
Using the restore mission parameters you can specify time and event dependency information for the execution of the mission.
How Do I Activate a Restore Mission?
Restore Missions must be scheduled to the Active Missions file to execute. A scheduling program called by the New Day procedure CTDNDAY is responsible for performing the scheduling of Restore Missions. The scheduling options are discussed later in this phase.
Active Mission File Display
 ------------------- CONTROL-D/V ACTIVE MISSIONS ENVIRONMENT ----------------(A)
 COMMAND ===>                                                    SCROLL===> CRSR
 O NAME     ODATE  TYP OWNER    ------------------STATUS ------------------ UP
   JBR3450  020400 REP M90      J00469 ENDED "OK"
   BKP0031D 020400 BKP M22      WAIT PROCESS
   RST0060M 020400 CRS M22      WAIT PROCESS
   RSTADHOC 020400 RST M22      WAIT PROCESS
   PO1000M  020400 REP M83      WAITING FOR JOB
   PAC1020D 020400 REP M90      J09381 ENDED "OK"
   LAS132   020400 PRT M90      PAGES= 119 ENDED "OK"
  ======== >>>>>>>>>>>>>>>>>>> BOTTOM OF ACTIVE MISSIONS LIST <<<<<<<<<<<<<< ===
OPT ? WHY H HOLD D DELETE F FREE L LOG Z ZOOM R RERUN P PRINT CONTROL   12.20.47
Restore Mission Workflow
The restore mission workflow of Control-D is shown in Figure 10. It shows the stages involved from initially scheduling the restore mission through to restoring the CDAM datasets. There are certain phases of the workflow during which you have to decide how restores should be performed at your site. We will examine each phase in detail, as follows:
-
Schedule restore mission to the Active Missions file.
-
Select restore mission for execution.
-
Execute restore mission instructions.
-
Create restore job.
-
Submit restore job.
-
Execute restore job.
Figure 33 Graphic Overview of Restore Mission Workflow

DAILY SUBSYSTEM in the above figure refers to the New Day procedure and the programs it calls.
Schedule Restore Mission to the Active Missions File
A restore mission must be placed in the Active Missions file to execute. The mechanism used to place a copy of the restore mission definitions in the Active Missions file is the New Day procedure (CTDNDAY).
The New Day procedure calls a special scheduling program that runs independently of the Control-D monitor (a started task – STC). The program can run at any time, even if the Control-D monitor is not active.
The scheduling program will scan your restore mission library and analyze which restore missions should be scheduled to the Active Missions file depending on the Basic Scheduling parameters you have defined. You can also specify special parameters in the list of missions to be scheduled that can override any specified scheduling criteria. For example, parameter FORCE will ignore Basic Scheduling parameters and always place the restore mission in the Active Missions file.
Methods of Scheduling Restore Missions
You can invoke the scheduling program under a variety of environments. Below is a list of the possible invocation environments and a description of how they work.
-
Online from the Restore Mission Library
-
All users will use this method for ad hoc scheduling or testing. You simply specify, using the online options, which restore missions you want to place in the Active Missions file.
-
Batch execution of the Scheduling Program
-
You can run the scheduling program as a batch job, using procedure CTDRSDAY. The batch job will analyze the Basic Scheduling parameters of the specified restore missions and schedule the relevant missions to the Active Missions file.
-
Using CTDNDAY (recommended method)
-
During the run of the New Day procedure CTDNDAY, as explained in the Control-D and Control-V chapter of the INCONTROL for z/OS Administrator Guide, one of its phases is an execution of the scheduling program. During this phase, it will analyze a supplied list of restore missions and determine which ones should be scheduled to the Active Missions file.
Select Restore Missions for Execution
The Control-D monitor analyzes the Active Missions file at the interval specified in installation parameter INTERVALD in member CTDPARM, and selects missions for execution once all runtime dependencies have been met.
The Control-D monitor analyzes the Runtime Scheduling parameters of the restore mission to determine when the restore mission should be executed. You can specify dependency information and time specifications to control exactly when the restore mission should execute.
Execute Restore Mission Instructions
The Control-D monitor executes the restore mission. The mission analyzes the History User Report List file to see if any requests have been made to restore reports using this restore mission.
In the History User Report List file, users request the reports they would like restored.
Requesting a Restore in the History File
 HISTORY LIST   <D> JOB          REP                      USR          CHILD (U)
 COMMAND ===>                                                    SCROLL===> CRSR
 O USER     REPORT                     +--------------------------------+
   BR11     HI ACCTS REPORT            |  CONFIRM           : Y         |
 R BR11     HI ACCTS REPORT      <-----|  BY RESTORE MISSION: RST0060M  |
   BR11     ACCTS-1001-REPORT          +--------------------------------+
   BR11     INVENTORY-FOR-1001   03/03/00      4       97   Backed up
   BR12     INVENTORY-FOR-1002   03/03/00      1        3   Backed up
 ====== >>>>>>>>>>>>>>>>>> NO MORE REPORTS IN THE LIST <<<<<<<<<<<<<<<<<< ======
OPTIONS: R RESTORE  C NO-RESTORE U UPDATE  D DELETE  A ADD INFO        11.02.43
Create Restore Job
The result of the execution is a restore job that will restore the selected CDAM files to disk and copy the relevant entries back to the Active User Report List file.
This job is created in the format of the backup product you want to use to perform the restore. Which backup product is used at your site is specified at time of installation in member CTDPARM in the IOA PARM library.
Restore Job Skeleton
There must be a skeleton member in the Control-D SKL library (the Skeleton library) that matches the name of the restore mission. This member is used as a basis for building the restore job. There are sample members of all supported backup products in the Control-D SKL library.
Restore Job Skeleton JCL
 EDIT ---- CTDP.PROD.SKL(RST0060M)     - 01.04 ------------------ COLUMNS 001 072
 COMMAND ===>                                                  SCROLL ===> CSR
 ****** ***************************** TOP OF DATA ******************************
//M90RST JOB ,IOA,CLASS=A,MSGCLASS=X
//*
//*******************************************************************
//*                       RESTORE STEPS                             *
//*******************************************************************
//*
%REPEAT%
//RESTORE  EXEC PGM=FDRDSF,COND=EVEN,REGION=OM
//SYSPRINT DD DSN=CTDP.PROD.%MISSNAME%.RSTLIST,
//            DISP=(MOD,PASS),SPACE=(CYL,(1,1)),UNIT=SYSALLDA
//DISK1    DD UNIT=SYSALLDA,DISP=SHR,VOL=SER=FDSYM3
//TAPE1    DD DSN=CTDP.BKP.%ODATE%.%TIME%.LABEL1,
//            UNIT=(TAPE,,DEFER),DISP=SHR
//SYSIN    DD  *
    RESTORE TYPE=DSF,MAXCARDS=9999
    %DSNS%
//*
%ENDREPEAT%
//*******************************************************************
//*                 CONTROL-D ANALYZE STEP                          *
//*******************************************************************
//ANALYZE  EXEC PGM=CTDRSC,COND=EVEN,REGION=OM,
//            PARM='%TIMESTMP%,%MISSNAME%'
//STEPLIB  DD DSN=IOAP.PROD.LOAD,DISP=SHR
//SYSIN    DD DSN=CTDP.PROD.%MISSNAME%.RSTLIST,
//          DISP=(OLD,DELETE)
//DAAMF    DD DISP=SHR,DSN=CTDP.PROD.Active Missions File
//DAAMF1   DD DISP=SHR,DSN=CTDP.PROD.Active Missions File
//DALOG    DD DISP=SHR,DSN=IOAP.PROD.LOG
//DAVACT   DD DSN=CTDP.PROD.ACTUSR,DISP=SHR,
//          AMP=('BUFSP=300000')
//DAVHST   DD DSN=CTDP.PROD.HSTUSR,DISP=SHR,
//          AMP=('BUFSP=300000')
//SYSPRINT DD SYSOUT=*,HOLD=YES
//SYSABEND DD SYSOUT=*,HOLD=YES
//PRTDBG   DD SYSOUT=*,HOLD=YES
//
 *********************************** BOTTOM OF DATA ****************************
Create Restore Job JCL
The restore mission uses the skeleton member to create a restore job in the Control-D JOB library (the backup job library). All variable values from the skeleton member are substituted. This job contains a list of all the CDAM data restored.
Restore Job JCL
 EDIT ---- CTDP.PROD.JOB(RST0060M)    - 01.00 ------------------ COLUMNS 001 072
 COMMAND ===>                                                  SCROLL ===> CSR
 *********************************** TOP OF DATA ******************************
//M90RST JOB ,IOA,CLASS=A,MSGCLASS=X
//*
//*******************************************************************
//*                       RESTORE STEPS                             *
//*******************************************************************
//*
//RESTORE  EXEC PGM=FDRDSF,COND=EVEN,REGION=OM
//SYSPRINT DD DSN=CTDP.PROD.M90RST.RSTLIST,
//            DISP=(MOD,PASS),SPACE=(CYL,(1,1)),UNIT=SYSALLDA
//DISK1    DD UNIT=SYSALLDA,DISP=SHR,VOL=SER=FDSYM3
//TAPE1    DD DSN=CTDP.BKP.D000317.T175627.LABEL1,
//            UNIT=(TAPE,,DEFER),DISP=SHR
//SYSIN    DD  *
    RESTORE TYPE=DSF,MAXCARDS=9999
           RESTORE DSN=CTDP.R3.JGL1030.J08529.D0761755.S91.N002500
           RESTORE DSN=CTDP.R3.BL1140D.J08502.D0761542.S91.N000900
//*
//*******************************************************************
//*                 CONTROL-D ANALYZE STEP                          *
//*******************************************************************
//ANALYZE  EXEC PGM=CTDRSC,COND=EVEN,REGION=OM,
//            PARM='13470051,M90RST  '
//STEPLIB  DD DSN=IOAP.PROD.LOAD,DISP=SHR
//SYSIN    DD DSN=CTDP.PROD.M90RST.RSTLIST,
//          DISP=(OLD,DELETE)
//DAAMF    DD DISP=SHR,DSN=CTDP.PROD.Active Missions File
//DAAMF1   DD DISP=SHR,DSN=CTDP.PROD.Active Missions File
//DALOG    DD DISP=SHR,DSN=IOAP.PROD.LOG
//DAVACT   DD DSN=CTDP.PROD.ACTUSR,DISP=SHR,
//          AMP=('BUFSP=300000')
//DAVHST   DD DSN=CTDP.PROD.HSTUSR,DISP=SHR,
//          AMP=('BUFSP=300000')
//SYSPRINT DD SYSOUT=*,HOLD=YES
//SYSABEND DD SYSOUT=*,HOLD=YES
//PRTDBG   DD SYSOUT=*,HOLD=YES
//
 ********************************** BOTTOM OF DATA ****************************
Once the JCL for the restore job has been written to the JOB library it is then ready for submission.
Because this library is used to create a new member (or replace an existing one), the library should be compressed on a regular basis to avoid any space problems.
Submit Restore Job
Once the JCL created for the restore job has been written to the JOB library, Control-D provides two methods for submitting the job to the system:
-
The Control-D monitor will submit the job (default).
-
Control-M or another automated scheduling package will submit the job.
These methods are described below:
-
Submit using the Control-D monitor.
-
Control-D will automatically submit the job to the system.
-
Submit using Control-M.
-
If you have Control-M installed in Shared Database mode, you can add a condition to trigger the submission of the JCL by Control-M. This is the preferred method for Control-M users because the execution of the restore job can be monitored by Control-M.
-
Submit using the production control system.
-
You can pass control to another production control system to submit the job. Using this method, the execution of the job can be monitored by the production control system. This method is implemented using Control-D Exit CTDX011.
Execute Restore Job
Once the restore job has started executing, it has two phases. The first is to restore all the requested CDAM datasets to DASD. The second is to analyze the results of the execution, to copy the selected entries to the Active User Report List file (so that the restored CDAMs can be accessed), and to update the status of the History User Report List file entries to indicate that they have been successfully restored.
If the restore mission fails while executing, you may have to run a RSTRESET job from the Control-D JCL library.
Define Restore Missions
There are two supplied restore mission definitions that you can use. For many sites, no other definitions are required. We recommend that when you are creating new restore mission definitions, you use the CLIST CTDCRMIS. This CLIST will automatically create a restore mission definition and a restore skeleton job for you, according to the parameters you supply.
You can also define the restore mission parameters online using the Control-D Mission Definition facility screens (Option M in the IOA Primary Option menu). The definitions that you create are saved in the Control-D restore missions library. Note that because the definitions are saved in a partitioned dataset (PDS), you should ensure that the PDS is backed up regularly in case you lose your definitions due to some type of system error.
In this section, we will offer recommendations on specific parameters that you will define in your restore mission definitions. Below is a summary of the information that you will specify. We have split the information into four distinct steps. For a detailed explanation, see the printing, backup and restore mission parameters chapter in the Control-D and Control-V User Guide.
We will use this four-step guide to explain how to define restore missions. Each step corresponds to a particular category of the restore mission parameters:
-
General mission information (General parameters).
-
When to schedule the mission (Basic Scheduling parameters).
-
When to execute the mission (Runtime Scheduling parameters).
-
What to do upon termination of the mission (Post-Processing parameters).
Restore Mission Parameters Definition Screen
 ---- CONTROL-D CATEGORY                      RST MISSION RST0060M --------(M.S)
 COMMAND ===>                                                    SCROLL===> CRSR
 +-----------------------------------------------------------------------------
   CATEGORY                                   MISSION
   OWNER    M90           TASKTYPE RST        GROUP
   DESC
   ===========================================================================
   DAYS                                                          DCAL
                                                                      AND/OR
   WDAYS                                                         WCAL
   MONTHS  1- Y 2- Y 3- Y 4- Y 5- Y 6- Y 7- Y 8- Y 9- Y 10- Y 11- Y 12- Y
   DATES
   CONFCAL          SHIFT   RETRO N MAXWAIT 00
   MINIMUM          PDS
   ===========================================================================
   IN
   TIME FROM      TO      NOT LATER THAN      PRIORITY    INTERVAL
   ===========================================================================
   OUT
   SHOUT WHEN                                      TO                   URGN
   MSG
 ======= >>>>>>> END OF RESTORE MISSION PARAMETERS OF THIS CATEGORY <<<<<< =====
PLEASE FILL IN MISSION PARAMETERS. USE "SHPF" TO SEE PFK DEFINITION     15.15.36
Step 1: General Mission Information
The first set of parameters you can fill in are the General Mission parameters. In this section, you define general information about the mission, much of which can be used for tracking and control purposes.
General Mission Parameters
We recommend that the mission names reflect the restore interval. This should make it easy to identify and forecast when the next restore will occur.
CATEGORY                                   MISSION
OWNER                  TASKTYPE RST        GROUP
DESC
Step 2: When to Schedule the Mission
The second set of parameters you can fill in are the Basic Scheduling parameters. In this section, you define information about when to schedule the mission to the Active Missions file.
Basic Scheduling Parameters
DAYS                                                          DCAL                                                                                 AND/OR
WDAYS                                                         WCAL
MONTHS  1- Y 2- Y 3- Y 4- Y 5- Y 6- Y 7- Y 8- Y 9- Y 10- Y 11- Y 12- Y
DATES
CONFCAL          SHIFT   RETRO N MAXWAIT 00
MINIMUM          PDS
A scheduling program called by the New Day procedure CTDNDAY analyzes these parameters to determine if the mission should be placed in the Active Missions file. The various options for scheduling were detailed in Schedule Restore Mission to the Active Missions File.
We recommend that you select a method for scheduling of the restore missions and implement it at this stage. This will mean that the restore procedures will be in place for the implementation of Control-D into production (which will occur in Phase 8).
Step 3: When to Execute the Mission
The third set of parameters you can fill in are the Runtime Scheduling parameters. In this section, you define information about when the mission should execute after it has been placed in the Active Missions file.
Runtime Scheduling Parameters
IN
TIME FROM      TO      NOT LATER THAN      PRIORITY    INTERVAL
Once all runtime parameters are fulfilled concurrently, the restore mission will start executing. The Control-D monitor checks the Active Missions file at specified intervals (defined in CTDPARM) to see if the specified criteria have been met. You can specify dependency information to the restore mission using parameter IN.
The following definition specifies that the restore mission should not run until the operators have added a condition. In this example, we are using a manual trigger to execute the mission.
IN        OP-START-RESTORE-ADH ODAT
TIME FROM      TO      NOT LATER THAN      PRIORITY    INTERVAL
Step 4: What to Do Upon Termination of the Mission
The fourth set of parameters you can fill in are the Post-Processing parameters. In this section, you define information about what to do when the mission finishes executing.
Report Decollating Mission Post Processing Parameters
OUT                                          SHOUT WHEN NOTOK
TO OPER2       URG V
MSG RESTORE MISSION RST0060M ENDED NOT OK - PLEASE CHECK
We recommend that you use the Shout facility for exception handling (such as when a mission fails). You should try to avoid sending "comforting" messages indicating that all your restore missions have worked successfully as these may obscure any real exceptions that occur in Control-D.
Cyclic Restore Missions
Standard restore missions (when the TASKTYPE parameter is set to RST) are scheduled to the Active Missions file and execute once (unless manually rerun).
Normally you will define restore missions as being "cyclic" by setting the TASKTYPE parameter to CRS. This means that the mission can have multiple executions rather than just one. The flow of a cyclic mission is that the mission is scheduled to the Active Missions file. The mission executes at a specific point based on time and dependency parameters, and when it completes it is rescheduled for another potential execution. Using this method, a Restore Mission can have multiple executions, for example:
CATEGORY PROD                              MISSION RST0060M
OWNER    M90           TASKTYPE CRS        GROUP   ADMIN
DESC     RESTORES SELECTED REPORTS EVERY HOUR
DESC
===========================================================================
DAYS    ALL                                                   DCAL
                                                                  AND/OR
WDAYS                                                         WCAL
MONTHS  1- Y 2- Y 3- Y 4- Y 5- Y 6- Y 7- Y 8- Y 9- Y 10- Y 11- Y 12- Y
DATES
CONFCAL          SHIFT   RETRO N MAXWAIT 00
MINIMUM          PDS
===========================================================================
IN
TIME FROM 0800 TO 1900 NOT LATER THAN      PRIORITY    INTERVAL 060
===========================================================================
OUT
SHOUT WHEN                                      TO                   URGN
MSG
====== >>>>>>> END OF RESTORE MISSION PARAMETERS OF THIS CATEGORY <<<<<< ====
In the definition above, we specify that the restore mission should restore all reports (for this mission) at an hourly interval between 0800 and 1900 hours. This means that the restore mission will execute at an hourly interval between the specified times to check if any reports should be restored.
You should by now have defined and implemented the restore procedures.
Daily Flow of Housekeeping Tasks
During this phase, we have detailed which utilities we need to set up to maintain the Control-D User Report files, and have given recommendations on how to set up backup and restore missions. We recommend that you run the utilities on a daily basis using Control-M or another automated scheduling package, if possible. Listed below is the recommended flow of housekeeping tasks.
After the nightly report decollating missions have completed, do the following:
Table 35 Daily Housekeeping Tasks Following The Nightly Run Of Decollating Missions
|
Task |
Related Information |
|---|---|
|
1. Run backup missions |
To copy created CDAM files to tape (that is, archive reports). |
|
2. Back up the Active User Report List file |
Using any DASD management product such as DFDSS, FDR, HSM or using the IDCAMS REPRO utility. |
|
3. Run CTDCA2P |
To copy any new user entries to the Permanent User Report List file. |
|
4. Run CTDDELRP |
To move the entries that have passed their Active User Report List file deadlines to the History User Report List file, and delete the associated CDAM files from DASD. |
|
5. Run CTDCLHST |
To delete entries that have passed their Archive duration from the History User Report List file and to release their associated tapes back into the system. |
|
6. Run CTDCP2A |
To copy "dummy" entries to the Active Report List file, if you are allowing users to temporarily change the attributes of reports of the coming night. This utility is optional, depending on how you set up your report decollating mission SEARCH parameter. |
|
7. Check UNIDENT |
On a regular basis so that the reports assigned to the UNIDENT user will be checked to determine how and why reports have not been assigned. |
You should now set up the required utilities to run on a daily basis.
Review
During this phase, you have learned what the purpose of the Control-D user files is, which types of entries are contained in the files, how we manage the files, how to set up backup and restore procedures, and which processes should be performed on a daily basis to administer Control-D.
Before you continue, you should have:
-
Implemented the housekeeping utilities.
-
Set the search default using Control-D Wish WD0933.
-
Defined and implemented the backup missions.
-
Defined and implemented the restore missions.
-
Implemented backup and restore procedures.
 Communities
 Support Center
 YouTube
 Twitter
 Facebook
 LinkedIn