Creating an Azure Data Factory Plug-in
This procedure describes how to create a plug-in that triggers an existing pipeline in Azure Data Factory.
This plug-in is a simplified version of the Control-M Integration plug-in available from BMC, as described in Control-M for Azure Data Factory.
Similar to many other plug-ins, the Azure Data Factory plug-in involves the following key actions:
Authenticate (obtain a token) > Execute a pipeline > Track the pipeline
Before You Begin
To follow the steps, you must have an editable version of the Azure Data Factory plug-in from BMC, for reference purposes. Download the Control-M Azure Data Factory plug-in from the Control-M Custom Integrations Plug-ins Community Solutions in GitHub and import it into Application Integrator. Keep the imported plug-in open in Application Integrator, to view its attributes and settings.
Begin
Adding the New Plug-in
This procedure describes how to create a new plug-in with just a few basic details. This procedure adds the new plug-in to your collection of plug-ins in Application Integrator and prepares it for you to populate it with steps and attributes.
Begin
-
From the Home tab in Application Integrator, click Add Plug-in.
-
On the Add Plug-in pane, complete the following basic plug-in definitions:
-
In the Plug-in name field, type New Azure Data Factory Plugin.
-
In the Plug-in ID field, type ADF.
-
From the Steps Default Interface drop-down list, select REST API.
-
In the Description field, type Azure Data Factory REST plugin.
-
-
Click Add.
The new plug-in opens on a separate tab. It is also added to the list of plug-ins on the Home tab.
Defining Attributes in the Plug-in
This procedure describes how to prepare Connection Profile attributes and Job Property attributes for use in the plug-in steps.
Begin
-
In the plug-in tab of your new plug-in, click Attribute Management.
-
On the Attribute Management pane, define Connection Profile attributes and Job Properties attributes as they appear in the Azure Data Factory plug-in that you downloaded from GitHub and imported into Application Integrator.
For example, use the following steps to define a Connection Profile attribute for the Azure account subscription ID:
-
Click
 .
.The Add Attribute pane appears.
- Define values in the following fields:
- From the Field Type drop-down list, select Text box.
- In the Label field, type Subscription ID.
- In the Attribute Name field, type Subscription_ID.
-
On the Validation tab, toggle on Mandatory field (non empty).
-
Click Add.
-
-
Continue defining Connection Profile attributes and Job Properties attributes according to the attribute definitions in the Azure Data Factory plug-in that you downloaded from GitHub (and have open on a separate tab).
The following figures show the completed lists of attributes on the Attribute Management pane:


-
Click Close and then click Save.


Defining a Pre-Execution Step to Obtain a Token
This procedure describes how to define the pre-execution step, which obtains a token for the connection to Azure Data Factory.
Begin
-
From the Azure Data Factory tab, under Execution Steps, select the Pre-execution step and click
 .
. -
On the Edit Pre-Execution Step pane, in the Description field, type Token for loading pipeline information and click Save.
-
In the REST API tab on the right, complete the technical details of the pre-execution step as they appear in the Azure Data Factory plug-in that you downloaded from GitHub (and have open on a separate tab):
-
In the REST API URL field, type https://{{RESTHost}}.
-
In the URL Request Path field, type /{{tenant_id}}/oauth2/token.
-
From the Method drop-down list, select POST.
-
In Headers, in Editor View, type Content-Type=application/x-www-form-urlencoded.
-
In Body, in Editor View, type the following:
grant_type=client_credentials&client_id={{app_id}}&client_secret={{client_secret}}&resource=https://management.azure.com/.
-
-
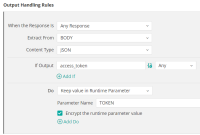
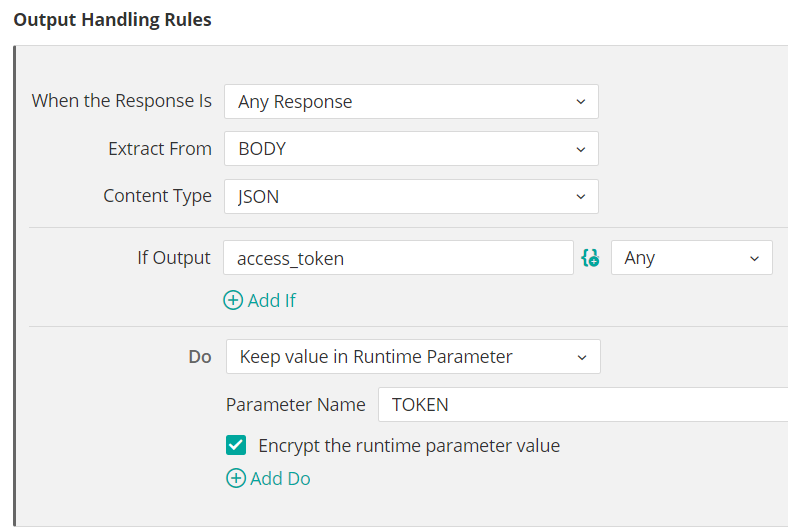
In the Output Handling tab, create an output handling rule to save the access token as a runtime parameter, as defined in the Azure Data Factory plug-in that you downloaded from GitHub and shown in the following figure:
-
Click Save.
Defining an Execution Step to Run a Pipeline
This procedure describes how to define the first Execution step, which runs a Data Factory pipeline.
Begin
-
In the plug-in tab, under Execution Steps, select the unnamed Execution step and click
. -
On the Edit Execution Step pane, type values in the following fields and then click Save:
-
In the Step Name field, type Run Data Factory Pipeline.
-
In the Description field, type Trigger ADF pipeline.
-
-
In the REST API tab on the right, complete the technical details of the Execution step as they appear in the Azure Data Factory plug-in that you downloaded from GitHub (and have open on a separate tab):
-
In the REST API URL field, type https://{{main_url}}.
-
In the URL Request Path field, type the following:
//subscriptions/{{Subscription_ID}}/resourceGroups/{{ResourceGroupName}}/providers/Microsoft.DataFactory/factories/{{FactoryName}}/pipelines/{{PipelineName}}/createRun?api-version=2018-06-01.
-
From the Method drop-down list, select POST.
-
In Headers, in Editor View, type the following:
Content-Type=application/json&Content-Length=0&Authorization=Bearer {{TOKEN}}.
-
In Body, in Editor View, type {{parameters}}
-
Under Advanced Settings, select the Override connection timeout check box and type {{timeout}} in the field.
-
-
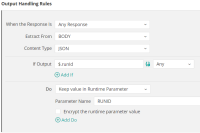
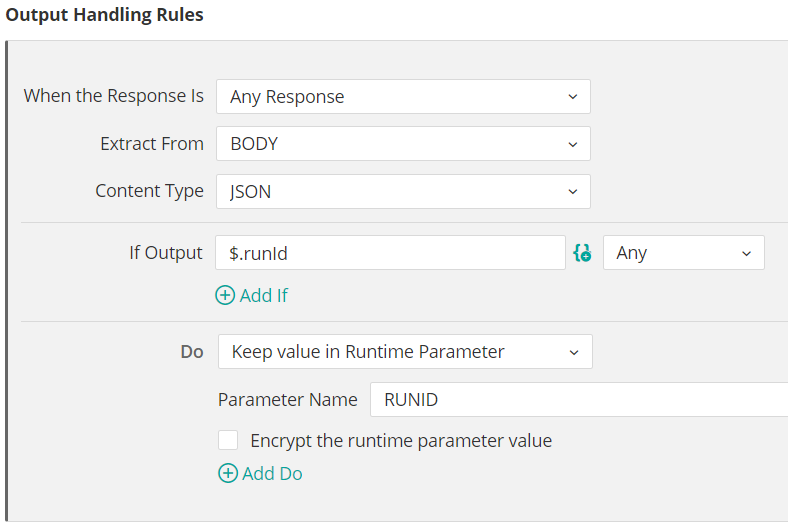
In the Output Handling tab, create an output handling rule to save the job run ID as a runtime parameter, as defined in the Azure Data Factory plug-in that you downloaded from GitHub and shown in the following figure:
-
Click Save.
Defining an Execution Step to Track the Pipeline
This procedure describes how to define the second Execution step, which tracks the running Data Factory pipeline.
Begin
-
In the plug-in tab, above the steps, click
. -
On the Add Execution Step pane, complete the following settings and then click Add:
-
In the Step Name field, type Track the Pipeline.
-
In the Description field, type Track the ADF pipeline.
-
Toggle on the Manual abort operation check box.
-
Toggle on the Verify operation completion check box.
-
-
In the REST API tab on the right, complete the following technical details of the Execution step as they appear in the Azure Data Factory plug-in that you downloaded from GitHub (and have open on a separate tab):
-
In the REST API URL field, type https://{{main_url}}.
-
In the URL Request Path field, type the following:
/subscriptions/{{Subscription_ID}}/resourceGroups/{{ResourceGroupName}}/providers/Microsoft.DataFactory/factories/{{FactoryName}}/pipelineruns/{{RUNID}}?api-version=2018-06-01.
-
From the Method drop-down list, select GET.
-
Under the method selection, select the Authentication required check box.
-
Under Authentication Settings, complete the following authentication details:
-
From the Authentication Type drop-down list, select OAuth2.
-
In the OAuth2 API URL field, type https://{{RESTHost}}/{{tenant_id}}/oauth2/token.
-
In the Token Parameter field, type REFRESHTOKEN.
-
From the Grant Type drop-down list, select Resource owner password credentials.
-
Select the Apply client ID check box and type {{app_id}} in the field.
-
Select the Use client secret check box and type {{client_secret}} in the field.
-
Select the Specify content type check box and type application/x-www-form-urlencoded in the field.
-
Select the Apply body check box and, in Editor View, type resource=https://management.azure.com/.
-
-
In Headers, in Editor View, type the following:
Content-Type=application/json&Authorization=Bearer {{REFRESHTOKEN}}.
-
-
In the Output Handling tab, create output handling rules for the following objectives, according to the definitions in the Azure Data Factory plug-in that you downloaded from GitHub:
-
Save the activity name from the output
-
Save the start time as a parameter
- Save the run ID as a parameter
-
-
Click Save.
Defining the Sub-steps of the Second Execution Step
This procedure describes how to define the two sub-steps under the Execution step for tracking the running Data Factory pipeline. One sub-step enables the user to manually abort the job in Control-M and the other sub-step enables Control-M to verify the completion of the job.
Begin
-
In the plug-in tab, expand the Execution - Tracking Pipeline Execution step.
-
Select the Manual abort operation sub-step and complete its REST API details, as they appear in the Azure Data Factory plug-in that you downloaded from GitHub (and have open on a separate tab):
-
In the REST API URL field, type https://{{main_url}}.
-
In the URL Request Path field, type the following:
/subscriptions/{{Subscription_ID}}/resourceGroups/{{ResourceGroupName}}/providers/Microsoft.DataFactory/factories/{{FactoryName}}/pipelineruns/{{RUNID}}/cancel?api-version=2018-06-01
-
From the Method drop-down list, select POST.
-
Under the method selection, select the Authentication required check box.
-
Under Authentication Settings, complete the following authentication details:
-
From the Authentication Type drop-down list, select Basic.
-
From the User Name Attribute drop-down list, select CON_PRO.
-
From the Password Attribute drop-down list, select client_secret.
-
-
In Headers, in Editor View, type the following:
Content-Type=application/json&Authorization=Bearer {{REFRESHTOKEN}}.
-
Select the Apend REST API response to job output check box.
-
-
Select the Verify operation completion sub-step and click
. -
On the Edit Verify Operation Completion pane, complete the following settings and then click Save:
-
In the Rerun Interval (In Seconds) field, type {{Poll_Interval}}.
-
Under Tolerance, toggle on Retry in case of failure and in the Retries field, type 1.
-
-
Complete the REST API details of the Verify operation completion sub-step, as they appear in the Azure Data Factory plug-in that you downloaded from GitHub:
-
In the REST API URL field, type https://{{main_url}}.
-
In the URL Request Path field, type the following:
/subscriptions/{{Subscription_ID}}/resourceGroups/{{ResourceGroupName}}/providers/Microsoft.DataFactory/factories/{{FactoryName}}/pipelineruns/{{RUNID}}?api-version=2018-06-01
-
From the Method drop-down list, select GET.
-
Under the method selection, select the Authentication required check box.
-
Under Authentication Settings, complete the following authentication details:
-
From the Authentication Type drop-down list, select OAuth2.
-
In the OAuth2 API URL field, type https://{{RESTHost}}/{{tenant_id}}/oauth2/token.
-
In the Token Parameter field, type REFRESHTOKEN.
-
From the Grant Type drop-down list, select Resource owner password credentials.
-
Select the Apply client ID check box and type {{app_id}} in the field.
-
Select the Use client secret check box and type {{client_secret}} in the field.
-
Select the Specify content type check box and type application/x-www-form-urlencoded in the field.
-
Select the Apply body check box and, in Editor View, type resource=https://management.azure.com/.
-
-
In Headers, in Editor View, type the following:
Content-Type=application/json&Authorization=Bearer {{REFRESHTOKEN}}.
-
-
In the Output Handling tab of the Verify operation completion sub-step, create output handling rules for the following objectives, according to the definitions in the Azure Data Factory plug-in that you downloaded from GitHub:
-
Save the reason for failure if the job fails
-
Fail the job if the pipeline run failed
- Fail the job when canceling a pipeline
- Save the status as a runtime parameter
- Save runtime parameters
- Save the entity that started the pipeline run
- Complete and proceed when the pipeline run is successful
- Fail the job when a pipeline is cancelled
-
-
Click Save.
Defining a Post-Execution Step to Retrieve Pipeline Completion Details
This procedure describes how to define a post-execution step, which retrieves pipeline completion details.
Begin
-
In the plug-in tab, under Execution Steps, select the Post-execution step and click
. -
On the Edit Post-Execution Step pane, in the Description field, type Retrieve pipeline completion details and click Save.
-
In the REST API tab on the right, complete the following technical details of the Execution step, as they appear in the Azure Data Factory plug-in that you downloaded from GitHub (and have open on a separate tab):
-
In the REST API URL field, type https://{{main_url}}.
-
In the URL Request Path field, type the following:
/subscriptions/{{Subscription_ID}}/resourceGroups/{{ResourceGroupName}}/providers/Microsoft.DataFactory/factories/{{FactoryName}}/pipelineruns/{{RUNID}}/queryActivityruns?api-version=2018-06-01&startTime="+(Get-Date).ToString('yyyy-MM-dd')+"&endTime="+(Get-Date).AddDays(1).ToString('yyyy-MM-dd')+"&pipelineName={{PipelineName}}".
-
From the Method drop-down list, select POST.
-
In Headers, in Editor View, type the following:
Content-Type=application/json&Authorization=Bearer {{REFRESHTOKEN}}.
-
In Body, in Editor View, type the following:
{"orderBy":[{"orderBy":"ActivityName","order":"DESC"}],"lastUpdatedBefore":"2040-12-31T23:59:59.999"}
-
-
In the Output Handling tab, create output handling rules for the following objectives, according to the definitions in the Azure Data Factory plug-in that you downloaded from GitHub:
-
Save the activity name from the output
-
Save the start time as a parameter
- Save the end time as a parameter
- Save the run ID as a parameter
- Save execution details
-
-
Click Save.
Testing Your Plug-in
This procedure describes how to run a test execution of the plug-in, to ensure that plug-in jobs can complete successfully.
Begin
-
Click Test.
Plug-in steps and attributes are first validated. You can continue with the test even if validation issues are found.
-
On the Test tab, select an Agent for the test, and optionally enter values in the Connection Profile fields and Job Properties fields.
-
Click Run Test.
The test runs and results are displayed on-screen.
Publishing and Deploying Your Plug-in
This procedure describes how to publish your plug-in to Control-M/EM and deploy it to an Agent, so that it is available in Control-M.
Begin
-
Click Publish & Deploy.
Plug-in steps and attributes are first validated. You can continue to publish even if warnings are found.
- In the Publish & Deploy pane, from the Deploy plug-in to selected agents drop-down list, select the Agents where you want to deploy the plug-in.
- Click Apply.
 YouTube
 Twitter
 Facebook
 LinkedIn