Control-M SaaS Unified View Migration
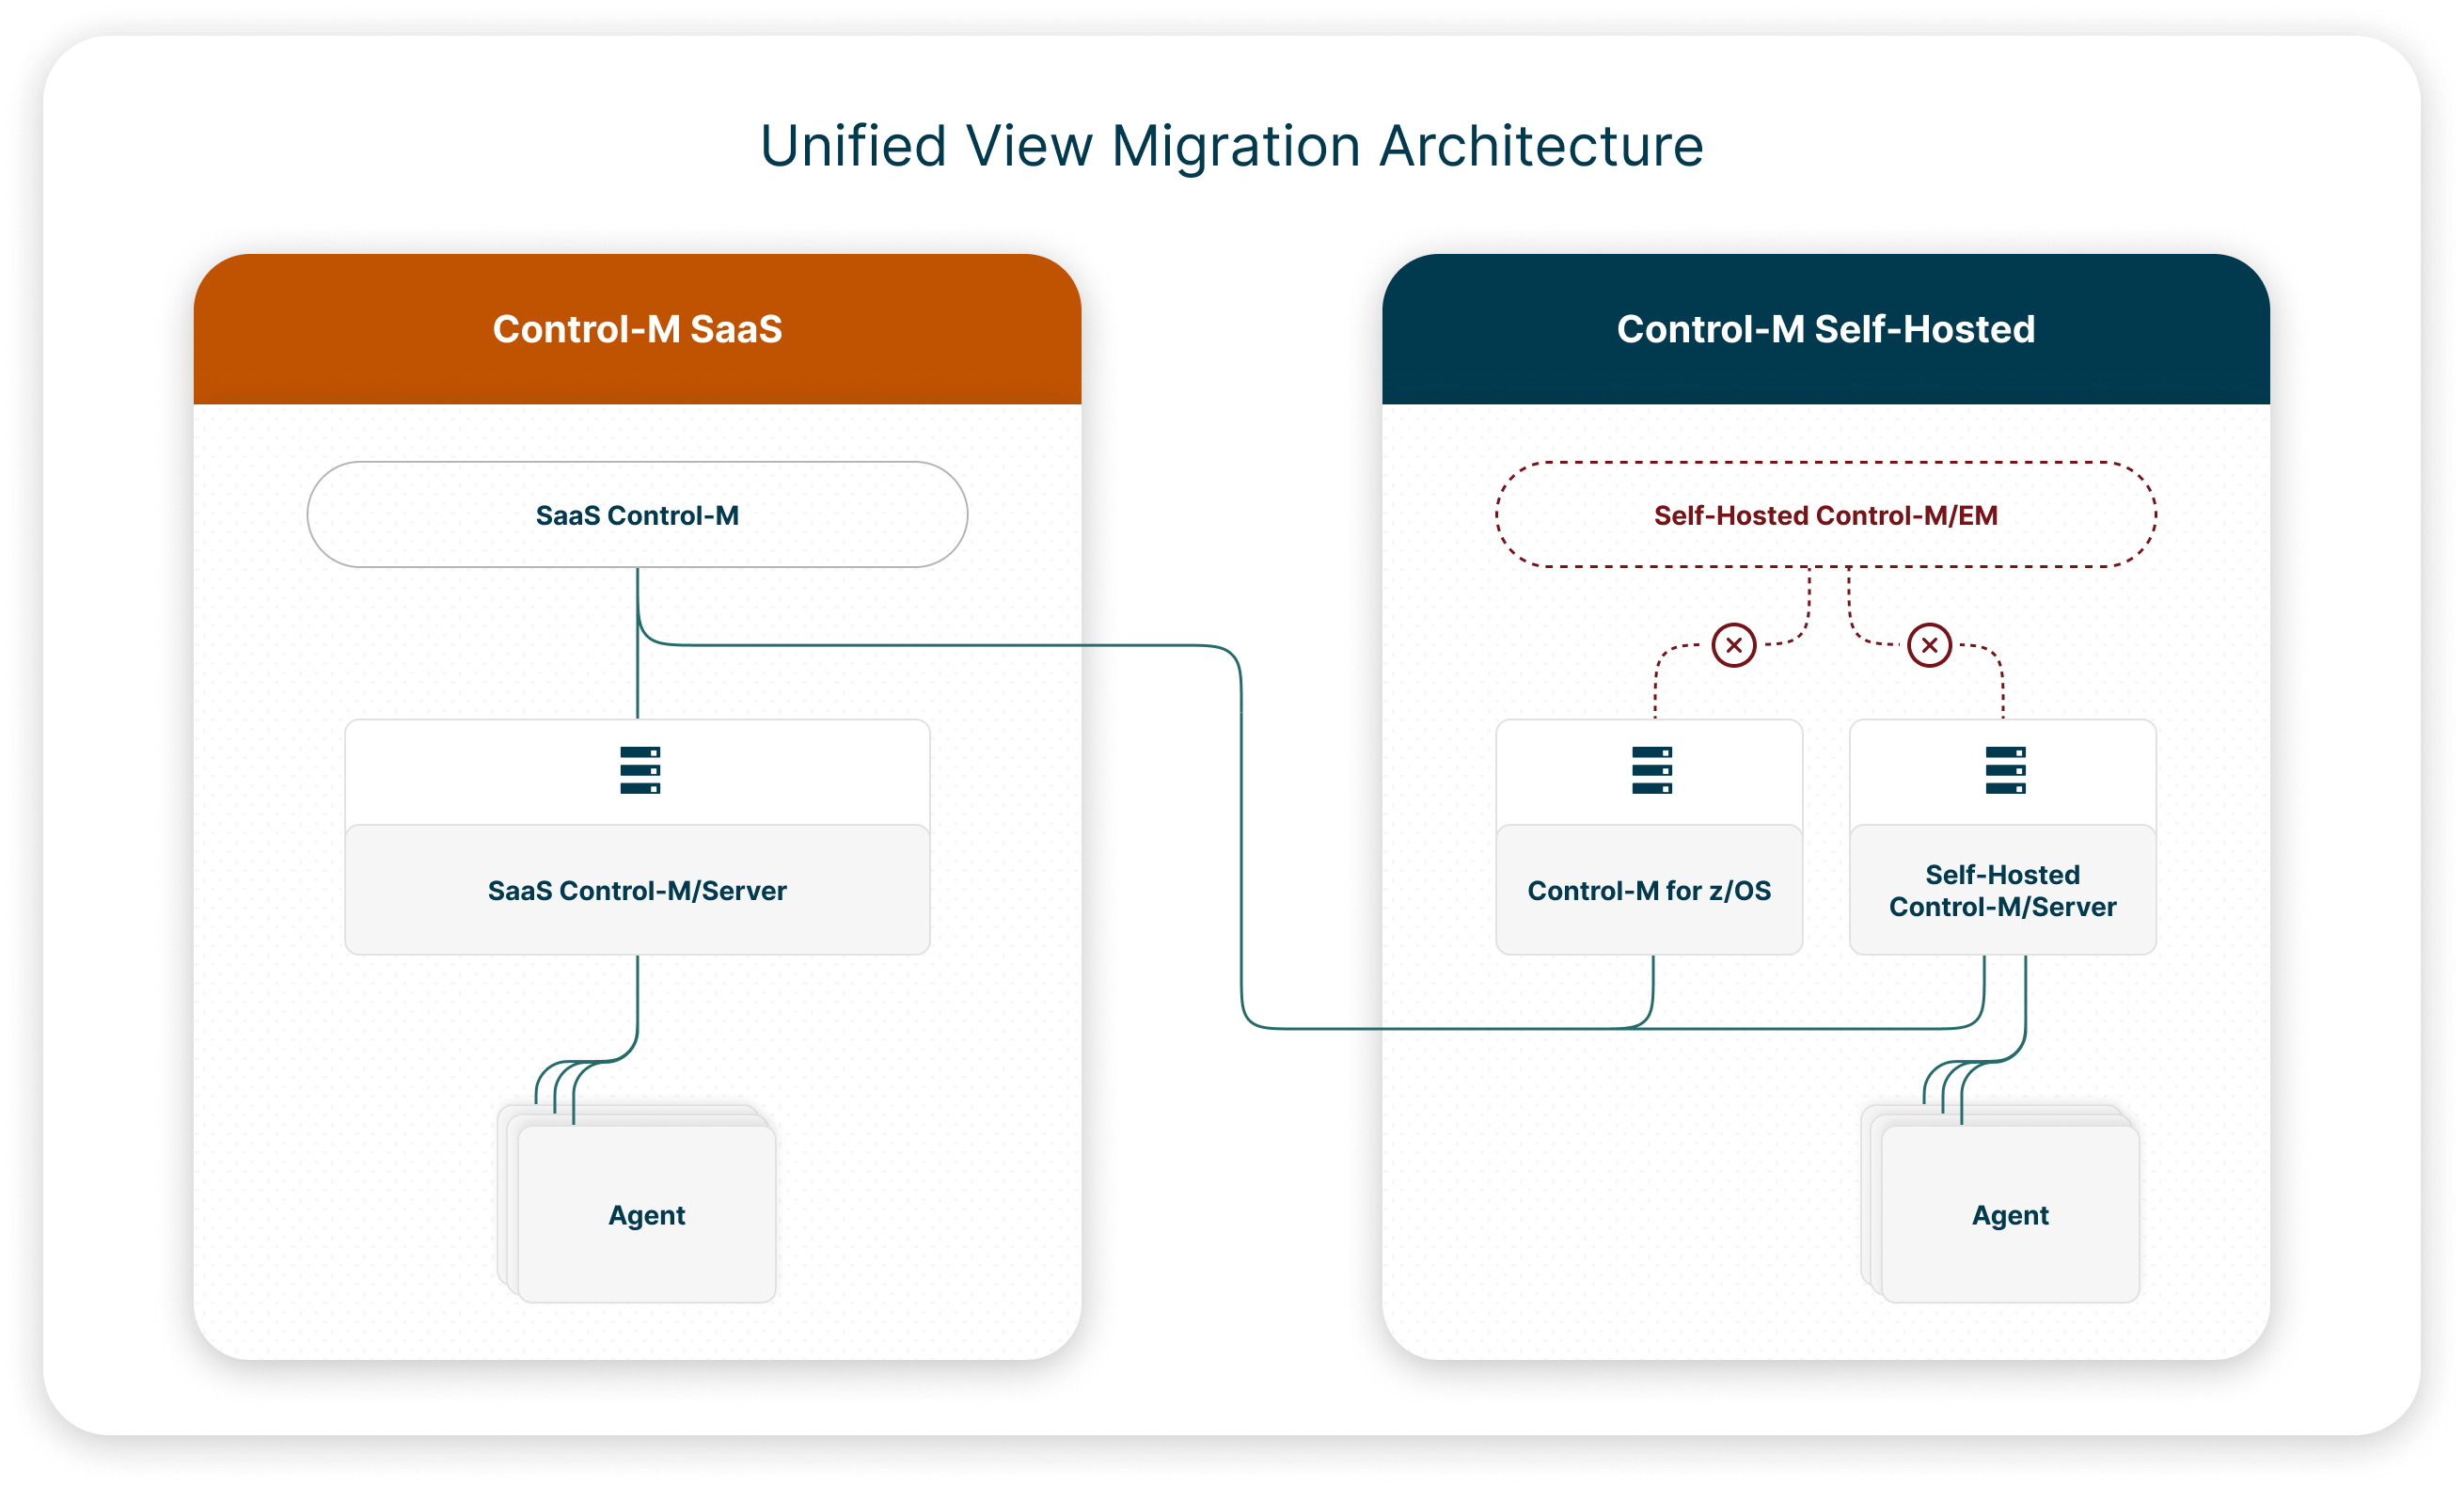
The Control-M SaaS Unified View migration copies the data from one self-hosted Control-M/EM to one SaaS Control-M/EM, and connects one or more self-hosted Control-M/Servers to SaaS Control-M Unified View![]() A mode of Control-M SaaS that enables you to manage self-hosted and SaaS Control-M/Servers..
A mode of Control-M SaaS that enables you to manage self-hosted and SaaS Control-M/Servers..
This eliminates the need to maintain Control-M/EM and its database.
The following diagram shows the logical architecture of a typical Control-M SaaS Unified View migration:
Migrating to Control-M SaaS Unified View
This procedure describes how to migrate your Control-M/EM data, and connect your Control-M/Servers to Control-M SaaS, based on your organizational needs and the results of the qualification scan.
Before You Begin
-
Verify that you are qualified to migrate to Control-M SaaS, as described in Scanning Control-M Self-Hosted.
-
Verify that Control-M/EM 9.0.21.300 is installed.
Begin
-
Migrate your Control-M/EM data to Control-M SaaS, as described in Migrating to Control-M SaaS.
-
Generate a token that enables you to add a self-hosted Control-M/Server or Control-M for z/OS to Control-M SaaS, as described in Generating a Server Token.
-
For each Control-M/Server or Control-M for z/OS currently connected to your self-hosted Control-M/EM, do one of the following:
-
Connect a self-hosted Control-M/Server to Control-M SaaS, as described in Connecting a Self-Hosted Control-M/Server to Control-M SaaS Unified View.
-
Connect a self-hosted Control-M for z/OS to Control-M SaaS, as described in Connecting a Self-Hosted Control-M for z/OS to Control-M SaaS Unified View.
-
-
Resume all connected, self-hosted Control-M/Servers and Control-M for z/OS environments, as described in Resuming All Connected Self-Hosted Control-M/Servers and Control-M for z/OS Environments.
The following use cases demonstrate the need to migrate to Control-M SaaS Unified View:
-
Migrate your self-hosted workflows to Control-M SaaS that rely on mainframe modernization plug-ins or Control-M for z/OS.
-
Combine the functionality of both platforms for the following reasons:
-
Critical workflows must remain on your distributed Control-M Self-Hosted.
-
Some self-hosted features have not yet been integrated into Control-M SaaS.
-
Migrating to Control-M SaaS
This procedure describes how to migrate your Control-M/EM to Control-M SaaS. The migration exports your Control-M/EM data to an export file, uploads it to an Amazon S3 bucket, transfers the file, uncompresses it, and then integrates it into your new Control-M SaaS tenant.
If your Control-M/EM is not connected to the internet, you can transfer the export file to any internet-accessible Windows or Linux host and then continue the migration.
Before You Begin
-
Verify that you are qualified to migrate your Control-M/EM to Control-M SaaS, as described in Scanning Control-M Self-Hosted.
-
Verify that Control-M/EM 9.0.21.300 is installed.
Begin
-
Log in to Control-M SaaS with a username that is associated with an Admin role, and then generate and record the value of an API token, as described in Creating an API Token.
-
Download the Control-M SaaS EM Data Migration Tool to your Control-M/EM host from Control-M SaaS Migration Tool, and unzip it to a temporary directory.
-
From the command line, navigate to the export directory in the unzipped migration directory, and then run the following command to export your Control-M/EM data to a compressed archive (*.tar.gz) file:
-
Linux: run_saas_migration_export.sh
-
Windows: run_saas_migration_export.bat
The export tool runs, produces a compressed archive export file, named EMExportForSaaS.tar.gz, that contains your Control-M/EM data, and saves it to the temporary directory.
-
-
From an internet-accessible host (either your Control-M/EM or a separate Windows or Linux host) do the following:
-
Verify that Python 3.8 or higher and a pip or pip3 Python package-management system is installed.
-
From the import directory in the unzipped migration tool directory, run one of the following commands:
-
Pip: pip install -r requirements.txt
-
Pip3: pip3 install -r requirements.txt
-
-
If you use a proxy server, define the following environment system variable:
-
Name: https_proxy
-
Value: http://<Proxy_Server_Address>:<Proxy_Server_Port>
-
-
Verify that you have outgoing internet access to the following locations:
-
*.controlm.com:443
-
*.amazonaws.com:443
-
-
Navigate to the import directory in the temporary directory.
From the import directory in the unzipped migration tool directory, do one of the following to import your Control-M/EM data to Control-M SaaS:
-
Control-M/EM Host: From your internet-accessible Control-M/EM host, run the following command:
-
Linux: em ./run_saas_migration_import.sh
-
Windows: em ./run_saas_migration_import.bat
-
-
Separate Host: From your separate internet-accessible host, run the following command:
-
Linux: ./run_saas_migration_import.sh
-
Windows: ./run_saas_migration_import.bat
-
-
-
-
At the prompts, type the requested information, as described in Import Parameters.
The import tool runs and a number of status messages appear that describe the import process.
Import Parameters
The following table describes the parameters that you must provide at the import tool prompts in Migrating to Control-M SaaS.
|
Parameter |
Description |
|---|---|
|
SaaS Control-M Automation API Endpoint |
Defines the SaaS Control-M Automation API endpoint, in the following format: <Tenant_Name>-aapi.<Zone>.controlm.com |
|
Control-M Automation API Token |
Defines the API token that you created in Migrating to Control-M SaaS. |
|
Compressed Archive Export File Pathname |
Defines the pathname of the compressed archive export file that you created in Migrating to Control-M SaaS. <Temporary_Directory>HelixEmMigrationTool\export\EMExportForSaaS.tar.gz |
|
Python Interpreter Name or Pathname |
Defines the name or pathname of the Python interpreter that converts source code into machine language, as follows:
|
Generating a Server Token
This procedure describes how to generate a Server token, which enables you to add a self-hosted Control-M/Server or self-hosted Control-M for z/OS to Control-M SaaS.
Begin
-
Log in to Control-M SaaS with a user ID that is associated with an Admin role.
-
From the
 icon, select Configuration.
The Configuration domain opens.
-
From the
 drop-down list, select Control-M/Servers.
The Control-M/Servers tab appears.
-
Toggle on Self-Hosted and verify that your self-hosted Control-M/Servers or self-hosted Control-M for z/OS environments appear in the Self-Hosted area of the Control-M/Servers pane.
In the Status column, a Ready to Connect button appears next to the added self-hosted Control-M/Servers or self-hosted Control-M for z/OS.
-
Select the required self-hosted Control-M/Server or self-hosted Control-M for z/OS, and then do the following:
-
Click Ready to Connect.
A Control-M/Server Token dialog box appears.
-
Click Get Control-M/Server Token.
A dialog box appears with the token value and enables you to copy it to your clipboard.
-
Record the token, which you must provide when you are prompted by the registration utility, as described in Connecting a Self-Hosted Control-M/Server to Control-M SaaS Unified View and Connecting a Self-Hosted Control-M for z/OS to Control-M SaaS Unified View.
-
Connecting a Self-Hosted Control-M/Server to Control-M SaaS Unified View
This procedure describes how to disconnect a self-hosted Control-M/Server from your Control-M/EM and connect it to Control-M SaaS Unified View via the ctm_menu utility.
-
You cannot connect a self-hosted Control-M/Server that is installed on Windows to Control-M SaaS Unified View.
-
If your Control-M/Servers execute more than
Before You Begin
-
Verify that you are qualified to connect your self-hosted Control-M/Server to Control-M SaaS Unified View, as described in Scanning Control-M Self-Hosted.
-
Verify that you have generated a server token in Control-M SaaS.
Begin
-
Pause the self-hosted Control-M/Server, as described in Pausing a Control-M/Server or config server::pause.
-
Disable the self-hosted Control-M/Server, as described in Disabling a Control-M/Server, and verify that the Actual State is Disabled.
-
Unmanage the self-hosted Control-M/Server, as described in Unmanaging a Control-M/Server
-
Set the desired state of the Control-M/Server Gateway to Down from the CCM or via the following ccmcli utility command:
ccmcli -u <Username> -p <Password> -t Gateway -n <Component_Name> -h <Component_Host> -cmd stop
-
From the self-hosted Control-M/Server host, do the following:
-
Run the following command:
ctm_menu
The Control-M Main Menu appears.
-
Press 1.
-
Type
The registration utility runs and connects the self-hosted Control-M/Server to Control-M SaaS.
-
-
Resume the self-hosted Control-M/Server in Control-M SaaS, as described in Resuming All Connected Self-Hosted Control-M/Servers and Control-M for z/OS Environments or config server::resume.
-
From the Control-M/Servers pane in Control-M SaaS, verify that the self-hosted Control-M/Server status changes from Ready to Connect to OK.
The self-hosted Control-M/Server is now disconnected from the Control-M/EM and is connected to Control-M SaaS.
Connecting a Self-Hosted Control-M for z/OS to Control-M SaaS Unified View
This procedure describes how to disconnect a self-hosted Control-M for z/OS from your Control-M/EM and connect it to Control-M SaaS Unified View via the ICE utility.
If your Control-M for z/OS environments execute more than
Before You Begin
-
Verify that you are qualified to connect your self-hosted Control-M for z/OS to Control-M SaaS Unified View, as described in Scanning Control-M Self-Hosted.
-
Verify that you have generated a server token in Control-M SaaS, as described in Generating a Server Token.
-
Verify that the Control-M API Gateway is installed, as described in Step 12 – Install Control-M API Gateway in the INCONTROL documentation.
Begin
-
Pause the self-hosted Control-M for z/OS, as described in Pausing a Control-M/Server or config server::pause.
-
Disable the self-hosted Control-M for z/OS, as described in Disabling a Control-M/Server, and verify that the Actual State is Disabled.
-
Unmanage the self-hosted Control-M for z/OS, as described in Unmanaging a Control-M/Server
-
Set the desired state of the Control-M/EM Gateway to Down from the CCM or via the following ccmcli utility command:
ccmcli -u <Username> -p <Password> -t Gateway -n <Component_Name> -h <Component_Host> -cmd stop
-
From your Control-M for z/OS, load ICE, as described in Installing INCONTROL Products with ICE.
-
Select Installation.
The IOA Installation menu appears.
-
Select Customized Installation.
The IOA Customized Installation menu appears.
-
From the IOA Customized Installation menu, at the Option ===> prompt, type 2, at the Product ID ===> prompt, type CTM, and then press ENTER.
The Major Steps Selection menu appears.
-
Select 13 - Register Control-M for z/OS to Helix CTM.
The Minor Steps Selection menu appears for major step 13 - Register Control-M for z/OS to Helix CTM.
-
Follow steps 1–8 in the Minor Steps Selection menu, as described in Step 13 - Register Control-M for z/OS to Helix CTM.
-
Resume the self-hosted Control-M for z/OS in Control-M SaaS, as described in Resuming All Connected Self-Hosted Control-M/Servers and Control-M for z/OS Environments or config server::resume.
The self-hosted Control-M for z/OS is now connected to Control-M SaaS.
Resuming All Connected Self-Hosted Control-M/Servers and Control-M for z/OS Environments
This procedure describes how to resume all connected, self-hosted Control-M/Servers and self-hosted Control-M for z/OS environments, which enables you to run jobs from Control-M SaaS.
Before You Begin
-
Verify that you have connected all required self-hosted Control-M/Servers and self-hosted Control-M for z/OS environments.
Begin
-
From the
 icon in Control-M SaaS, select Configuration.
The Configuration domain opens.
-
From the
 drop-down list, select Control-M/Servers.
The Control-M/Servers tab appears.
-
Do one of the following:
-
From the Control-M/Servers Pane: Toggle on Self-Hosted and select the required self-hosted Control-M/Server or self-hosted for Control-M for z/OS, and then click Resume.
-
From a Command Prompt: Run config server::resume.
-
-
Verify that the self-hosted Control-M/Server or self-hosted Control-M for z/OS Actual State changes from Paused & Up to Up.
-
Resume the remaining connected, self-hosted Control-M/Servers and self-hosted Control-M for z/OS environments.
You can now access your resumed, self-hosted Control-M/Servers and self-hosted Control-M for z/OS environments from Control-M SaaS Unified View.
 YouTube
 Facebook
 LinkedIn