Control-M SaaS Full Migration
A Contol-M SaaS full migration copies the data from one self-hosted Control-M/EM to one SaaS Control-M/EM, and all self-hosted Control-M/Servers to SaaS Control-M/Servers.
This migration eliminates the need to maintain these self-hosted components and their associated databases.
The following diagram shows the logical architecture of a typical full migration:
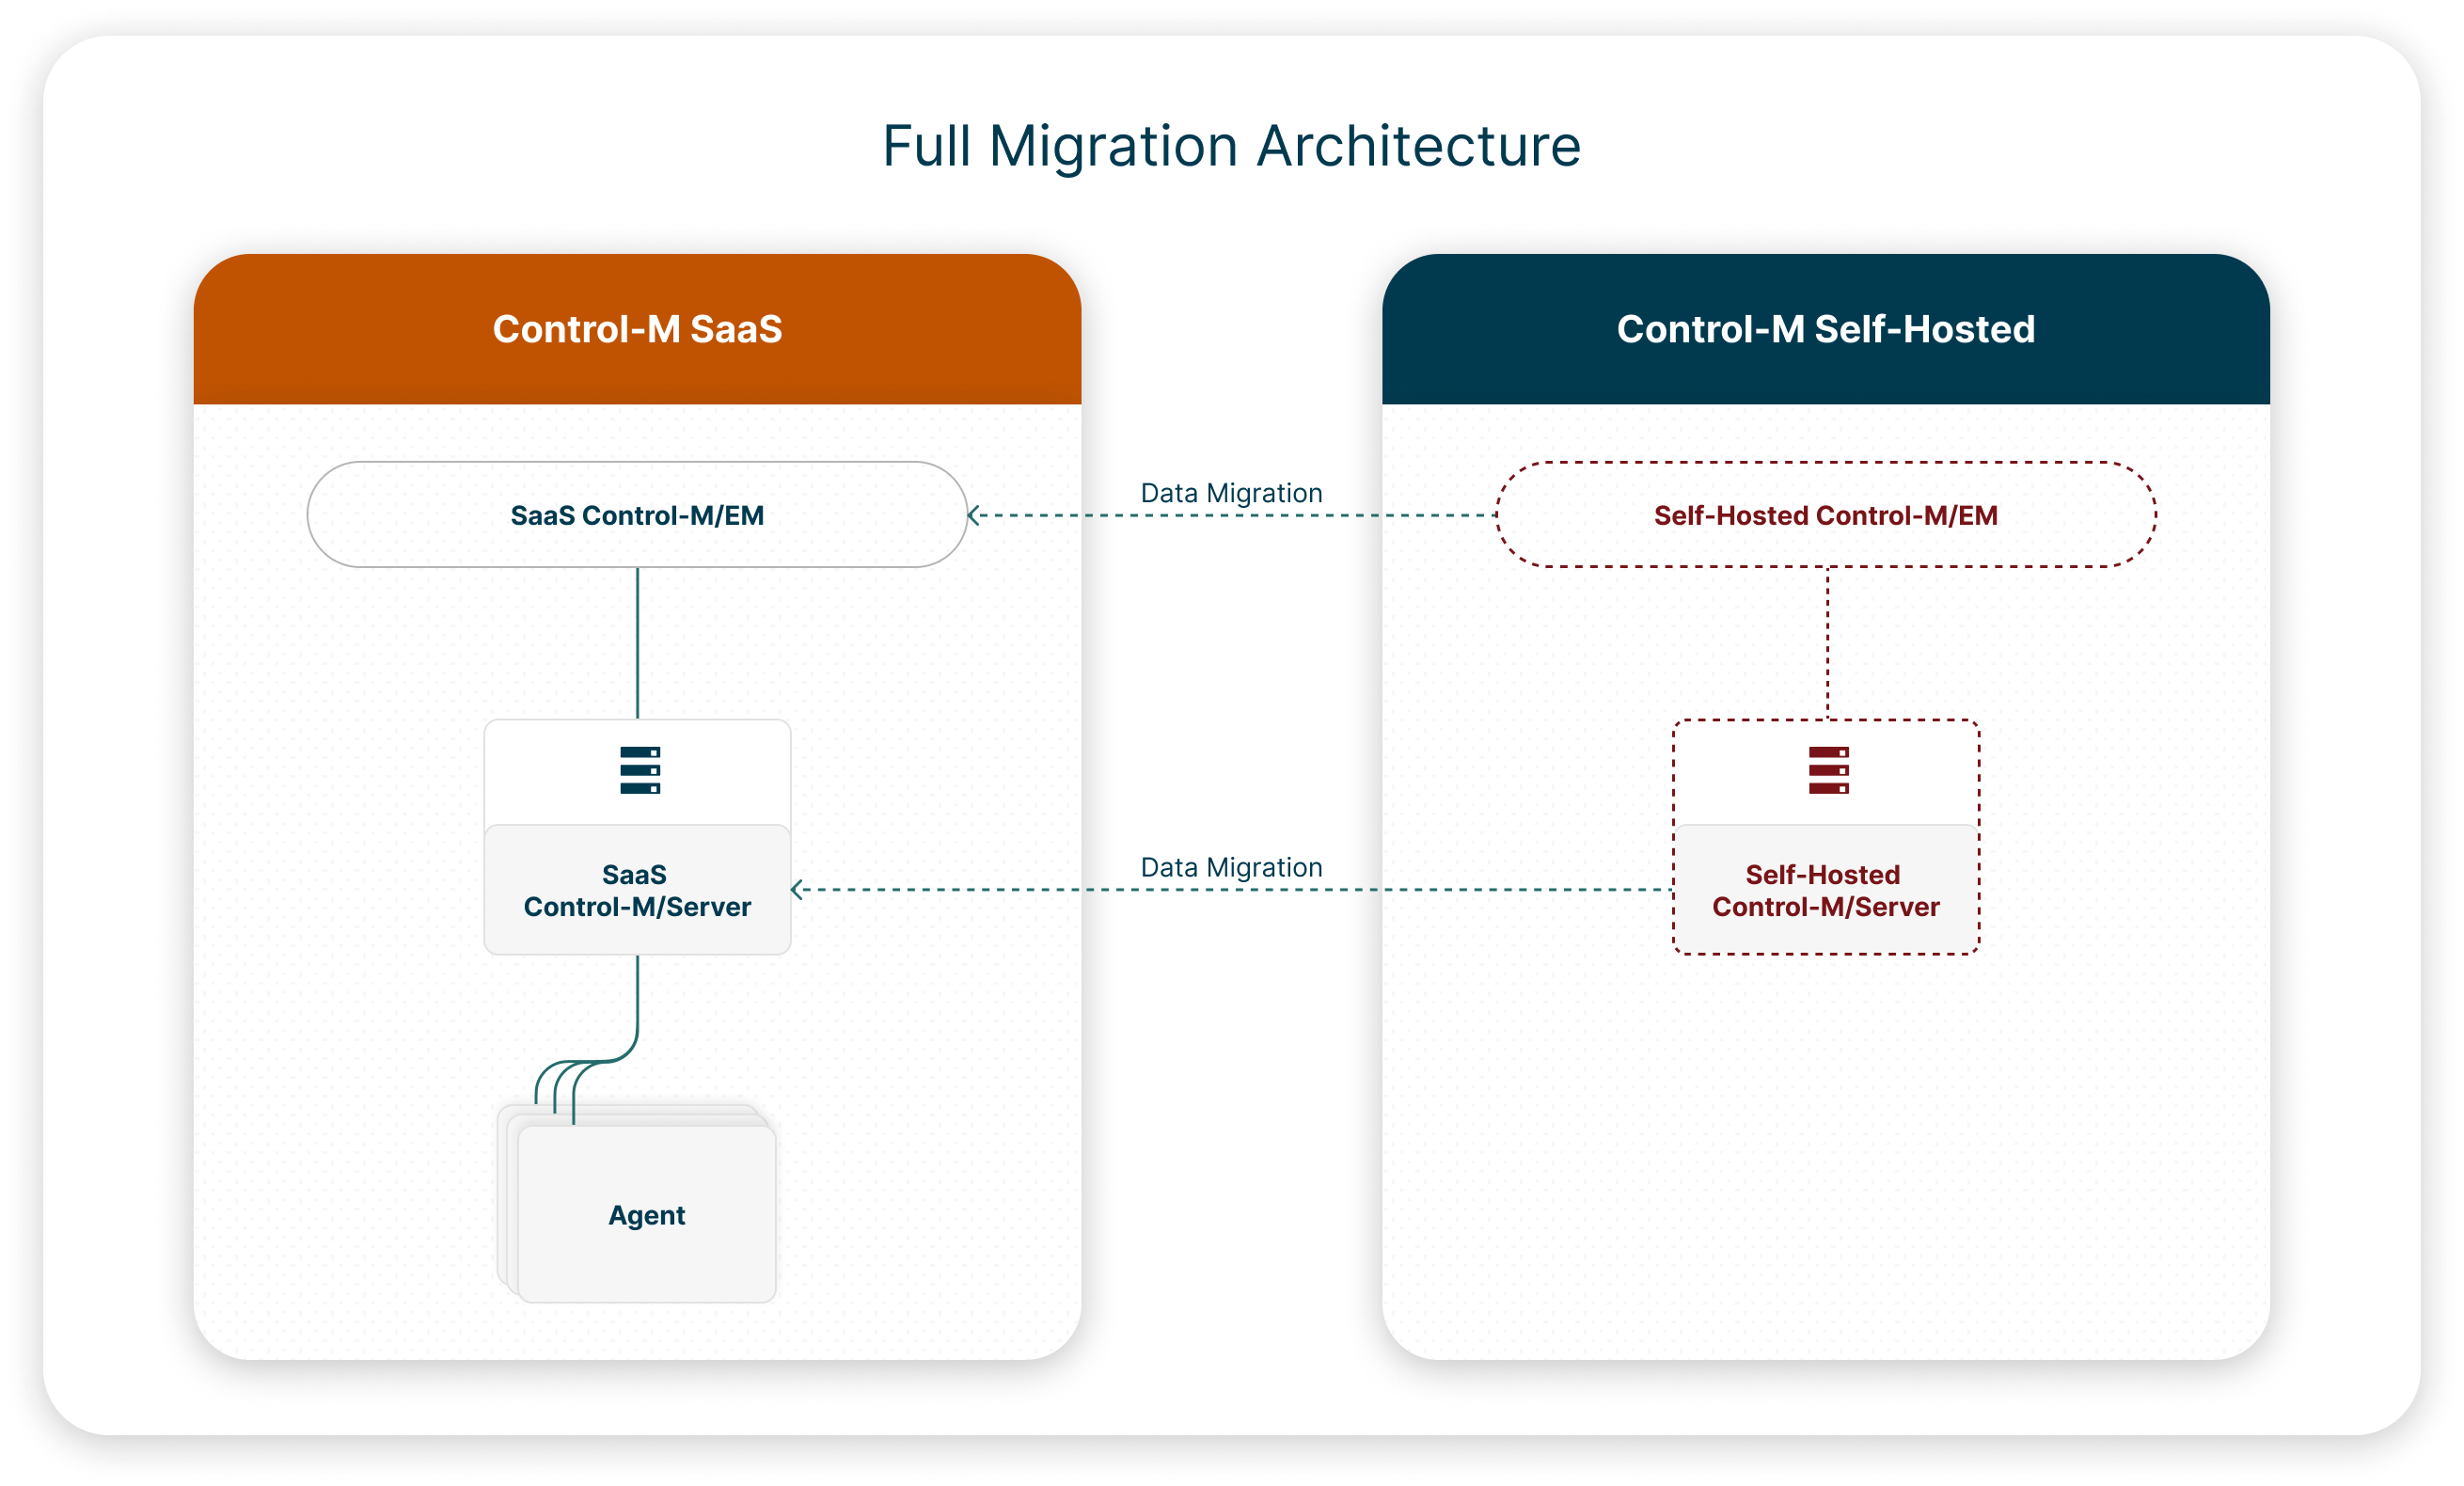
An organization scans their Self-Hosted Control-M and discovers that they are qualified to migrate to Control-M SaaS. Their qualification report advises them to make a number of changes, including adjustments to their folder definitions. The Administrator then runs another scan in Export Mode that exports every folder in their Control-M Self-Hosted components. The Administrator makes the required changes that are detailed in the qualification report, registers for Control-M SaaS, and then runs a Deploy Only migration on every self-hosted Control-M/Server, which migrates their self-hosted Control-M/EM and all the extracted folders with the applied changes.
Migrating to Control-M SaaS
This procedure describes how to migrate your self-hosted Control-M/EM and Control-M/Server data to Control-M SaaS, based on your organizational needs and the results of the qualification scan.
Before You Begin
-
Verify that you are qualified to migrate to Control-M SaaS, as described in Scanning Control-M Self-Hosted.
Begin
-
Verify that you are qualified to migrate to Control-M SaaS, as described in Scanning Control-M Self-Hosted.
The scan produces qualification reports that enable you to determine the steps that you must take before you can migrate to Control-M SaaS.
-
Register for Control-M SaaS, as described in Registering for Control-M SaaS.
This enables BMC to provide you a SaaS Control-M/EM with SaaS Control-M/Servers that match the time zones and Control-M/Server names in your current self-hosted environment.
-
Migrate your self-hosted Control-M/EM and Control-M/Server data to Control-M SaaS, as described in Migrating to Control-M SaaS.
Migrates Self-Hosted Control-M to Control-M SaaS, applies necessary adjustments, and generates an Excel-based migration report that identifies any remaining incompatibility issues and the actions you must take to resolve or work around them.
Scanning Control-M Self-Hosted
This procedure describes how to scan a self-hosted Control-M/EM and Control-M/Server, which generates an Excel-based Qualification Report that identifies incompatibilities and describes the steps you must take to migrate to Control-M SaaS. You must perform this procedure for every Control-M/Server connected to Control-M Self-Hosted.
You can run this tool from any Windows or Linux host.
Before You Begin
-
Verify that Control-M Automation API 9.0.20.245 or higher is installed on the self-hosted Control-M/EM server.
-
Verify that you have access to the self-hosted Control-M/EM server database.
BMC recommends that you use the latest version of Control-M Automation API. For more information, see Automation API Installation.
Begin
-
Download the Control-M SaaS Server Data Migration tool, based on your operating system, from Control-M SaaS Migration Tool, and unzip it to a temporary folder.
-
(Optional) Migrate your variable lists to pool variables, as described in Creating a LIBMEMSYM Control File.
-
From the inputParameters folder inside the unzipped migrateToSaaS temporary folder, open the parameters.txt file in a text editor, and then define the required parameters, as described in Migration Tool Parameters.
-
Do one of the following:
-
Qualification Mode: To scan your components and export up to 5,000 folders to a *.json file, navigate to the unzipped migrateToSaaS folder and run the following command:
-
UNIX: migrateToSaaS.sh qualification
-
Windows: migrateToSaaS.bat qualification
-
-
Export Mode: To scan your components and export all folders to a *.json file, do the following:
-
Install the most recent version of Control-M Automation API on Control-M/EM server, as described in Automation API Installation.
-
From the command line, navigate to the unzipped migrateToSaaS folder and run the following command:
-
UNIX: migrateToSaaS.sh extract
-
Windows: migrateToSaaS.bat extract
Scan and export time depends on the size of your components.
-
-
The scan runs and produces an Excel-based Qualification_Report.xlsx file in the report folder, which includes one or more of the following results in the Qualification Summary sheet:
-
Passed
-
An automatic adjustment was made.
-
Manual action is required.
-
An incompatibility was found.
-
-
From the report folder, open, review, and follow the directions in the Qualification Report.
Depending on the report results, you might have to scan your components more than once.
Registering for Control-M SaaS
This procedure describes how to register for Control-M SaaS, which enables BMC to provide you a with a SaaS Control-M/EM and SaaS Control-M/Servers that match the time zones and Control-M/Server names in your current self-hosted environment. You must perform this procedure only once.
Begin
-
Run the Control-M SaaS Server Data Migration tool in Qualification Mode, as described in Scanning Control-M Self-Hosted.
-
Open the migration metadata file from the following location:
-
UNIX: <migrateToSaaS>/output/migration_metadata.xlsx
-
Windows: "<migrateToSaaS>\output\migration_metadata.xlsx"
-
-
From the Control-M/Server column, delete all Control-M/Servers that must remain self-hosted and do not migrate to SaaS Control-M/Servers.
-
From the Time Zone drop-down list next to each Control-M/Server, select your Control-M/Server time zone.
-
Save the file and upload it in the Control-M SaaS Migration - Technical Migration Details section of the SaaS Subscription Registration form.
-
Complete and submit the SaaS Subscription Registration form.
A confirmation email with a link to your new Control-M SaaS tenant arrives after it is ready. If you do not receive this email, you must contact your customer service representative.
Migrating to Control-M SaaS
This procedure describes how to migrate your self-hosted Control-M/EM and one Control-M/Server to Control-M SaaS. You must perform this procedure for every self-hosted Control-M/Server that is connected to the self-hosted Control-M/EM.
You can run this tool from any Windows or Linux host.
Before You Begin
-
Verify that the most recent version of Control-M Automation API is installed on Control-M/EM server. For more information, see Automation API Installation.
- Verify that you have access to the Control-M/EM database.
Begin
-
Download the Control-M SaaS Server Data Migration tool, based on your operating system, from Control-M SaaS Migration Tool, and unzip it to a temporary folder.
-
(Optional) Migrate your variable lists to pool variables, as described in Creating a LIBMEMSYM Control File.
-
From the inputParameters folder, inside the unzipped migrateToSaaS folder, open the parameters.txt file in a text editor, define the parameters for the required parameters, as described in Migration Tool Parameters. If necessary, redefine the parameters that you defined when you last ran the tool.
-
Do the following:
-
From the command line, navigate to the unzipped migration tool folder.
-
Do one of the following:
-
To rescan and migrate your defined self-hosted components to Control-M SaaS, run the following command:
-
UNIX: migrateToSaaS.sh migrate
-
Windows: migrateToSaaS.bat migrate
The tool rescans your components, migrates your self-hosted Control-M/EM and the defined Control-M/Server to Control-M SaaS, and produces an Excel-based Migration_Report.xlsx file in the report folder.
-
-
To immediately migrate your defined self-hosted components to Control-M SaaS, run the following command:
-
UNIX: migrateToSaaS.sh deployOnly
-
Windows: migrateToSaaS.bat deployOnly
The tool migrates your self-hosted Control-M/EM and the defined Control-M/Server to Control-M SaaS, and produces an Excel-based Deploy_Only_Report.xlsx file in the report folder.
-
-
-
-
From the report folder, open, review, and follow the directions in the Migration or Deploy Only Report.
Your self-hosted Control-M/EM and one self-hosted Control-M/Server has been migrated to your Control-M SaaS.
-
(Optional) Migrate Control-M MFT local connection profiles and Application-Integrator-created plug-in connection profiles to SaaS-supported centralized connection profiles, as described in Migrating Local to Centralized Connection Profiles.
-
Get started with Control-M SaaS, as described in Getting Started.
Migrating Local to Centralized Connection Profiles
This procedure describes how to migrate Control-M MFT local connection profiles and Application-Integrator-created plug-in connection profiles to centralized connection profiles in Control-M SaaS. You must perform this procedure on every Agent that contains Control-M MFT and Application-Integrator-plug-in-created local connection profiles that you want to migrate.
Before You Begin
-
Verify that Control-M/Agent 9.0.21 or higher is installed.
-
Verify that Control-M SaaS Agent 9.0.21.200 or higher is installed.
Begin
-
Download the Control-M LCP-to-CCP Migration Tool, based on your operating system, from Control-M SaaS Migration Tool, and unzip it to a temporary folder.
-
From the Agent host, navigate to the temporary folder where you unzipped the LCP-to-CCP migration tool, and run the following command to export your local connection profiles:
lcpToCcp -export [-pluginType <MFT, AI, or ALL>] [-agentDir <Windows_Agent_Directory_Pathname>]
For more information, see Connection Profile Migration Parameters.
The directory path and filename of the zipped, exported local connection files appears.
-
Copy the zip file to the SaaS Agent.
-
From the SaaS Agent, run the following command to migrate the zipped local connection profiles to centralized connection profiles:
lcpToCcp -import -path <ZIP_Pathname_and_Filename> -url <Automation_API_URL> -token <API_Token> -ctm <Control-M/Server> -agent <Agent> [-cpnp <OVERWRITE, SKIP, or ASK>] [-d <TRUE or FALSE>] [-agentdir <Agent_Directory_Pathname>]
For more information, see Connection Profile Migration Parameters.
The local connection profiles from the Agent are migrated to centralized connection profiles in Control-M SaaS.
Migration Tool Parameters
The following table describes the parameters that you must define when Scanning Control-M Self-Hosted and Migrating to Control-M SaaS, depending on the mode.
|
Parameter |
Mode |
Definition |
|---|---|---|
|
Control-M Automation API Endpoint |
All Modes |
--control-m-automation-api-endpoint "<endpoint>:8443/automation-api" |
|
Control-M/Server Name |
All Modes |
--control-m-server-name "<Control-M/Server-Name>" Defines the name of the Control-M/Server, as it appears in the CCM. |
|
Control-M/EM Administrator Username |
All Modes |
--control-m-enterprise-manager-username "<EM_Username>" |
|
Control-M/EM Administrator Password |
All Modes |
--control-m-enterprise-manager-password "<EM_Password>" To enter the password when prompted by the migration tool, delete "<EM_Password>". |
|
Control-M/EM Database Username |
All Modes |
--control-m-enterprise-manager-database-username "<Database_Username>" |
|
Control-M/EM Database Password |
All Modes |
--control-m-enterprise-manager-database-password "<Database_Password>" To enter the password when prompted by the migration tool, delete "<Database_Password>". |
|
Control-M/EM Database Type |
All Modes |
--control-m-enterprise-manager-database-type "<Database_Type>" Type MSSQL, PostgreSQL, or Oracle. |
|
Control-M/EM Database Host Name |
All Modes |
--control-m-enterprise-manager-database-hostname "<Database_Host_Name>" |
|
Control-M/EM Database Port Number |
All Modes |
--control-m-enterprise-manager-database-port "<Port_Number>" |
|
Control-M/EM Database Name |
All Modes |
--control-m-enterprise-manager-database-name "<EM_Database_Name>" Type your database or service name. |
|
Control File with LIBMEMSYM Details |
All Modes |
--libmemsym-control-file "<LIBMEMSYM_Control_File.csv_Pathname>" (Optional) Defines the filename that you create in Creating a LIBMEMSYM Control File, which enables you to create pool variables with names and values that correspond to each variable in the %%LIBMEMSYM list variable. Control-M SaaS does not recognize %%LIBMEMSYM variable lists. To migrate your variable lists, you must find all your %%LIBIMEMSYM variable lists, copy them to your local host, and create a control file to migrate your %%LIBIMEMSYM variable lists to Pool variables, as described in Creating a LIBMEMSYM Control File. |
|
Output Folder Path |
All Modes |
--output-folder-path "output" (Optional) To change the default output folder, replace output with a new directory path. |
|
Control-M SaaS Automation API Endpoint |
All Migrations |
--control-m-saas-automation-api-endpoint "<Endpoint>/automation-api" |
|
Control-M SaaS Automation API Token |
All Migrations |
--control-m-saas-api-token "<Token_ID>" To enter the API token when prompted by the migration tool, delete "<Token_ID>". For more information, see Creating an API Token. |
|
Skip Missing Agents |
All Migrations |
--skip-if-missing-agents (Optional) Does not migrate job and folder definitions when the required SaaS Agents are not installed. |
|
SaaS Control-M/Server Name |
All Modes |
--control-m-saas-server-name "<Control-M/Server_Name>" (Optional) Defines the name of the SaaS Control-M/Server that the current Control-M/Server migrates to. |
Connection Profile Migration Parameters
The following table describes the parameters that you must define when you migrate your Control-M MFT and Application Integrator local connection profiles to centralized connection profiles in Control-M SaaS.
|
Parameter |
Description |
|---|---|
|
-pluginType |
(Optional) Determines which plug-in connection profiles are exported, as follows:
Default: ALL |
|
-agentDir |
(Windows only) Defines the Agent directory pathname where the connection profiles are stored. You must use this parameter if you have multiple Agents on the same host. Default: Defaults to the local Agent directory. "C:\Program Files\BMC Software\SaaS Agent\ABC-TLV-WEG30I_1" |
|
-path |
Defines the *.zip file pathname on the SaaS Agent that contains the exported local connection profiles. /home/myuser/pluginExportedData_dba-tlv-w5r6p9_20230716_121315.zip |
|
-url |
Defines the Control-M Automation API URL. https://myemserver-aapi.us1.ci.ctmsaas.com/automation-api/ |
|
-token |
Defines the Control-M Automation API token, as described in Creating an API Token. |
|
-ctm |
Defines the Control-M/Server name, such as AA01. |
|
-agent |
Defines the Agent name or alias, such as Agent1. |
|
-cpnp |
(Optional) Determines one of the following actions to take when a centralized connection profile with the same name is found:
|
|
-d |
(Optional) Determines whether to save or delete the *.zip file that contains the Control-M MFT local connection profiles and Application-Integrator-created plug-in connection profiles after they are migrated to centralized connection profiles in Control-M SaaS.
Default: FALSE |
Creating a LIBMEMSYM Control File
This procedure describes how to create a LIBMEMSYM control file, which the migration tool uses to transfer your %%LIBMEMSYM variable lists to Pool variables. For more information, see List Variables.
Begin
-
Find all unique LIBMEMSYM files that each %%LIBMEMSYM variable points to, and copy these files from the self-hosted Control-M/Server to a temporary folder on your host.
-
Open a text editor and for each unique %%LIBMEMSYM list variable, type the following entries, separated by commas, on a new line:
-
Pathname of the copied LIBMEMSYM file that you copied from the self-hosted Control-M/Server, on your host.
-
Pathname of the LIBMEMSYM file on the self-hosted Control-M/Server.
-
Pool Name that each variable in the %%LIBMEMSYM list variable is migrated into.
c:\temp\libMem1.txt,C:\Program Files\BMC Software\Control-M Server\ctm_server\libMem1,PoolName1
c:\temp\libMem2.txt,C:\Program Files\BMC Software\Control-M Server\ctm_server\libMem2,PoolName2
c:\temp\libMem3.txt,C:\Program Files\BMC Software\Control-M Server\ctm_server\libMem3,PoolName3
-
-
Save the LIBMEMSYM_Control_File.csv file and type the pathname after the = (equals sign) in the %%LIBMEMSYM list variable Parameter, as described in Migration Tool Parameters.
Migration Troubleshooting
The following table describes migration problems that might occur and corrective actions you can take to troubleshoot the migration process.
|
Problem |
Corrective Action |
|---|---|
|
Errors appear when you run the migration tool. |
|
|
There are connectivity issues when you run the migration tool. |
Run the following command to determine if you have sufficient privileges in your self-hosted Control-M: ctm config servers::get If the following response does not appear, you must grant read and write privileges to your self-hosted Control-M Automation API: Copy
|
 YouTube
 Facebook
 LinkedIn