Zone 1 SSL Configuration
Zone 1 SSL configuration enables you to configure SSL between the Web Server and Control-M client applications.
The following procedures describe how to configure SSL in Zone 1 with the supported TLS 1.2 protocol, and locally deploy certificates to Control-M/EM, Control-M/Servers, and Agents:
-
Generating SSL Certificates and Keystores
-
Configuring SSL:
-
Reconfiguring Connections Between Control-M/EM Services and the Web Server
To remotely deploy certificates to Agents and automate SSL certificate updates, see Certificate Configuration.
Generating a Signed Certificate
This procedure describes how to generate a signed certificate.
You do not need to perform this procedure in the following cases:
-
You received a private key, signed certificate, root certificate, or a secure connector keystore file and password from your Security Administrator.
-
You are using the default tomcat.p12 keystore file that is provided with the installation.
Begin
-
Navigate to one of the following directories:
-
UNIX: <EM Home Directory>/data/SSL/config directory
-
Windows: <EM Home Directory>\Data\SSL\config directory
-
-
In the csr_params.cfg file (a standard openssl configuration file) in the [dn] section, do the following:
-
Change the value of the following fields to the required values:
-
C = <Your_Country>
-
ST = <Your_State>
-
L = <Your_Locality>
-
O = <Your_Organization>
-
OU = <Your_Organizational_Unit>
-
CN = <Control-M/EM_Server_Fully_Qualified_Domain_Name_(FQDN)>
This field supports the * wildcard, which enables you to define the Control-M/EM server short name and FQDN, such as CN = example*.
-
emailAddress = <Your_Email_Address>
-
The first time you run the ctmkeytool -create_csr script, it automatically updates the :FQDN: and :ShortHostName: placeholders in the [ alt_names] section of the csr_params.cfg file with your host FQDN and hostname, which enables the generated signed certificate to support HTTPS connections.
-
Alternatively, you can define one or more supported DNS names in the subjectAltName section of the signed certificate in one of the following ways:
-
subjectAltName = DNS:<Host_01>, DNS:<Host_02>, DNS:<Host_03>
-
subjectAltName = @alt_names
[ alt_names ]
DNS.1 = <Host_01>
DNS.2 = <Host_02>
DNS.3 = <Host_03>
-
-
-
If you have any other certificate requirements, you can include them in this file.
-
-
Run the following command to create the private key and certificate signing request file:
<ctmkeytool location>/ctmkeytool -create_csr -password <private key password>
-
(UNIX only) You must run this script in the Control-M/EM shell, such as em tcsh. For more information, see ctmkeytool.
-
You can generate the private key using an elliptic curve cryptography (ECC) algorithm. For more information, see ctmkeytool.
-
-
Use the Certificate Signing Request (CSR) file to obtain the certificate file and the certificate chain file with a .pem extension from a recognized CA. PEM format specifies that these certificates are ASCII-encoded X.509 certificates.
Common file extensions for PEM files are .pem, .crt, .cer, or .ca-bundle.
Generating the Secure Connector Keystore
This procedure describes how to generate the secure connector An Apache Web Server secure connector is a configuration that enables encrypted and authenticated communication between the Apache HTTP Server and clients via SSL/TLS protocols. The secure connector usually uses a keystore, such as a .p12 file, that contains a private key and certificate, which enables the Web Server to establish secure HTTPS connections. keystore.
-
You do not need to perform this procedure in the following cases:
-
You received a secure connector keystore from your Security Administrator.
-
You are using the default tomcat.p12 keystore file that is provided with the installation.
-
-
If you did not use the default tomcat.p12 password (changeit), you must update it in the Apache Tomcat Web Server configuration, as described in Updating the Secure Connector Keystore File and Password.
Begin
-
Back up the existing secure connector keystore file in one of the following directories:
-
UNIX: <EM Home Directory>/ini/ssl
-
Windows: <EM Home Directory>\ini\ssl
-
-
Create the secure connector keystore file by running the following command:
<EM Home>/bin/openssl pkcs12 -in <Certificate_PEM_Filename> -inkey <Private_Key_Filename> -export -passout pass:<New_Secure_Connector_Keystore_Password> -passin pass:<Private_Key_Password> -CAfile <Certificate_Chain_PEM_Filename> -chain -out tomcat.p12 -name <Keystore_Friendly_Name> -caname <CA_Friendly_Name>
-
Save the secure connector keystore file in the <EM Home Directory>/ini/ssl directory.
-
If the CA certificate signing your web server certificate, as described above, does not exist in the Trusted Root Certificate Authorities, see Installing the Root CA Certificate on the Control-M Client.
-
(UNIX only) You must run this script in the Control-M/EM shell, such as em tcsh.
-
Updating the Secure Connector Keystore File and Password
This procedure describes how to update the secure connector keystore file (by default, tomcat.p12) and password in the Apache Tomcat Web Server configuration. You must perform this procedure every time you update the secure connector keystore file or change its password.
-
You do not need to perform this procedure if you use the default tomcat.p12 keystore file that is provided with the installation.
-
This procedure updates the new password in Control-M/EM. It does not change the keystore password in the keystore file.
Begin
-
Back up the following files:
-
UNIX:
-
<EM Home>/ctm_em/ini/ssl/<Secure_Connector_Keystore_Filename_and_Extension>
-
<EM Home>/ctm_em/ini/ssl/tomcat.ini
-
<EM Home>/ctm_em/etc/emweb/tomcat/conf/server.xml
-
-
Windows:
-
<EM Home>\ini\ssl\<Secure_Connector_Keystore_Filename_and_Extension>
-
<EM Home>\ini\ssl\tomcat.ini
-
<EM Home>\emweb\tomcat\conf\server.xml
-
-
-
Run the following command to configure the secure connector keystore file on the Web Server:
manage_webserver
The Tomcat Configuration Manager main menu appears.
-
Press 1 to navigate to the Tomcat Configuration menu.
The Tomcat Configuration Manager sub-menu appears.
-
Press 3 to navigate to the Secure Connector Configuration menu.
The Secure Connectors Configuration menu appears.
-
Press 3 to navigate to the Edit SSL Connector menu.
The Select Secure Connector to Edit menu appears.
-
Press the required number to edit the secure connector.
The Edit - <Secure_Connector_URL_and_Port_Number> menu appears.
-
Do one or more of the following:
-
Update the Secure Connector Keystore File: Do the following:
-
Press the relevant number for the required secure connector.
The Edit - <Secure_Connector_URL_and_Port_Number> menu appears.
-
Press 7.
A prompt appears that requests the new secure connector keystore filename.
-
Type the new secure connector keystore filename.
The file is changed in Control-M/EM and the Edit - <Secure_Connector_URL_and_Port_Number> menu reappears with the new secure connector keystore filename.
-
If a different password is used in the new secure connector keystore file, you must also change the new secure connector keystore password, as described in the Update the Secure Connector Password option below.
-
-
Update the Secure Connector Keystore Password: Do the following:
-
Press 8.
A prompt appears that requests the new secure connector keystore password.
-
Type the new secure connector keystore password.
The password is changed in Control-M/EM and the Edit - <Secure_Connector_URL_and_Port_Number> menu reappears with the new secure connector keystore password.
-
-
-
Type s to save the changes.
A confirmation prompt appears.
-
Type Y to confirm that you want to save the changes.
The password is encrypted and the changes are saved to Control-M/EM.
-
Update the secure connector keystore password in the <EM Home Directory>/ini/ssl/tomcat.ini file by running the following command:
-
UNIX: emcryptocli <New_Secure_Connector_Keystore_Password> <EM_Home>/ini/ssl/tomcat.ini
(UNIX only) You must run this script in the Control-M/EM shell, such as em tcsh.
-
Windows: emcryptocli <New_Secure_Connector_Keystore_Password> <EM_Home>\ini\ssl\tomcat.ini
-
-
Recycle the Web Server, as described in Recycling a Control-M/EM Component.
Configuring SSL on the Web Server
This procedure describes how to configure and enable SSL between Control-M client applications and the Web Server with the secure connector keystore. This SSL configuration occurs in Zone 1.
-
BMC recommends that you bring your own certificate. For POC or demo purposes, you can use the default demo certificate provided with the installation (the <EM_HOME>/ini/ssl/tomcat.p12 keystore)
-
BMC recommends that you use Java settings to limit the ciphers that are used for secured connections. This ensures that all Java-implemented connections on your machine follow the same policy. Contact your Java vendor for instructions to limit the ciphers that can be used. If you want to set cipher limitations only for the Web Server, continue with this procedure.
Before You Begin
-
If you did not receive a private key, signed certificate, root CA certificate and chain in PEM format or the secure connector keystore from your Security Administrator, you must generate the certificate and the secure connector keystore, as described in Generating a Signed Certificate and Updating the Secure Connector Keystore File and Password.
-
Verify that the certificates have the required authentication level, as described in Verifying Certificate Authentication Levels in Zone 1.
-
To find supported ciphers for your installation, see your Java vendor documentation for your JRE installed version. You can view details of your JRE version by running the following command:
openssl ciphers -V
If you want to use ciphers from the output of the openssl command for Zone 1, you need to convert their names to the Java convention names. For examples of cipher names, see the existing ciphers in <EM Home Directory>/ini/ssl_tomcat_ciphers.xml.
Begin
-
Run the following command:
manage_webserver
The Tomcat Configuration Manager main menu appears.
-
Type the Tomcat Configuration menu item number.
The Tomcat Configuration Manager sub-menu appears.
-
Do the following to turn on SSL mode:
-
Type the SSL Mode menu item number.
The current configuration appears with a prompt that asks if you want to change it.
-
Press Y to set the current SSL configuration to true.
-
-
Recycle the following components, as described in Recycling a Control-M/EM Component:
-
Web Server
-
GUI Server
-
CMS
-
-
If the CA certificate that signs your Web Server certificate does not exist in the Trusted Root Certificate Authorities, see Installing the Root CA Certificate on the Control-M Client.
-
If you are working in a Control-M/EM Distributed environment with multiple Web Servers, or in a high availability environment, you must provide a different keystore for each server.
Removing the Non-secured Connectors from the Web Server
This procedure describes how to remove the non-secured port between Control-M client applications and the Web Server. BMC recommends that you remove the non-secured ports.
Begin
-
Run the following command:
manage_webserver
The Tomcat Configuration Manager main menu appears.
-
Type the Tomcat Configuration menu item number.
The Tomcat Configuration Manager sub-menu appears.
-
Type the Non Secure Connectors Configuration menu item number.
The Non Secure Connectors Configuration menu appears.
-
Do the following to remove a non-secured connector:
-
Type the Delete Connector menu item number.
The Select Connector To Delete menu appears.
-
Type the required connector menu item number.
A confirmation prompt appears.
-
Press Y to confirm deletion.
-
-
Repeat the above step for all configured non-secured connectors.
-
Recycle the Web Server, as described in Recycling a Control-M/EM Component.
Configuring SSL on the Web Server with the Default Certificate
This procedure describes how to configure SSL between Control-M client applications and the Web Server using the default certificate signed by BMC. This SSL configuration occurs in Zone 1. During Control-M/EM installation, a CA certificate and a self-signed certificate that is signed by this CA certificate are generated for the Web Server. These certificates and the generated private key are saved in the secure connector keystore file that is located in the following directory:
<EM_Home_Directory>/ini/ssl
Begin
-
Run the following command:
manage_webserver
The Tomcat Configuration Manager main menu appears.
-
Type the Tomcat Configuration menu item number.
The Tomcat Configuration Manager sub-menu appears.
-
Do the following to turn on SSL mode:
-
Type the SSL Mode menu item number.
The current configuration appears with a prompt that asks if you want to change it.
-
Press Y to set the current SSL configuration to true.
The Tomcat Configuration Manager sub-menu reappears.
-
-
Update the keystore password, as follows:
-
Type the Secure Connector Configuration menu item number.
The Secure Connectors Configuration menu appears.
-
Type the Edit SSL Connector menu item number.
The Select Secure Connector to Edit menu appears.
-
Press the required number to edit the secure connector.
The Edit - <Secure_Connector_URL_and_Port_Number> menu appears.
-
Type the Set Keystore Password menu item number.
A prompt appears that requests the new secure connector keystore password.
-
Type the new secure connector keystore password.
The password is changed in Control-M/EM and the Edit - <Secure_Connector_URL_and_Port_Number> menu reappears.
-
-
Type s to save the changes.
A confirmation prompt appears.
-
Type Y to confirm that you want to save the changes.
The password is encrypted and the changes are saved to Control-M/EM.
-
-
Recycle the following components, as described in Recycling a Control-M/EM Component:
-
Web Server
-
GUI Server
-
CMS
-
If the CA certificate that signs your Web Server certificate does not exist in the Trusted Root Certificate Authorities, see Installing the Root CA Certificate on the Control-M Client.
Installing the Root CA Certificate on the Control-M Client
This procedure describes how to install the root CA certificate that signed your Web Server certificate on the Control-M client host.
-
Extract the root CA certificate from your secure connector keystore on the Control-M/EM machine where your Web Server runs, and run the following command:
<Control-M/EM_Home>/bin/openssl pkcs12 -in <EM_Home_Directory>/ini/ssl/<Secure_Connector_Keystore_Filename_and_Extension> -cacerts -nokeys -password pass:<Secure_Connector_Keystore_Password> > cacert.crt
(UNIX only) You must run this script in the Control-M/EM shell, such as em tcsh.
-
Copy the created cacert.crt file to the Control-M client.
-
Double-click the file to install the CA certificate.
The Crypto Shell Extensions application opens, which shows the certificate details.
If the Crypto Shell Extensions application does not open, configure Windows to open .crt files using the Crypto Shell Extensions.
-
Click Install Certificate, continue with the Local Machine option, and then place the certificate in the Trusted Root Certificate Authorities.
Managing Secure Connectors
This procedure describes how to add, change, or delete secure connectors. By default, the installation includes a secure (HTTPS) and non-secure (HTTP) connector.
Begin
-
Run the following command:
manage_webserver
The Tomcat Configuration Manager main menu appears.
-
Type the Tomcat Configuration menu item number.
The Tomcat Configuration Manager sub-menu appears.
-
Type the Secure Connectors Configuration menu item number.
The Secure Connectors Configuration menu appears.
-
Do one of the following:
-
Add: To add a new connector, do the following:
-
Type the Add New SSL Connector menu item number.
-
At the prompt, type the filename for the new keystore that is located in the following directory:
-
UNIX: <Control-M/EM_Home>/ini/ssl
-
Windows: <Control-M/EM_Home>\ini\ssl
-
-
At the prompt, type the keystore file password.
The new connector now uses the keystore file that you defined.
-
-
Update: To update a connector, do the following:
-
Type the Edit SSL Connector menu item number.
The Select Secure Connector to Edit menu appears.
-
Type the required secure connector menu item number.
The Edit - <Secure_Connector_URL_and_Port_Number> menu appears.
-
Type the required parameter menu item number and follow the prompts to update its value.
-
-
Delete: To delete a connector, do the following:
-
Type the Delete SSL Connector menu item number.
The Delete SSL Connector menu appears.
-
Type the required secure connector menu item number.
The Edit - <Secure_Connector_URL_and_Port_Number> menu appears.
-
Type the menu item number of the secure connector that you want to delete.
A confirmation prompt appears.
-
Type Y to confirm deletion.
-
-
-
Recycle the Web Server, as described in Recycling a Control-M/EM Component.
Testing SSL on the Web Server
This procedure describes how to test the HTTPS connector on the Web Server.
Begin
-
Do the following to verify that the hostname and port are used by the relevant connector:
-
Run the following command:
manage_webserver
The Tomcat Configuration Manager main menu appears.
-
Type the Tomcat Configuration menu item number.
The Tomcat Configuration Manager sub-menu appears.
-
Type the Secure Connectors Configuration menu item number.
The Secure Connectors Configuration menu appears.
-
Type the Edit SSL Connector menu item number.
The Select Secure Connector to Edit menu appears and lists all the secure connectors.
-
-
Log in to the CCM, select Web server URLs and then click Web Server.
-
From the web browser on the Control-M client host, type the URL as follows:
https://<Web_Server_FQDN>:<Web_Server_Port_Number>
The Control-M welcome page appears.
Reverting to an Old Connector
This procedure describes how to revert to an old connector if you deleted it.
Begin
-
Do one of the following:
-
To replace the server.xml file, if the delete or update action was the last action in the manage_webserver utility, do the following:
-
Navigate to the following directory:
-
UNIX: <EM_HOME>/etc/emweb/tomcat/conf/
-
Windows: <EM_HOME>\emweb\tomcat\conf
-
-
Delete the server.xml file.
-
Rename the server_lastfile.xml file to server.xml in the /backup directory.
-
-
To edit the server.xml file add the HTTP connector, as follows:
<Connector port="18080" protocol="HTTP/1.1"
connectionTimeout="20000"
redirectPort="8443" />
-
-
Recycle the Web Server, as described in Recycling a Control-M/EM Component.
Adding Root CA Certificates to the .p12 Keystore
This procedure describes how to add root CA certificates to the .p12 keystore with minimal downtime. You need to perform this procedure if the root CA certificate or one of the certificates in the intermediate chain is about to expire.
Begin
-
Import the new root CA certificate (or chain of intermediate certificates) into the keystore used by the component.
-
From the command line, run the following command:
keytool -v -importcert -trustcacerts -alias <new unique alias> -keystore <keystore file name> -storepass <keystore password> -storetype pkcs12 -file <added certificate file>
-
Run the following command to verify that the new CA certificate was added to your truststore:
keytool -keystore <keystore file> -list
The added certificate appears in the list.
-
Restart all components where you updated the keystore, and verify SSL connectivity.
-
Run the following command to remove the old root CA or intermediate chain certificate from all updated keystores:
keytool -delete -keystore <keystore file> -alias root_to_remove
-
Restart all components where you updated the keystore, and verify SSL connectivity.
Verifying Certificate Authentication Levels in Zone 1
This procedure describes how to verify the authentication level of a certificate and compare it to the security policy in the Web Server.
-
Each certificate installed on a Control-M component must fit the authentication level required for this component.
-
If the Control-M component authentication level and the authentication level supported by the installed certificate is not configured correctly, the SSL connection might fail.
Begin
-
Verify the Zone 1 authentication level configuration for a specific HTTPS connector, as follows:
-
Run the following command:
manage_webserver
The Tomcat Configuration Manager main menu appears.
-
Type the Tomcat Configuration menu item number.
The Tomcat Configuration Manager sub-menu appears.
-
Type the Secure Connectors Configuration menu item number.
The Secure Connectors Configuration menu appears.
-
Type the Edit SSL Connector menu item number.
The Select Secure Connector to Edit menu appears.
-
Type the required secure connector menu item number.
The Edit - <Secure_Connector_URL_and_Port_Number> menu appears.
-
Change the value of the
The default certificateVerification property value is none.
-
-
Do the following:
-
Run the following command to view the Web Server certificate attributes:
openssl x509 -in <Web_Server_Certificate_Path> -text -noout
The Web Server certificate attributes appear.
-
In the Web Server certificate attributes, search for X509v3 Extended Key Usage, as follows:
-
If X509v3 Extended Key Usage does not appear or if it appears as follows, then the Web Server certificate supports TLS Web Server and TLS web client authentication:
X509v3 Extended Key Usage:
TLS Web Server Authentication, TLS Web Client Authentication
-
If the following appears, then the Web Server certificate only supports TLS Web Server authentication:
X509v3 Extended Key Usage:
TLS Web Server Authentication
-
-
-
Do the following:
-
Run the following command to view the root CA certificate attributes:
openssl x509 -in <Root_CA_Certificate_Path> -text -noout
The root CA certificate attributes appear.
-
In the root CA certificate attributes, search for X509v3 Extended Key Usage, as follows:
-
If X509v3 Extended Key Usage does not appear or if it appears as follows, then the root CA certificate supports TLS Web Server and TLS web client authentication:
X509v3 Extended Key Usage:
TLS Web Server Authentication, TLS Web Client Authentication
-
If the following appears, then the root CA certificate only supports TLS Web Server authentication:
X509v3 Extended Key Usage:
TLS Web Server Authentication
-
-
Reconfiguring Connections Between Control-M/EM Services and the Web Server
This procedure describes how to reconfigure the HTTP/HTTPS connection attributes that enable Control-M/EM Services and the Web Server to communicate. These attributes are configured by default, as described in Default HTTP/HTTPS Connection Attributes.
Begin
-
Log in to the Control-M/EM host.
-
Open the following file in a text editor:
-
UNIX: <Control-M/EM_Home>/etc/services/config/custom/services-common-application-custom.yml
-
Windows: <Control-M/EM_Home>\Default\services\config\custom\services-common-application-custom.yml
The HTTP/HTTPS connection attribute values that are defined in the services-common-application-custom.yml file override the values that are defined in the services-common-application.yml file.
-
-
In the services-common-application-custom.yml file, do the following:
-
Ensure that the following code snippet is at the top of the file:
Copycom:
bmc:
services:
## Jetty setting
server: -
On a new line under the server parameter, for each HTTPS connection attribute that you need to change, type the attribute name and its new value, as described in Default HTTP/HTTPS Connection Attributes.
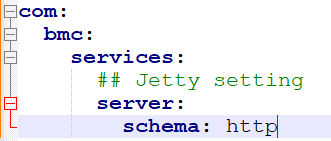
The following code snippet in the services-common-application-custom.yml file changes the default schema attribute from https to http:
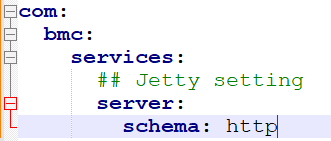
-
Save and close the file.
-
-
If you have updated the keystore or keystorepass attributes, run the following command to encrypt the password in the keystore password file:
emcryptocli <New_Keystore_Password> <Full_Keystore_Password_Pathname>
(UNIX only) You must run this script in the Control-M/EM shell, such as em tcsh.
-
UNIX: em emcryptocli 73YlIjW_1u%a <Control-M/EM_Home>/ini/ssl/myTomcat_Password.ini
-
Windows: %EM_HOME%\bin\emcryptocli 73YlIjW_1u%a %EM_HOME%\ini\ssl\myTomcat_Password.ini
-
-
Recycle all Control-M/EM services, as described in Recycling a Control-M/EM Component.
Default HTTP/HTTPS Connection Attributes
The following code snippet describes the default HTTP/HTTPS connection attributes that enable Control-M/EM Services and the Web Server to communicate. These attributes are defined in the services-common-application.yml configuration file after the server parameter, as follows:
com:
  bmc:
    services:
      ## Jetty setting
      server:
schema: https
keystore: ini/ssl/tomcat.p12
keystoreType: PKCS12
keystorepass: ini/ssl/tomcat.ini
rest:
portspan: 0
hostname: "*"This services-common-application.yml file is located in the following directory:
-
UNIX: <EM_Home>/etc/services/config/
-
Windows: EM_Home>\Default\services\config\
BMC recommends that you do not edit this file because it might be overwritten when you upgrade Control-M. To change the default HTTP/HTTPS connection attributes, see Reconfiguring Connections Between Control-M/EM Services and the Web Server.
|
Attribute |
Description |
|---|---|
|
schema |
Determines which of the following protocols enable connections between Control-M/EM Services and the Web Server:
Default: https |
|
keystore |
Defines the path to the secure connector keystore. Default: ini/ssl/tomcat.p12 |
|
keystoreType |
Determines the type of secure connector keystore file, such as JKS or PKCS#12. Default: PKCS12 |
|
keystorepass |
Defines the secure connector keystore password pathname Default: ini/ssl/tomcat.ini |
|
sslProtocols |
Determines one or more TLS protocols that enable the HTTPS connection to encrypt data, verify server identity, and ensure data integrity. Default: TLSv1.2,TLSv1.3 This attribute does not appear in the services-common-application.yml file, but you can add it to the services-common-application-custom.yml file when you configure the default HTTPS connection attributes, as described in Reconfiguring Connections Between Control-M/EM Services and the Web Server. |
 YouTube
 Facebook
 LinkedIn