Control-M SaaS Migration
The Control-M SaaS migration copies the data from a self-hosted A Control-M environment (Control-M Self-Hosted), or specific Control-M component that you install and manage on your own infrastructure. Control-M/EM to a SaaS Control-M/EM and enables you to migrate some or all of your self-hosted Control-M components to Control-M SaaS. This eliminates the need to maintain a self-hosted Control-M/EM, one or more self-hosted Control-M/Servers, and the databases for all migrated components. If you have Control-M/Servers or Control-M for z/OS environments that cannot be migrated, you can instead connect these components to Control-M SaaS Unified View A mode of Control-M SaaS that enables you to connect self-hosted Control-M/Servers and Control-M for z/OS environments to Control-M SaaS, and then run jobs that are connected to these self-hosted components from Control-M SaaS..
Before you migrate your data, BMC Services or a BMC certified partner will help you scan your Control-M Self-Hosted components and create a migration plan that best suits your organization.
-
If you are unable to upgrade your self-hosted Control-M/EM to version 9.0.21, as described in Control-M/EM Upgrade, contact a BMC pre-sales representative.
-
You cannot migrate the following self-hosted components to Control-M SaaS, but you can connect them to Control-M SaaS Unified View.
-
Control-M for z/OS environments.
-
Self-hosted Control-M/Servers that are connected to Agents that are installed on unsupported platforms or that run unsupported plug-ins, as described in Control-M Compatibility for Version 9.0.22.100 and Control-M SaaS Compatibility.
-
-
You cannot revert a Control-M SaaS migration.
The following diagram shows the logical architecture of a typical migration:
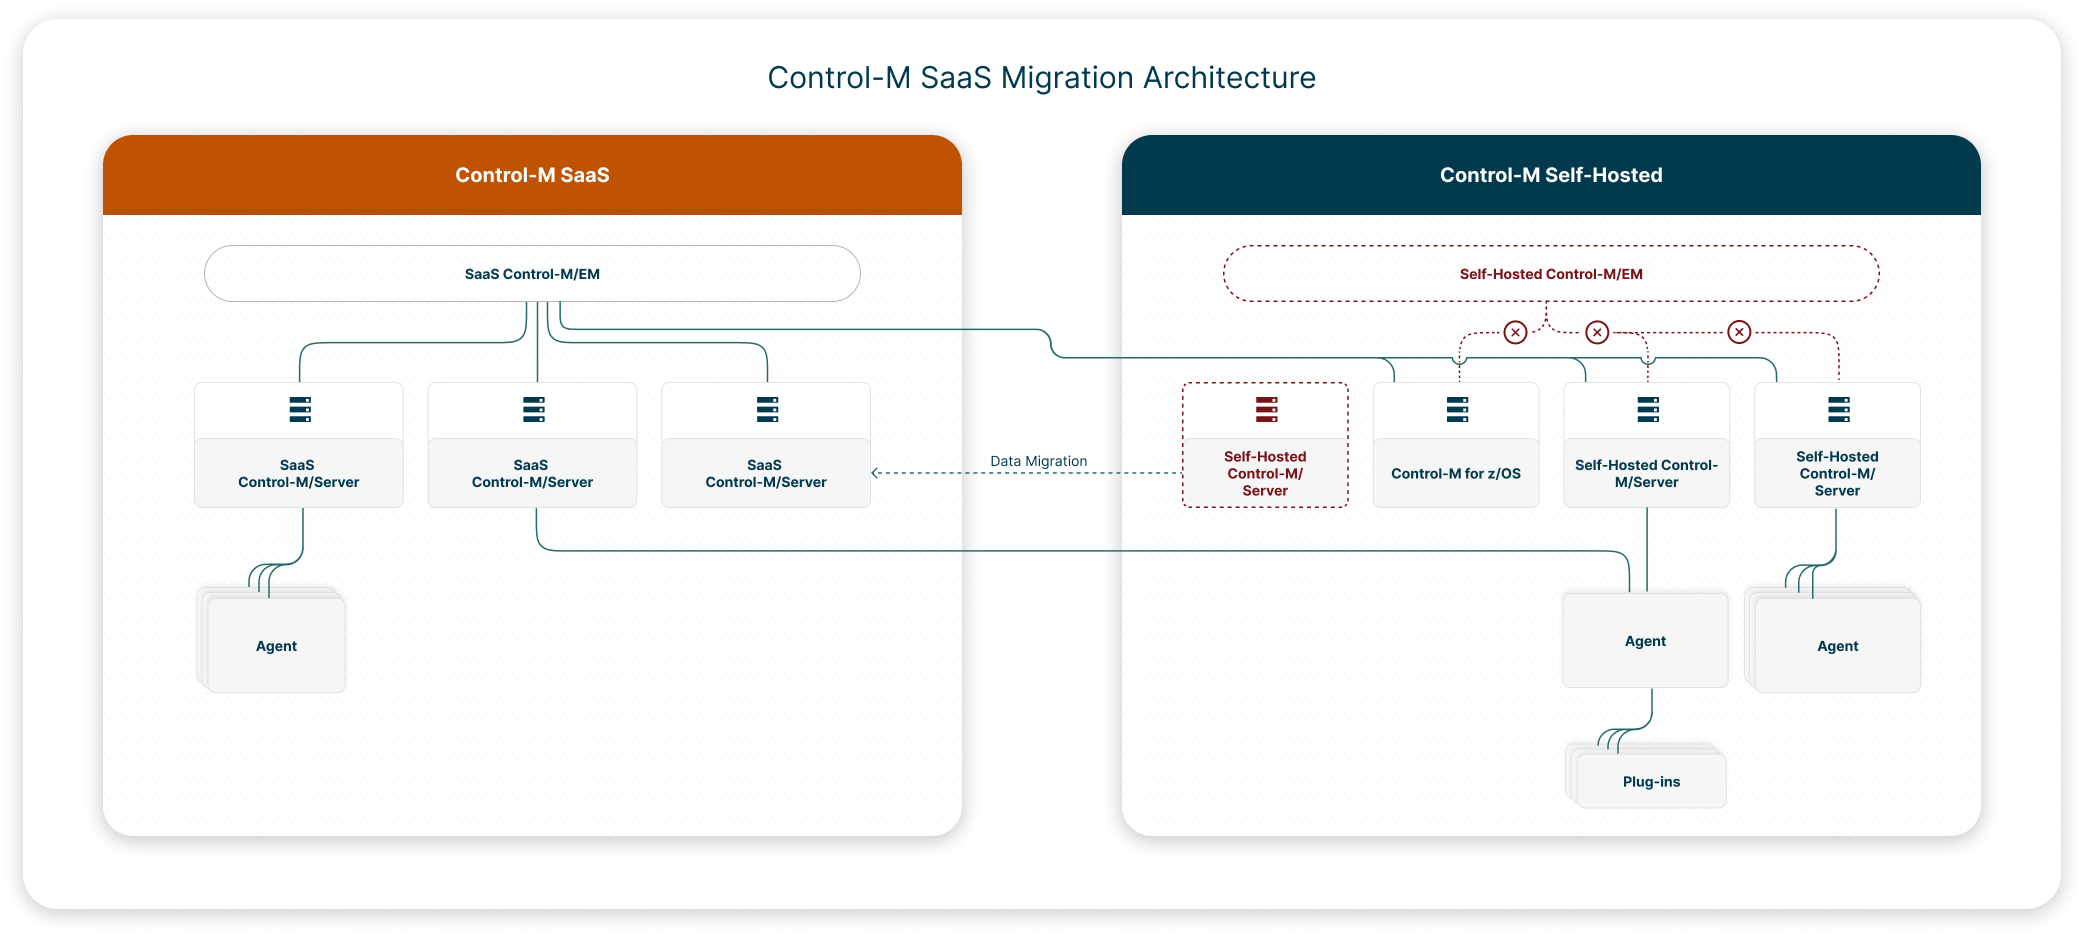
Migrating to Control-M SaaS
This procedure describes how to migrate the data from a self-hosted Control-M/EM to a SaaS Control-M/EM, and migrate or connect your self-hosted Control-M/Servers to Control-M SaaS, based on your organizational needs and the results of a preliminary qualification scan.
Before You Begin
-
Verify that you are qualified to migrate or connect to Control-M SaaS, as described in Scanning Control-M Self-Hosted.
-
Verify that Control-M/EM 9.0.21 or higher is installed.
-
(Control-M/EM 9.0.22 or higher only) Configure automatic time zone management, as described in Configuring Automatic Time Zone Management.
Begin
-
Register for Control-M SaaS, as described in Registering for Control-M SaaS.
This enables BMC to provide you with a Control-M SaaS tenant and SaaS Control-M/Servers that match the names of your current self-hosted Control-M/Servers.
-
From your new Control-M SaaS tenant, redefine your IdP settings, as described in Configuring System Settings.
-
Export and package your self-hosted Control-M/Server and Control-M/EM data into a combined Control-M Self-Hosted data file, as described in Exporting Control-M Self-Hosted.
-
Import your self-hosted Control-M/EM and Control-M/Server data to Control-M SaaS, as described in Importing Control-M Self-Hosted into Control-M SaaS.
-
(Optional) Connect one of the following self-hosted components to Control-M SaaS Unified View
A mode of Control-M SaaS that enables you to connect self-hosted Control-M/Servers and Control-M for z/OS environments to Control-M SaaS, and then run jobs that are connected to these self-hosted components from Control-M SaaS.:A number of Control-M Administrators connect their components to Control-M SaaS Unified View to do one or more of the following:
-
Run self-hosted workflows that rely on mainframe modernization plug-ins or Control-M for z/OS environments.
-
Access both platforms (Control-M Self-Hosted and Control-M SaaS) for the following reasons:
-
Critical workflows must remain on distributed self-hosted components.
-
Some self-hosted features have not yet been integrated into Control-M SaaS.
-
-
-
Resume all connected self-hosted components, as described in Resuming All Connected Self-Hosted Components.
-
Get started with Control-M SaaS, as described in Getting Started.
-
(Optional) Migrate Control-M Workload Archiving to Control-M SaaS, as described in Migrating Self-Hosted Workload Archiving Data to Control-M SaaS.
Scanning Control-M Self-Hosted
This procedure describes how to scan your Control-M Self-Hosted components with BMC Services or a BMC certified partner. The scan produces qualification reports that enable you to determine the following:
-
The migration plan that best suits your organization.
-
The steps that you must take before you can migrate to Control-M SaaS.
You must run this tool from your Windows- or UNIX-based self-hosted Control-M/EM host.
You cannot migrate the following components to Control-M SaaS, but you can connect them to Control-M SaaS Unified View:
-
Control-M for z/OS environments.
-
Control-M/Servers that are connected to the following types of Agents:
-
Agents that are installed on operating systems which are not supported in Control-M SaaS. For more information, see Control-M Compatibility for Version 9.0.22.100 and Control-M SaaS Compatibility.
-
Agents that run plug-ins which are not supported in Control-M SaaS.
-
Before You Begin
-
Verify that Control-M/EM 9.0.20 or higher is installed.
-
Verify that you have access to the Control-M/EM host.
-
Verify that Control-M Automation API 9.0.20.245 or higher is installed on the Control-M/EM server.
BMC recommends that you install the latest version of Control-M Automation API. For more information, see Automation API Installation.
Begin
-
Log in to the host where Control-M/EM is installed with a username that is associated with an Admin role.
-
Download the Control-M SaaS One Migration Tool for the required operating system from Control-M SaaS Scanning and Migration Tools, and unzip it to a temporary directory.
-
From a command line, navigate to the temporary directory where you unzipped the Control-M SaaS One Migration Tool, and run the following command:
-
UNIX: ctm-saas-migrate.sh qualify -u <Control-M_Automation_API_Admin_Username> -p <Control-M_Automation_API_Admin_Password>
-
Windows: ctm-saas-migrate.bat qualify -u <Control-M_Automation_API_Admin_Username> -p <Control-M_Automation_API_Admin_Password>
The qualification tool scans your Control-M/EM and all connected Control-M/Servers and Control-M for z/OS environments, and then saves a compressed results file (named ControlMSaaSQualificationResults<Timestamp>.zip) to the saas-migration-tool directory. The report directory inside this compressed results file contains the following Excel report types:
-
SaaS Migration Qualification Reports: These reports describe the actions that you must take before you can migrate to Control-M/SaaS. The tool creates one Control-M/EM report and a separate report for each connected self-hosted Control-M/Server.
-
EM_SaaS_Qualification.xlsx: Contains the Control-M/EM migration qualification scan results.
-
Server_Qualification_<Control-M/Server_Name>.xlsx: Contains the self-hosted-to-SaaS Control-M/Server migration qualification scan results.
-
-
Unified View Connection Qualification Reports: These reports describe the actions that you must take before you can connect a self-hosted Control-M/Server or Control-M for z/OS to Control-M SaaS Unified View
A mode of Control-M SaaS that enables you to connect self-hosted Control-M/Servers and Control-M for z/OS environments to Control-M SaaS, and then run jobs that are connected to these self-hosted components from Control-M SaaS.. The tool creates a separate report for each connected self-hosted Control-M/Server and Control-M for z/OS.-
Server_Qualification_Self_Hosted_<Control-M/Server_Name>.xlsx: Contains the self-hosted-to-Unified-View Control-M/Server connection qualification scan results. The tool creates one report for every self-hosted Control-M/Server.
-
Server_Qualification_Self_Hosted_<Control-M_for_z/OS_Name>.xlsx: Contains the Self-Hosted-to-Unified-View Control-M/Server connection qualification scan results.
-
-
-
Do the following:
-
Navigate to the following directory:
-
UNIX: <Control-M_SaaS_One_Migration_Tool_Directory>/saas-migration-tool/
-
Windows: <Control-M_SaaS_One_Migration_Tool_Directory>\saas-migration-tool\
-
-
Locate the compressed ControlMSaasQualificationResults_<Timestamp> file, which contains the results of the qualification scans, and send it to BMC Services or a BMC certified partner.
-
-
From the same sub-directory, navigate to the report directory, review the qualification reports, and do the following:
-
Based on the qualification report results, determine which self-hosted Control-M/Servers will fully migrate and which will connect to Control-M SaaS Unified View.
-
Follow the directions in the relevant qualification reports.
-
Migrate to Control-M SaaS, as described in Migrating to Control-M SaaS.
-
-
(Optional) For each Control-M/Server in your self-hosted environment, scan all of the self-hosted Agents to determine how you must redefine your Agents for Control-M SaaS, as described in Scanning Control-M Agents.
Registering for Control-M SaaS
This procedure describes how to register for Control-M SaaS, which enables BMC to provide you with a Control-M SaaS tenant and SaaS Control-M/Servers that match the names of your current self-hosted Control-M/Servers. You only need to perform this procedure once.
Before You Begin
-
If required, rescan your Control-M Self-Hosted components, as described in Scanning Control-M Self-Hosted.
Begin
-
Do the following:
-
Navigate to the following directory:
-
UNIX: <Control-M_SaaS_One_Migration_Tool_Directory>/saas-migration-tool/
-
Windows: <Control-M_SaaS_One_Migration_Tool_Directory>\saas-migration-tool\
-
-
Locate and unzip the ControlMSaaSQualificationResults<Timestamp>.zip file.
-
Navigate to the report directory and locate the migration_metadata.xlsx file.
-
-
Open the migration_metadata.xlsx file and do the following:
-
From the Control-M/Server Name column, delete every Control-M/Server row for the Control-M/Servers that must remain self-hosted and will not migrate to SaaS Control-M/Servers.
Do not change the self-hosted Control-M/Server names that remain in the Control-M/Server column. If you do, they will fail to migrate. After migration, these new SaaS Control-M/Servers retain their original self-hosted names.
- From the Time Zone column, click the drop-down list and select the required time zone.
-
-
Save the migration_metadata.xlsx file and upload it in the online Control-M SaaS Production: Migration Metadata file (Migration Only!) section of the SaaS Subscription Registration form.
-
Complete and submit the SaaS Subscription Registration form.
A confirmation email with a link to your new Control-M SaaS tenant will arrive when it is ready. If you do not receive this email, you must contact your customer service representative.
Scanning Control-M Agents
This procedure describes how to scan all of the self-hosted Agents that are connected to a Control-M/Server in your current self-hosted environment. This scan produces a qualification report that enables you to determine the migration plan that best suits each self-hosted Agent.
You must run this scan for every Control-M/Server that is connected to your self-hosted Control-M/EM.
Before You Begin
-
Verify that Control-M/EM 9.0.20 or higher is installed.
-
Verify that you have downloaded the Control-M SaaS One Migration Tool from Control-M SaaS Scanning and Migration Tools and unzipped it to a temporary directory, as described in Scanning Control-M Self-Hosted.
-
Verify that Control-M Automation API 9.0.20.245 or higher is installed on the Control-M/EM server.
BMC recommends that you install the latest version of Control-M Automation API. For more information, see Automation API Installation.
Begin
-
Log in to the host where Control-M/EM is installed with a username that is associated with an Admin role.
-
From a command line, navigate to the following directory:
-
UNIX: <Control-M_SaaS_One_Migration_Tool_Directory>/saas-migration-tool/scripts/
-
Windows: <Control-M_SaaS_One_Migration_Tool_Directory>\saas-migration-tool\scripts\
-
-
Run the following command:
-
UNIX: SaasAgentQualificationTool.sh -u <Control-M_Automation_API_Admin_Username> -p <Control-M_Automation_API_Admin_Password>
-
Windows: SaasAgentQualificationTool.bat -u <Control-M_Automation_API_Admin_Username> -p <Control-M_Automation_API_Admin_Password>
-
-
Follow the on-screen instructions until the scan is complete.
The qualification tool scans all of the Agents that are connected to the Control-M/Server that you define, creates an Agents_Qualification_Report_<Control-M/Server_Name>.xlsx, and saves it to the report folder in the saas-migration-tool directory.
-
Navigate to the report directory, review the qualification report, and do one or more of the following to redefine each of your self-hosted Agents for Control-M SaaS:
-
Install a new SaaS Agent, as described in Agent Installation.
-
Connect a self-hosted Agent to a SaaS Control-M/Server, as described in Agent Connection to Multiple Control-M/Servers.
-
Define an Agentless Host, as described in Agentless Hosts.
To copy LCPs from self-hosted Agents to SaaS Agents or Agents that can connect to self-hosted and SaaS Control-M/Servers, see Migrating Local Connection Profiles.
-
Exporting Control-M Self-Hosted
This procedure describes how to package your self-hosted Control-M/EM and Control-M/Servers into a combined Control-M Self-Hosted data export file that you can import into Control-M SaaS.
Before You Begin
-
Verify that Control-M/EM 9.0.21 or higher is installed.
-
If you made changes to the self-hosted Control-M/Server after the qualification scan, then you must run the scan again, as described in Scanning Control-M Self-Hosted.
Begin
-
Log in to the host where Control-M/EM is installed with a username that is associated with an Admin role.
-
Download the Control-M SaaS One Migration Tool for the required operating system from Control-M SaaS Scanning and Migration Tools, and unzip it to a temporary directory.
-
(Optional) Migrate your variable lists to pool variables, as described in Creating a LIBMEMSYM Control File.
-
From the command line, navigate to the <Control-M_SaaS_One_Migration_Tool> directory and then run the following command:
-
UNIX: ctm-saas-migrate.sh export -u <Control-M_Automation_API_Admin_Username> -p <Control-M_Automation_API_Admin_Password>
-
Windows: ctm-saas-migrate.bat export -u <Control-M_Automation_API_Admin_Username> -p <Control-M_Automation_API_Admin_Password>
The export tool does the following:
-
Exports the Control-M/EM data to a compressed archive file (ctm-package.tar.gz) and saves it to the following directory:
-
UNIX: <Control-M_SaaS_One_Migration_Tool_Directory>\output
-
Windows: <Control-M_SaaS_One_Migration_Tool_Directory>/output
-
-
Extracts any self-hosted Control-M/Server data saved to Control-M/EM.
-
Prompts you to manually export the remaining Control-M/Server data from each connected Control-M/Server to a compressed archive file.
-
-
For each self-hosted Control-M/Server that you intend to migrate, do the following to export its remaining data to a compressed archive file:
-
Log in to the host where the Control-M/Server (that is named in the ctm-saas-migrate.sh export script prompt) is installed, and copy the following directory from the unzipped Control-M SaaS One Migration Tool on the Control-M/EM to the Control-M/Server host:
-
UNIX: <Control-M_SaaS_One_Migration_Tool_Directory>/ctms-data-migration
-
Windows: <Control-M_SaaS_One_Migration_Tool_Directory>\ctms-data-migration
-
-
From the command line, navigate to the copied ctms-data-migration directory, and run the following command:
-
UNIX: ctmsaasexport
-
Windows: ctmsaasexport.bat
The tool exports your self-hosted Control-M/Server data to a compressed archive file with the following pathname
The fully specified name of a computer file, including the position of the file in the file system directory structure.:-
UNIX: <Control-M/Server_Home>/CTMSExportForSaaS.tar.gz
-
Windows: <Control-M/Server_Home>\CTMSExportForSaaS.tar.gz
-
-
Navigate to the compressed archive file and rename it with the Control-M/Server name, as follows:
CTMSExportForSaaS_<Control-M/Server_Name>.tar.gz
This enables you to distinguish between multiple exported Control-M/Server data files when you package them with the Control-M/EM data.
-
Copy the Control-M/Server compressed archive data file to a local directory on the Control-M/EM host or an accessible network directory, and record the pathname.
-
At the ctm-saas-migrate.sh export script prompt on the Control-M/EM host, type the Control-M/Server compressed archive data file pathname.
The export tool does the following:
-
Prompts you for any remaining Control-M/Server compressed archive data file pathnames.
-
Displays an Export Results table.
-
Packages the Control-M/Server data and Control-M/EM data into a combined Control-M Self-Hosted compressed archive file (ctm-package.tar.gz), and saves it to the following location:
-
UNIX: <Control-M_SaaS_One_Migration_Tool_Directory>\output
-
Windows: <Control-M_SaaS_One_Migration_Tool_Directory>/output
-
-
-
-
You can now import your Control-M/EM and self-hosted Control-M/Server data into Control-M SaaS, as described in Importing Control-M Self-Hosted into Control-M SaaS.
Importing Control-M Self-Hosted into Control-M SaaS
This procedure describes how to import your self-hosted Control-M/EM and Control-M/Server data to Control-M SaaS. The tool uploads the combined Control-M Self-Hosted data export file to an Amazon S3 bucket, extracts it, and then imports it into your new Control-M SaaS tenant.
If your Control-M/EM host is not connected to the internet, you can transfer the combined Control-M Self-Hosted data export file to any internet-accessible Windows or Linux host and then continue the migration.
Before You Begin
-
On an internet-accessible host (either your self-hosted Control-M/EM or a separate Windows or Linux host), verify that you have downloaded the Control-M SaaS One Migration Tool from Control-M SaaS Scanning and Migration Tools, and then extracted it to a temporary folder.
Begin
-
Log in to Control-M SaaS with a username that is associated with an Admin role, and then generate and record the value of an API token that is associated with an Admin role, as described in Creating an API Token.
-
Ensure that the combined Control-M Self-Hosted data export file is saved in a local directory on the internet-accessible host.
-
Do the following on the internet-accessible host:
-
Verify that Python 3.8 or higher and a pip or pip3 Python package-management system is installed.
-
From a command line, navigate to the following directory:
-
Linux: <Control-M_SaaS_One_Migration_Tool_Directory>/em-data-migration/Control-M_EM/import
-
Windows: <Control-M_SaaS_One_Migration_Tool_Directory>\em-data-migration\Control-M_EM\import
-
-
Run one of the following commands:
-
Pip: pip install -r requirements.txt
-
Pip3: pip3 install -r requirements.txt
-
-
If you use a proxy server, define the following environment system variable:
-
Name: https_proxy
-
Value: http://<Proxy_Server_Address>:<Proxy_Server_Port>
-
-
Verify that you have outgoing internet access to the following locations:
-
*.controlm.com:443
-
*.amazonaws.com:443
-
-
-
Return to the command line and navigate to the <Control-M_SaaS_One_Migration_Tool_Directory> directory.
-
Do one of the following to import the self-hosted Control-M/EM and all or some of the Control-M/Servers whose data is saved to the compressed archive self-hosted data export file that you created in Exporting Control-M Self-Hosted:
-
Import Everything: Run the following command to import everything:
-
Linux: ctm-saas-migrate.sh import --env -e <SaaS_Control-M_Automation_API_Endpoint> -t <Control-M_Automation_API_Token> [-a <Control-M_Self-Hosted_Data_Export_File_Pathname>] [--python <Python_Interpreter_Name> | <Python_Interpreter_Pathname>]
-
Windows: ctm-saas-migrate.bat -import --env -e <SaaS_Control-M_Automation_API_Endpoint> -t <Control-M_Automation_API_Token> [-a <Control-M_Self-Hosted_Data_Export_File_Pathname>] [--python <Python_Interpreter_Name> | <Python_Interpreter_Pathname>]
-
-
Import Specific Control-M/Servers: Run the following command to import the Control-M/EM and the Control-M/Servers that you define:
-
Linux: ctm-saas-migrate.sh import -s <Control-M/Server_Name> [-s <Additional_Control-M/Server_Name>] -e <SaaS_Control-M_Automation_API_Endpoint> -t <Control-M_Automation_API_Token> [-a <Control-M_Self-Hosted_Data_Export_File_Pathname>] [--python <Python_Interpreter_Name> | <Python_Interpreter_Pathname>]
-
Windows: ctm-saas-migrate.bat import -s <Control-M/Server_Name> [-s <Additional_Control-M/Server_Name>] -e <SaaS_Control-M_Automation_API_Endpoint> -t <Control-M_Automation_API_Token> [-a <Control-M_Self-Hosted_Data_Export_File_Pathname>] [--python <Python_Interpreter_Name> | <Python_Interpreter_Pathname>]
-
Every -s <Control-M/Server_Name> option and option argument defines one Control-M/Server whose data has been exported to the compressed archive self-hosted data export file. You must use a separate -s <Control-M/Server_Name> option and option argument for every Control-M/Server that you want to import. You must also define all the required Control-M/Servers in this single command. You cannot rerun the command.
-
The -a <Control-M_Self-Hosted_Data_Export_File_Pathname> option and option argument is only required when the combined Control-M Self-Hosted compressed archive file (ctm-package.tar.gz) has been moved from its default location in the <Control-M_SaaS_One_Migration_Tool_Directory>\output directory.
-
For more information, see Control-M SaaS Migration Parameters.
-
The following command is run on an alternative internet-accessible host, imports everything (all Control-M/EM and Control-M/Server data) from the export data file that is located in the c:\temp directory, and runs the script with a python3 interpreter:
ctm-saas-migrate.sh import --env -e https://jdoe-12345-aapi.us1.devci.ctmsaas.com -t b25QcmVtOmNlYmVmOTA2LTExMWQtNDE0ZC1iNjkxLWI5MDYyNzYwNmNhNw== -a c:\temp\ctm-package.tar.gz --python python3
-
The following command is run on Control-M/EM and imports the Control-M/EM data and three Control-M/Servers from the default export data file directory:
ctm-saas-migrate.sh import -s vw-aus-cm-mlk8 -s vw-eng-cm-qrx9 -s vw-ger-cm-grf2 -e milton-dv02.us.1.devci.ctmsaas.com -t UFJER0ZQOmQ0ZjBlOGRjLWIzNDMtNDQ0Zi04YzkwLWIxNDXV3V2hJbzhmdDBNPQ==
-
-
Log in to Control-M SaaS, open the Shared Variables tool, and verify that all self-hosted Control-M/Server variables now appear in Control-M SaaS.
Control-M SaaS Migration Parameters
The following table describes the parameters that you must provide in Importing Control-M Self-Hosted into Control-M SaaS and Migrating Self-Hosted Workload Archiving Data to Control-M SaaS.
|
Parameter |
Description |
|---|---|
|
SaaS Control-M Automation API Endpoint |
Defines the SaaS Control-M Automation API endpoint, in the following format: <Tenant_Name>-aapi.<Zone>.controlm.com https://jdoe-12345-aapi.us1.devci.ctmsaas.com |
|
Control-M Automation API Token |
Defines the API token that you created in Importing Control-M Self-Hosted into Control-M SaaS. |
|
Control-M Self-Hosted Data Export File Pathname |
Defines the pathname of the Control-M Self-Hosted data export file (ctm-package.tar.gz), which you must enter when you move this file to a different directory on Control-M/EM or an alternative internet-accessible host. c:\temp\ctm-package.tar.gz |
|
Python Interpreter Name or Pathname |
Defines the name or pathname of the Python interpreter that converts source code into machine language, as follows:
|
|
Workload Archiving Compressed Archive Export Files Directory |
Defines the full path to a local or network directory where the compressed Workload Archiving data files are exported. |
Creating a LIBMEMSYM Control File
This procedure describes how to create a LIBMEMSYM control file, which enables the Control-M SaaS migration tool to migrate the self-hosted %%LIBMEMSYM variable lists into corresponding SaaS pool variables. For more information, see List Variables. You must perform this procedure for every required Control-M/Server that will migrate to Control-M SaaS.
Begin
-
Find all unique LIBMEMSYM files that each %%LIBMEMSYM variable points to, and copy these files from the self-hosted Control-M/Server to a location that is accessible to the Control-M SaaS One Migration Tool on your internet-accessible host.
-
Navigate to the following directory:
-
UNIX: <Control-M_SaaS_One_Migration_Tool_Directory>/input
-
Windows: <Control-M_SaaS_One_Migration_Tool_Directory>\input
-
-
Open the libmemsymControlFile-SERVER_NAME.txt file in a text editor and for each unique %%LIBMEMSYM list variable, type the following entries, separated by commas, on a new line:
-
Pathname of the copied LIBMEMSYM file that you copied from the self-hosted Control-M/Server, on your internet-accessible host.
-
Pathname of the LIBMEMSYM file on the self-hosted Control-M/Server.
You must type the entries in the following format:
<Copied_LIBMEMSYM_File_Pathname_on_Internet-Accessible_Host>,<Original_LIBMEMSYM_File_Pathname_on_Control-M/Server>
c:\temp\libMem1.txt,C:\Program Files\BMC Software\Control-M Server\ctm_server\libMem1
c:\temp\libMem2.txt,C:\Program Files\BMC Software\Control-M Server\ctm_server\libMem2
c:\temp\libMem3.txt,C:\Program Files\BMC Software\Control-M Server\ctm_server\libMem3
-
-
Rename the libmemsymControlFile-SERVER_NAME.txt file with the specific Control-M/Server name and save the file.
libmemsymControlFile-CTMPROD.txt
Connecting a Self-Hosted Control-M/Server to Control-M SaaS Unified View
This procedure describes how to disconnect a self-hosted Control-M/Server from your self-hosted Control-M/EM and connect it to Control-M SaaS Unified View via the ctm_menu utility.
-
You cannot connect Control-M/Servers with Agents that are installed on unsupported platforms or that run unsupported plug-ins. For more information, see Control-M Compatibility for Version 9.0.22.100 and Control-M SaaS Compatibility.
-
If your Control-M/Servers execute more than 100,000 jobs daily, you must distribute these jobs on two or more Control-M/Servers.
Before You Begin
-
Verify that Control-M/EM 9.0.21 or higher is installed.
-
Verify that Control-M/Server 9.0.21.300 or higher is installed.
-
Generate a server token in Control-M SaaS, as described in Generating a Server Token.
Begin
-
Pause the self-hosted Control-M/Server, as described in Pausing a Control-M/Server or config server::pause.
-
Do the following:
-
Disable the Control-M/Server from Control-M/EM 9.0.21.300 or higher, as described in Disabling a Control-M/Server.
-
Verify that the Actual State of the Control-M/Server is Disabled.
-
-
Unmanage the Control-M/Server via the config server::unmanaged Control-M Automation API command, or via the Configuration domain on Control-M/EM 9.0.21.300 or higher, as described in
-
Set the desired state of the Control-M/EM Gateway to Down via the ccmcli utility, or via the Configuration domain on Control-M/EM 9.0.21.300 or higher, as described in Shutting Down a Control-M/EM Component.
-
From the Control-M/Server host, do the following:
-
Run the following command:
ctm_menu
The Control-M Main Menu appears.
-
Type the CONTROL-M Manager menu item number.
-
Type the Register Control-M/Server in SaaS Control-M/EM menu item number, and then follow the prompts.
The registration utility runs and connects the Control-M/Server to Control-M SaaS.
-
-
From the Control-M/Servers pane in Control-M SaaS, verify that the self-hosted Control-M/Server status changes from Ready to Connect to OK.
The self-hosted Control-M/Server is now disconnected from the Control-M/EM and is connected to Control-M SaaS.
Connecting a Self-Hosted Control-M for z/OS to Control-M SaaS Unified View
This procedure describes how to disconnect a self-hosted Control-M for z/OS from your Control-M/EM and connect it to Control-M SaaS Unified View via the ICE utility.
If your Control-M for z/OS environments execute more than 100,000 jobs daily, you must distribute these jobs on two or more Control-M for z/OS environments.
Before You Begin
-
Verify that Control-M/EM 9.0.21 or higher is installed.
-
Verify that Control-M for z/OS 9.0.21.300 or higher is installed.
-
Verify that the Control-M API Gateway is installed, as described in Step 12 – Install Control-M API Gateway in the INCONTROL documentation.
-
Generate a server token in Control-M SaaS, as described in Generating a Server Token.
Begin
-
Pause the Control-M for z/OS, as described in Pausing a Control-M/Server or config server::pause.
-
Disable the Control-M for z/OS, as described in Disabling a Control-M/Server, and verify that the Actual State is Disabled.
-
Unmanage the Control-M for z/OS via the config server::unmanaged Control-M Automation API command, or via the Configuration domain on Control-M/EM 9.0.21.300 or higher, as described in
-
Set the desired state of the Control-M/EM Gateway to Down via the ccmcli utility, or via the Configuration domain on Control-M/EM 9.0.21.300 or higher, as described in Shutting Down a Control-M/EM Component.
-
From your Control-M for z/OS, load ICE, as described in Installing INCONTROL Products with ICE.
-
Select Installation.
The IOA Installation menu appears.
-
Select Customized Installation.
The IOA Customized Installation menu appears.
-
From the IOA Customized Installation menu, at the Option ===> prompt, type 2, at the Product ID ===> prompt, type CTM, and then press ENTER.
The Major Steps Selection menu appears.
-
Select 13 - Register Control-M for z/OS to CTM SaaS.
The Minor Steps Selection menu appears for major step 13 - Register Control-M for z/OS to CTM SaaS.
-
Follow steps 1–8 in the Minor Steps Selection menu, as described in Step 13 - Register Control-M for z/OS to CTM SaaS.
The self-hosted Control-M for z/OS is now connected to Control-M SaaS.
Generating a Server Token
This procedure describes how to generate a Server token, which enables you to connect a self-hosted Control-M/Server or Control-M for z/OS to Control-M SaaS Unified View.
Begin
-
Log in to Control-M SaaS with a username that is associated with an Admin role.
-
From the
 icon, select Configuration.
The Configuration domain opens.
-
From the
 drop-down list, select Control-M/Servers.
The Control-M/Servers page appears.
-
Toggle on Self-Hosted and verify that your self-hosted Control-M/Servers or Control-M for z/OS environments appear in the Self-Hosted area of the Control-M/Servers pane.
In the Status column, a Ready to Connect button appears next to the recently added Control-M/Server or Control-M for z/OS.
-
Select the required self-hosted Control-M/Server or self-hosted Control-M for z/OS, and then do the following:
-
Click Ready to Connect.
A Control-M/Server Token dialog box appears.
-
Click Get Control-M/Server Token.
A dialog box appears with the token value and enables you to copy it to your clipboard.
-
Record the token, which you must provide when you are prompted by the registration utility, as described in Connecting a Self-Hosted Control-M/Server to Control-M SaaS Unified View and Connecting a Self-Hosted Control-M for z/OS to Control-M SaaS Unified View.
-
Resuming All Connected Self-Hosted Components
This procedure describes how to resume all self-hosted Control-M/Servers and Control-M for z/OS environments that are now connected to Control-M SaaS Unified View. This enables you to run jobs on Agents that are connected to these self-hosted components from Control-M SaaS.
Before You Begin
-
Verify that you have connected all required self-hosted Control-M/Servers, as described in the following procedures:
Begin
-
From the
icon, select Configuration.The Configuration domain opens.
-
From the
drop-down list, select Control-M/Servers.The Control-M/Servers page appears.
-
Do one of the following:
-
From the Control-M/Servers Pane: Toggle on Self-Hosted and select the required self-hosted Control-M/Server or Control-M for z/OS, and then click Resume.
-
From a Command Prompt: Run config server::resume.
-
-
Verify that the Control-M/Server or Control-M for z/OS Actual State changes from Paused & Up to Up.
-
Repeat this procedure to resume the remaining connected, self-hosted Control-M/Servers or Control-M for z/OS environments.
You can now access and manage your resumed, self-hosted Control-M/Servers or Control-M for z/OS environments from Control-M SaaS Unified View.
Migrating Self-Hosted Workload Archiving Data to Control-M SaaS
This procedure describes how to migrate your self-hosted Control-M Workload Archiving data to Control-M SaaS. This migration exports your self-hosted Workload Archiving data to one or more compressed export files, uploads them to an Amazon S3 bucket, transfers and extracts the files, and then imports the Workload Archiving data into your new Control-M SaaS tenant.
If your Control-M/EM host is not connected to the internet, you can transfer the export file to any internet-accessible Windows or Linux host and then continue the migration.
Before You Begin
-
Verify that your self-hosted Control-M/EM and Control-M/Servers are migrated or connected to Control-M SaaS, as described in Migrating to Control-M SaaS.
-
Verify that Workload Archiving is activated on your Control-M SaaS tenant.
-
Verify that the self-hosted Workload Archiving database is up and that one of the following versions is installed:
-
BMC-dedicated PostgreSQL 11 or higher
-
External PostgreSQL 14 or higher
-
Oracle, all versions
-
-
Verify that all the Workload Archiving policies that are defined in Control-M Self-Hosted are defined in Control-M SaaS, as described in Defining a Workload Archiving Policy.
-
Create a local or network directory with sufficient free space for the compressed, exported Control-M Workload Archiving data.
-
Verify that all self-hosted Control-M/EM components are down.
-
Verify that you have your Workload Archiving database password available.
-
Verify that you have outgoing internet access to the following locations:
-
*.controlm.com:443
-
*.amazonaws.com:443
-
Begin
-
Download the Control-M SaaS One Migration Tool from Control-M SaaS Scanning and Migration Tools to your self-hosted Control-M/EM host where Workload Archiving is installed, and unzip it to a temporary folder.
-
Do the following to export the Workload Archiving data:
-
From a command line, navigate to the temporary directory where you unzipped the Control-M SaaS One Migration Tool, and run the following command to export your data to one or more compressed (*.tar) export files:
-
Linux: ctm-saas-migrate.sh workload-archive export --output-dir <Data_Export_Directory>
-
Windows: ctm-saas-migrate.bat workload-archive export --output-dir <Data_Export_Directory>
where the <Data_Export_Directory> defines the full path to the local or network directory where the Workload Archiving data is exported.
You can move the export script to a background process, which enables the export to continue if you need to log out of the session during the export process or the shell unexpectedly shuts down.
-
-
At the prompt, type the Workload Archiving database password.
The export tool runs, produces one or more compressed data export files that contain your data, and saves them to the <Data_Export_Directory>.
-
On average, the export takes around 24 hours to complete.
-
If the export stops, rerun the run_archive_migration_export command and the export will continue from where it stopped.
-
-
-
Do the following to import the Workload Archiving data:
-
From the command line, navigate to the temporary directory where you unzipped the Control-M SaaS One Migration Tool, and run the following command to import your exported data into Control-M SaaS:
-
Linux: ctm-saas-migrate.sh workload-archive import
-
Windows: ctm-saas-migrate.bat workload-archive import
-
-
At the prompts, type the requested information, as described in Control-M SaaS Migration Parameters.
The import script uploads, extracts, and imports the exported data into Control-M SaaS.
On average, the import takes around 24 hours to complete.
-
-
Do the following to verify that all the exported data has been imported into Control-M SaaS:
-
Run the following command:
-
Linux: ctm-saas-migrate.sh workload-archive report
-
Windows: ctm-saas-migrate.bat workload-archive report
-
-
At the prompts, type the requested information, as described in Control-M SaaS Migration Parameters.
The integration status of each exported data archive file appears, as shown in the following example:
"2025_12_07_15_45_57 Sales.tar": "In Progress",
"2025_12_07_11_22_10 Records.tar": "Completed",
"2025_12_07_10_58_41 Planning.tar": "In Progress"
You can rerun the following command to refresh the migration progress:
-
Linux: ctm-saas-migrate.sh workload-archive report
-
Windows: ctm-saas-migrate.bat workload-archive report
On average, the verification process takes around 24 hours to complete.
The self-hosted Control-M Workload Archiving data is migrated to Control-M SaaS when all of the files in the report appear as Completed.
-
-
You can troubleshoot common Workload Archiving migration problems, as described in Workload Archiving Migration Troubleshooting.
Workload Archiving Migration Troubleshooting
The following table describes how to troubleshoot common problems that you might encounter when you try to migrate your self-hosted Workload Archiving data to Control-M SaaS, as described in Migrating Self-Hosted Workload Archiving Data to Control-M SaaS.
|
Problem |
Corrective Action |
|---|---|
|
The export script fails because the local or network output directory lacks sufficient disk space to store the exported Control-M Workload Archiving data. The following error appears: Your export file sizes exceed the maximum amount of allowed disk space (<Disk_Space_Utilization_Limit>%). |
|
|
The export script fails for some other reason. |
Rerun the export command with the same parameters, as follows:
The export script continues from where it stopped to export the Workload Archiving data. |
|
The import script fails with one of the following errors:
|
|
|
The import script fails with one of the following errors:
|
Verify that the same Workload Archiving policies that are defined in Control-M Self-Hosted are defined in Control-M SaaS, as described in Defining a Workload Archiving Policy. |
|
The import script fails for some other reason. |
|
|
The report script fails with the following error: The Athena service is busy. Please try again later. |
Wait 30 seconds and then rerun the report command, as follows:
|
|
The integration status of one or more exported data archive files appears with an error, as shown in the following example: "2025_12_07_15_45_57 Sales.tar": "In Progress", "2025_12_07_11_22_10 Records.tar": "Completed", "2025_12_07_10_58_41 Planning.tar": "Error" |
|
Creating More Disk Space
This procedure describes how to create more disk space in the Workload Archiving migration output directory, as described in Workload Archiving Migration Troubleshooting.
Begin
-
Move the exported TAR files to a different drive or network location to create more free disk space.
-
Rerun the following export command to decrease the number of simultaneous TAR file exports:
-
Linux: ctm-saas-migrate.sh workload-archive export --output-dir <Data_Export_Directory> --max-workers=<Simultaneous_Exports>
-
Windows: ctm-saas-migrate.bat workload-archive export --output-dir <Data_Export_Directory> --max-workers=<Simultaneous_Exports>
where the <Simultaneous_Exports> parameter defines a number lower than the default of 5.
ctm-saas-migrate.sh workload-archive export --output-dir /home/workstation250/TEMP --max-workers=2
-
Increasing the Disk Space Utilization Limit
This procedure describes how to increase the maximum percentage of disk space that the Workload Archiving migration export files can utilize, as described in Workload Archiving Migration Troubleshooting. By default, the export utility can utilize up to 90 percent of disk space.
Begin
-
Rerun the following export command to increase the maximum percentage of disk space that the export files can utilize:
-
Linux: ctm-saas-migrate.sh workload-archive export --output-dir <Data_Export_Directory> --max-disk-usage=<Disk_Space_Utilization_Limit>
-
Windows: ctm-saas-migrate.bat workload-archive export --output-dir <Data_Export_Directory> --max-disk-usage=<Disk_Space_Utilization_Limit>
where the <Disk_Space_Utilization_Limit> parameter defines a number higher than the default of 90 percent.
run_archive_migration_export.sh --output-dir /home/workstation250/TEMP --max-disk-usage=95
-
 YouTube
 Facebook
 LinkedIn