Migrating Control-M/Server Automatically
This procedure describes how to automatically migrate historical, definition, and active data from the Control-M/Server old environment to the new environment. Automatic migration minimizes the shutdown time of Control-M/Server and removes the need to log in to the old environment of Control-M/Server.
Before You Begin
Ensure that you have successfully completed the following:
-
If you are also migrating Control-M/EM, ensure that you have already performed Control-M/EM Migration.
-
Verify that you have an SSH or WMI connection between the new and old environments, as described in Defining a remote host.
-
Review the Control-M/Server migration parameters in the migration.cfg file, which is located in <server_home>/ctm_server/upgrade/import/data (on UNIX) or in <server_home>\ctm_server\upgrade\import\data (on Windows). Edit parameter values as necessary. For descriptions of the migration parameters, see Control-M/Server Migration Parameters.
Begin
-
Run one of the following migration commands on the new environment:
-
UNIX:<server_home>/ctm_server/upgrade/import/upgrade
-
Windows: <server_home>\ctm_server\upgrade\import\upgrade.bat
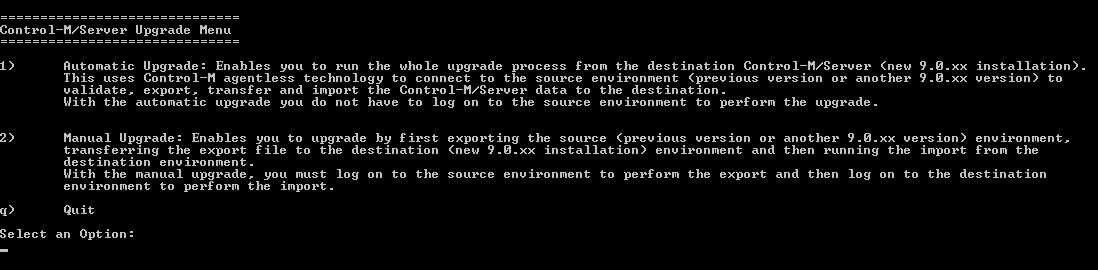
The Control-M/Server Upgrade Menu appears.
-
-
To migrate historical, definition, and active data from the old environment, enter 1.
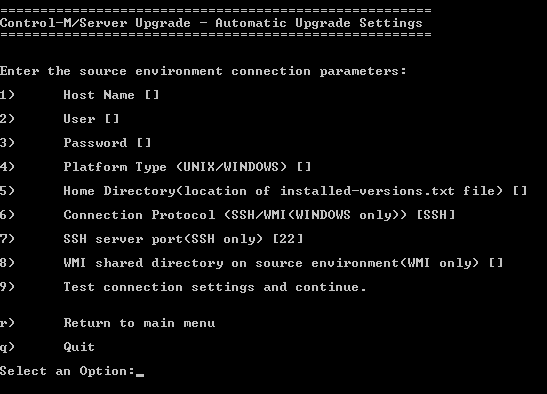
The Automatic Upgrade menu appears.
-
To set values for connection parameters in the old environment, enter the number of a parameter and then enter a value for that parameter. Repeat this step for all parameters that you want to set.
For the value of the home directory (parameter number 5), do not use quotes.
-
To test the connection and continue the migration process, enter 9.
After a successful connection is established, a new set of options is displayed.
-
To start the migration, enter an upgrade option:
-
For a full environment upgrade — including the migration of historical data, job definitions data, and active data — enter 3.
-
If you have previously performed a migration of historical data and job definitions (phase 1), and are now performing this task again to migrate active data only (phase 2), enter 4. Then skip to step 9.
-
-
For the migration of job definitions, you are prompted to add the new Control-M/Server host to the Authorized Servers list, so that jobs can run in the new environment. Enter Yes.
This step may take some time.
-
For the migration of historical data, you are prompted for the number of days of historical data to export. Do one of the following:
-
If you do not want to migrate historical data at all, enter 0.
-
For all historical data, enter ALL.
-
For a specific number of days of historical data, enter a number between 1 and 100.
You are prompted for this setting only if ASK_LOG_DAYS is set to Yes in the migration.cfg file. If ASK_LOG_DAYS is set to No, you can still control this number using the LOG_DEPTH parameter in the migration.cfg file. For more information about these migration parameters, see Control-M/Server Migration Parameters.
-
-
When asked when you plan to upgrade the active environment with active data, do one of the following:
-
To import the active data now, type NOW.
-
To import the active data at another time, type LATER, and do one of the following:
-
When you are ready to import the active data, perform this migration process again. In step 5 you can select option 4 for migration of active data only, and then you can skip to step 9 and shut down the Control-M/Server.
-
If at a later time you decide that you do not want to import the active data at all, run the <server_home>/ctm_server/upgrade/export/FINALIZE command. This command performs the following actions:
-
- Moves agent definitions and communication parameters from the old environment to the new environment, and updates permitted agent utilities.
-
- Re-enables the New Day procedure on the new environment (it is disabled during Automatic migration).
-
- Updates job counters used for job ID generation. Clears definitions used by the Automatic migration.
-
-
-
To migrate historical and definition data only, type NEVER.
BMC recommends that you use the NEVER option to test the new target environment several days before you perform the actual migration
If you choose to use this option, you will not be able to perform job actions in Production from the Archived Viewpoint.
-
-
When asked if you want to shut down the Control-M Server to enable the migration of active data, enter one of the following responses:
-
To enable the inclusion of active data in the migration, enter YES.
-
If you are migrating only historical and definition data, enter NO.
The migration process runs. When migration completes, you are ready to continue with Post-Control-M/Server Migration Procedures.
-
 YouTube
 Facebook
 LinkedIn