Data Assurance
Control-M Data Assurance is an add-on that enables you to monitor and verify the quality and accuracy of your data across multiple data sources, before, during, and after they are extracted, transformed, and loaded through Control-M workflows or plug-ins.
Data Assurance jobs scan data sources for missing or inconsistent data based on user-defined monitors. These monitors can contain up to 50 data quality metrics with user-defined metric scopes that determine the extent of the datasets on the data sources that are scanned. If one or more metrics detect missing or inconsistent data, the Data Assurance job sends an alert to the Data Assurance domain Dashboard tab and ends Not OK.
Data Assurance consists of the following entities:
-
Data Sources: A database or directory of CSV files. Data Assurance supports Snowflake, MSSQL, Oracle, and MySQL databases.
-
Dataset: Database tables or a directory of CSV files. Each data source contains one or more datasets.
-
Metric: A predefined or customized SQL-based data quality metric, such as minimum length, standard deviation, or average. Data Assurance provides a list of predefined metrics that are relevant to the type of data in the selected dataset when you define the scope of the metric, as described in Metric Scope Attributes.
-
Metric Scope: A user-defined measurement of a specific section of data in the dataset, such as the number of missing entries in the customer_full_name column in the customers dataset, as described in Metric Scope Attributes.
-
Monitor: A user-defined set of up to 50 metrics, as described in Creating a Monitor.
-
Alert: A notification that appears in the Dashboard tab of the Data Assurance domain when a Data Assurance job ends Not OK. This indicates that one or more inconsistencies or missing values are found in your data, based monitors that you have defined. You can define the alert severity when you create a Data Assurance job, as described in Data Assurance Job.
After you define one or more Data Assurance jobs with a specific monitor and alert, you can build these jobs into existing workflows that must have the full and correct data to perform as required. If a predecessor Data Assurance job finds no missing data or inconsistencies (as defined by its monitor), no alert is sent, the job ends OK, and successor jobs in the workflow can execute with quality assured data. If the Data Assurance job ends Not OK, an alert is issued and successor jobs do not execute, which enables you to prevent the creation of incorrect results from bad data.
-
Data Assurance job No_Nulls is defined with a monitor that verifies that the Account_Owner column in the most recent Current_Customers.csv file, which is located in a CSV file directory data source, contains no empty entries. The No_Nulls job executes and finds a number of empty entries, which causes the job to send a Critical alert to the Data Assurance Dashboard and end Not OK. This prevents the execution of successor jobs, which rely on a Current_Customers.csv file that contains no empty values.
-
Three Data Assurance jobs are defined at different stages of an extract, transform, and load (ETL) workflow, as follows:
-
Before extraction, the Verify_Raw_Data job scans a PostgreSQL data source to confirm that the Customer_Information table contains at least one million rows. The job successfully completes, which indicates that one million rows do exist, and enables the successor extraction job to begin execution.
-
After the extraction job successfully completes, its successor Data Assurance job, Verify_Data_Levels, verifies that the data is less than 24 hours old and all customer IDs are unique in the ID column. This job successfully completes and enables the transformation job to begin execution.
-
After the transformation job successfully completes, the successor Data Assurance Verify_Transformed_Data job confirms that the maximum product discounts do not exceed the minimum product cost, the number of distinct regions meets the expected number, and the distribution of sales across all regions falls within a certain standard deviation.
-
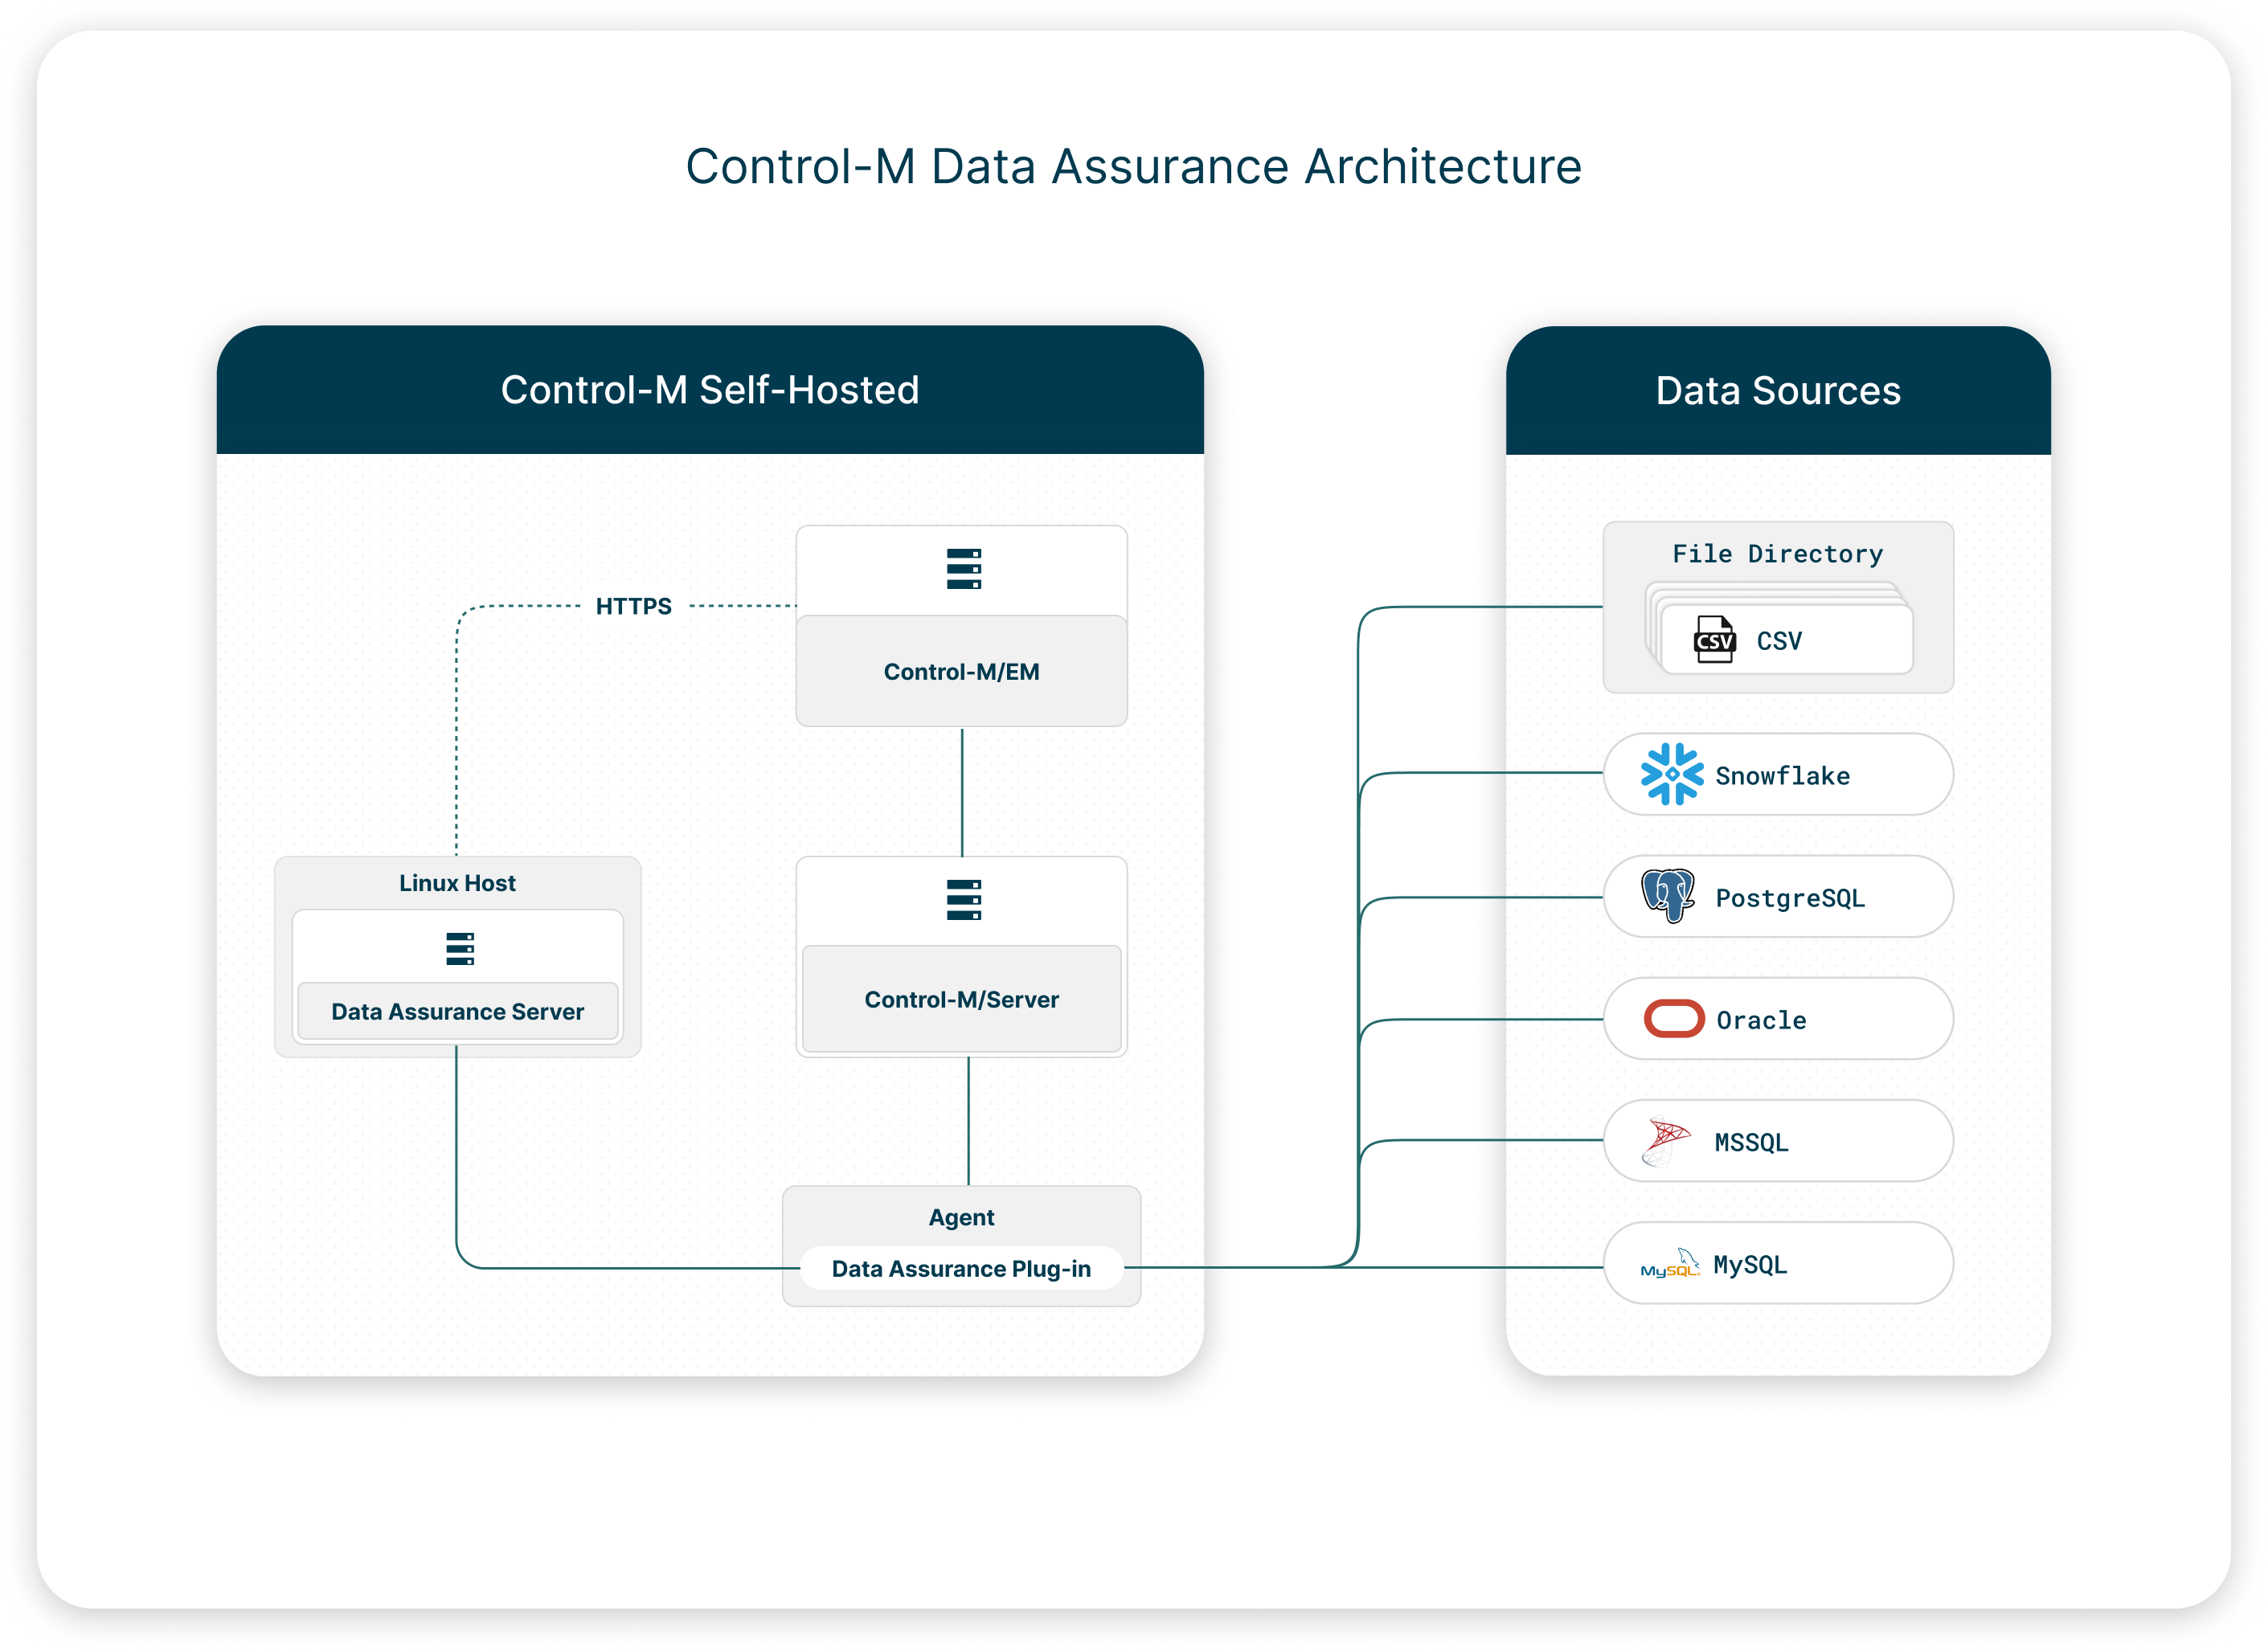
Data Assurance consists of two components, as follows:
-
Data Assurance Plug-in: Connects to one or more data sources and is installed on an Agent. You can install the Data Assurance plug-in on multiple Agents and connect each Data Assurance plug-in to the Data Assurance Server.
-
Data Assurance Server: Connects to and analyzes the data from the Data Assurance plug-in, and is installed on a separate Linux host.
For more information, see Control-M Data Assurance Installation.
The following diagram shows the Control-M Data Assurance architecture:
Setting Up Data Assurance
This procedure describes how to set up and get started with Data Assurance.
Begin
-
Add Data Sources: Add one or more data sources, as described in Adding a Data Source.
-
Create Monitors: Define one or more monitors, which contain one or more data quality metrics, as described in Creating a Monitor.
-
Create a Data Assurance Job: Create a Data Assurance job, as described in Creating a Job, with Data Assurance Job attributes.
You can now run Data Assurance jobs in Control-M and monitor alerts in the Dashboard tab of the Data Assurance domain.
Adding a Data Source
This procedure describes how to create a data source, which can be a directory of CSV files, or a Snowflake, PostgreSQL, MSSQL, Oracle, or MySQL database.
Before You Begin
-
To create a CSV file directory data source, copy the CSV file directory and its files to a local or network directory that the Data Assurance plug-in host can access.
Begin
-
Create a centralized connection profile for each data source with Data Assurance Connection Profile Parameters.
-
From the
 icon, select Data Assurance.
The Data Assurance domain opens.
-
Click the Catalog tab.
The Catalog tab appears.
-
In the Data Sources pane, click Refresh.
A confirmation message appears and the new data source appears in the Data Sources pane.
-
In the Data Sources pane, select the new data source and then do one of the following, based on the data source type:
-
Database: Do the following:
-
Click Refresh Datasets.
The Select Data Assurance Plug-in dialog box appears.
-
If you have more than one Data Assurance Plug-in, select the required plug-in.
-
Click Refresh Datasets.
The datasets appear in the main data source pane.
-
-
File Directory: Do the following:
-
Click Configure Schema.
The Configure Schema pane appears.
The schema describes the type of data in each row of the CSV files that are defined in the Path and File Pattern attributes of the CSV File Directory data source, as described in Data Assurance Connection Profile Parameters.
-
In the Schema Name field, type a logical name for the CSV file schema.
-
In the Select area, do one of the following:
-
Click Sample File and attach a sample CSV file that contains a schema which matches the file schema for all the files in your CSV file directory data source. You can use one of the files in your file directory data source if it is 1,024 KB or smaller.
-
Click Schema and attach a user-defined schema file that defines the schema for the CSV file directory data source.
-
-
Click Next.
A preview of the schema, based on the uploaded file, appears.
-
(Optional) Add, edit, or delete the schema fields as required, as described in Schema Configuration Attributes.
-
Click Save.
-
In the Data Sources pane, click Refresh.
The schema is configured for the required data source.
-
-
-
Define one or more monitors, which contain one or more data quality metrics, as described in Creating a Monitor.
Schema Configuration Attributes
The following table describes the schema configuration attributes that you can redefine in the Configure Schema dialog box when you configure the schema for the CSV files in your CSV file directory data source, as described in Adding a Data Source.
|
Type |
Description |
|---|---|
|
CHAR |
Configures the schema to read the values in the associated dataset Field column as strings of alphanumeric characters. |
|
DATE |
Configures the schema to read the values in the associated dataset Field column as calendar dates, based on the format you define in the Date format column, as follows:
A dataset Field column with values formatted as YYYY/MM/dd-HH:mm:ss returns one column value as 1949/04/04-15:15:01, for 3:15:01 pm, on 4 April 1949. |
|
FLOAT |
Configures the schema to read the values in the associated dataset Field column as decimal numbers. |
|
INT |
Configures the schema to read the values in the associated dataset Field column as integers. |
|
TIMESTAMP |
Configures the schema to read the values in the associated dataset Field column as UNIX (POSIX) time. |
Creating a Monitor
This procedure describes how to create a monitor. Monitors contain sets of up to 50 predefined or customized SQL-based data quality metrics that enable you to check specific attributes of the data that are contained in each dataset.
Before You Begin
-
Verify that at least one data source has been added to Data Assurance, as described in Adding a Data Source.
Begin
-
From the
 icon, select Data Assurance.
The Data Assurance domain opens.
-
Click the Monitors tab.
The Monitors tab appears.
-
Do the following:
-
Click New Monitor.
The Select Dataset pane appears with the connected data sources.
-
Next to the required data source in the Select Dataset pane, click > to browse the datasets, and then search for or select the required dataset.
-
Click Select Dataset.
The New Monitor tab appears.
-
-
Do the following:
-
In the Enter monitor name field, type a logical name and then click
 .
.The new monitor name, followed by its dataset name, appears in the new monitor tab.
Verify_Customer_Details: CUSTOMERS
-
Click New metric to define which data in the dataset are monitored and what the metric must find.
The Scope pane appears.
-
In the Scope pane, define the scope of the metric, as described in Metric Scope Attributes.
-
Click Add Metric to add the metric to the Monitor.
The new metric appears in the monitor tab.
-
(Optional) Define another metric for this monitor.
-
Click Save Changes.
The new monitor is saved.
-
-
Create a Data Assurance job, as described in Creating a Job, with Data Assurance Job attributes.
Metric Scope Attributes
The following table describes the metric scope attributes for each metric that is defined in a monitor. The metric scope describes the range of values that is included in the metric, and it can be defined as narrowly or as broadly as required. Through the metric scope definition, you can enable a monitor to search via a user-defined SQL query, or by predefined metrics and user-defined operators, thresholds, and dataset fields.
|
Metric Scope |
Description |
|---|---|
|
Field |
Defines the metric scope of the column (dataset field), as follows:
The following Field scope definition creates a metric that enables you to verify that there are no missing names in the customer_full_name column in the customers dataset:
|
|
Entire Dataset |
Defines the metric scope of the entire database table or CSV files (dataset), as follows:
The following Entire Dataset scope definition creates a metric that enables you to determine if an entire database table contains 5,000 rows:
|
|
Custom |
Defines the metric scope of the entire table or directory of CSV files (dataset) in SQL query syntax:
The following Custom scope definition creates a metric that enables you to determine when the number of former subscribers, indicated by a FALSE value in the Current_Subscriber column, exceeds 2,500:
|
|
Disables |
Determines whether to disable this metric, which eliminates the need to delete the metric when you want to narrow the scope of your monitor and enables you to include the metric when you want to expand what the monitor searches. |
Metric Attributes
The following table describes the attributes for each data metric that is defined in the data metric scope attributes and then added to a monitor, as described in Creating a Monitor. You can click the required dataset in the Datasets area of the Data Assurance Dashboard to monitor and compare the metric values that are calculated with the values that you require.
|
Attribute |
Type |
Description |
|---|---|---|
|
Records count |
Volume Return Value: Numerical |
Calculates the number of rows that are in a dataset table. |
|
Distinct values count |
Variance Return Value: Numerical |
Calculates the number of distinct, non-null values that are in a dataset column. The following values appear in a dataset column, which is symbolized by [ ] (square brackets): [A, B, B, C, C, <null value>, D] The metric calculates 4 distinct values for A, B, C, and D. |
|
Distinct values percent |
Variance Return Value: Numerical |
Calculates the percentage of distinct, non-null values that are in a dataset column. There are 10,000 non-null USD, EUR, and GBP currency symbols in a dataset column. The metric calculates a distinct values percentage of 0.03, (from 3 ÷ 10,000). |
|
Missing values count |
Empty Return Value: Numerical |
Calculates the number of null values that are in a dataset column. There are 5,000 rows in a SWIFT code dataset column. 120 rows are empty. The metric calculates a missing values count of 120. |
|
Missing values percent |
Empty Return Value: Numerical |
Calculates the percentage of null values in a dataset column. In a dataset of 5,000 credit card payments, the Merchant Category Codes column contains 400 null values. The metric calculates a missing values percentage of 8 (from 400 ÷ 5,000). |
|
Minimum |
Variance Return Value: Numerical |
Finds the smallest numerical value in a dataset column. |
|
Maximum |
Variance Return Value: Numerical |
Finds the largest numerical value in a dataset column. |
|
Average |
Variance Return Value: Numerical |
Calculates the average of all the values in a dataset column. |
|
Standard deviation |
Variance Return Value: Numerical |
Calculates the standard deviation of all the values in a dataset column. A standard deviation measures how spread out the values are in a set from the average of all those values. |
|
Variance |
Variance Return Value: Numerical |
Calculates the average of the squared differences from the average for numerical values in a dataset column. This statistical measure indicates the degree of spread in the data distribution. This value appears in an alert in the Data Assurance Dashboard tab. |
|
Nonparametric skew |
Variance Return Value: Numerical |
Calculates the asymmetry of the data distribution in a dataset column. A value of zero indicates symmetric distribution, positive values indicate right-skewed data, and negative values indicate left-skewed data. |
|
Minimal text field length |
Conformity Return Value: Numerical |
Calculates the shortest length of characters among all of the non-null values in a dataset column. This metric applies only to text. |
|
Average text field length |
Conformity Return Value: Numerical |
Calculates the average length of characters among all the non-null values in a dataset column. This metric applies only to text. |
|
Maximal text field length |
Conformity Return Value: Numerical |
Calculates the longest length of characters among all the non-null values in a dataset column. This metric applies only to text. |
 YouTube
 Facebook
 LinkedIn