Control-M Communication Behind a Firewall
The following procedures describe how to connect Control-M components to each other when they reside behind a firewall. This enables you to safely bypass the security software that restricts access to these components from outside network devices:
-
Configuring Control-M/EM Server with High-Availability or Control-M/EM Distributed Behind a Firewall
-
Connecting to Control-M/EM Behind a Firewall from Control-M Clients
-
Connecting to Control-M/EM Behind a Firewall from Workload Archiving Server
Connections are created when a port on a host (source) initiates a connection to a destination endpoint, which listens for and accepts the connection. In these procedures you must configure the unidirectional ports (destination endpoints) behind your firewall. This enables your Control-M components to communicate bidirectionally, between the source and destination.
Connecting to Control-M/Server Behind a Firewall
This procedure describes how to configure Control-M/Server to communicate with other components when it resides behind a firewall.
Begin
-
From a command line on the Control-M/Server, run the following command:
ctm_menu
-
Select 4 Parameter Customization.
-
Select 1 Basic Communication and Operational Parameters to verify
A list of Control-M/Server configuration parameters appear.
-
In the firewall settings, verify that the following listed ports are open to bidirectional communication:
-
Control-M/EM TCP/IP: 2370
-
Configuration Agent (Control-M/Server): 2369
-
Agent-to-Server: 7005
-
High Availability: 2368
The port number range for a Control-M for z/OS is 1024–65534.q
-
-
From the ctm_menu, do the following:
-
Select 8 - Services Configuration.
-
Select 2 - API-Gateway Service Configuration.
-
-
Verify that the following port is set in the firewall rules on all instances of Control-M/EM to allow bidirectional communication:
API-Gateway Port Number : 8393
Connecting to an Agent Behind a Firewall
This procedure describes how to connect to an Agent behind a firewall by configuring ports in the ctmagcfg utility.
Begin
-
From a command line on an Agent, run the following command:
ctmagcfg
-
Verify that the following ports are open in the firewall rules for bidirectional communication:
-
Agent-to-Server Port Number . . . : [7005]
-
Server-to-Agent Port Number . . . : [7006]
-
Configuring Control-M/EM Server with High-Availability or Control-M/EM Distributed Behind a Firewall
This procedure describes how to configure Control-M/EM server to communicate with other components in a high availability environment or when there are multiple Control-M/EMs.
Begin
-
In the CCM, open Control-M/EM System Parameters, and from the Advanced tab, navigate to the HostPort parameter.
-
If there are additional HostPort parameters defined for each component, delete the additional HostPort parameters.
-
In the original HostPort parameter, click Restore Default.
-
Do the following:
-
To set the available control port range for Control-M/EM, except for the Gateway, do the following:
-
Select the HostPort parameter.
The Control-M/EM - Update System Parameter dialog box appears.
-
In the Value field, define the port range as follows, and then click Save:
:<Port1>-<Port2>
-
You cannot use 0 as a port number.
-
The minimum range is 20.
-
-
To set the available port range for the Gateway, select the HostPort parameter and click Add.
-
In the Value field, define the port range as follows:
:<Port3>-<Port4>.
-
From the Type drop-down list, select Gateway and click Save.
-
You cannot use 0 as a port number.
-
The minimum range is 10.
-
If you have more than five Control-M/Servers, the minimum port range must be at least double the amount of Control-M/Servers.
-
-
To change the Thrift ports range, do the following:
-
Open the <HOME>/ctm_em/etc/domains/communication.xml file.
-
Navigate to the following line:
<!--variable name="ListenPort" value="9090-9150"/-->
-
Replace the line with the following text:
<variable name="ListenPort" value="9090-9150/">
-
Change the ports if needed.
-
Save and close the .xml file.
-
-
To configure the Kafka server component behind a firewall, you must configure the Kafka server ports, as described in Configuring Control-M/EM Services Behind a Firewall.
-
-
Recycle all Control-M/Server components on all Control-M/EM environments including the Control-M/EM Configuration Agent.
-
If Control-M Workload Archiving is installed on the Distributed Control-M/EM, see Connecting to Control-M/EM Behind a Firewall from Workload Archiving Server.
-
The defined port ranges must not overlap and must not contain the Web Server port.
-
The Web Server port must be open in the Firewall settings.
-
The port range should be open between the primary, secondary, and all Distributed machines.
Connecting to Control-M/EM Behind a Firewall from Control-M Clients
This procedure describes how to connect to Control-M/EM behind a firewall from Control-M clients.
Begin
-
From a command line on a Control-M/EM server, run the following command:
emweb_status
The following appears:
web server is running [ host:port/ ]
-
In your firewall definition, verify that this specific port is open.
To use the Control-M Client Distribution feature and access the Help, Control-M Desktop 9.0.18 or higher must be installed to communicate with Control-M Web Server. The port is configured in the ./etc/emweb/tomcat/conf/server.xml file.
Configuring Control-M/EM Services Behind a Firewall
This procedure describes how to configure the static ports for all Control-M/EM services. This enables these services to communicate with each other when Control-M/EM is behind a firewall. For more information, see Control-M/EM Services. You must perform this procedure after you configure the other Control-M/EM server components that reside behind a firewall, as described in Configuring Control-M/EM Server with High-Availability or Control-M/EM Distributed Behind a Firewall.
BMC recommends that you ask your firewall administrator to add a range of port numbers to the list of trusted ports. Then you can define the port numbers for each service from this range.
Begin
-
Log in to the Control-M/EM host.
-
Configure each Control-M/EM service, as follows:
-
Services Configuration Agent Service: Do the following:
-
Open the following files in a text editor:
-
UNIX: <EM_Home>/etc/services/config/services-configuration-agent-application.yml
-
Windows:<Control-M/EM_Home>\Default\services\config\services-configuration-agent-application.yml
-
-
Locate the following code block:
Copycom:
bmc:
services:
sca:
minretry:
millisecs: 60000
monitor:
threads:
num: 1
shutdown:
timeout: 60
kafka:
kafkaDataDeletionService:
#isEnabled: true (control by OS type, enabled only on windows)
deletionCandidatesSuffixes: 'deleted'
fileDirectoriesRelativeToServicesHome: '../kafka/kafkadata'
isRecursiveFileSearch: true
seekNewFilesIntervalSeconds: 200
server:
schema: https
rest:
port: 0 - (Optional) Do one or both of the following:
- Update the port to a fixed port number.
- To include a range of ports, add the portspan property after port and assign a value greater than 0.
-
Save and close the file.
-
Ask your firewall administrator to add these numbers to the list of trusted ports.
-
-
Control-M Web Service: Do the following:
-
Open the following files in a text editor:
-
UNIX:
-
<EM_Home>/etc/emweb/tomcat/conf/Catalina/localhost/ControlM.xml
-
<EM_Home>/etc/emweb/tomcat/conf/Catalina/localhost/ControlMMobile.xml
-
-
Windows:
-
<Control-M/EM_Home>\Default\emweb\tomcat\conf\Catalina\localhost\ControlM.xml
-
<Control-M/EM_Home>\Default\emweb\tomcat\conf\Catalina\localhost\ControlMMobile.xml
-
-
-
Locate the following line:
<Parameter name="target_uri" value="http://localhost:<Port_Number>/" override="false" />
where the <Port_Number> value defines the Control-M Web service port number, as shown in the following example:
<Parameter name="target_uri" value="http://localhost:32200/" override="false" />
- Verify that the Control-M Web service port number is the same in each file, and record the port number.
- Open the following file in a text editor:
- UNIX: <Control-M\EM_Home>/etc/services/config/controlm-web-application.yml
- Windows: <Control-M\EM_Home>\Default\services\config\controlm-web-application.yml
-
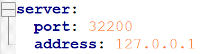
Locate the server parameter and on the next line, define the Control-M Web service port number and the local host IP address , as follows:
port: <Port_Number>
address: 127.0.0.1
-
Save and close the file.
-
Ask your firewall administrator to add this number to the list of trusted ports.
-
-
Reports Service: Do the following:
-
Open the following file in a text editor:
-
UNIX: <Control-M\EM_Home>/etc/emweb/tomcat/conf/Catalina/localhost/RF-Server.xml
-
Windows: <Control-M\EM_Home>\Default\emweb\tomcat\conf\Catalina\localhost\RF-Server.xml
-
-
Locate the following line:
<Parameter name="target_uri" value="http://localhost:<Port_Number>/" override="false" />
where the Port_Number defines the Reports service port number.
-
Record the Reports service port number.
-
Open the following file in a text editor:
- UNIX: <Control-M/EM_Home>/etc/emweb/reporting/reporting.properties
- Windows: <Control-M\EM_Home>\Default/emweb\reporting\reporting.properties
-
Locate the server.port parameter, and then type the Reports service port number that you recorded, as follows:
server.port=<Port_Number>
gsr=localhost
server.port=32300
-
Save and close the file.
-
Ask your firewall administrator to add this number to the list of trusted ports.
-
-
Protocol Translator Service: Do the following:
-
Open the following file in a text editor:
-
UNIX: <Control-M\EM_Home>/etc/services/config/protocol-translator-application.yml
-
Windows: <Control-M\EM_Home>\Default\services\config\protocol-translator-application.yml
-
-
Locate the following code block:
Copycom:
bmc:
services:
protocol-translator:
advertised_scheme: http://
advertised_hostname: default -
Between protocol-translator: and advertised_scheme:, define the Thrift RPC and REST API port numbers, as follows:
Copycom:
bmc:
services:
protocol-translator:
port: <Thrift_RPC_Port_Number>
rest: <REST_API_Port_Number>
advertised_scheme: http://
advertised_hostname: default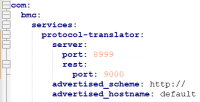
-
Ask your firewall administrator to add these numbers to the list of trusted ports.
-
-
Apache Kafka Service: Do the following:
-
Open the following files in a text editor, verify that the port number is the same in each file, and record the port number.
-
UNIX:
-
<Control-M/EM_Home>/etc/services/config/services.yml:
zookeeper.connect: '<Hostname>\:<Port_Number>/emkafka'
zookeeper.connect: 'dba-tlv-x6btqq.bmc.com\:12230/emkafka'
-
<Control-M/EM_Home>/kafka/kafka/config/bmc.server.properties:
zookeeper.connect = <Hostname>\:<Port_Number>/emkafka
zookeeper.connect = dba-tlv-x6btqq.bmc.com\:12230/emkafka
-
<Control-M/EM_Home>/kafka/kafka/config/bmc.zookeeper.properties:
clientPort = <Port_Number>
clientPort = 12230
-
-
Windows:
-
<Control-M/EM_Home>\Default\services\config\services.yml:
zookeeper.connect: '<Hostname>\:<Port_Number>/emkafka'
-
<Control-M/EM_Home>\kafka\kafka\config\bmc.server.properties:
zookeeper.connect = <Hostname>\:<Port_Number>/emkafka
-
<Control-M/EM_Home>\kafka\kafka\config\bmc.zookeeper.properties:
clientPort = <Port_Number>
-
In a Control-M Full Installation, the bmc.server.properties and bmc.zookeeper.properties files are located in the following directory:
-
UNIX: <BMC_Software_Home>/Control-M Common/kafka/kafka/config/
-
Windows: <BMC_Software_Home>\Control-M Common\kafka\kafka\config\
-
-
Close the files.
-
Ask your firewall administrator to add this number to the list of trusted ports.
-
-
Apache Zookeeper Service: Do the following:
-
Open the following files in a text editor, and then locate and record the Apache Zookeeper service and client port numbers, as follows:
-
UNIX:
-
<Control-M/EM_Home>/etc/services/config/services.yml:
kafka.bootstrap.servers: '<Hostname>\:<Zookeeper_Port_Number>'
kafka.bootstrap.servers: 'dba-tlv-x6btqq.bmc.com\:19092'
-
<Control-M/EM_Home>/kafka/kafka/config/bmc.server.properties:
advertised.listeners = SASL_PLAINTEXT://<Hostname>:<Zookeeper_Port_Number>
advertised.listeners = SASL_PLAINTEXT://dba-tlv-x6btqq.bmc.com:19092
-
<Control-M/EM_Home>/kafka/kafka/config/zookeeper.properties:
clientPort = <Zookeeper_Client_Port_Number>
clientPort=2181
-
-
Windows:
-
<Control-M/EM_Home>\Default\services\config\services.yml:
kafka.bootstrap.servers: '<Hostname>\:<Zookeeper_Port_Number>'
-
<Control-M/EM_Home>\Control-M Common\kafka\kafka\config\bmc.server.properties:
advertised.listeners = SASL_PLAINTEXT://<Hostname>:<Zookeeper_Port_Number>
-
<Control-M/EM_Home>\Control-M Common\kafka\kafka\config\zookeeper.properties:
clientPort = <Zookeeper_Client_Port_Number>
-
In a Control-M Full Installation, the bmc.server.properties and zookeeper.properties files are located in the following directory:
-
UNIX: <BMC_Software_Home>/Control-M Common/kafka/kafka/config/
-
Windows: <BMC_Software_Home>\Control-M Common\kafka\kafka\config\
-
-
Close the files.
-
Ask your firewall administrator to add these numbers to the list of trusted ports.
-
-
Application Integrator Service: Do the following:
-
Open the following files in a text editor, and locate and record the Application Integrator service port number, as follows:
-
UNIX:
-
<Control-M/EM_Home>/etc/services/config/aisrv-web-application.yml:
server: {port: <Port_Number>, address: 127.0.0.1}
server: {port: 32100, address: 127.0.0.1}
-
<Control-M/EM_Home>/etc/emweb/tomcat/conf/Catalina/localhost/aisrv.xml:
<Parameter name="target_uri" override="false" value="http://localhost:<Port_Number>/"/>
<Parameter name="target_uri" override="false" value="http://localhost:32100/"/>
-
-
Windows:
-
<Control-M/EM_Home>\Default\services\config\aisrv-web-application.yml:
server: {port: <Application_Integrator_Service_Port_Number>, address: 127.0.0.1}
-
<Control-M/EM_Home>\Default\emweb\tomcat\conf\Catalina\localhost\aisrv.xml
<Parameter name="target_uri" override="false" value="http://localhost:<Application_Integrator_Service_Port_Number>/"/>
-
-
-
Save and close the file.
-
Ask your firewall administrator to add this number to the list of trusted ports.
-
-
Authorization Service: Do the following:
-
Open the following file in a text editor:
-
UNIX: <Control-M\EM_Home>/etc/services/config/authorization-service-application.yml
-
Windows: <Control-M\EM_Home>\Default\services\config\authorization-service-application.yml
-
-
Ensure that the following code block is in the file, and define the port:
Copycom:
bmc:
services:
authorization-service:
server:
rest:
port: <Authorization_Service_Primary_Port_Number>
portspan: 0
hostname: "*"The Authorization service primary port number cannot be 0.
-
Save and close the file.
-
Ask your firewall administrator to add the static port number or range of dynamic port numbers to the list of trusted ports.
-
-
EM-CTM Request Service: Do the following:
-
Open the following file in a text editor:
-
UNIX: <Control-M\EM_Home>/etc/services/config/em-ctm-request-service-application.yml
-
Windows: <Control-M\EM_Home>\Default\services\config\em-ctm-request-service-application.yml
-
-
Ensure that the following code block is in the file, and define the port:
Copycom:
bmc:
services:
ctmreq-service:
server:
rest:
port: <EM-CTM_Request_Service_Primary_Port_Number>
portspan: 0
hostname: "*"The EM-CTM Request service primary port number cannot be 0.
-
Save and close the file.
-
Ask your firewall administrator to add the static port number or range of dynamic port numbers to the list of trusted ports.
-
-
EM-MFT Update Service: Do the following:
-
Open the following file in a text editor:
-
UNIX: <Control-M\EM_Home>/etc/services/config/em-mft-updates-service-application.yml
-
Windows: <Control-M\EM_Home>\Default\services\config\em-mft-updates-service-application.yml
-
-
Locate the following code block and define that the EM-MFT Update service port, as follows:
Copycom:
bmc:
services:
em-mft-updates-service:
server:
rest:
port: <EM-MFT_Update_Service_Port_Number>
portspan: 0
hostname: "*"The EM-MFT Update service primary port number cannot be 0.
-
Save and close the file.
-
Ask your firewall administrator to add the static port number or range of dynamic port numbers to the list of trusted ports.
-
-
Scheduling Service: Do the following:
-
Open the following file in a text editor:
-
UNIX: <Control-M\EM_Home>/etc/services/config/em-scheduling-service-application.yml
-
Windows: <Control-M\EM_Home>\Default\services\config\em-scheduling-service-application.yml
-
-
Locate the following code block:
Copycom:
bmc:
services:
map:
eviction:
interval: 600 -
On a new line after the interval parameter, define the Scheduling service URI, as follows:
Copycom:
bmc:
services:
map:
eviction:
interval: 600
em-scheduling-service:
server:
schema: https
rest:
port: <Scheduling_Service_Port_Number>
portspan: 0
hostname: "*" -
Save and close the file.
-
Ask your firewall administrator to add the static port number or range of dynamic port numbers to the list of trusted ports.
-
-

Connecting to Control-M/EM Behind a Firewall from Workload Archiving Server
This procedure describes how to configure a port or range of ports to enable you to connect the Workload Archiving Server to Control-M/EM when it is behind a firewall.
Begin
-
Back up the communication.xml file to a Control-M/EM Distributed host in one of the following locations:
-
Windows: %EM_HOME%\etc\domains\communication.xml
-
UNIX/Linux: $EM_HOME/etc/domains/communication.xml
-
-
In the original communication.xml file, add the "ARC" scope name to define the listen port for the Workload Archiving Server, and save the file, as shown in the following example:
Copy<scope name="ARC">
<variable name="ListenPort" value="port_number"/>
</scope>where "port_number" is the port number or port range, such as 10250 for a specific port or 10250–10255 for a range of ports.
Workload Archiving Server requires only one port number. However, if the defined port number is already in use, Control-M can automatically select an available port from the port range if it is defined.
-
From the
-
Verify that the configured port on the primary and Distributed Control-M/EM environments is open.
-
From the Control-M/EM Distributed host, run the following utility to verify that the Workload Archiving Server is listening on the configured port:
> arc_test_configuration
-
Run an archive search to verify that the search function is working.
 YouTube
 Facebook
 LinkedIn